本篇要來實作一個簡單版的 GAN 模型。如果忘記 GAN 是什麼的同學,傳送門在此:
參考的程式碼來自:simple_keras_GAN,本文擷取部分程式碼說明,完整 code 請參考上方連結。
Note: 原程式碼在實際跑模型時有出現一些小 error,因此本文的 code 有稍微調整,並修改訓練的 epochs 。
生成手寫數字的圖片
MNIST
Keras 2.1.5
Python 3.6.7
TensorFlow 1.11.0
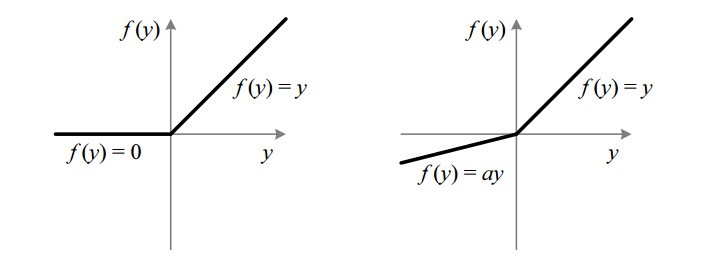
圖片來源:https://towardsdatascience.com/activation-functions-neural-networks-1cbd9f8d91d6
# -*- coding: utf-8 -*-
""" Simple implementation of Generative Adversarial Neural Network """

import numpy as np

from IPython.core.debugger import Tracer

from keras.datasets import mnist
from keras.layers import Input, Dense, Reshape, Flatten, Dropout
from keras.layers import BatchNormalization
from keras.layers.advanced_activations import LeakyReLU
from keras.models import Sequential
from keras.optimizers import Adam

import matplotlib.pyplot as plt
plt.switch_backend('agg')   # allows code to run without a system DISPLAY
loss 使用 binary_crossentropy,來表示真實/假圖像
def __init__(self, width=28, height=28, channels=1):

    self.width = width
    self.height = height
    self.channels = channels

    self.shape = (self.width, self.height, self.channels)

    self.optimizer = Adam(lr=0.0002, beta_1=0.5, decay=8e-8)

    self.G = self.__generator()
    self.G.compile(loss='binary_crossentropy', optimizer=self.optimizer)

    self.D = self.__discriminator()
    self.D.compile(loss='binary_crossentropy', optimizer=self.optimizer, metrics=['accuracy'])

    self.stacked_generator_discriminator = self.__stacked_generator_discriminator()

    self.stacked_generator_discriminator.compile(loss='binary_crossentropy', optimizer=self.optimizer)
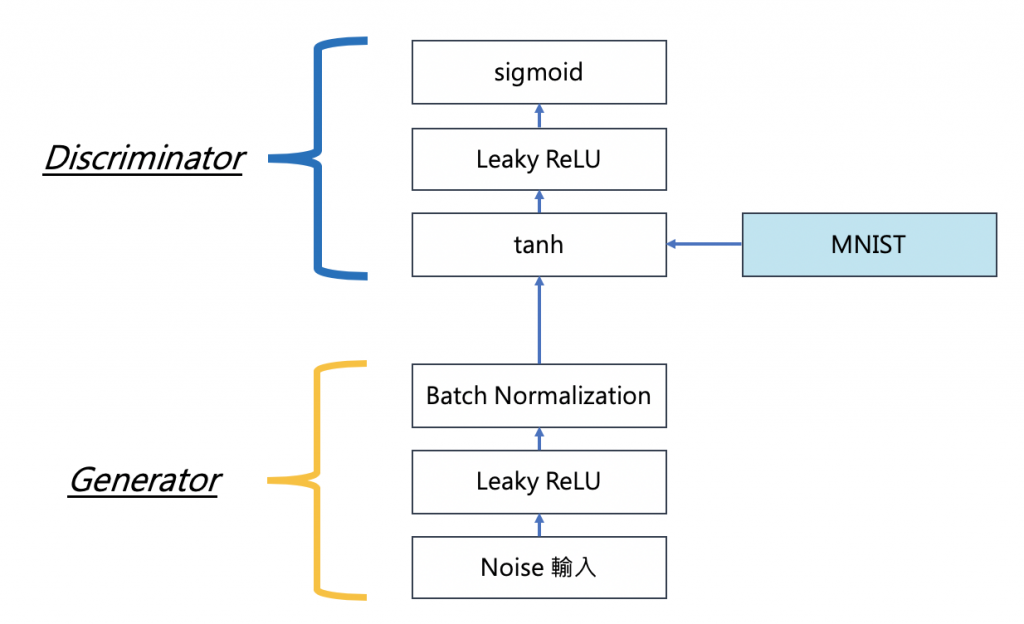
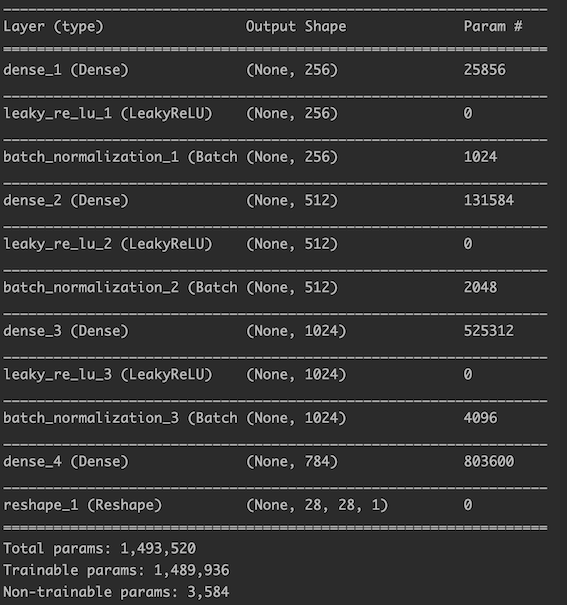
def __generator(self):
    """ Declare generator """

    model = Sequential()
    model.add(Dense(256, input_shape=(100,)))
    model.add(LeakyReLU(alpha=0.2))  # 使用 LeakyReLU 激活函數
    model.add(BatchNormalization(momentum=0.8))  # 使用 BatchNormalization 優化
    model.add(Dense(512))
    model.add(LeakyReLU(alpha=0.2))
    model.add(BatchNormalization(momentum=0.8))
    model.add(Dense(1024))
    model.add(LeakyReLU(alpha=0.2))
    model.add(BatchNormalization(momentum=0.8))
    model.add(Dense(self.width  * self.height * self.channels, activation='tanh'))
    model.add(Reshape((self.width, self.height, self.channels)))
    model.summary()

    return model
def __discriminator(self):
    """ Declare discriminator """

    model = Sequential()
    model.add(Flatten(input_shape=self.shape))
    model.add(Dense((self.width * self.height * self.channels), input_shape=self.shape))
    model.add(LeakyReLU(alpha=0.2))
    model.add(Dense(int((self.width * self.height * self.channels)/2)))
    model.add(LeakyReLU(alpha=0.2))
    model.add(Dense(1, activation='sigmoid'))
    model.summary()

    return model

def __stacked_generator_discriminator(self):

    self.D.trainable = False

    model = Sequential()
    model.add(self.G)
    model.add(self.D)

    return model
先訓練 discriminator,再訓練 generator,每個 minibatch 中輪流訓練。
def train(self, X_train, epochs=10000, batch = 32, save_interval = 100):

    for cnt in range(epochs):

        ## train discriminator
        random_index = np.random.randint(0, len(X_train) - batch/2)
        legit_images = X_train[random_index : random_index + int(batch/2)].reshape(int(batch/2), self.width, self.height, self.channels)

        gen_noise = np.random.normal(0, 1, (int(batch/2), 100))
        syntetic_images = self.G.predict(gen_noise)

        x_combined_batch = np.concatenate((legit_images, syntetic_images))
        y_combined_batch = np.concatenate((np.ones((int(batch/2), 1)), np.zeros((int(batch/2), 1))))

        d_loss = self.D.train_on_batch(x_combined_batch, y_combined_batch)


        # train generator

        noise = np.random.normal(0, 1, (batch, 100))  # 添加高斯噪聲
        y_mislabled = np.ones((batch, 1))

        g_loss = self.stacked_generator_discriminator.train_on_batch(noise, y_mislabled)

        print ('epoch: %d, [Discriminator :: d_loss: %f], [ Generator :: loss: %f]' % (cnt, d_loss[0], g_loss))

        if cnt % save_interval == 0:
            self.plot_images(save2file=True, step=cnt)

def plot_images(self, save2file=False, samples=16, step=0):
    ''' Plot and generated images '''
    filename = "./images/mnist_%d.png" % step
    noise = np.random.normal(0, 1, (samples, 100))

    images = self.G.predict(noise)

    plt.figure(figsize=(10, 10))

    for i in range(images.shape[0]):
        plt.subplot(4, 4, i+1)
        image = images[i, :, :, :]
        image = np.reshape(image, [self.height, self.width])
        plt.imshow(image, cmap='gray')
        plt.axis('off')
    plt.tight_layout()

    if save2file:
        plt.savefig(filename)
        plt.close('all')
    else:
        plt.show()
生成的圖像演變:

