本系列同步發表在 個人部落格,歡迎大家關注~
恩... 越看越多東西需要修改一下...
那麼接續昨天的議題。
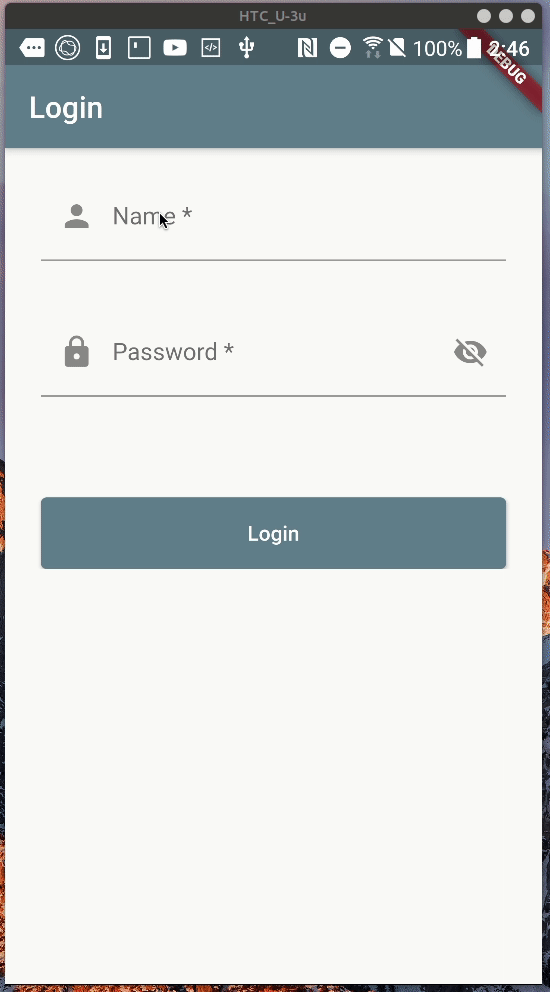
Login Page - password text hide & text show/hide switch
修正的項目:
- 密碼隱藏輸入字元
- 可切換密碼字元 顯示/隱藏
隱藏輸入字元可藉著 TextFormField.obscureText 屬性來調整。
切換密碼字元 顯示/隱藏,參考 YouTube - Flutter - toggle password visibility
Login Page - loading modal
修正的項目:
- Loading 字底下有雙黃線
- 按下登入紐需收起鍵盤
Loading 字樣有雙黃線,參考了 StackOverflow - Yellow lines under Text Widgets in Flutter? 及相關 Issue Text in Hero red when animating #30647
如何在按下登入紐取消鍵盤呢?參考 StackOverflow - How can I dismiss the on screen keyboard?
Login Page - login button color
直接在 lib/main.dart 中,theme 屬性中添加 ThemeData.buttonTheme,正也是 MaterialApp 好用的地方。
--
修改後成果
點選 GIF 可直接看 Commit
好囉~ 現在回到 UI 開發上面。

在個人頁面的資訊區域(上半部頭貼、自介、地點等等...),可以視為一個擴增版的 AppBar。
再加上下半部會有大量可捲動的資訊區域(Repos、Stars ...),這時候我們可以使用 Flutter 中一些特別的 Widget; CustomScrollView 和 SliverXXX 系列來達成此功能。
完全聽不懂嗎?
沒關係,先作一個簡單的 SliverAppBarDemo 頁面(參考 Flutter实战 - 6.5 CustomScrollView)
import "package:flutter/material.dart";

class SliverAppBarDemo extends StatelessWidget {
  @override
  Widget build(BuildContext context) {
    return Scaffold(
      body: CustomScrollView(
        slivers: <Widget>[
          SliverAppBar(
            pinned: true,
            expandedHeight: 250.0,
            flexibleSpace: FlexibleSpaceBar(
              centerTitle: true,
              title: Container(
                padding: EdgeInsets.all(8.0),
                child: Text('SliverAppBar Demo'),
                color: Colors.black54,
              ),
              background: Image.network(
                "https://images.unsplash.com/photo-1515975325863-a4ceb4b7d6c0?ixlib=rb-1.2.1&ixid=eyJhcHBfaWQiOjEyMDd9&auto=format&fit=crop&w=1225&q=80",
                fit: BoxFit.cover,
              ),
            ),
          ),
          SliverPadding(
            padding: const EdgeInsets.all(8.0),
            sliver: SliverFixedExtentList(
              itemExtent: 50.0,
              delegate: SliverChildBuilderDelegate(
                (BuildContext context, int index) {
                  return Container(
                    alignment: Alignment.center,
                    color: Colors.lightBlue[100 * (index % 9)],
                    child: Text('list item $index'),
                  );
                },
                childCount: 50,
              ),
            ),
          ),
        ],
      ),
    );
  }
}
結果
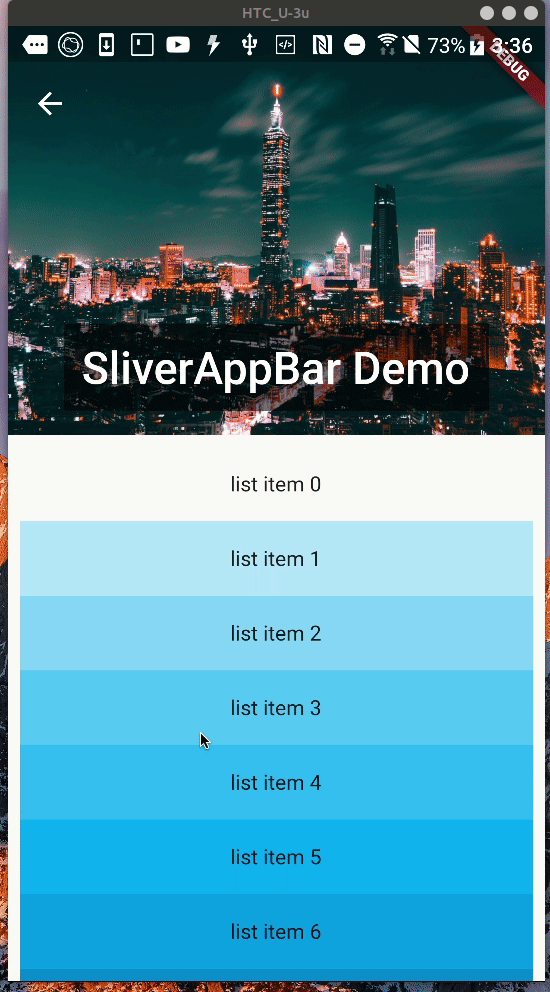
這樣應該稍微有點概念了吧~ 接下來就看看實際如何用在 ProfilePage 裡吧~
lib/pages/profile/profile.dart
import "package:flutter/material.dart";
import 'package:gitme_reborn/components/profile/profile_info.dart';

class ProfilePage extends StatelessWidget {
  @override
  Widget build(BuildContext context) {
    return DefaultTabController(
      child: Scaffold(
        body: CustomScrollView(
          slivers: <Widget>[
            SliverAppBar(
              title: Text("BbsonLin"),
              pinned: true,
              expandedHeight: 250.0,
              flexibleSpace: FlexibleSpaceBar(
                background: Column(
                  mainAxisAlignment: MainAxisAlignment.end,
                  children: <Widget>[
                    ProfileInfo(
                      avatarUrl:
                          "https://avatars2.githubusercontent.com/u/18156421?s=400&u=1f91dcf74134827fde071751f95522845223ed6a&v=4",
                      name: "Bobson Lin",
                      location: "New Taipei City, Taiwan",
                    ),
                    SizedBox(height: 8.0),
                    TabBar(
                      labelPadding: EdgeInsets.zero,
                      tabs: <Widget>[
                        Tab(text: "Repos"),
                        Tab(text: "Stars"),
                        Tab(text: "Followers"),
                        Tab(text: "Following"),
                      ],
                    ),
                  ],
                ),
              ),
            ),
            SliverFillRemaining(
              child: TabBarView(
                children: <Widget>[
                  Text("Repos"),
                  Text("Stars"),
                  Text("Followers"),
                  Text("Following"),
                ],
              ),
            ),
          ],
        ),
      ),
      length: 4,
    );
  }
}

個人頁面的資訊區域(上半部),額外拉出來寫成 ProfileInfo
lib/components/profile/profile_info.dart
import "package:flutter/material.dart";

class ProfileInfo extends StatelessWidget {
  const ProfileInfo({
    Key key,
    @required this.avatarUrl,
    @required this.name,
    this.bio,
    this.location,
  }) : super(key: key);

  final String avatarUrl;
  final String name;
  final String bio;
  final String location;

  @override
  Widget build(BuildContext context) {
    TextTheme _primaryTextTheme = Theme.of(context).primaryTextTheme;

    return Column(
      children: <Widget>[
        CircleAvatar(
          radius: 36.0,
          backgroundImage: NetworkImage(avatarUrl),
        ),
        SizedBox(height: 8.0),
        Text(
          name,
          style: _primaryTextTheme.subtitle,
        ),
        SizedBox(height: 6.0),
        Text(
          bio ?? "No bio yet",
          style: _primaryTextTheme.body1,
        ),
        SizedBox(height: 6.0),
        Row(
          mainAxisAlignment: MainAxisAlignment.center,
          children: <Widget>[
            Icon(
              Icons.location_on,
              size: _primaryTextTheme.caption.fontSize,
              color: _primaryTextTheme.caption.color,
            ),
            SizedBox(width: 4.0),
            Text(
              location,
              style: _primaryTextTheme.caption,
            ),
          ],
        ),
      ],
    );
  }
}
小提醒:
- 在 Material Design 中,針對頂部應用欄 (App Bars: top) 的行為有些規範,參考: App Bars: top - Behavior
Sliver系列,是較進階的渲染方式。出現原因主要是解決,有大量資訊需要用捲動顯示時設備資源浪費的問題;試想一下,如果有 100、1000 個需要條列的資料,如果一次就要渲染,性能較差的手機可能就負荷不了了,效能好的手機就算能作到,也會影響使用者的使用體驗。- 想深入了解的同學不妨看看參考中的 YouTube 影片。
--
成果
今天先到這,明天在接續完成個人頁面下半部吧~
參考:
