雖然現今有深度學習這項技術,然而對於深度學習最重要的莫過於資料,換句話說資料的重要性大於技術,除了資料以外還有一項則是資料的代表性程度,輸入給深度學習的資料若有足夠的代表性,則整個訓練出來的模型會與真實情況相近,若無足夠代表性則會無法得到可用的模型,而不必要的資訊太多則會變成garbage in garbage out,因此對於資料的選擇或處理也是非常重要的一部分。
先前在影像處理當中已有介紹不少的用法,但這些用法都是在空間域做處理,然而事實上有些問題則能通過頻率域做處理,能使得處理得更快並達到一定的效果,本篇文章主要筆記對於空間域轉頻率域的方法做簡單的分析。
正弦曲線也就是所謂的Sine wave,如下圖,這裡主要先介紹波的相關屬性。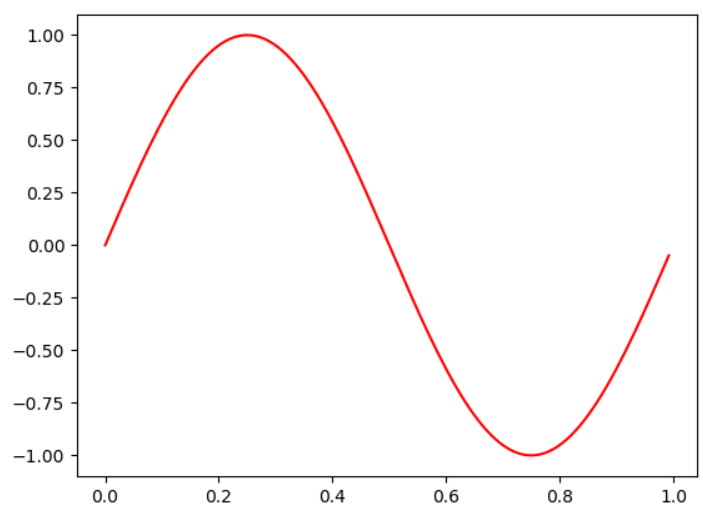
x = np.arange(0, 1.0, 1.0 / 128)
y = np.sin(2 * np.pi * 1 * x)
plt.plot(x, y, 'r')
振幅即是波的高低程度,如下圖,藍色的峰頂和低谷都是紅色的兩倍,主要藉由sin前面的係數控制。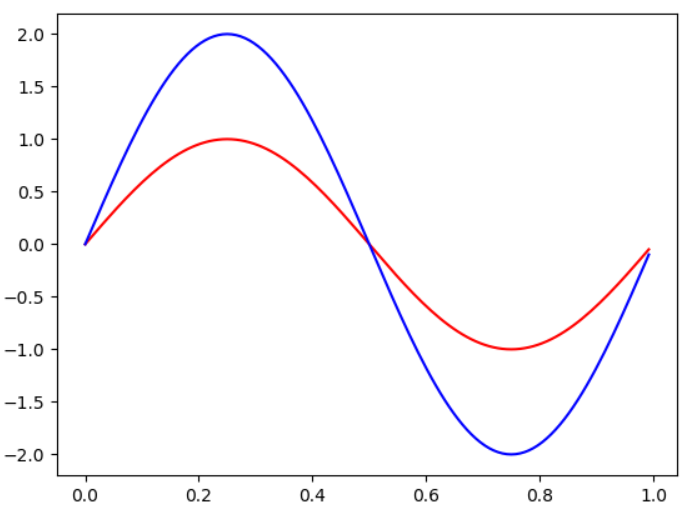
x = np.arange(0, 1.0, 1.0 / 128)
y = np.sin(2 * np.pi * 1 * x)
plt.plot(x, y, 'r')

x = np.arange(0, 1.0, 1.0 / 128)
y = 2 * np.sin(2 * np.pi * 1 * x)
plt.plot(x, y, 'b')
相位即是波開始的位置,將上述的x改為0.2開始,則結果如下圖,主要藉由x去控制,簡單來說從x做採樣的動作,而這裡所採樣的範圍是[0.2, 1.0]。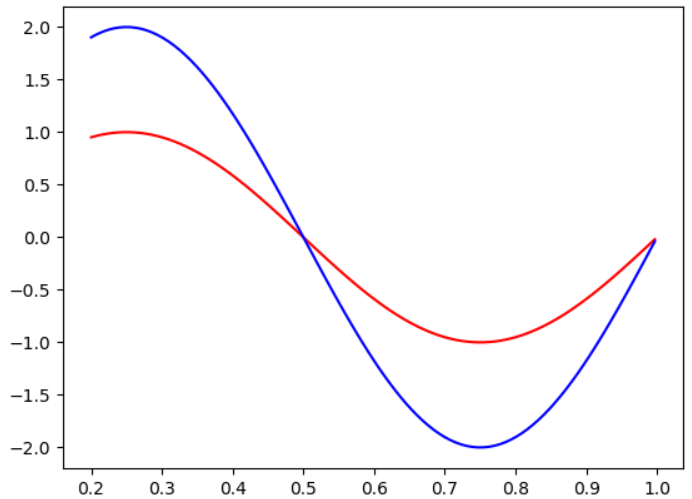
x = np.arange(0.2, 1.0, 1.0 / 128)
y = np.sin(2 * np.pi * 1 * x)
plt.plot(x, y, 'r')

x = np.arange(0.2, 1.0, 1.0 / 128)
y = 2 * np.sin(2 * np.pi * 1 * x)
plt.plot(x, y, 'b')
頻率則是在一秒內震動的週期次數,如下圖,先前可以看到輸出都只有一個週期的波,藉由改動sin內的參數乘上2倍則變為兩個週期,改動3倍則變為三個週期,以此類推,而128是我們在1秒鐘採樣的次數,在這裡128次即代表了一個週期資訊的概念。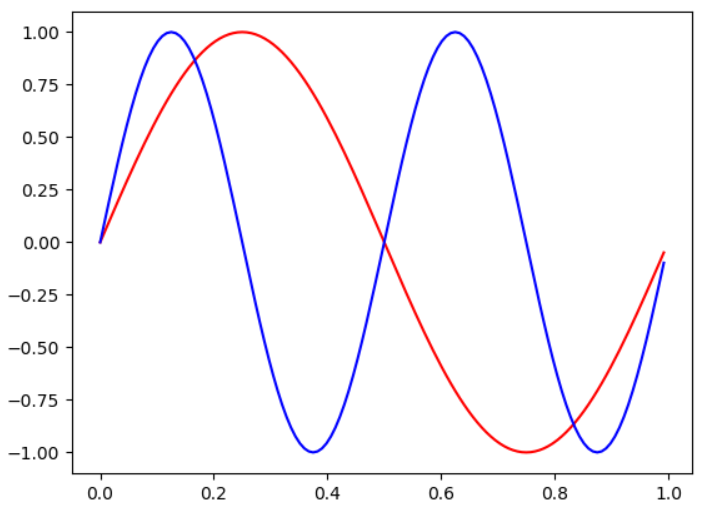
x = np.arange(0, 1.0, 1.0 / 128)
y = np.sin(2 * np.pi * 1 * x)
plt.plot(x, y, 'r')

x = np.arange(0, 1.0, 1.0 / 128)
y = np.sin(2 * np.pi * 2 * x)
plt.plot(x, y, 'b')
週期可以當作為一個園,圓在繞一圈時即是一個週期,如下圖(執行程式碼可跑動態),每一個藍點即是我們在一個週期時間內採樣的數量。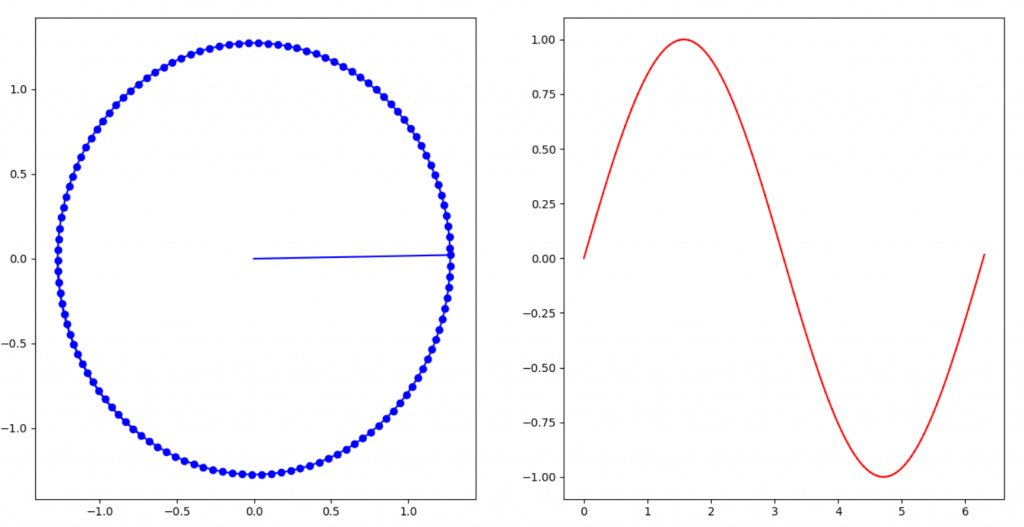
現實當中我們所得到的波形往往不是單純的,然而這些波形能用正弦(sin)和餘弦(cos)疊加組成,這裡示範sin的疊加,如下圖。
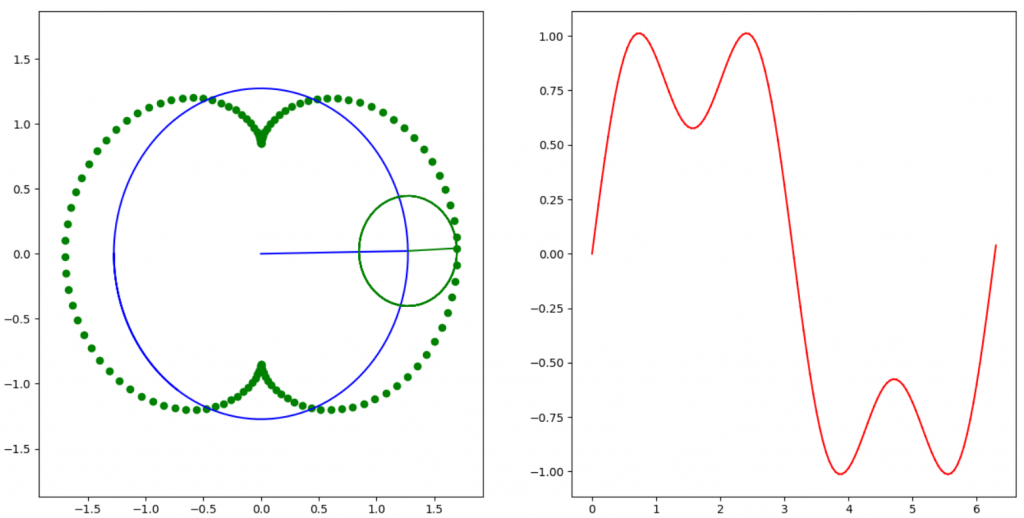
2個sin波疊加
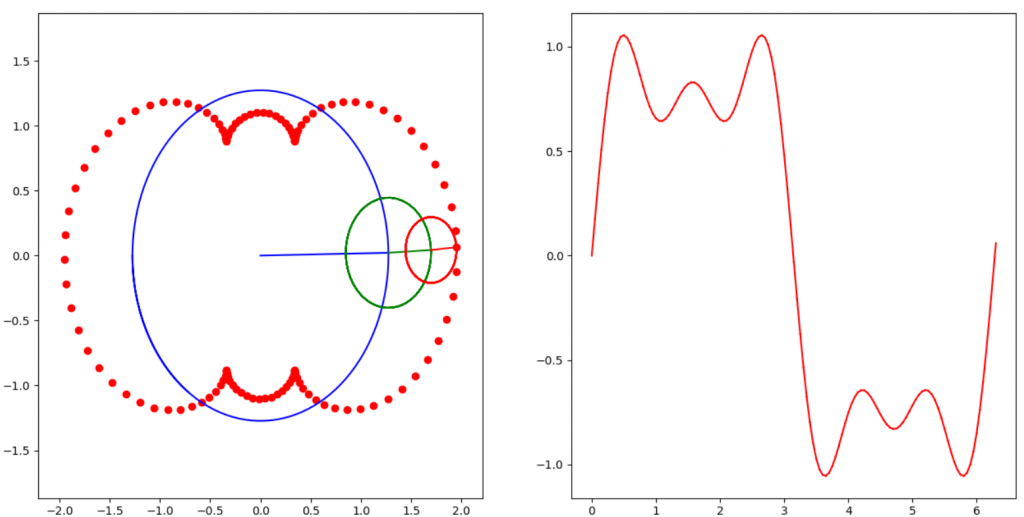
3個sin波疊加
def add_sin(x, n):
    y = np.sin(x)
    for n in range(3, n + 1, 2):
        y += 4 * np.sin(n * x) / (n * np.pi)
    return y

plt.ion()
plt.show()

N = 5
angle = np.arange(0, 2 * np.pi + 0.05, 0.05)
last_x = angle[0]
last_y = add_sin(last_x, N)
ln_list = [None for _ in range(0, N * 2 + 1, 2)]

for index in range(1, len(angle), 1):
    x = angle[index]
    y = add_sin(x, N)

    plt.subplot(122)
    plt.plot([last_x, x], [last_y, y], 'r')
    last_x = x
    last_y = y


    plt.subplot(121)
    for ln in ln_list:
        if ln != None:
            ln.remove()
    colors = ['b', 'g', 'r', 'c', 'm', 'y', 'k']
    circle_offset_x = 0
    circle_offset_y = 0

    for n in range(1, N + 1, 2):
        color = colors[n // 2]

        pos = np.arange(-np.pi, np.pi + 1, 0.05)
        circle_x = circle_offset_x + 4 * np.cos(n * pos) / (n * np.pi)
        circle_y = circle_offset_y + 4 * np.sin(n * pos) / (n * np.pi)
        ln_list[n - 1], = plt.plot(circle_x, circle_y, color)

        end_x = circle_offset_x + 4 * np.cos(n * angle[index]) / (n * np.pi)
        end_y = circle_offset_y + 4 * np.sin(n * angle[index]) / (n * np.pi)
        ln_list[n], = plt.plot([circle_offset_x, end_x],[circle_offset_y, end_y], color)

        circle_offset_x = end_x
        circle_offset_y = end_y

        if n == N:
            plt.scatter([end_x], [end_y], c=color)

    plt.draw()
    plt.pause(0.001)
plt.pause(9999)
上述提到現實的波形往往都是複雜的疊加而成,然而能不能將每一個波分解呢?,這時傅立葉變換即能派上用場。首先看下圖,由3個sin波組合而成的3D圖,在上面介紹時通常會朝向X那方看過去,這時看的到即是上述所提的疊加後的波,然而傅立葉變換可以想像為從Y方向看過去,即會變為3條線,這時想要移除雜訊或不必要的波就能夠從中處理並且傅立葉變換剛好是一個正交矩陣,利用這特性只需要將複數取共軛即可得到原始的結果,複數部分下面會簡單講解。接著以實作來簡易講解傅立葉實用性。
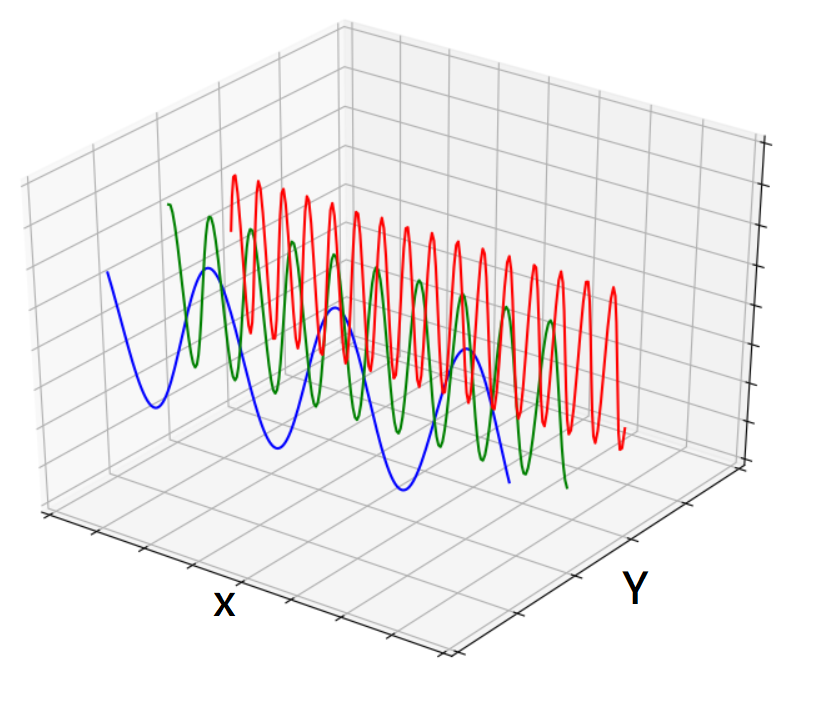
fig = plt.figure()
ax = plt.axes(projection='3d')
ax.set_xlim([-10, 10])
ax.set_ylim([0, 10])
ax.set_zlim([-2, 2])
N = 5
colors = ['b', 'g', 'r', 'c', 'm', 'y', 'k']
for n in range(1, N + 1, 2):
    color = colors[n // 2]
    x = np.arange(-10, 10, 0.1)
    y = np.ones_like(x) * n + 1
    z = np.sin(n * x)
    ax.plot(x, y, z, color=color)
plt.show()
離散餘弦變換(Discrete Cosine Transform, DCT)有點類似先前介紹的霍夫轉換,實際上傅立葉變換也都有點類似,差別在於霍夫轉換使用極座標目的是要找出線或圓,而這裡介紹的轉換則是轉為頻率域讓我們更好做分離或處理的動作。
以下為離散餘弦的變換公式和反變換公式。可以很明顯看到都是利用坐標下去做轉換,座標(i,j)能當作是空間座標對應到不同的頻率,(x, y)則是控制波長的振幅。

使用以下圖測試DCT轉換,然而若觀測輸出的矩陣能觀察到,有許多接近於0的值,為了更方便觀看因此將其使用值方圖可視化如下。
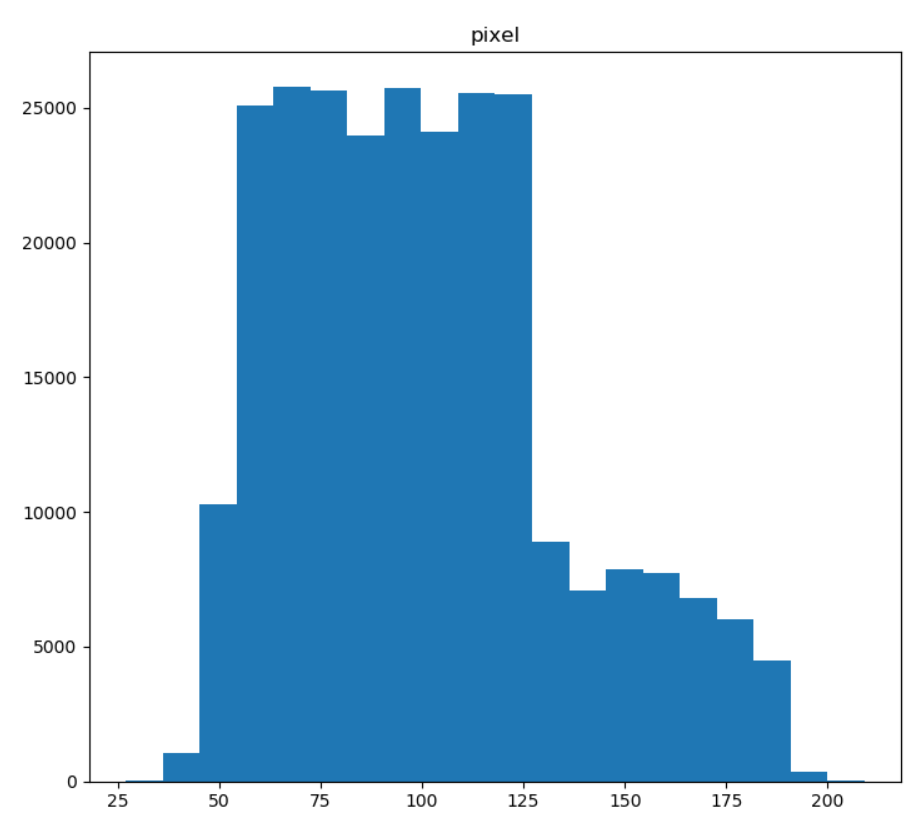
未轉換前
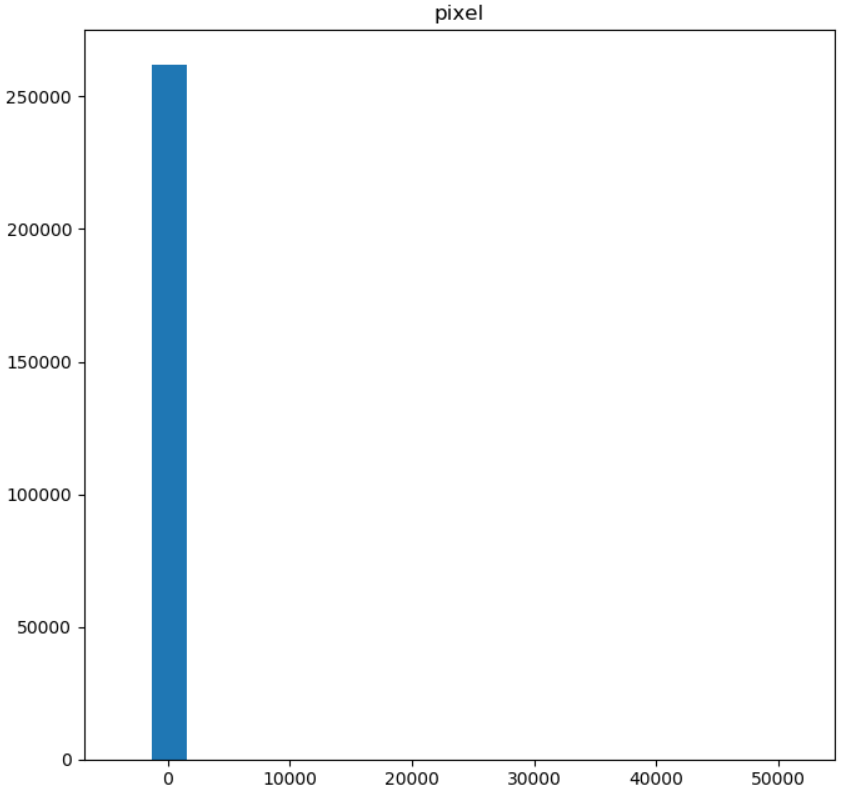
DCT轉換後
因此DCT是能將資料做壓縮的變換,例如JPEG主要使用DCT做轉換在量化與編碼進行壓縮,雖然是有損壓縮,但人對於高頻的敏感度較低頻的差,因此可能感受不出來,最後實作簡易版的DCT,公式如上所述,這裡我將變換和反變換分開可讀性比較高。
def DCT_process(matrix, i, j):
   width = matrix.shape[1]
   height = matrix.shape[0]
   value = 0.
   for col in range(height):
       for row in range(width):
           save = matrix[col, row]
           save *= math.cos(math.pi * (2 * col + 1) * i / (2. * height))
           save *= math.cos(math.pi * (2 * row + 1) * j / (2. * width))
           value += save
   c = 1.
   if i == 0:
       c /= np.sqrt(2)
   if j == 0:
       c /= np.sqrt(2)

   return (2. / np.sqrt(height * width)) * c * value

def DCT(matrix):
   width = matrix.shape[1]
   height = matrix.shape[0]
   dct = np.zeros_like(matrix)

   for col in range(height):
       for row in range(width):
           dct[col, row] = DCT_process(matrix, col, row)
   return dct

def IDCT_process(dct, i, j):
   width = dct.shape[1]
   height = dct.shape[0]
   value = 0

   for col in range(height):
       for row in range(width):
           save = dct[col, row]
           if col == 0:
               save /= np.sqrt(2)
           if row == 0:
               save /= np.sqrt(2)
           save *= math.cos(math.pi * (2 * i + 1) * col / (2. * height))
           save *= math.cos(math.pi * (2 * j + 1) * row / (2. * width))
           value += save

   return (2. / np.sqrt(height * width)) * value

def IDCT(dct):
   width = dct.shape[1]
   height = dct.shape[0]
   matrix = np.zeros_like(dct)

   for col in range(height):
       for row in range(width):
           matrix[col, row] = IDCT_process(dct, col, row)
   return matrix


value = np.arange(10, 160, 10,dtype=np.float)
matrix = np.reshape(value, (5, 3))
matrix_dct = DCT(matrix)
print(matrix_dct.astype(np.int))
print(IDCT(matrix_dct))
先前介紹的是僅僅使用cos,而傅立葉變換則是使用cos和sin,而在先前篇章神經網路學習有提過數學e,而他另一個名稱則是尤拉公式也就是複數,複數則是由實數和虛數組合成,在高中以前的數學通常只會學到實數,而一個虛數表示的是sqrt(-1),這裡可以想像在這世界上一個函數的表達也是很有可能x^2=-1,然而複數還對應到一個反射的對應複數,稱為共軛複數,假設有一複數為(1 + i2),取共軛則為(1 - i2),這裡先給出轉換公式,如下。另外在上述章節週期與疊加的圓形恰好是cos和sin所組合成的。

在上述公式中,可以想像它是在做一個極座標轉換,霍夫轉換是計數點的數量進而找到線或圓,而這裡是轉換到能將疊加的波轉為分解的波,如下圖1轉換範例,進而將第一行都變為0觀察會發生甚麼變化,變化則如下圖2,可以看到其它的數字都變為與第三列一樣,代表著剛剛拿掉的第一行是其它列的疊加訊息。
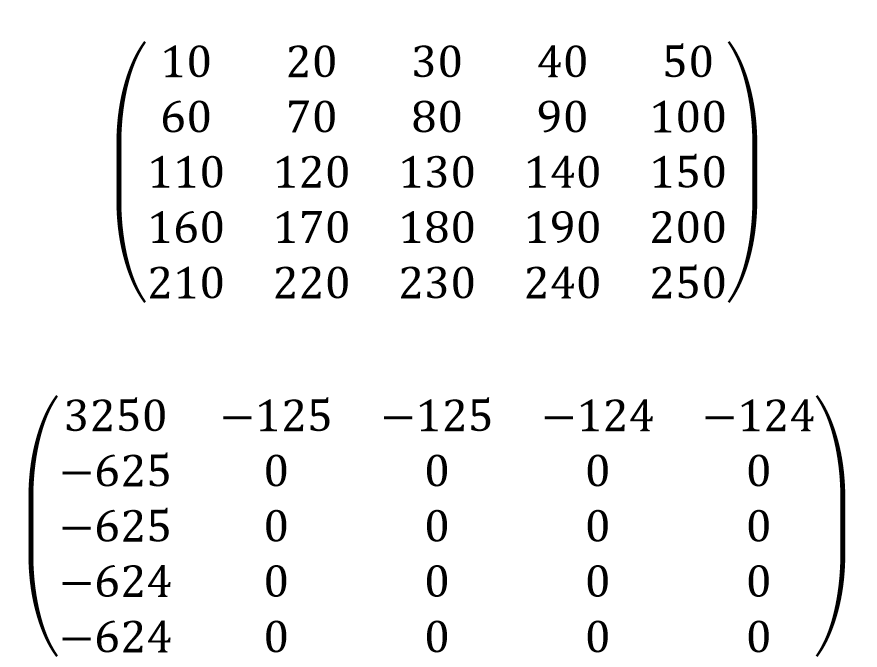
圖1,上面為未轉換,下面為轉換後(只取實數)。
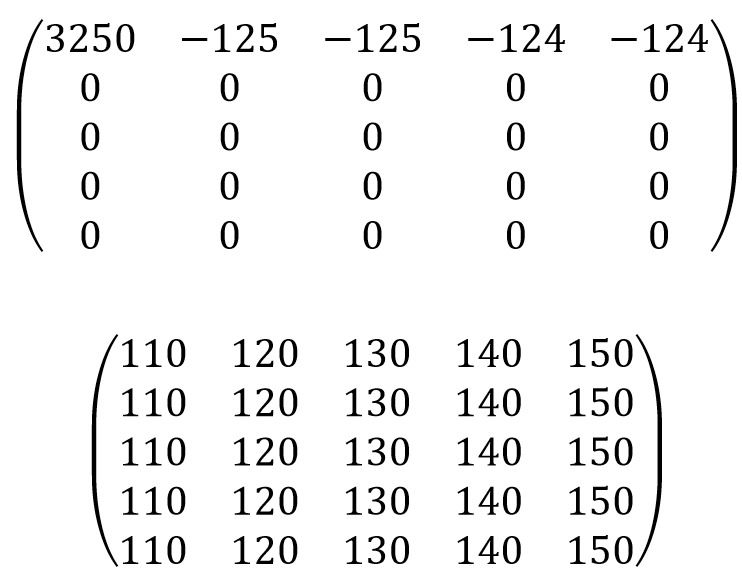
圖2,上面為將第一行拿掉,下面為轉換後(只取實數)。
以下為實作程式碼,將變換和反變換分開方便閱讀。
def DFT_process(matrix, i, j):
    pi = np.pi * 2.
    width = matrix.shape[1]
    height = matrix.shape[0]
    complex = np.array([0., 0.])

    for col in range(height):
        for row in range(width):
            angle = pi * ((i * col) / float(height) + (j * row) / float(width))
            value[0] += matrix[col, row] * np.cos(angle)
            value[1] -= matrix[col, row] * np.sin(angle)

    #return (1. / np.sqrt(height * width)) * value
    return value

def DFT(matrix):
    width = matrix.shape[1]
    height = matrix.shape[0]
    dct = np.zeros((height, width, 2))

    for col in range(height):
        for row in range(width):
            dct[col, row] = DFT_process(matrix, col, row)
    return dct

def IDFT_process(dft, i, j):
    pi = np.pi * 2.
    width = dft.shape[1]
    height = dft.shape[0]
    value = np.array([0., 0.])

    for col in range(height):
        for row in range(width):
            angle = pi * ((i * col) / float(height) + (j * row) / float(width))
            value[0] += dft[col, row, 0] * np.cos(angle) - dft[col, row, 1] * np.sin(angle)
            value[1] += dft[col, row, 0] * np.sin(angle) + dft[col, row, 1] * np.cos(angle)

    return value

def IDFT(dft):
    width = dft.shape[1]
    height = dft.shape[0]
    matrix = np.zeros_like(dft)

    for col in range(height):
        for row in range(width):
            matrix[col, row] = IDFT_process(dft, col, row)
    return matrix
在這之前對於二維的傅立葉變換所要使用的時間複雜度為O(N^M^2),從演算法筆記[1]得知使用動態規劃能使得複雜度降低到O(NMlog(NM))。
考慮一維的傅立葉變換,將u提出,因為它不是每一個輸出的共同變因,簡單舉個例子,假設長度n=8,若u=0,則對於每個x對應的為w^0~0,w次方間距為0(頻率),若u=1則對於每個的x對應的w^0~7,w次方間距為1(頻率),若u=2則對於每個的x對應的w^0~14,w次方間距為2(頻率),而最主要的原因是經過動態規劃的u會疊加上去,而到最後會僅用u=1疊加上去。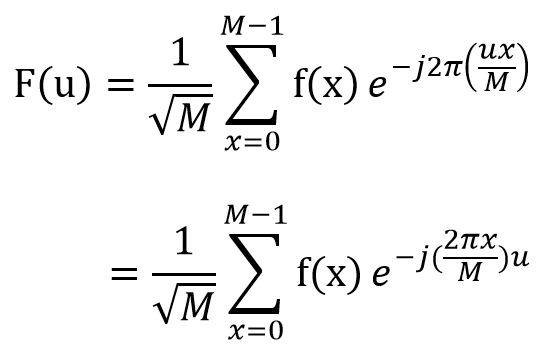
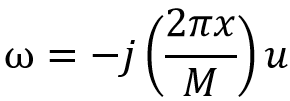
上述的w有對稱的特性,如下圖,而這特性讓它在計算時能用動態規劃和疊加的方式減少計算量。以下參考演算法筆記[1]來推導。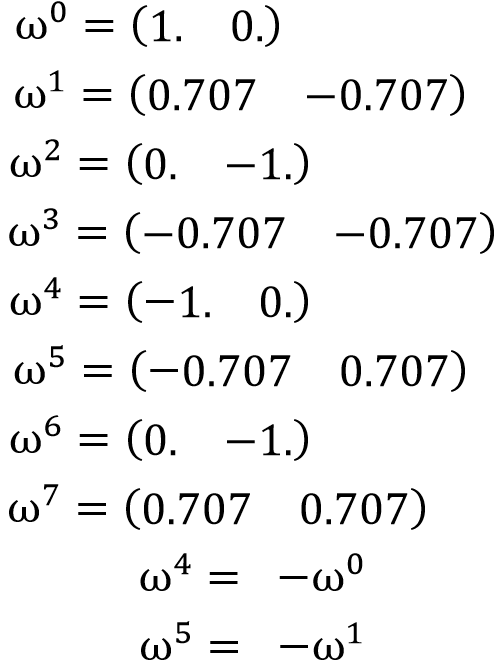
假設(x0, x1, x2, x3, x4, x5, x6, x7)經由傅立葉變換轉換到(y0, y1, y2, y3, y4, y5, y6, y7),其中N=8,則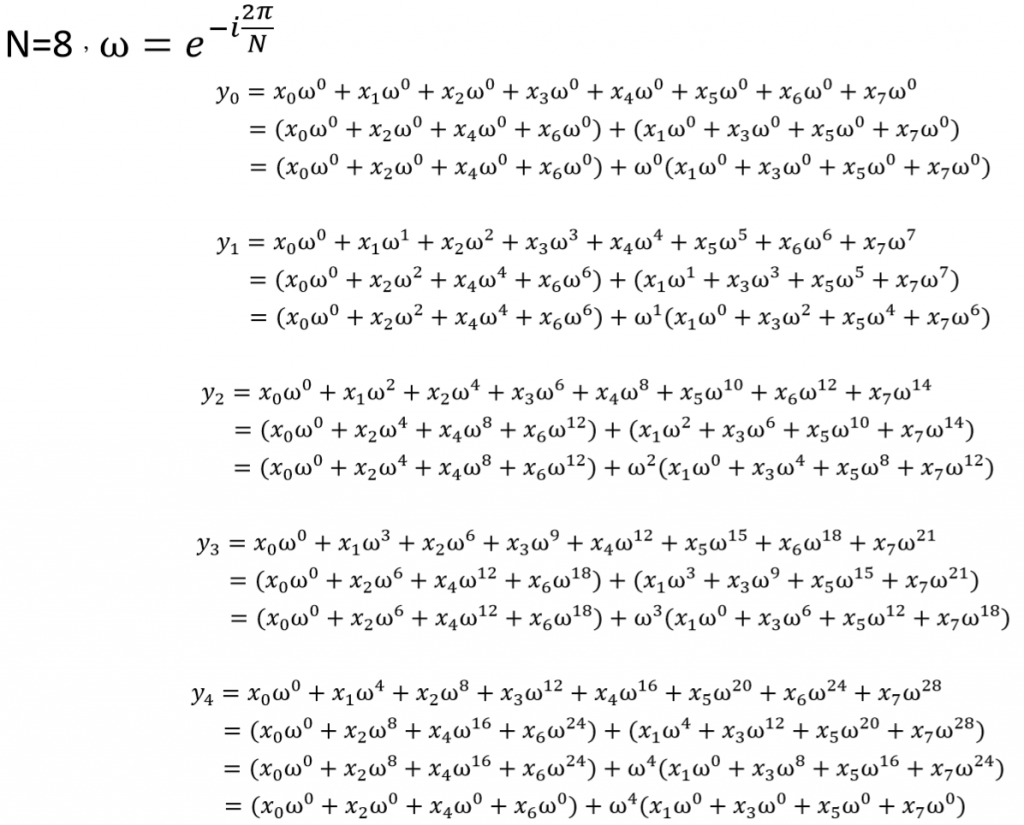
N=4,取左邊偶數4個x,則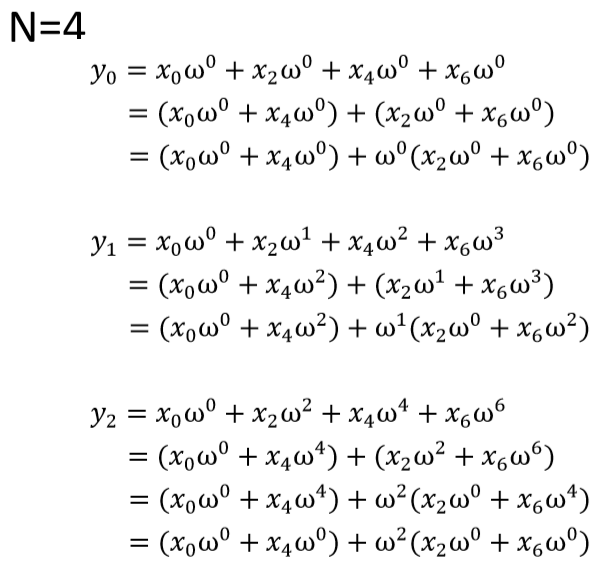
N=2,取左邊偶數2個x,則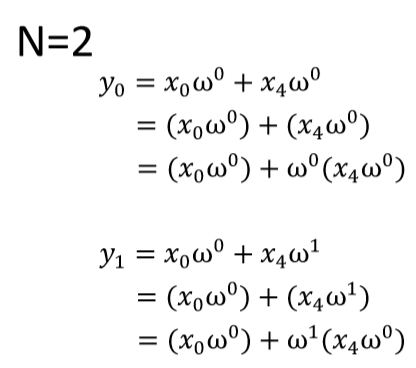
首先觀察 N=2 ,而 w 對應的另一半取負數(0 度~180 對應 180 度~360 度),因此得知
從N=2推回去,在N=2會處理兩次,兩次分別為N=4的左邊偶數和右邊偶數,所以
註:左邊整行為偶數結果,右邊為奇數結果。
N=4推回去,分別跑迴圈從偶數結果第一個和奇數結果第一個交叉處理,同樣處理兩次分別為N=8的左邊偶數和右邊偶數,所以
註:左邊整行為偶數結果,右邊為奇數結果。
N=8推回去,分別跑迴圈從偶數結果第一個和奇數結果第一個交叉處理,所以可得到全部轉換結果為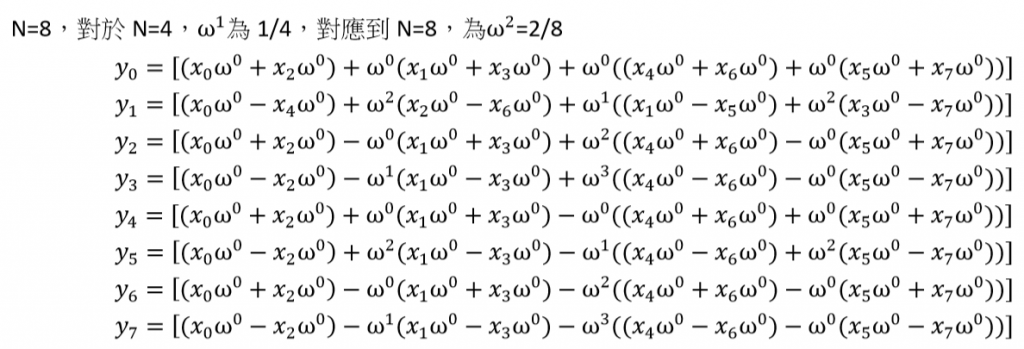
以y1做為驗證結果,如下圖
在實作的部分即可使用上述的規則來達成動態規劃,在二維傅立葉變換部份,事實上能使用一維傅立葉變換先做列在做行。以下先整理上述的推倒結果。
先從N=2開始看,假設a為左邊偶數,b為右邊奇數,則規則即是y0 = a + w^0 * b,y1 = a - w^0 * b,往回推N=4可以看到當計算一次結果w次方就會多1,也就是計算y0和y2後,w次方就會多1,因此可得知公式。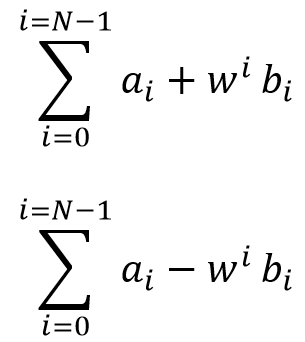
1.建立w函數,這裡與上述相同,而u可忽略。oper為控制變換和逆變化。
def get_w(len, oper):
    var = -2
    if oper != 1:
        var = 2
    w_complex = np.zeros([len, 2])
    for i in range(len):
        c = [np.cos((var * np.pi * i / len)), np.sin((var * np.pi * i / len))]
        w_complex[i] = c
    return w_complex
2.複數運算,複數較不同的在於乘法運算,加法與減法則雷同。
def complex_multi(com1, com2):
    r = com1[0] * com2[0] - com1[1] * com2[1]
    i = com1[0] * com2[1] + com1[1] * com2[0]
    return np.array([r, i])

def complex_add(com1, com2):
    r = com1[0] + com2[0]
    i = com1[1] + com2[1]
    return np.array([r, i])

def complex_sub(com1, com2):
    r = com1[0] - com2[0]
    i = com1[1] - com2[1]
    return np.array([r, i])
3.1D的變換和逆變換,這裡依照上述先分解,直到剩下1個回傳,最後左邊偶方和右邊奇方從第一個開始依序做處理。這裡依照上述整理的公式帶入即可完成。而逆變化做法則是,假如先做寬在做高則逆變換要先做高在做寬,最後w部份則取負號即可轉換回來。
def FFT_1D(complexs):
    size = len(complexs)
    if size == 1:
        return complexs;

    w_len = size >> 1
    num1 = complexs[0::2]
    num2 = complexs[1::2]

    num_complex = np.zeros([size, 2])
    com1 = FFT_1D(num1)
    com2 = FFT_1D(num2)
    w_complex = get_w(size, 1)

    for i in range(w_len):
        com_mul = complex_multi(w_complex[i], com2[i])
        num_complex[i] = complex_add(com1[i], com_mul)
        num_complex[w_len + i] = complex_sub(com1[i], com_mul)
    return num_complex;

def IFFT_1D(complexs):
    size = len(complexs)
    if size == 1:
        return complexs;

    w_len = size >> 1
    num1 = complexs[0::2]
    num2 = complexs[1::2]

    num_complex = np.zeros([size, 2])
    com1 = IFFT_1D(num1)
    com2 = IFFT_1D(num2)
    w_complex = get_w(size, -1)

    for i in range(w_len):
        com_mul = complex_multi(w_complex[i], com2[i])
        num_complex[i] = complex_add(com1[i], com_mul)
        num_complex[w_len + i] = complex_sub(com1[i], com_mul)
    return num_complex;
4.變換和逆變換,先做寬在做高。
def FFT(matrix):
    width = matrix.shape[1]
    height = matrix.shape[0]
    fft = np.zeros((height, width, 2))
    fft[:,:,0] = matrix

    for col in range(height):
        fft[col,:,:] = FFT_1D(fft[col,:,:])

    fft = np.transpose(fft, [1, 0, 2])

    for row in range(width):
        fft[row,:,:] = FFT_1D(fft[row,:,:])

    fft = np.transpose(fft, [1, 0, 2])
    return fft

def IFFT(fft):
    width = fft.shape[1]
    height = fft.shape[0]
    matrix = fft

    matrix = np.transpose(matrix, [1, 0, 2])

    for row in range(width):
        matrix[row,:,:] = IFFT_1D(matrix[row,:,:])

    matrix = np.transpose(matrix, [1, 0, 2])

    for col in range(height):
        matrix[col,:,:] = IFFT_1D(matrix[col,:,:])

    return matrix
這裡簡單的分析一下要如何使用傅立葉分解,首先如下圖一,左邊為2個sin波疊加,右邊為經過傅立葉變換(這裡使用實數變換),可以看到傅立葉明顯有兩個凸區域,將其中一個凸區域設為0,經過逆轉換則可得到圖二結果,能看到有一個波已經被分離了,而通常都會使用低通濾波器或高通濾波器來做處理,這部份以後有機會會在做一篇文章解析。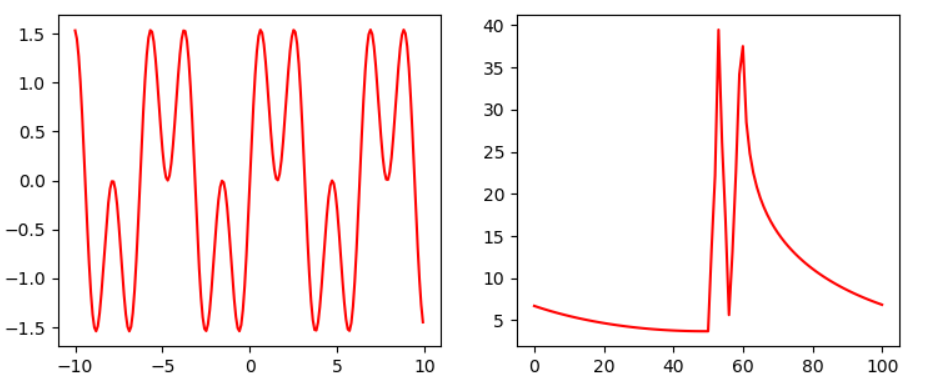
圖一
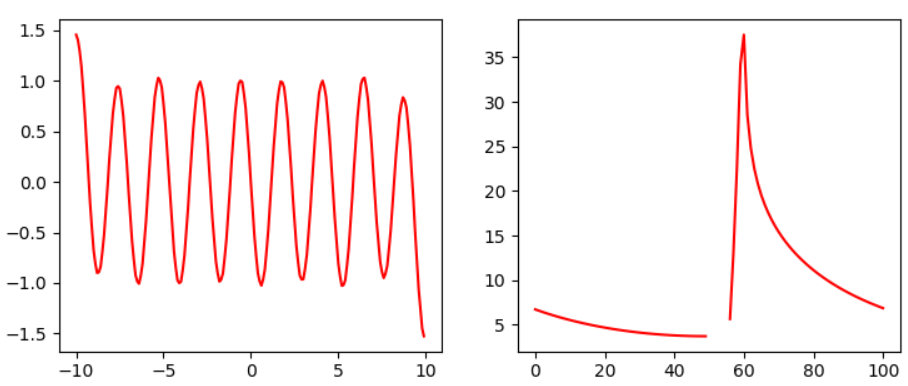
圖二
x = np.arange(-10, 10, 0.1)
value = np.sin(x) + np.sin(3 * x)
matrix = value
matrix_dct = np.fft.rfft(matrix)
matrix_dct = np.fft.fftshift(matrix_dct)

plt.subplot(221)
plt.plot(x, value, 'r')

plt.subplot(222)
plt.plot(np.arange(0, len(matrix_dct)), np.log10(matrix_dct) * 20, 'r')

matrix_dct[50: 56] = 0

plt.subplot(223)
print(len(np.fft.irfft(np.fft.fftshift(matrix_dct))))
plt.plot(x, np.fft.irfft(np.fft.fftshift(matrix_dct)), 'r')

plt.subplot(224)
plt.plot(np.arange(0, len(matrix_dct)), np.log10(matrix_dct) * 20, 'r')

plt.show()
此篇對傅立葉公式做簡單解說並筆記,實際上還有許多物理意義沒有解說到,未來有時間會解析傅立葉的特性與影像應用,若有錯誤地方歡迎糾正指導。
[1] 演算法筆記 - Wave, [Online]. Available: http://www.csie.ntnu.edu.tw/~u91029/Wave.html [Accessed: May. 10, 2020]
