介紹這一套私有雲的服務,如果預算有限買不起市面上的 NAS 剛好虛擬服務上空間很多,那可以架設這套 NextCloud 服務來使用,這是一套跨平台的服務連行動裝置也可以使用,還可以備份手機上的照片。
系統環境: CentOS 7
Web 服務: Nginx 1.18
PHP 服務: PHP 7.4
資料庫服務: MariaDB 10.4
Nginx 先決條件dnf install yum-utils -y
yum 存儲庫,在此目錄下新增一個 vim /etc/yum.repos.d/nginx.repo 屬於 官方提供載點
[nginx-stable]
name=nginx stable repo
baseurl=http://nginx.org/packages/centos/$releasever/$basearch/
gpgcheck=1
enabled=1
gpgkey=https://nginx.org/keys/nginx_signing.key
module_hotfixes=true

[nginx-mainline]
name=nginx mainline repo
baseurl=http://nginx.org/packages/mainline/centos/$releasever/$basearch/
gpgcheck=1
enabled=0
gpgkey=https://nginx.org/keys/nginx_signing.key
module_hotfixes=true
stable 穩定版本,如果想使用比較最新的版本請使用 nginx-mailine 會以當時官方釋出的版本為主,目前 BUBU 是使用官方比較新版為主yum-config-manager --enable nginx-mainline
nginx 服務dnf install nginx -y
systemctl start nginx ; systemctl enable nginx
新增加MariaDB安裝檔
vim /etc/yum.repos.d/MariaDB.repo

再填入內容為以下

# MariaDB 10.4 CentOS repository list - created 2019-12-03 02:20 UTC
# http://downloads.mariadb.org/mariadb/repositories/
[mariadb]
name = MariaDB
baseurl = http://yum.mariadb.org/10.4/centos7-amd64
gpgkey=https://yum.mariadb.org/RPM-GPG-KEY-MariaDB
gpgcheck=1

增加完畢後在下命令安裝

yum install MariaDB-server MariaDB-client -y
systemctl start mariadb ; systemctl enable mariadb   # 啟動資料庫服
mysql_secure_installation   # 設定資料庫的root密碼

NOTE: RUNNING ALL PARTS OF THIS SCRIPT IS RECOMMENDED FOR ALL MariaDB
      SERVERS IN PRODUCTION USE!  PLEASE READ EACH STEP CAREFULLY!

In order to log into MariaDB to secure it, we'll need the current
password for the root user.  If you've just installed MariaDB, and
you haven't set the root password yet, the password will be blank,
so you should just press enter here.

Enter current password for root (enter for none): 第一次設定,直接按 Enter 鍵即可
OK, successfully used password, moving on...

Setting the root password ensures that nobody can log into the MariaDB
root user without the proper authorisation.

Set root password? [Y/n] 按 Y 設定資料庫 root 密碼
New password: 輸入新密碼
Re-enter new password: 再次輸入新密碼
Password updated successfully!
Reloading privilege tables..
 ... Success!


By default, a MariaDB installation has an anonymous user, allowing anyone
to log into MariaDB without having to have a user account created for
them.  This is intended only for testing, and to make the installation
go a bit smoother.  You should remove them before moving into a
production environment.

Remove anonymous users? [Y/n] 按 Y 移除anonymous users
 ... Success!

Normally, root should only be allowed to connect from 'localhost'.  This
ensures that someone cannot guess at the root password from the network.

Disallow root login remotely? [Y/n] 按 Y 關閉 root 遠端登入
 ... Success!

By default, MariaDB comes with a database named 'test' that anyone can
access.  This is also intended only for testing, and should be removed
before moving into a production environment.

Remove test database and access to it? [Y/n] 按 Y 移除資料表 test
 - Dropping test database...
 ... Success!
 - Removing privileges on test database...
 ... Success!

Reloading the privilege tables will ensure that all changes made so far
will take effect immediately.

Reload privilege tables now? [Y/n] 按 Y 重新載入資料表權限
 ... Success!

Cleaning up...

All done!  If you've completed all of the above steps, your MariaDB
installation should now be secure.

Thanks for using MariaDB!

mysql -u root -p   # 登入資料庫裡設定資表及權限

CREATE DATABASE IF NOT EXISTS nextcloud_db DEFAULT CHARACTER SET utf8 COLLATE utf8_general_ci; #在資料庫裡新增nextcloud_db表單
GRANT ALL PRIVILEGES ON nextcloud_db.* TO 'nextclouduser'@'localhost' IDENTIFIED BY 'password' WITH GRANT OPTION; #密碼請自己輸入好記錄的密碼
FLUSH PRIVILEGES;
quit
yum install -y epel-release yum-utils
rpm -Uvh http://rpms.famillecollet.com/enterprise/remi-release-7.rpm
yum-config-manager --disable remi-php54
yum-config-manager --enable remi-php73
yum install -y php php-mysqlnd php-pdo php-xml php-pear php-devel php-mbstring re2c gcc-c++ gcc \
php-fpm php-mysql php-gd php-cli php-json php-opcache php-curl php-ldap php-odbc php-xmlrpc php-soap \
curl curl-devel php-intl php-zip php-pecl-apcu-devel php-pecl-apcu php-mcrypt php-common php-process \
php-pecl-redis php-pecl-imagick
vim /etc/php.ini」 設定檔修改前
;cgi.fix_pathinfo=1
修改後
cgi.fix_pathinfo=0
修改時區
[Date]
修改前
;date.timezone =
修改後
date.timezone = Asia/Taipei
修改資料上傳限制
; 上傳檔案大小上限(單一檔案大小)
upload_max_filesize = 50M
; POST 大小上限(所有檔案大小加總)
post_max_size = 200M
; 記憶體用量上限
memory_limit = 512M
; Script執行時間上限(單位:秒)
max_execution_time = 600
; Script處理資料時間上限(單位:秒)
max_input_time = 600
; Socket無回應斷線時間(單位:秒)
default_socket_timeout = 600
存檔
:wq
vim /etc/php-fpm.d/www.conf」由誰使用此服務
; RPM: apache user chosen to provide access to the same directories as httpd
;user = apache
user = nginx
; RPM: Keep a group allowed to write in log dir.
;group = apache
group =nginx
; Set permissions for unix socket, if one is used. In Linux, read/write
; permissions must be set in order to allow connections from a web server.
; Default Values: user and group are set as the running user
; mode is set to 0660
listen.owner = nginx
listen.group = nginx
;listen.mode = 0660
env[HOSTNAME] = $HOSTNAME
env[PATH] = /usr/local/bin:/usr/bin:/bin
env[TMP] = /tmp
env[TMPDIR] = /tmp
env[TEMP] = /tmp
php_value[session.save_path] = /var/www/html/sessions
修改好存檔
:wq
systemctl restart php-fpm ; systemctl enable php-fpm
mkdir /var/www/html/sessions
chown -R nginx:nginx /var/www/html/sessions
user nginx;
worker_processes auto;
error_log /var/log/nginx/error.log;
pid /run/nginx.pid;
include /usr/share/nginx/modules/*.conf;
#
events {
    worker_connections 1024;
}
#
http {
    log_format main  '$remote_addr - $remote_user [$time_local] "$request" '
                      '$status $body_bytes_sent "$http_referer" '
                      '"$http_user_agent" "$http_x_forwarded_for"';
#
    access_log /var/log/nginx/access.log  main;
#
    server_tokens off;
#
# Restoring the original visitor IP for your web application
    set_real_ip_from 127.0.0.1;
# use any of the following two
# real_ip_header CF-Connecting-IP;
    real_ip_header X-Forwarded-For;
#
# Default is 60, May need to be increased for very large uploads
#
    sendfile on;
#
    tcp_nopush on;
    tcp_nodelay on;
    keepalive_timeout 65;
    types_hash_max_size 2048;
# set max upload size
    client_max_body_size 1G;
    fastcgi_buffers 64 4K;
# Enable gzip but do not remove ETag headers
    gzip on;
    gzip_vary on;
    gzip_comp_level 4;
    gzip_min_length 256;
    gzip_proxied expired no-cache no-store private no_last_modified no_etag auth;
    gzip_types application/atom+xml application/javascript application/json application/ld+json application/manifest+json application/rss+xml application/vnd.geo+json application/vnd.ms-fontobject application/x-font-ttf application/x-web-app-manifest+json application/xhtml+xml application/xml font/opentype image/bmp image/svg+xml image/x-icon text/cache-manifest text/css text/plain text/vcard text/vnd.rim.location.xloc text/vtt text/x-component text/x-cross-domain-policy;
#
    include /etc/nginx/mime.types;
    include /etc/nginx/conf.d/*.conf;
#
    default_type application/octet-stream;
}
upstream php-handler {
    server 127.0.0.1:9000;
}
#
server {
    listen 80;
    server_name 您的網域;
#
    access_log /var/log/nginx/nc_access.log;
    error_log /var/log/nginx/nc_error.log;
#
#
# Add headers to serve security related headers
# Before enabling Strict-Transport-Security headers please read into this
# topic first.
#add_header Strict-Transport-Security "max-age=15768000; includeSubDomains; preload;";
#
# WARNING: Only add the preload option once you read about
# the consequences in https://hstspreload.org/. This option
# will add the domain to a hardcoded list that is shipped
# in all major browsers and getting removed from this list
# could take several months.
    add_header X-Content-Type-Options nosniff;
    add_header X-XSS-Protection "1; mode=block";
    add_header X-Robots-Tag none;
    add_header X-Download-Options noopen;
    add_header X-Permitted-Cross-Domain-Policies none;
    add_header Referrer-Policy no-referrer;
    add_header X-Frame-Options SAMEORIGIN;
# Remove X-Powered-By, which is an information leak
    fastcgi_hide_header X-Powered-By;
#
    location = /robots.txt {
        allow all;
        log_not_found off;
        access_log off;
    }
# The following 2 rules are only needed for the user_webfinger app.
# Uncomment it if you're planning to use this app.
#rewrite ^/.well-known/host-meta /public.php?service=host-meta last;
#rewrite ^/.well-known/host-meta.json /public.php?service=host-meta-json
# last;
    location = /.well-known/carddav {
        return 301 $scheme://$host:$server_port/remote.php/dav;
    }
    location = /.well-known/caldav {
        return 301 $scheme://$host:$server_port/remote.php/dav;
    }
# Uncomment if your server is build with the ngx_pagespeed module
# This module is currently not supported.
#pagespeed off;
#
    location / {
        rewrite ^ /index.php;
    }
    location ~ ^\/(?:build|tests|config|lib|3rdparty|templates|data)\/ {
        deny all;
    }
    location ~ ^\/(?:\.|autotest|occ|issue|indie|db_|console) {
        deny all;
    }
    location ~ ^\/(?:index|remote|public|cron|core\/ajax\/update|status|ocs\/v[12]|updater\/.+|oc[ms]-provider\/.+)\.php(?:$|\/) {
        fastcgi_split_path_info ^(.+?\.php)(\/.*|)$;
        try_files $fastcgi_script_name =404;
        include fastcgi_params;
        fastcgi_param SCRIPT_FILENAME $document_root$fastcgi_script_name;
        fastcgi_param PATH_INFO $fastcgi_path_info;
        fastcgi_param HTTPS on;
# Avoid sending the security headers twice
        fastcgi_param modHeadersAvailable true;
# Enable pretty urls
        fastcgi_param front_controller_active true;
        fastcgi_pass php-handler;
        fastcgi_intercept_errors on;
        fastcgi_request_buffering off;
    }
    location ~ ^\/(?:updater|oc[ms]-provider)(?:$|\/) {
        try_files $uri/ =404;
        index index.php;
    }
# Adding the cache control header for js, css and map files
# Make sure it is BELOW the PHP block
    location ~ \.(?:css|js|woff2?|svg|gif|map)$ {
        try_files $uri /index.php$request_uri;
        add_header Cache-Control "public, max-age=15778463";
# Add headers to serve security related headers (It is intended to
# have those duplicated to the ones above)
# Before enabling Strict-Transport-Security headers please read into
# this topic first.
#add_header Strict-Transport-Security "max-age=15768000; includeSubDomains; preload;";
#
# WARNING: Only add the preload option once you read about
# the consequences in https://hstspreload.org/. This option
# will add the domain to a hardcoded list that is shipped
# in all major browsers and getting removed from this list
# could take several months.
        add_header X-Content-Type-Options nosniff;
        add_header X-XSS-Protection "1; mode=block";
        add_header X-Robots-Tag none;
        add_header X-Download-Options noopen;
        add_header X-Permitted-Cross-Domain-Policies none;
        add_header Referrer-Policy no-referrer;
        add_header X-Frame-Options SAMEORIGIN;
# Optional: Don't log access to assets
        access_log off;
    }
    location ~ \.(?:png|html|ttf|ico|jpg|jpeg)$ {
        try_files $uri /index.php$request_uri;
# Optional: Don't log access to other assets
        access_log off;
    }
}
cd /var/www/html

wget https://download.nextcloud.com/server/releases/nextcloud-16.0.3.tar.bz2

解壓
tar -jxvf nextcloud-16.0.3.tar.bz2

建立 data 目錄
mkdir nextcloud/data

權限
chown -R nginx:nginx nextcloud
vim /var/www/html/nextcloud/config/config.php,這裡要新增加信任的網域及內網的 IP,如果未來有設要跟 NextCloud 結合會建在這裡增網域及 IP 'trusted_domains' =>
array (
0 => '[sub.domain].com',
1 => '192.168.1.41',
),
https://您的服務網址
SQLite 版本,我們要修改成 MariaDB 版本
MySQL/MariaDB

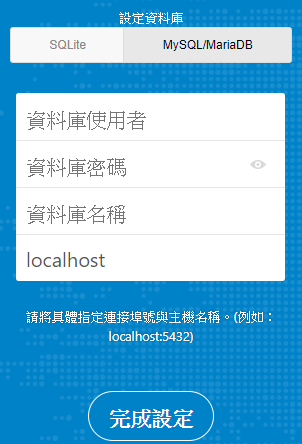
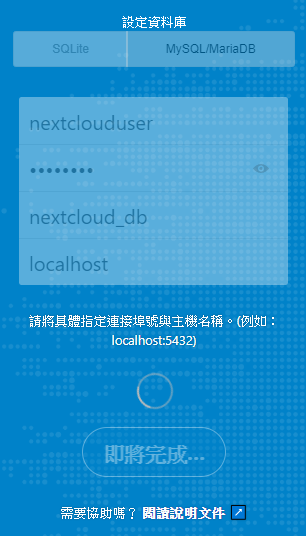
NexctCloud 的頁面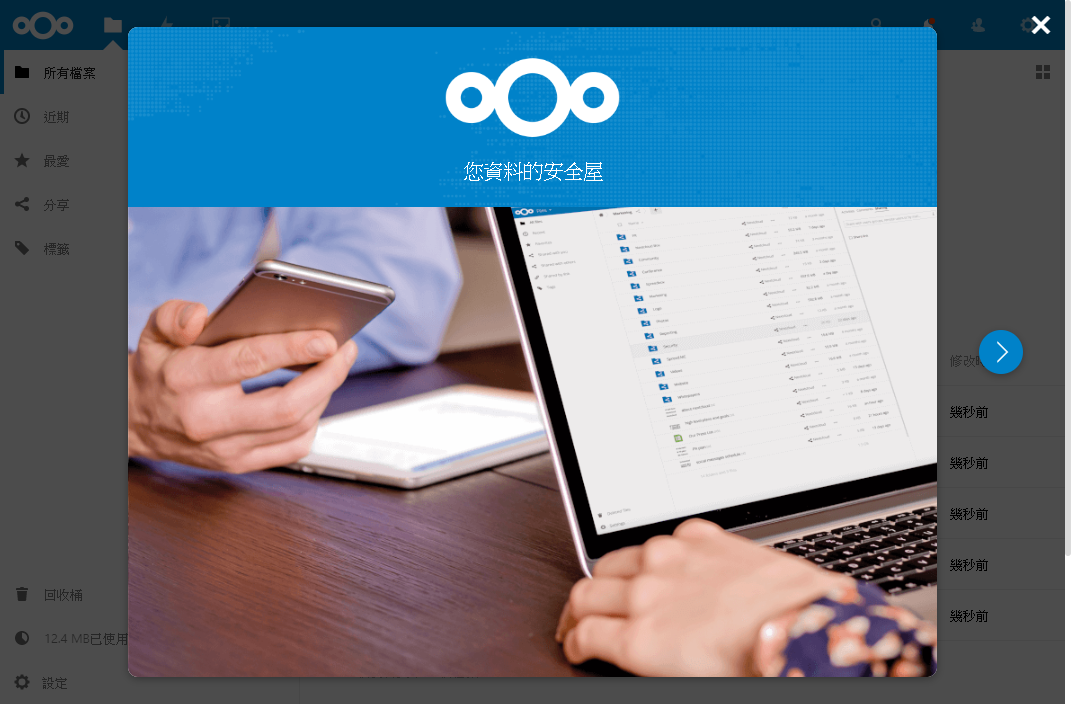


 iThome鐵人賽