本章繼續延續View端的介紹,來談談Partial View與ViewComponent這兩個在View端最常使用的共用頁面吧。
Partial View
主要作用是,在不同的View中,可以重複使用的HTML,其命名通常習慣以底線(underline)來命名,大多都會放在/Views/Shared資料夾底下。
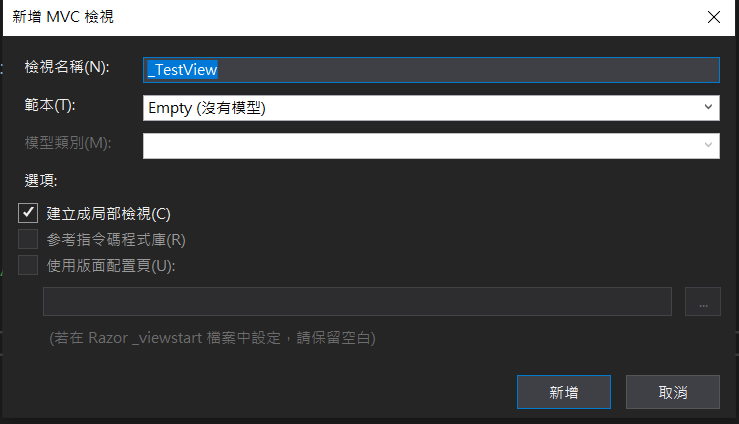
接著來新增一個看看
Shared資料夾底下->右鍵點選新增->檢視
_PartialView頁面,我們設計印出一串list試試看,由於是從Index導頁,所以我們要在這個Action準備好餵給PartialView的資料才行
Controller如下:
        public IActionResult Index()
        {
            List<Comment> data = new List<TestModel> {
         new TestModel { Id = 100, Subject = "A" },
         new TestModel { Id = 200, Subject = "B" },
         new TestModel { Id = 300, Subject = "C" }
       };
            return View(data);
        }
@model IEnumerable<IronMan.Models.TestModel>

@{
    Layout = null;
}

<!DOCTYPE html>

<html>
<head>
    <meta name="viewport" content="width=device-width" />
    <title>TestPartialView</title>
</head>
<body>
    <h1>TestPartialView</h1>
    @*<ul>
            @foreach (var item in Model)
            {
                <li>@item.Id, @item.Subject</li>
            }
        </ul>*@
    <!--以MVC5方法呼叫寫法-->
    @Html.Partial("_TestView")

    <!--也可以寫成非同步方式-->
    @await Html.PartialAsync("_TestView")

    <!--也可以寫成指定路徑非同步方式-->
    @await Html.PartialAsync("~/views/shared/_TestView.cshtml")

    <!--Tag Helper也是沒問題-->
    <partial name="_TestView" />

    <!--Tag Helper指定路徑也是沒問題-->
    <partial name="~/views/shared/_TestView.cshtml" />
</body>
</html>
接著,主頁要使用_PartialView
以@Html.Partial("_TestView")呼叫,注意要在頁面準備好model接收資料
@model IEnumerable<IronMan.Models.TestModel>
@{
    Layout = null;
}

<!DOCTYPE html>

<html>
<head>
    <meta name="viewport" content="width=device-width" />
    <title>主頁</title>
</head>
<body>
    <h1>GetPartialView</h1>
    @Html.Partial("_TestView")
</body>
</html>
ViewComponent
接著來介紹ViewComponent,他主要是為了取代舊版MVC5的Html.Action,非常像PartialView,但提供了更多功能,但最大的不同為,不提供Model Binding,資料由呼叫時決定,通常會從Layout呼叫。
有幾項注意事項必須要知道
綜合以上,我其實比較喜歡ViewComponent這個設定-不依附Controller的生命週期(資料準備不用要伴隨Controller一起),因為以前在使用PartialView時,我必須在呼叫的Controller準備好PartialView要用的資料,整個Controller就會顯得超肥,而且十分不好維護,但若使用ViewComponent,我們的耦合度就鬆散,可以自行管控,所以十分推薦使用ViewComponent,要使用 ViewComponent,必須在.cshtml最上方加入@addTagHelper *,這個其實在我們之前的ViewImport有加入過了。
預設搜尋路徑:
Views/xxxController/Components/xxxViewComponent/View名稱.cshtml
Views/Shared/Components/xxxViewComponent/View名稱.cshtml
呼叫方式:
@await Component.InvokeAsync("View名稱")

<!--vc代表ViewComponent-->
<vc:ViewComponent名稱></vc:ViewComponent名稱>
接著,將上面PartialView的範例,改成ViewComponent看看吧。
Controller如下:
        public IActionResult Index()
        {
            return View();
        }
新增ViewComponent類別:
using Microsoft.AspNetCore.Mvc;
using IronMan.Models;
using System;
using System.Collections.Generic;
using System.Linq;
using System.Threading.Tasks;

namespace IronMan.ViewComponents
{
    public class TestViewComponent : ViewComponent
    {
        public async Task<IViewComponentResult> InvokeAsync()
        {
            List<TestModel> data = new List<TestModel> {
              new TestModel{Id=100,Subject="A"},
              new TestModel{Id=200,Subject="B"},
              new TestModel{Id=300,Subject="C"}
            };

            return View(data);
        }
    }
}
主頁面呼叫ViewComponent:
@{
    Layout = null;
}

<!DOCTYPE html>

<html>
<head>
    <meta name="viewport" content="width=device-width" />
    <title>Index</title>
</head>
<body>
    <h1>Test</h1>
    @await Component.InvokeAsync("TestViewComponent")
    <vc:test></vc:test>
</body>
</html>
是不是輕便許多,不用再把Controller寫的肥大。
參考資料
https://docs.microsoft.com/zh-tw/aspnet/core/mvc/views/view-components?view=aspnetcore-3.1
