在先前,我們藉由 Firebase 提供的方法,將我們取得的所有文章全部丟到 posts 裡面讓 Vue 來渲染我們的文章列表,接下來我們要來處理使用者點擊進去的畫面。
現在先讓我們來稍微想想,要怎麼製作這個頁面。
由於我們當初在上傳文章時用的是這樣的方式 ( add ):
db.collection('posts').add(data).then(res => {
  console.log('新增文章成功')
}).catch(res => {
  console.log('新增文章失敗')
})
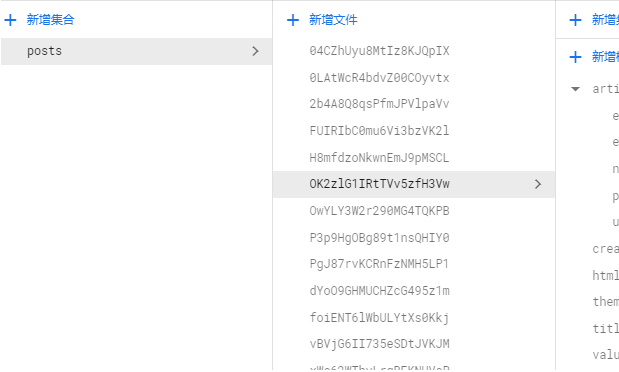
這樣的方式會讓 document 生成隨機的雜湊碼,這樣有一個好處,就是可以讓我們的每一筆文章資訊都有唯一的識別 id ,而這個 id 值,當我們使用 Firebase 的 get 方法一次取得所有集合內的 doc 時,就可以一併獲得,我們已經用這樣的方式在 v-for 渲染 posts 並為每次渲染綁上獨有的 id 值了,還記得嗎 ?
不想讓他為隨機的雜湊碼,如果你有自己實驗過其他更新資料的方式的話,應該知道就是我們要指定 doc 傳入的引數。
像這樣,後續對他進行資料的上傳或更新,就會看見 doc id 會是 james 了。
var docRef = db.collection('lebron').doc('james')
現在我們知道 posts collection 的 doc 上面,每筆文章資訊都包含獨一無二的 id 值了,接下來準備對頁面進行改寫。
第一步,為避免後續檔名相近,我們先把原本 Articles.vue 檔案名稱改為 ArticleList.vue,並把 Home.vue、router/index.js 內的所有 Articles.vue 的引用通通都改過來,現在我們負責顯示所有文章列表的組件名稱要叫做 ArticleList.vue。
App.vue:
<template>
  <b-container class="pageHome">
    <b-row>
      <b-col cols="9"><ArticleList/></b-col>
      <b-col cols="3"><Recently/></b-col>
    </b-row>
  </b-container>
</template>

<script>
// @ is an alias to /src
import ArticleList from '@/components/ArticleList.vue'
import Recently from '@/components/Recently.vue'

export default {
  name: 'Home',
  components: {
    ArticleList,
    Recently
  }
}
</script>
第二步,在 components 下新增 ArticlePage.vue 檔案,負責當點進去後的文章載體,接著在 router/index.js 內加入新的內容,這邊使用的是 動態路由,請看下方程式碼的註解解說,如果不明瞭的話請留言或者有時間再做小範例。
const routes = [
  {
    path: '/',
    name: 'Home',
    component: Home
  },
  {
    path: '/about',
    name: 'About',
    // route level code-splitting
    // this generates a separate chunk (about.[hash].js) for this route
    // which is lazy-loaded when the route is visited.
    component: () => import(/* webpackChunkName: "about" */ '../views/About.vue')
  },
  {
    path: '/login',
    name: 'Login',
    component: () => import('../views/Login.vue')
  },
  {
    path: '/backend',
    name: 'Backend',
    component: () => import('../views/Backend.vue'),
    children: [
      {
        path: 'article_editor',
        name: 'ArticleEditor',
        component: () => import('../components/ArticleEditor.vue')
      }
    ]
  },
  // :articleId 的部分是動態路由,也就是 :articleId 的部分是動態的,
  // (名稱也是自己取的,取一個別人看得懂有意義的名稱,加個冒號就是動態的了)
  // 我們所指定的動態路由不論值為何,都會使用 ArticlePage.vue 這個組件。

	// 而我們這邊的 :articleId 意義也很鮮明,我們會指定這個位置是文章的 id 值,也就是 doc id。
  // 動態路由的key(articleId),當進到頁面時,會自動跑到 $route.params 內,值會是我們指定的網址名稱的值,
  // 也就是說當每次頁面的動態值都不一樣時,$route.params 值也會更新。

	// 比如說'/article/lebron'
	// 比如說'/article/james'
	// 通通都會使用 ArticlePage.vue
	// 並且頁面內 $route.params 的 articleId 分別會是 lebron、james

  // 所以我們可以利用這個值,向 Firebase 請求特定文章的資料。

	{
    path: '/article/:articleId',
    name: 'ArticlePage',
    component: () => import('../components/ArticlePage.vue')
  }
]
準備好路由設定,接下來開始準備點擊和另一個頁面的處理。
ArticleList.vue:
先讓我們的繼續閱讀文本也隨著 v-for 帶上該次文章的 id 值,並在外面 div 綁上 click。
<div class="goto" @click="gotoArticle">
    <p :data-articleId="article.id"> >> 繼續閱讀</p>
</div>
方法用 { target } 接出來,去找這次點擊的 target ,我們為他每次設置的 data attribute 值去和 posts 進行過濾,我們只取出我們要的那一篇唯一的 " id 相同的那組文章資訊 (物件) ",最後指定我們要前往的頁面就是代表該文章 id 的頁面 ( push )。
gotoArticle ({ target }) {
  const targetArticle = this.posts.find(ele => {
    return target.dataset.articleid === ele.id
  })
  // console.log(targetArticle)
  this.$router.push(`/article/${targetArticle.id}`)
}
全部 :
<template>
  <div class="article__blocks">
    <div class="article__blocks__block" v-for="article in posts" :key="article.id">
      <div class="article__blocks__block_title">
        <h3>{{ article.title }}</h3>
      </div>
      <div class="article__blocks__block_content">
        <p>{{ article.stopOnMore }}</p>
      </div>
      <div class="goto" @click="gotoArticle">
        <p :data-articleId="article.id"> >> 繼續閱讀</p>
      </div>
    </div>
  </div>
</template>

<script>
import { db } from '../Model/FirebaseModel.js'
export default {
  name: 'ArticleList',
  props: {
    msg: String
  },
  created () {
    const self = this
    db.collection('posts').orderBy('createdAt', 'desc').get().then(function (querySnapshot) {
      querySnapshot.forEach(function (doc) {
        // doc.data() is never undefined for query doc snapshots
        // console.log(doc.id, ' => ', doc.data())
        const data = doc.data()
        data.id = doc.id
        self.posts.push(data)
        // console.log(data)
      })
    })
  },

  data () {
    return {
      posts: [
      ]
    }
  },

  methods: {
    gotoArticle ({ target }) {
      const targetArticle = this.posts.find(ele => {
		    return target.dataset.articleid === ele.id
		  })
      this.$router.push(`/article/${targetArticle.id}`)
    }
  }
}
</script>
當我們 push 到該網址後,注意這個值 ${targetArticle.id} ,由於它的位置是我們設置動態 id 的位置,所以 thiis.$route.params 中,就會看見他的身影,現在讓我們點隨便一篇文章進去 ( 別忘了是 ArticlePage.vue 負責渲染 ),接著我們在組件檔內先查看$route 變數。
ArticlePage.vue 內
created () {
  console.log(this)
}
看見我們動態路由的 params 變數,而裡面的值就是我們網址上文章的 id 值
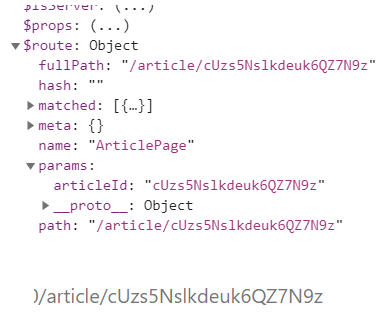
所以這邊驗證了當初給路由設置成動態路由時,articleId 的部分是 key,值就是對應的網址字串。
path: '/article/:articleId'
所以我們就可以很輕易地利用 this.$route.params.articleId 的文章 id 值去取得相對應在資料庫中的 doc id。
所以現在我們可以簡單先把 ArticlePage.vue 的內容修改成如下,讓我們一進到頁面在 created 階段取得文章資料:
<template>
  <b-container fluid>
    <b-row>
      <b-col cols="8" offset="2">
        <div class="article">
          <div class="content__header">
            <h3>{{ articleInfo.title }}</h3>
            <p>文章作者: {{ articleInfo.userInfo.email }}</p>
            <p>上傳時間: {{ articleInfo.createdAt }}</p>
          </div>
          <div class="article__content" v-html="articleInfo.html"></div>
        </div>
      </b-col>
    </b-row>
  </b-container>
</template>

<script>
import { db } from '../Model/FirebaseModel.js'
export default {
  name: 'ArticlePage',
  data () {
    return {
			// articleId 在這裡: this.$route.params.articleId
      articleId: this.$route.params.articleId,
      articleInfo: {
        title: '',
        createdAt: '',
        userInfo: {
          email: ''
        }
      }
    }
  },
  created () {
		// this.articleId 就是我們要的特定 doc id 文章,已經透過動態路由的儲存變數取得了
    const articleRef = db.collection('posts').doc(this.articleId)
    articleRef.get().then((doc) => {
      if (doc.exists) {
        this.articleInfo = doc.data()
      } else {
        // doc.data() will be undefined in this case
        console.log('No such document!')
      }
    }).catch(function (error) {
      console.log('Error getting document:', error)
    })
  }
}
</script>

<style lang="scss" scoped>
// 請自行發揮CSS的部分

</style>
現在你可以點進去文章,然後獲得文章資料了,只要資料有出來,後面的思路可以了解的話,各位就可以自行建構頁面,並且有了資料,就可以自己進行版面配置和 CSS 啦哈哈 XD,我設計啥的不行啊 QQ,反整有資料了版面啥的就自己發揮吧哈哈。
沒事也可以逛逛我們其他團隊成員的文章啦 ~~
eien_zheng: 前端小嘍嘍的Golang學習旅程_The journey of learning Golang 系列
PollyPO技術: 前端設計轉前端工程師-JS踩坑雜記 30 天 系列
阿電: 忍住不打牌位,只要30天VueJS帶你上A牌 系列
喬依司: 實作經典 JavaScript 30 系列


 iThome鐵人賽