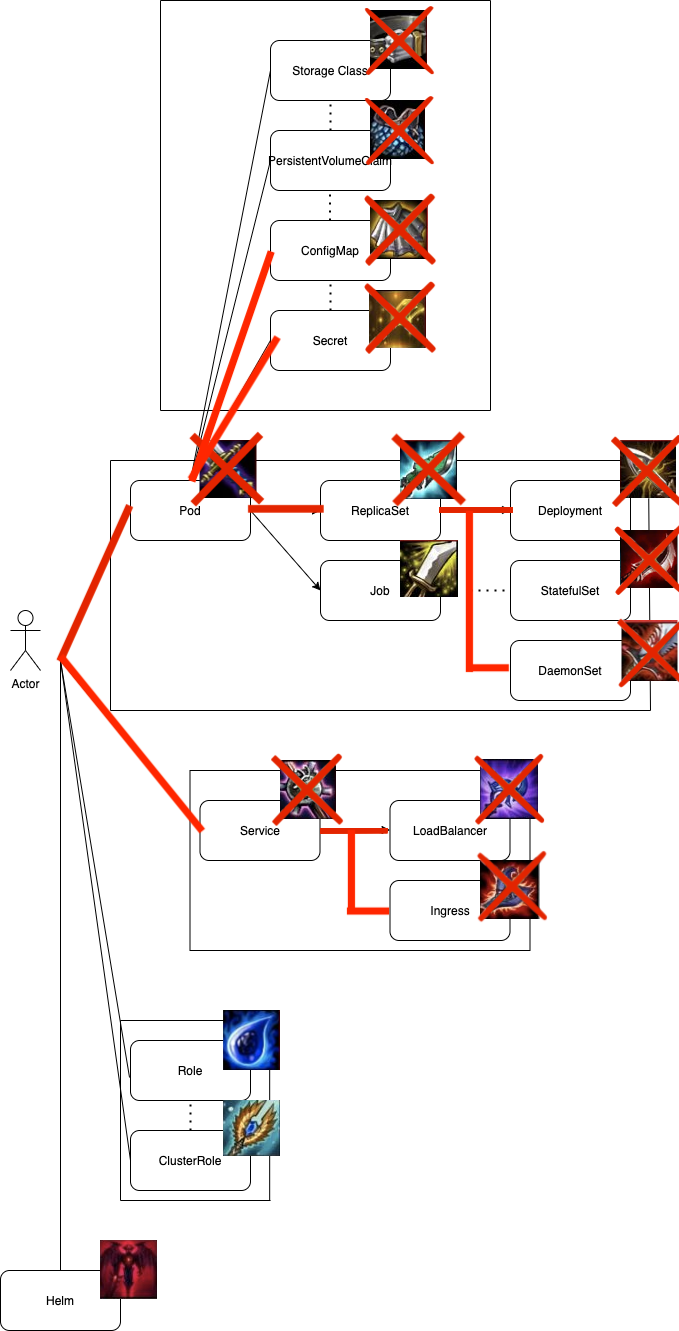
前面我們先介紹了Pod, 控管Pod的ReplicaSet與管理ReplicaSet的Deployment,也在前面章節解說了專門用於守護進程的DaemonSet,接下來則講述StatefulSet與其解決的問題。
大家在使用Pod時一定會遇到一個問題,每種Pod有著許許多多的類別,並且每個種類的Pod都會有著一個以上的replica,但當其他Pod與外界在聯繫該種類的Pod時,無法識別它們。
或許在大部分情況之下,每個Pod都有著相同資料並執行著一樣的任務,但還是會遇到某些情形每個Pod需要有能夠識別彼此的識別證,就像是在Kafka中每個Node都是獨一無二的。
基本上StatefulSet管理Pod的方式與Deployment無異,但唯一不同的地方只有在StatefulSet Controller會為每個Pod生成獨一無二的識別資訊,並且這些資訊不會因為re-schedule而改變。
要如何判斷何時該使用StatefulSet呢?
也因此StatefulSet適合用來部署Kafka、MySQL、Redis與ZooKeeper等需要唯一識別身份與主機名的服務,至於其他無狀態服務請使用deployment。
這裡我們以mongoDb為例,講述一次StatefulSet。
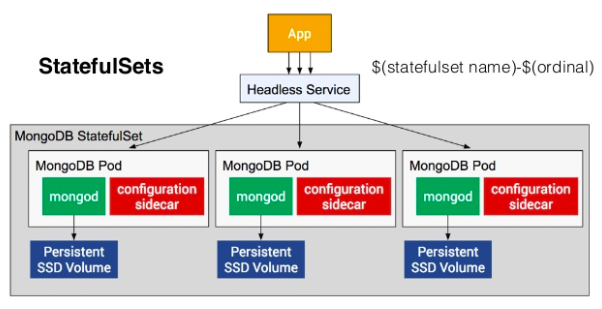
在Mongo Cluster當中,我們會需要
ssd.yaml
kind: StorageClass
apiVersion: storage.k8s.io/v1beta1
metadata:
  name: fast
provisioner: kubernetes.io/gce-pd
parameters:
  type: pd-ssd
| Type | Provisioner |
|---|---|
| AWS | kubernetes.io/aws-ebs |
| GCE | kubernetes.io/gce-pd |
| Glusterfs | kubernetes.io/glusterfs |
| OpenStack Cinder | kubernetes.io/cinder |
| vSphere | kubernetes.io/vsphere-volume |
| Ceph RBD | kubernetes.io/rbd |
| Quobyte | kubernetes.io/quobyte |
| Azure disk | kubernetes.io/azure-disk |
| Azure file | kubernetes.io/azure-file |
| Portworx | kubernetes.io/portworx-volume |
| ScaleIO | kubernetes.io/scaleio |
想知道更多詳細資訊請參照 https://k8smeetup.github.io/docs/concepts/storage/storage-classes/#gce
hhd.yaml
kind: StorageClass
apiVersion: storage.k8s.io/v1beta1
metadata:
  name: slow
provisioner: kubernetes.io/gce-pd
parameters:
  type: pd-standard
statefulset.yaml
apiVersion: apps/v1
kind: StatefulSet
metadata:
  name: mongo
spec:
  selector:
    matchLabels:
      role: mongo
      environment: test
  serviceName: "mongo"
  replicas: 3
  template:
    metadata:
      labels:
        role: mongo
        environment: test
    spec:
      terminationGracePeriodSeconds: 10
      containers:
        - name: mongo
          image: mongo:3.4
          command:
            - mongod
            - "--replSet"
            - rs0
            - "--bind_ip"
            - 0.0.0.0
            - "--smallfiles"
            - "--noprealloc"
          ports:
            - containerPort: 27017
          volumeMounts:
            - name: mongo-persistent-storage
              mountPath: /data/db
        - name: mongo-sidecar
          image: cvallance/mongo-k8s-sidecar
          env:
            - name: MONGO_SIDECAR_POD_LABELS
              value: "role=mongo,environment=test"
  volumeClaimTemplates:
  - metadata:
      name: mongo-persistent-storage
      annotations:
        volume.beta.kubernetes.io/storage-class: "fast"
    spec:
      accessModes: [ "ReadWriteOnce" ]
      resources:
        requests:
          storage: 100Gi
這邊只講述deployment章節未提及的部分,若需要複習者請參考
headless-service.yaml
apiVersion: v1
kind: Service
metadata:
  name: mongo
  labels:
    name: mongo
spec:
  ports:
  - port: 27017
    targetPort: 27017
  clusterIP: None
  selector:
    role: mongo
$ kubectl apply -f ssd.yaml
storageclass.storage.k8s.io/fast created

$ kubectl apply -f hhd.yaml
storageclass.storage.k8s.io/slow created
$ kubectl apply -f statefulset.yaml
statefulset.apps/mongo created
$ kubectl apply -f headless-service.yaml
service/mongo created
我們可以透過GKE的控制台看到這些service都在創立,並且也顯示在了前台


我們先去cluster中第一個mongodb查看資訊
$ kubectl exec -it mongo-0 mongo
Defaulting container name to mongo.
Use 'kubectl describe pod/mongo-0 -n default' to see all of the containers in this pod.
MongoDB shell version v3.4.24
connecting to: mongodb://127.0.0.1:27017
MongoDB server version: 3.4.24
Welcome to the MongoDB shell.
For interactive help, type "help".
For more comprehensive documentation, see
        http://docs.mongodb.org/
Questions? Try the support group
        http://groups.google.com/group/mongodb-user
Server has startup warnings:
2020-10-10T12:54:28.505+0000 I STORAGE  [initandlisten]
2020-10-10T12:54:28.506+0000 I STORAGE  [initandlisten] ** WARNING: Using the XFS filesystem is strongly recommended with the WiredTiger storage engine
2020-10-10T12:54:28.506+0000 I STORAGE  [initandlisten] **          See http://dochub.mongodb.org/core/prodnotes-filesystem
2020-10-10T12:54:28.586+0000 I CONTROL  [initandlisten]
2020-10-10T12:54:28.586+0000 I CONTROL  [initandlisten] ** WARNING: Access control is not enabled for the database.
2020-10-10T12:54:28.586+0000 I CONTROL  [initandlisten] **          Read and write access to data and configuration is unrestricted.
2020-10-10T12:54:28.586+0000 I CONTROL  [initandlisten] ** WARNING: You are running this process as the root user, which is not recommended.
2020-10-10T12:54:28.587+0000 I CONTROL  [initandlisten]
> rs.initiate()
{
        "info2" : "no configuration specified. Using a default configuration for the set",
        "me" : "mongo-0:27017",
        "ok" : 1
}
rs0:OTHER> rs.conf()
{
        "_id" : "rs0",
        "version" : 1,
        "protocolVersion" : NumberLong(1),
        "members" : [
                {
                        "_id" : 0,
                        "host" : "mongo-0:27017",
                        "arbiterOnly" : false,
                        "buildIndexes" : true,
                        "hidden" : false,
                        "priority" : 1,
                        "tags" : {

                        },
                        "slaveDelay" : NumberLong(0),
                        "votes" : 1
                }
        ],
        "settings" : {
                "chainingAllowed" : true,
                "heartbeatIntervalMillis" : 2000,
                "heartbeatTimeoutSecs" : 10,
                "electionTimeoutMillis" : 10000,
                "catchUpTimeoutMillis" : 60000,
                "getLastErrorModes" : {

                },
                "getLastErrorDefaults" : {
                        "w" : 1,
                        "wtimeout" : 0
                },
                "replicaSetId" : ObjectId("5f81b283e49202849539609a")
        }
}
再來去第二個mongo db看看
kubectl exec -ti mongo-1 mongo
Defaulting container name to mongo.
Use 'kubectl describe pod/mongo-1 -n default' to see all of the containers in this pod.
MongoDB shell version v3.4.24
^[[Aconnecting to: mongodb://127.0.0.1:27017
MongoDB server version: 3.4.24
Welcome to the MongoDB shell.
For interactive help, type "help".
For more comprehensive documentation, see
        http://docs.mongodb.org/
Questions? Try the support group
        http://groups.google.com/group/mongodb-user
Server has startup warnings:
2020-10-10T12:55:06.160+0000 I STORAGE  [initandlisten]
2020-10-10T12:55:06.160+0000 I STORAGE  [initandlisten] ** WARNING: Using the XFS filesystem is strongly recommended with the WiredTiger storage engine
2020-10-10T12:55:06.160+0000 I STORAGE  [initandlisten] **          See http://dochub.mongodb.org/core/prodnotes-filesystem
2020-10-10T12:55:06.227+0000 I CONTROL  [initandlisten]
2020-10-10T12:55:06.227+0000 I CONTROL  [initandlisten] ** WARNING: Access control is not enabled for the database.
2020-10-10T12:55:06.227+0000 I CONTROL  [initandlisten] **          Read and write access to data and configuration is unrestricted.
2020-10-10T12:55:06.227+0000 I CONTROL  [initandlisten] ** WARNING: You are running this process as the root user, which is not recommended.
> rs.initiate()
{
        "info2" : "no configuration specified. Using a default configuration for the set",
        "me" : "mongo-1:27017",
        "ok" : 1
}
rs0:OTHER> rs.conf()
{
        "_id" : "rs0",
        "version" : 1,
        "protocolVersion" : NumberLong(1),
        "members" : [
                {
                        "_id" : 0,
                        "host" : "mongo-1:27017",
                        "arbiterOnly" : false,
                        "buildIndexes" : true,
                        "hidden" : false,
                        "priority" : 1,
                        "tags" : {

                        },
                        "slaveDelay" : NumberLong(0),
                        "votes" : 1
                }
        ],
        "settings" : {
                "chainingAllowed" : true,
                "heartbeatIntervalMillis" : 2000,
                "heartbeatTimeoutSecs" : 10,
                "electionTimeoutMillis" : 10000,
                "catchUpTimeoutMillis" : 60000,
                "getLastErrorModes" : {

                },
                "getLastErrorDefaults" : {
                        "w" : 1,
                        "wtimeout" : 0
                },
                "replicaSetId" : ObjectId("5f81b369ce23c2ce910e02d1")
        }
}
我們可以看到兩個mongoDB有著不同的host與id,這也表示我們成功了。
當replica數目大於1時,statefulSet會與deployment不同,statefulSet中的pod會同步且有順序的逐一產生。產生的流程如下:
$ kubectl get pod
mongo-0                    2/2     Running   0          27m
mongo-1                    2/2     Running   0          26m
mongo-2                    2/2     Running   0          26m
$ kubectl scale --replicas=5 statefulset mongo
statefulset.apps/mongo scaled
$ kubectl get pod --watch
NAME                       READY   STATUS              RESTARTS   AGE
mongo-0                    2/2     Running             0          28m
mongo-1                    2/2     Running             0          27m
mongo-2                    2/2     Running             0          27m
mongo-3                    0/2     ContainerCreating   0          10s
mongo-3                    2/2     Running             0          16s
mongo-4                    0/2     Pending             0          0s
mongo-4                    0/2     Pending             0          0s
mongo-4                    0/2     Pending             0          5s
mongo-4                    0/2     ContainerCreating   0          5s
mongo-4                    2/2     Running             0          19s
我們可以發現當mongo statefulset scaling up時,pod數目確實會照順序產生並運行。
與產生相同,刪除時也是有順序性的,但是他會反性刪除,意指從pod-2 —> pod-1 —> pod-0刪除。
Each pod in a StatefulSet backed by a Headless Service will have a stable DNS name. The template follows this format: .
This means the DNS names for the MongoDB replica set are:
mongo-0.mongo
mongo-1.mongo
mongo-2.mongo
We can use these names directly in the connection string URI of our app.
Using a database is outside the scope of this post, however for this case, the connection string URI would be:
"mongodb://mongo-0.mongo,mongo-1.mongo,mongo-2.mongo:27017/dbname_?"
本篇章所有程式碼將放在下面的github project當中的branch day-27
這章節我們學會了運用StatefulSet,這也讓我們以後想部署類似Kafka、ZooKeeper或是Cluster類型的Database都有了方法,並且配合著StorageClass與PVC來持續化地保存資料。
https://kubernetes.io/docs/concepts/workloads/controllers/statefulset/