從前面的章節中我們知道,Pod是由多個Containers所共用同個環境所生成,並且Pod時時刻刻狀態都有可能變化,也就是說Pod並沒有所謂的持續性,它是暫時的執行個體,也因此我們會遇到一個問題,那就是Pod內、Container內的資料會隨著Pod的消失而一併逝去。
也因此Kubernetes提供了許許多多的Solutions來解決這些問題。
我們在Docker與Docker-Compose的章節已經學會並運用了volume,也知道volume能夠幫助我們將Container內的資料給掛載出來。那Kubernetes的volume也一樣,它能夠將Container內的資料(創造)掛載到Container外,也就是Pod上。
這邊我們一樣用先前的deployment來說明:
deployment.yaml
apiVersion: apps/v1
kind: Deployment
metadata:
  name: ironman
  labels:
    name: ironman
    app: ironman
spec:
  minReadySeconds: 5
  strategy:
    type: RollingUpdate
    rollingUpdate:
      maxSurge: 1
      maxUnavailable: 1
  selector:
    matchLabels:
      app: ironman
  replicas: 1
  template:
    metadata:
      labels:
        app: ironman
    spec:
      containers:
       - name: ironman
         image: ghjjhg567/ironman:latest
         imagePullPolicy: Always
         ports:
           - containerPort: 8100
         resources:
           limits:
             cpu: "1"
             memory: "2Gi"
           requests:
             cpu: 500m
             memory: 256Mi
         envFrom:
           - secretRef:
               name: ironman-config
         command: ["./docker-entrypoint.sh"]
       - name: redis
         image: redis:4.0
         imagePullPolicy: Always
         ports:
           - containerPort: 6379
       - name: nginx
         image: nginx
         imagePullPolicy: Always
         ports:
           - containerPort: 80
         volumeMounts:
           - mountPath: /etc/nginx/nginx.conf
             name: nginx-conf-volume
             subPath: nginx.conf
             readOnly: true
           - mountPath: /etc/nginx/conf.d/default.conf
             subPath: default.conf
             name: nginx-route-volume
             readOnly: true
         readinessProbe:
           httpGet:
             path: /v1/hc
             port: 80
           initialDelaySeconds: 5
           periodSeconds: 10
      volumes:
        - name: nginx-conf-volume
          configMap:
            name: nginx-config
        - name: nginx-route-volume
          configMap:
            name: nginx-route-volume
volumes: 我會create volume並引用已經創建好的configMap
volumes:
  - name: redis-storage
    emptyDir: {}
volumeMounts: 掛載相關資訊
上述的Volume,雖然已經將Container內的資料給掛載出來,但依然無法避免與Pod共存的命運。也因此我們將介紹PersistentVolume來解決這個困境。
持久性的儲存空間,對用戶設置的PVC 申請屏蔽後端存儲的細節,一方面減輕用戶對於存儲資源細節的關注,另一方面也減輕了管理員手工管理PV 的工作,由系統自動完成PV 的創建和綁定,實現了動態的資源供應。使用基於StorageClass 的動態資源供應模式將逐步成為雲平台的標準存儲配置模式。
ssd.yaml
kind: StorageClass
apiVersion: storage.k8s.io/v1beta1
metadata:
  name: fast
provisioner: kubernetes.io/gce-pd
parameters:
  type: pd-ssd
| Type | Provisioner |
|---|---|
| AWS | kubernetes.io/aws-ebs |
| GCE | kubernetes.io/gce-pd |
| Azure disk | kubernetes.io/azure-disk |
| Azure file | kubernetes.io/azure-file |
| ..etc |
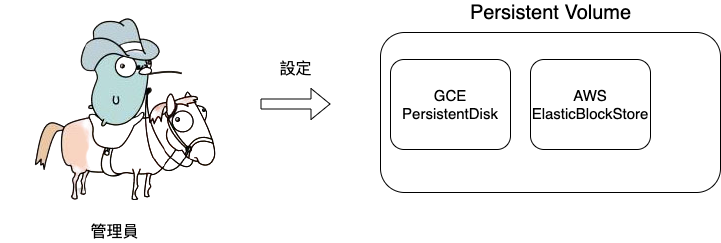
PersistentVolume是Kubernetes cluster當中專門用來儲存的物件,PersistentVolume透過API以及抽象化的的Interface讓使用者來操作它。
也就是說Persistent Volume是個提供虛擬化物件的儲存區,在PV中可能有著許多不同type的Volume,像是gcePersistentDisk、awsElasticBlockStore等。
也因為Persistent Volume是有別於Pod生命週期的物件,也因此在使用前必須先創建它。
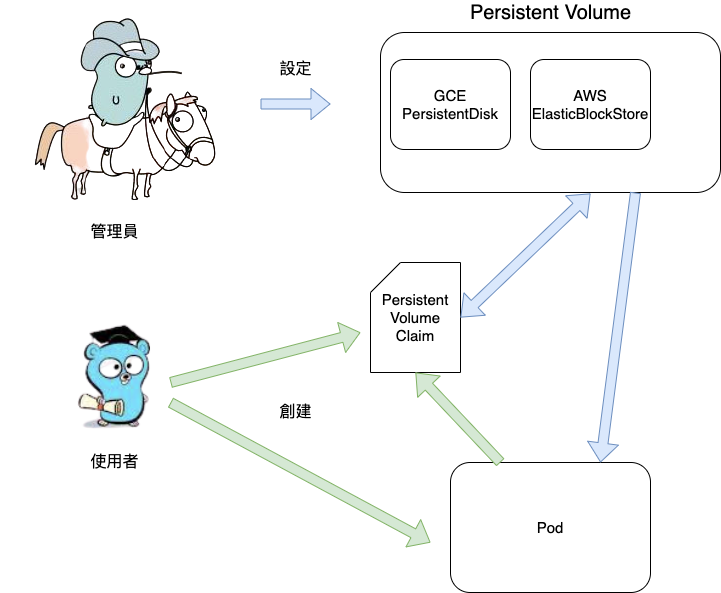
那在有了Persistent Volume後,我們要如何在Pod中使用它呢? 這時候就該我們的Persistent Volume Claim登場了!
何謂Persistent Volume Claim呢? Persistent Volume Claim有點像是Storage版本的Pod,透過綁定並消耗Persistent Volume資源來進行資料的儲存與使用,就像是Pod消耗Node的資源來運作一樣。
Pod可以請求特定級別的資源(CPU、Memory),PVC同樣也可與PV要求特定大小與訪問模式的PV。
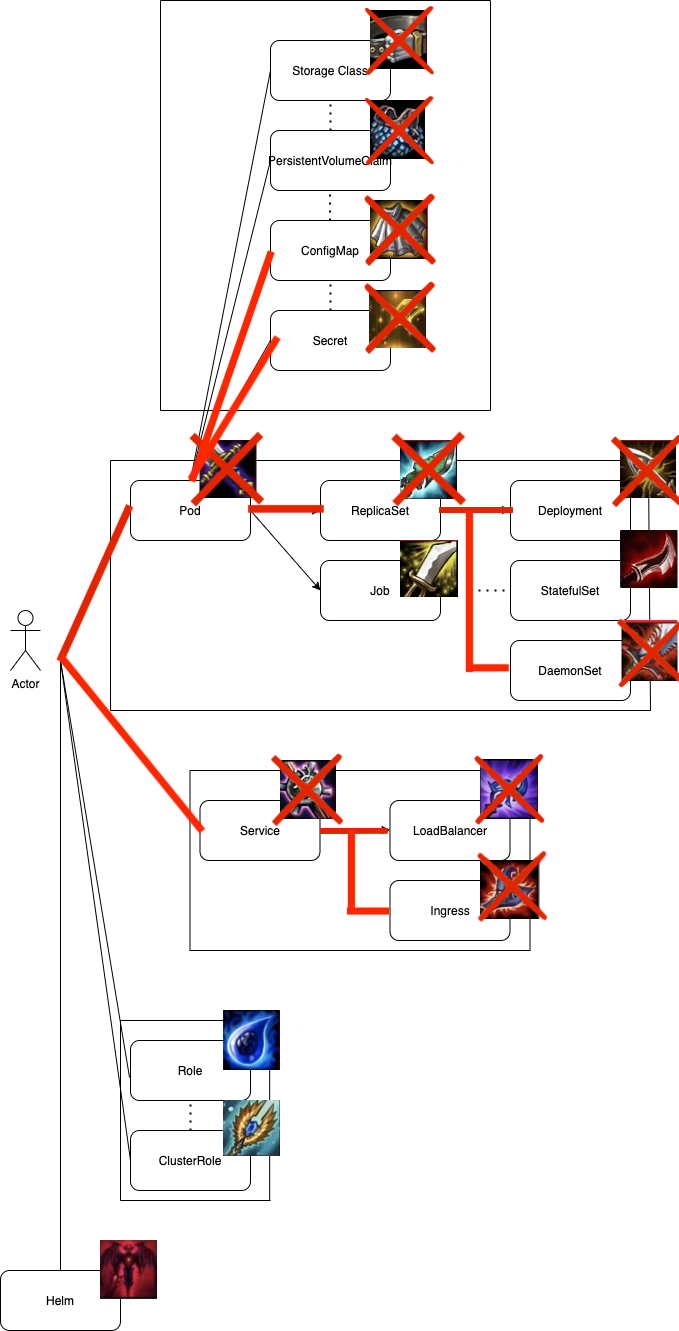
所以大概的架構圖會長這樣:
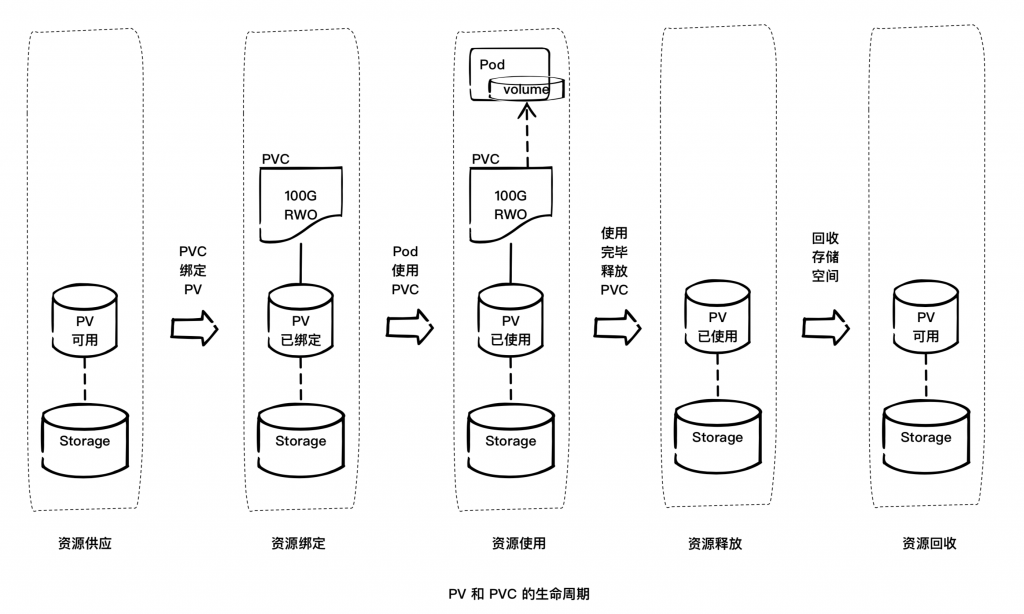
Kubernetes有著三種訪問儲存資源的方式,分別為直接訪問、靜態PV與動態PV
直接讓Pod得到Volume相關資訊,由Pod透過Node來訪問Volume
叢集管理者設定PV與其Storage type,之後便可以讓使用者透過建立的PVC來訪問Volume,上面所介紹的PV與PVC就是靜態PV訪問。

當管理員所建立的PV全部都無法匹配使用者的PVC時,Cluster可以動態地為PVC建立Volume。此配置基於StorageClass。PVC請求儲存類(StorageClass),並且管理員必須要建立並配置該StorageClass,該StorageClass才能進行動態的建立。

pv.yaml
apiVersion: v1
kind: PersistentVolume
metadata:
  name: pv
spec:
  capacity:
    storage: 5Gi
  volumeMode: Filesystem
  accessModes:
    - ReadWriteOnce
  persistentVolumeReclaimPolicy: Recycle
  storageClassName: fast
  mountOptions:
    - hard
    - nfsvers=4.1
  nfs:
    path: /tmp
    server: 172.17.0.2
pvc.yaml
apiVersion: v1
kind: PersistentVolumeClaim
metadata:
  name: pvc
spec:
  accessModes:
    - ReadWriteOnce
  volumeMode: Filesystem
  resources:
    requests:
      storage: 5Gi
  storageClassName: fast
這邊的Key都與PV相似,就只說幾個要重點注意的地方
deployment.yaml
apiVersion: apps/v1
kind: Deployment
metadata:
  name: ironman
  labels:
    name: ironman
    app: ironman
spec:
  minReadySeconds: 5
  strategy:
    type: RollingUpdate
    rollingUpdate:
      maxSurge: 1
      maxUnavailable: 1
  selector:
    matchLabels:
      app: ironman
  replicas: 1
  template:
    metadata:
      labels:
        app: ironman
    spec:
      containers:
       - name: ironman
         image: ghjjhg567/ironman:latest
         imagePullPolicy: Always
         ports:
           - containerPort: 8100
         resources:
           limits:
             cpu: "1"
             memory: "2Gi"
           requests:
             cpu: 500m
             memory: 256Mi
         envFrom:
           - secretRef:
               name: ironman-config
         command: ["./docker-entrypoint.sh"]
       - name: redis
         image: redis:4.0
         imagePullPolicy: Always
         ports:
           - containerPort: 6379
       - name: nginx
         image: nginx
         imagePullPolicy: Always
         ports:
           - containerPort: 80
         volumeMounts:
           - mountPath: /etc/nginx/nginx.conf
             name: nginx-conf-volume
             subPath: nginx.conf
             readOnly: true
           - mountPath: /etc/nginx/conf.d/default.conf
             subPath: default.conf
             name: nginx-route-volume
             readOnly: true
           - mountPath: "/var/www/html"
             name: mypd
         readinessProbe:
           httpGet:
             path: /v1/hc
             port: 80
           initialDelaySeconds: 5
           periodSeconds: 10
      volumes:
        - name: nginx-conf-volume
          configMap:
            name: nginx-config
        - name: nginx-route-volume
          configMap:
            name: nginx-route-volume
        - name: mypd
          persistentVolumeClaim:
            claimName: pvc
$ kubectl apply -f pv.yaml
persistentvolume/pv created

$ kubectl get pv
NAME     CAPACITY   ACCESS MODES   RECLAIM POLICY   STATUS      CLAIM         STORAGECLASS   REASON   AGE
pv       5Gi        RWO            Recycle          Bound       default/pvc   fast                    9m4s
$ kubectl apply -f pvc.yaml
persistentvolumeclaim/pvc created
$ kubectl get
NAME        STATUS        VOLUME                                     CAPACITY   ACCESS MODES   STORAGECLASS   AGE
pvc         Bound         pv                                         5Gi        RWO            fast           3s
$ kubectl apply -f deployment.yaml
deployment.apps/ironman created
$ kubectl describe deployment ironman
Name:                   ironman
Namespace:              default
CreationTimestamp:      Sun, 11 Oct 2020 13:08:59 +0800
Labels:                 app=ironman
                        name=ironman
Annotations:            deployment.kubernetes.io/revision: 1
                        kubectl.kubernetes.io/last-applied-configuration:
                          {"apiVersion":"apps/v1","kind":"Deployment","metadata":{"annotations":{},"labels":{"app":"ironman","name":"ironman"},"name":"ironman","nam...
Selector:               app=ironman
Replicas:               1 desired | 1 updated | 1 total | 0 available | 1 unavailable
StrategyType:           RollingUpdate
MinReadySeconds:        5
RollingUpdateStrategy:  1 max unavailable, 1 max surge
Pod Template:
  Labels:  app=ironman
  Containers:
   ironman:
    Image:      ghjjhg567/ironman:latest
    Port:       8100/TCP
    Host Port:  0/TCP
    Command:
      ./docker-entrypoint.sh
    Limits:
      cpu:     1
      memory:  2Gi
    Requests:
      cpu:     500m
      memory:  256Mi
    Environment Variables from:
      ironman-config  Secret  Optional: false
    Environment:      <none>
    Mounts:           <none>
   redis:
    Image:        redis:4.0
    Port:         6379/TCP
    Host Port:    0/TCP
    Environment:  <none>
    Mounts:       <none>
   nginx:
    Image:        nginx
    Port:         80/TCP
    Host Port:    0/TCP
    Readiness:    http-get http://:80/v1/hc delay=5s timeout=1s period=10s #success=1 #failure=3
    Environment:  <none>
    Mounts:
      /etc/nginx/conf.d/default.conf from nginx-route-volume (ro,path="default.conf")
      /etc/nginx/nginx.conf from nginx-conf-volume (ro,path="nginx.conf")
      /var/www/html from mypd (rw)
  Volumes:
   nginx-conf-volume:
    Type:      ConfigMap (a volume populated by a ConfigMap)
    Name:      nginx-config
    Optional:  false
   nginx-route-volume:
    Type:      ConfigMap (a volume populated by a ConfigMap)
    Name:      nginx-route-volume
    Optional:  false
   mypd:
    Type:       PersistentVolumeClaim (a reference to a PersistentVolumeClaim in the same namespace)
    ClaimName:  pvc
    ReadOnly:   false
Conditions:
  Type           Status  Reason
  ----           ------  ------
  Available      True    MinimumReplicasAvailable
  Progressing    True    ReplicaSetUpdated
OldReplicaSets:  ironman-6d598f45dd (1/1 replicas created)
NewReplicaSet:   <none>
Events:
  Type    Reason             Age   From                   Message
  ----    ------             ----  ----                   -------
  Normal  ScalingReplicaSet  5m3s  deployment-controller  Scaled up replica set ironman-6d598f45dd to 1
本篇章所有程式碼將放在下面的github project當中的branch day-26
這章節我們學習了Kubernetes用來持久性儲存的工具與空間,也就是StorageClass、PV以及PVC,那在下章節將介紹先前提及的StatefulSet,到時候大家也會了解為何要在StatefulSet前介紹Kubernetes Storage相關工具的理由。
https://itw01.com/VT2ZPED.html
https://wiki.shileizcc.com/confluence/display/KUB/Kubernetes+PV+and+PVC+Life+Cycle