到了這個章節大家可能會開始回想,剛開始聽到K8S時很多人都說Kubernetes的AutoScaling很厲害,亦或者是Kubernetes能夠幫使用者在Cloud上省下不少錢,但Kubernetes到底是如何這到這些事情的呢?這章節我們就是來探討此事。
在Kubernetes cluster當中,當叢集內部觸發了某些條件時,叢集會開始所謂的AutoScaling,但是這些AutoScaling又是有分層級的,分別為:
這本篇章會透過這三種層級的Scaling來探討Kubernetes是如何辦到這件事的,以及如何觸發這件事。
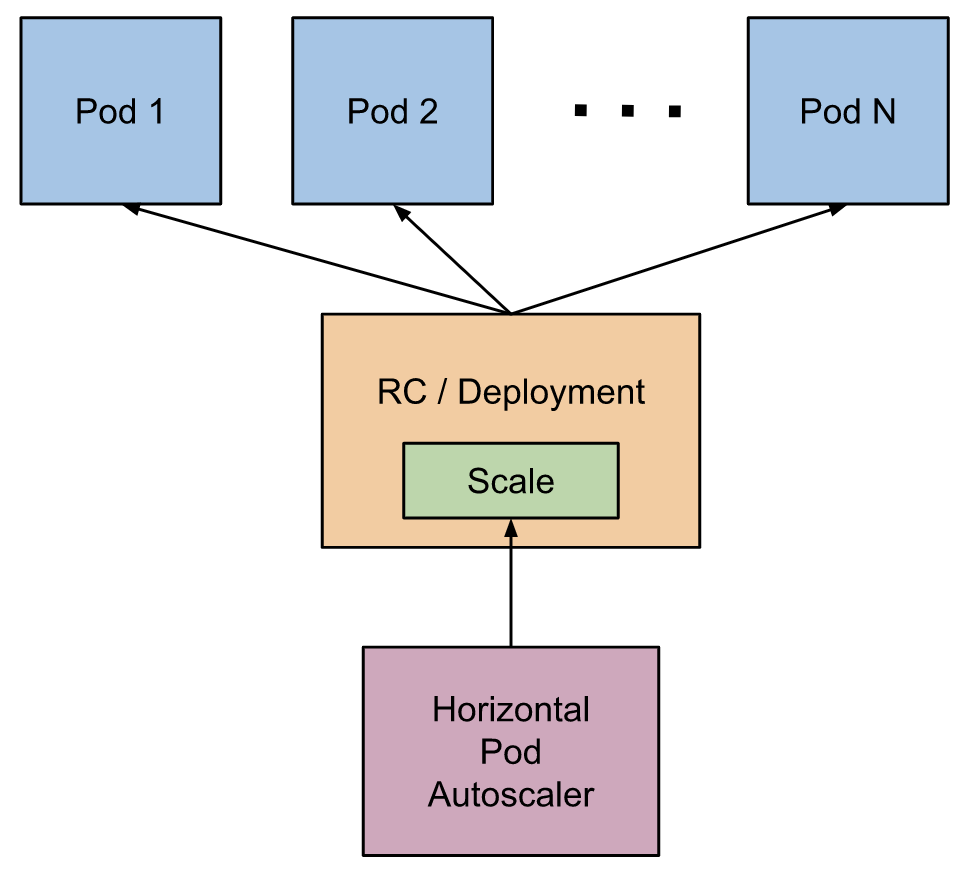
基於CPU使用率或特定資源條件自動增減ReplicationController、ReplicaSet與Deployment中Pod的數量。特定資源條件可以為CPU、Memory、Storage或其他自訂條件。另外原本就無法自動增減的Pod是不能透過HPA進行autoScaling的,像是DaemonSet中的Pod。
HorizontalPodAutoScaler也是透過Kubernetes APi資源和控制器實現,由監控中的資源來決定控制器的行為。控制器會周期性的調整replicaSet/Deployment中Pod的數量,以使得Pod的條件資源能夠低於臨界值而不在繼續的產生新的replica。
HorizontalPodAutoScaler每個週期時間會定期去查詢所監視的目標以及指定的目標資源查詢率,
來判斷目標是否需要Scaling。

hpa.yaml
apiVersion: autoscaling/v1
kind: HorizontalPodAutoscaler
metadata:
  name: ironman-hpa
spec:
  scaleTargetRef:
    apiVersion: apps/v1
    kind: Deployment
    name: ironman
  minReplicas: 2
  maxReplicas: 5
  targetCPUUtilizationPercentage: 50
desiredReplicas = ceil[currentReplicas * ( currentMetricValue / desiredMetricValue )]
VerticalPodAutoscaler有兩個目標:
也因此VerticalPodAutoscaler透過幾個方法達成該目標:
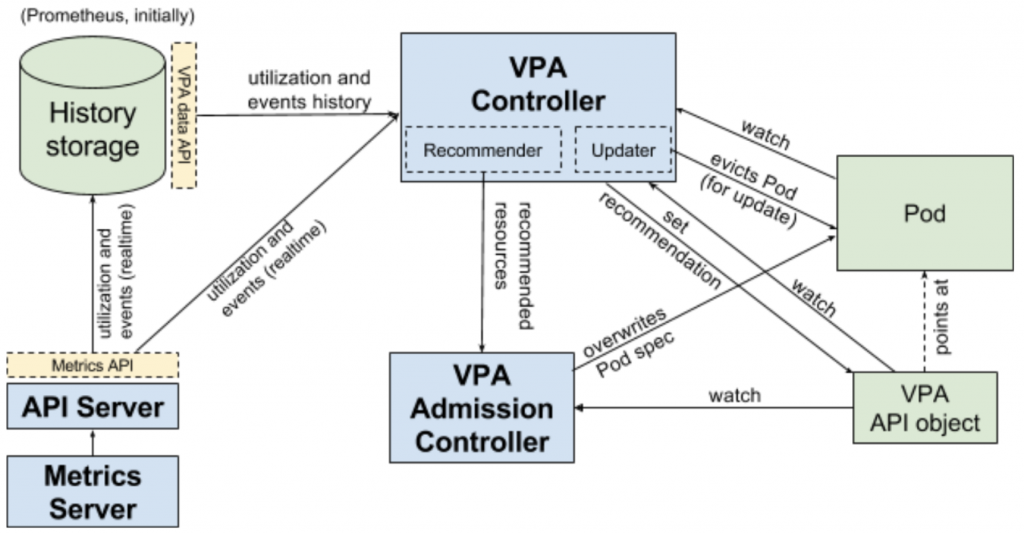
VerticalPodAutoscaler,它包括一個標籤識別器label selector(匹配Pod)、資源策略resources policy(控制VPA如何計算資源)、更新策略update policy(控制資源變化應用到Pod)和推薦資源信息。
並且VPA能夠透過VPA Controller做到以下幾件事:

deployment.yaml
apiVersion: apps/v1
kind: Deployment
metadata:
  name: ironman
  labels:
    name: ironman
    app: ironman
spec:
  minReadySeconds: 5
  strategy:
    type: RollingUpdate
    rollingUpdate:
      maxSurge: 1
      maxUnavailable: 1
  selector:
    matchLabels:
      app: ironman
  replicas: 1
  template:
    metadata:
      labels:
        app: ironman
    spec:
      containers:
       - name: ironman
         image: ghjjhg567/ironman:latest
         imagePullPolicy: Always
         ports:
           - containerPort: 8100
         resources:
           limits:
             cpu: "1"
             memory: "2Gi"
           requests:
             cpu: 500m
             memory: 256Mi
         envFrom:
           - secretRef:
               name: ironman-config
         command: ["./docker-entrypoint.sh"]
       - name: redis
         image: redis:4.0
         imagePullPolicy: Always
         ports:
           - containerPort: 6379
       - name: nginx
         image: nginx
         imagePullPolicy: Always
         ports:
           - containerPort: 80
         volumeMounts:
           - mountPath: /etc/nginx/nginx.conf
             name: nginx-conf-volume
             subPath: nginx.conf
             readOnly: true
           - mountPath: /etc/nginx/conf.d/default.conf
             subPath: default.conf
             name: nginx-route-volume
             readOnly: true
           - mountPath: "/var/www/html"
             name: mypd
         readinessProbe:
           httpGet:
             path: /v1/hc
             port: 80
           initialDelaySeconds: 5
           periodSeconds: 10
      volumes:
        - name: nginx-conf-volume
          configMap:
            name: nginx-config
        - name: nginx-route-volume
          configMap:
            name: nginx-route-volume
        - name: mypd
          persistentVolumeClaim:
            claimName: pvc
Cluster層級的Scaler,當物件因資源不足而無法生成啟動時,或者是叢集節點使用率過低時,ClusterAutoScaler會自動地去調節節點的數量。
這邊以GCP為例
$ gcloud container clusters create cluster-name --num-nodes 30 \
    --enable-autoscaling --min-nodes 15 --max-nodes 50 [--zone compute-zone]
$ gcloud container node-pools create pool-name --cluster cluster-name \
    --enable-autoscaling --min-nodes 1 --max-nodes 5 [--zone compute-zone]
$ gcloud container clusters update cluster-name --enable-autoscaling \
    --min-nodes 1 --max-nodes 10 --zone compute-zone --node-pool default-pool
$ gcloud container clusters update cluster-name --no-enable-autoscaling \
    --node-pool pool-name [--zone compute-zone --project project-id]
今天我們暸解了Kubernetes cluster在三種不同的層面分別使用的資源縮放策略,這也讓我們在往後遇到不同的問題,能透過最為合適的方法去進行資源調配,節省資源的浪費。

https://www.servicemesher.com/blog/kubernetes-vertical-pod-autoscaler/
https://kubernetes.io/docs/tasks/run-application/horizontal-pod-autoscale/
https://cloud.google.com/kubernetes-engine/docs/concepts/verticalpodautoscaler
https://cloud.google.com/kubernetes-engine/docs/how-to/cluster-autoscaler?hl=zh-tw
