之前的文章介紹了如何在 OpenShift 透過 Prometheus,AlertManager 跟 Grafana 來收集和監控服務的 Metrics,而對於 Logs 管理,OpenShift 官方是整合了 EFK (Elasticsearch + Fluentd + Kibana) 來做處理。
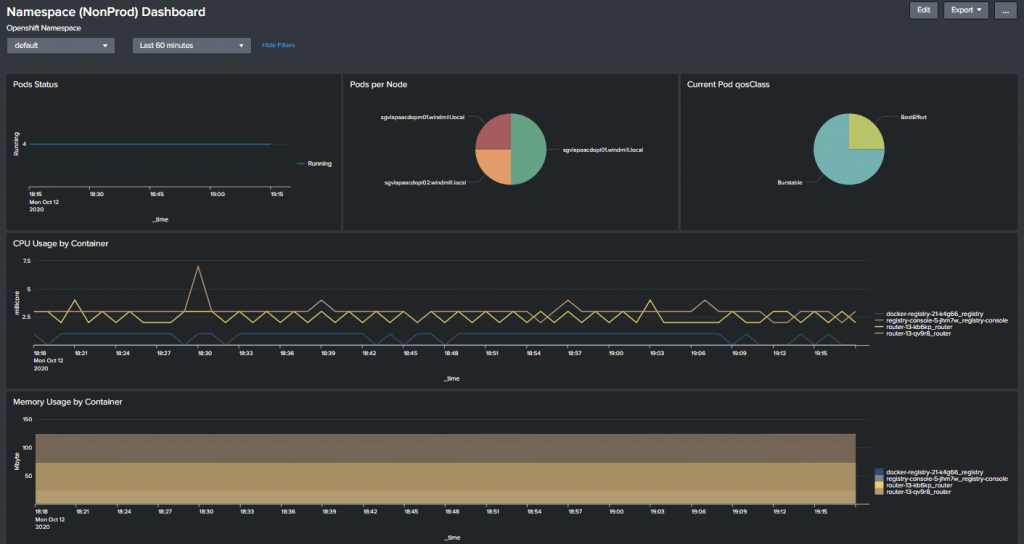
然後因為有些公司在導入 OpenShift 或 kubernetes 之前已經在使用 Splunk 企業版在做這件事,所以在這篇文章我將介紹如何透過 Splunk-connect-for-kubernetes 來將 OpenShift 的 logs 及 部分 Metrics 導入 Splunk 做監控及管理。
Splunk-connect-for-kubernetes 包含 3 個 Helm Charts:
| Component | Usage |
|---|---|
| logging | 收集 logs。 |
| metric | 收集 metrics, 譬如 cpu/memory usage。 |
| objects | 透過 Kubernetes API,收集系統物件的目前的狀態,例如 events, Pod的資訊等 |
建立新的 Splunk App: “ocp”
在新的 app 建立 以下 Indexes 給之後的 Http Event Collector (HEC) 做為預設的 Indexes
| index name | type | app |
|---|---|---|
| ocp_logging | Events | ocp |
| ocp_metrics | Metrics | ocp |
| ocp_objects | Events | ocp |
並把這些 Indexes push 到所有的 Splunk Indexer 節點。
打開 Settings > Data Inputs > HTTP Event Collector 頁面
我們需要建立 3 個 HEC token 分別給 logging, metrics 跟 object 使用
| HEC Token name | App Context | Select Allowed Indexes | Default index |
|---|---|---|---|
| ocp-logging | ocp | ocp_logging | ocp_logging |
| ocp-metrics | ocp | ocp_metrics | ocp_metrics |
| ocp-objects | ocp | ocp_objects | ocp_objects |
注意: 建立 Token 過程中.不要啟用 “indexer acknowledgement”。
最基本的 value 值範例:
splunk:
  hec:
    host: < splunk_host >
    port: 8088
    token: < splunk_hec_logging_token >
    indexName: < splunk_logging_indexname >
Optional: 客製化 buffer 設定
buffer:
  '@type': memory
  total_limit_size: 600m
  chunk_limit_size: 200m
  chunk_limit_records: 100000
  flush_at_shutdown: true
  flush_interval: 3s
  flush_thread_count: 4
  flush_thread_interval: 0.1
  flush_thread_burst_interval: 0.1
  overflow_action: drop_oldest_chunk
  retry_forever: true
  retry_wait: 60
Optional: 客製化 filter 設定
customFilters:
  SetIndexFilter:
    tag: "**"
    type: grep
    body: |
        <exclude>
                  key sourcetype
                  pattern /(fluentd:monitor-agent)/
                </exclude>
$ oc project splunk-connect
$ helm install -f logging_values.yaml splunk-logging https://github.com/splunk/splunk-connect-for-kubernetes/releases/download/1.4.3/splunk-kubernetes-logging-1.4.3.tgz
index="k8s_logging"
最基本的 value 值範例:
splunk:
  hec:
    host: < splunk_host >
    port: 8088
    token: < splunk_hec_metrics_token >
    indexName: < splunk_metrics_indexname >
Optional: 客製化 filter 設定
你可以參考 metrics-information 看支援的 metrics 有哪些,然後設定只將想監控的 metrics 傳到 Splunk,以避免不必要的流量。 譬如:
customFilters:
  SetContainerFilter:
    tag: kube.container.**
    type: grep
    body: |
        <regexp>
                key metric_name
                pattern /(cpu.usage_rate|cpu.limit|memory.usage|memory.limit)/
              </regexp>
  SetPodFilter:
    tag: kube.pod.**
    type: grep
    body: |
        <regexp>
                key metric_name
                pattern /(network.rx_bytes|network.tx_bytes|network.rx_errors|network.tx_errors|cpu.load.average.10s|cpu.usage_rate|cpu.limit|memory.usage|memory.limit|memory.available_bytes|volume.available_bytes|volume.used_bytes)/
              </regexp>
  SetNamespaceFilter:
    tag: kube.namespace.**
    type: grep
    body: |
        <regexp>
                key metric_name
                pattern /(usage|limit)/
              </regexp>
  SetNodeFilter:
    tag: kube.node.**
    type: grep
    body: |
        <regexp>
                key metric_name
                pattern /(network.rx_bytes|network.tx_bytes|network.rx_errors|network.tx_errors|cpu.usage_rate|memory.usage|memory.capacity)/
              </regexp>
$ helm install -f metrics_values.yaml splunk-metrics https://github.com/splunk/splunk-connect-for-kubernetes/releases/download/1.4.3/splunk-kubernetes-metrics-1.4.3.tgz
| mcatalog values(_dims) WHERE index="ocp_metrics" AND metric_name="kube.pod.cpu.load.average.10s"
最基本的 value 值範例:
splunk:
  hec:
    host: < splunk_host >
    port: 8088
    token: < splunk_hec_objects_token >
    indexName: < splunk_objects_indexname >
$ helm install -f objects_values.yaml splunk-objects https://github.com/splunk/splunk-connect-for-kubernetes/releases/download/1.4.3/splunk-kubernetes-objects-1.4.3.tgz
index="ocp_objects" metadata.namespace="splunk-connect" status.phase="Running" | stats distinct_count(metadata.uid)
Alerts:

Dashboard:

目前只有看到 OUTCOLD 這家公司號稱可以把應用程序的 prometheus metrics 轉傳到 Splunk,筆者還沒有看到什麼 open source 解決方案,所以目前建議 logs 可以用 splunk,但其他的 metrics 監控還是用 OpenShift 內建的 Prometheus 跟 Grafana 比較適合。
