今天要主要會介紹幾個 widget 的共通方法,後面的部分會介紹如何在介面上加上圖片還有其他幾個實用的方法~
♠♣今天的文章大綱♥♦
import tkinter as tk
root = tk.Tk()
root.title('cuteluluWindow')
root.configure(bg="#7AFEC6")
root.iconbitmap('heart_green.ico')
text=tk.Label(root, text="Hello\@^0^@/",font=("Bauhaus 93",20,"bold"))

count=0
def clickHello():
    global count
    count=count + 1
    text.config(text="Click Hello " + str(count) + " times")
B=tk.Button(root, text="Hello", command=clickHello,font=("Bauhaus 93",20,"bold"))

text.pack()
B.pack()

root.mainloop()
下圖為執行結果⬇⬇⬇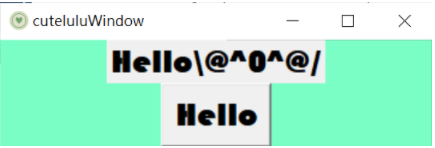
按按鈕後會自行加總: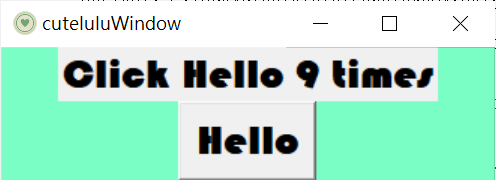
import tkinter as tk
root = tk.Tk()

root.title('cuteluluWindow')
root.configure(bg="#7AFEC6")
root.iconbitmap('heart_green.ico')
text=tk.Label(root, text='I am Label',
              font="Times 25 bold")
text.pack()
print(type(text))

print(text.keys()) #回傳參數

root.mainloop()
下圖為執行結果⬇⬇⬇
import tkinter as tk
root = tk.Tk()

root.title('cuteluluWindow')
root.configure(bg="#7AFEC6")
root.iconbitmap('heart_green.ico')
text=tk.Label(root, text='I am Label',
              font="Times 25 bold",
              wraplength=40) #40像素後自動換行

text.pack()


root.mainloop()
下圖為執行結果⬇⬇⬇
import tkinter as tk
root = tk.Tk()

root.title('cuteluluWindow')
root.configure(bg="#7AFEC6")
root.iconbitmap('heart_green.ico')
text=tk.Label(root, text='I am Label',
              font="Times 25 bold",
              wraplength=40,
              justify="right") #文字靠右

text.pack()


root.mainloop()
下圖為執行結果⬇⬇⬇
import tkinter as tk
root = tk.Tk()

root.title('cuteluluWindow')
root.configure(bg="#7AFEC6")
root.iconbitmap('heart_green.ico')
text=tk.Label(root, text='I am Label',
              font="Times 25 bold",
              bitmap="question",
              compound="center")

text.pack()


root.mainloop()
下圖為執行結果⬇⬇⬇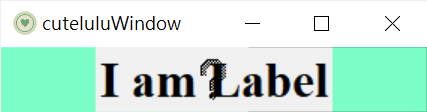
import tkinter as tk
root = tk.Tk()

root.title('cuteluluWindow')
root.configure(bg="#7AFEC6")
root.iconbitmap('heart_green.ico')
text=tk.Label(root, text='I am Label',
              font="Times 25 bold",
              padx=15,pady=20) #左右間隔5,上下間隔10

text.pack()


root.mainloop()
下圖為執行結果⬇⬇⬇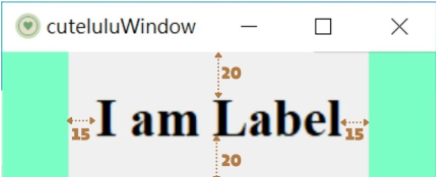
import tkinter as tk
root = tk.Tk()

root.title('cuteluluWindow')
root.configure(bg="#7AFEC6")
root.iconbitmap('heart_green.ico')

gif=tk.PhotoImage(file="7.gif")
text=tk.Label(root,image=gif)
text.pack()

root.mainloop()
下圖為執行結果⬇⬇⬇
from PIL import Image,ImageTk
import tkinter as tk
root = tk.Tk()

root.title('cuteluluWindow')
root.configure(bg="#7AFEC6")
root.iconbitmap('heart_green.ico')

image=Image.open("five.jpg")
five=ImageTk.PhotoImage(image)
text=tk.Label(root,image=five)
text.pack()

root.mainloop()
下圖為執行結果⬇⬇⬇
import tkinter as tk
root = tk.Tk()

root.title('cuteluluWindow')
root.configure(bg="#7AFEC6")
root.iconbitmap('heart_green.ico')

lyrics="""This is my fight song
Take back my life song
Prove I'm alright song
My power's turned on
Starting right now I'll be strong
I'll play my fight song
And I don't really care if nobody else believes
'Cause I've still got a lot of fight left in me"""#文字內容

gif=tk.PhotoImage(file="7.gif")#圖片
text=tk.Label(root, image=gif,text=lyrics,bg="#F5F5DC",
              compound="left", fg="#556B2F",
              font=("Viner Hand ITC", 12, "bold", "italic"))
text.pack()

root.mainloop()
下圖為執行結果⬇⬇⬇
❗❗❗ 重要提醒:如果bitmap參數跟image參數同時存在,bimap參數會沒有用 ❗❗❗
from tkinter.ttk import Separator #導入模組
import tkinter as tk
root = tk.Tk()

root.title('cuteluluWindow')
root.configure(bg="#7AFEC6")
root.iconbitmap('heart_green.ico')

Title="FIGHT SONG"
Content="""This is my fight song
Take back my life song
Prove I'm alright song
My power's turned on
Starting right now I'll be strong
I'll play my fight song
And I don't really care if nobody else believes
'Cause I've still got a lot of fight left in me"""


text1=tk.Label(root,text=Title,bg="#F5F5DC",
              compound="left",fg="#556B2F",
              font=("Viner Hand ITC",18,"bold"))
text1.pack(padx=5,pady=5)

sep=Separator(root,orient=tk.HORIZONTAL) #分隔線
sep.pack(fill='x',padx=7)

text2=tk.Label(root,text=Content,bg="#F5F5DC",
              compound="left",fg="#556B2F",
              font=("Viner Hand ITC",12,"bold","italic"))
text2.pack(padx=5,pady=5)

root.mainloop()
下圖為執行結果⬇⬇⬇
Label 的部分就在今天結束了~明天會進入功能鈕的部分,有問題都可以留言一起討論喔(。・∀・)ノ゙


 iThome鐵人賽