
股票申購是和時間有關的 feature,所以需要有一個 DateUtility,這個類別負責所有 Date 的處理。
struct DateUtility {

    static let dateFormatter = DateFormatter()
}
很多文獻都會和你說,Swift 的 DateFormatter() 是個 init 很貴(expensive)的物件,連 Apple 官方文件都建議你寫一個 static property 存起來,不要一直 init()。最嚴重的情況,是有可能卡你 UI 滑動的。
其中有一篇真的實測 init 的秒數的文章,我個人覺得很有深度。連結如下
https://sarunw.com/posts/how-expensive-is-dateformatter/
第一個 func 要寫的,就是從 String 轉換成 Date 型別。因為不是每個 String 都能轉成 Date,所以 return 設計成 optional。
struct DateUtility {

    static let dateFormatter = DateFormatter()

    func getDate(from string: String, format: String = "yyyy-MM-dd") -> Date? {

        DateUtility.dateFormatter.dateFormat = format

        return DateUtility.dateFormatter.date(from: string)
    }
}
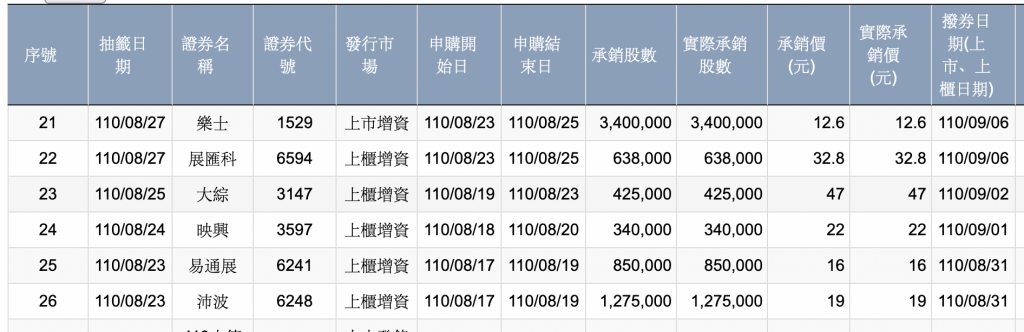
然後看了一下日期格式…嗯…果然是政府公開資料正常發揮的民國年,不是電腦標準的西元年。不過難度上來說,Big5 處理起來,比較麻煩,民國年轉西元年倒是沒有那麼困難。
跟據我過去的經驗,勸大家千萬不要自己手動轉換曆法
千萬不要自己手動轉換曆法!!
千萬不要自己手動轉換曆法!!!!
不管是哪種語言,儘可能的使用框架中寫好的方法進行轉換,而且在傳值的時候,使用 unix time 來傳遞,只有在顯示前的那一刻,再轉換成人類看得懂的格式。
將 dateFormatter 的 calendar property 在讀取民國年的時候,用台灣的曆法,就可以正確讀取以民國年紀錄的資料了。
struct DateUtility {

    static let dateFormatter = DateFormatter()

    private var isoCalendar: Calendar {
        return Calendar(identifier: .iso8601)
    }

    private var rocCalendar: Calendar {
        return Calendar(identifier: .republicOfChina)
    }

    func getDate(from string: String, format: String = "yyyy-MM-dd") -> Date? {

        DateUtility.dateFormatter.calendar = isoCalendar
        DateUtility.dateFormatter.dateFormat = format

        return DateUtility.dateFormatter.date(from: string)
    }

    func getDateFromTwCalendar(from string: String, format: String = "yyyy/MM/dd") -> Date? {

        DateUtility.dateFormatter.calendar = rocCalendar
        DateUtility.dateFormatter.dateFormat = format

        return DateUtility.dateFormatter.date(from: string)
    }
}
而 StockSubscription 能接受 yyyy 的輸入值,這個功能也歸在 DateUtility
func getIntFromDate(component: Calendar.Component) -> Int {

        let date = Date()
        let calendar = isoCalendar
        return calendar.component(component, from: date)
    }
然後,在 StockSubscriptionModel 中,加上三種狀態,但有可能真的遇到資料有問題,保險起見,我加上第四種 notDefined,如果真的解不出 Date,就讓他進入第四種狀態。當然,你也可以選擇讓其中一種狀態成為你的預設值啦。但實務上真的,真的,真的不要對後端來的資料用 force unwrap,遲早有一天會出事的。而出事的時候,你就是要修。
extension StockSubscriptionModel {

    enum SubscriptionState {

        case beforeSubscription
        case duringSubscription
        case finishedSubscription
        case notDefined
    }
}
然後,再用 local time 和 StockSubscriptionInfo 來判斷 indexPath 的 info 是哪個狀態。當然能取 server time 是最好,但現在狀況來說,我並沒有後端,所以就用 local time 來當基準。
extension StockSubscriptionModel {

    func getSubscriptionState(info: StockSubscriptionInfo) -> SubscriptionState {

        let currentTime = Date().timeIntervalSince1970

        if let startTime = info.subscriptionStart?.timeIntervalSince1970,
           let endTime = info.subscriptionEnd?.timeIntervalSince1970 {

            if currentTime < startTime {
                return .beforeSubscription
            } else if currentTime > endTime {
                return .finishedSubscription
            } else {
                return .duringSubscription
            }
        }

        return .notDefined
    }
}
在拿取申購資料的時候,要輸入欲取得的年份。但如果寫死 2021,那到了 2021-12-31 的時候,你就準備一份改成 2022 的程式碼,然後在跨年夜的時候更新。不然使用者的資料就會永遠停在 2021 了。
所以我們加上取得客端現在手機的時間,Model 就可以在 12月31日跨到隔年 1月1日的時候,在程式上直接處理了,不用更新程式碼。
private func getQueryYear() -> Int {

        let dateUtility = DateUtility()

        return dateUtility.getIntFromDate(component: .year)
    }

func requestStockSubscription() {

        let year = getQueryYear()
        manager.requestStockSubscriptionInfo(year: year) { [weak self] subscriptionList, error in

            // 需要去掉中央債的資料
            self?.subscriptionList = self?.filterNotAvailable(subscriptionList) ?? []
            self?.delegate?.didRecieveList(subscriptionList, error: error)
        }
    }
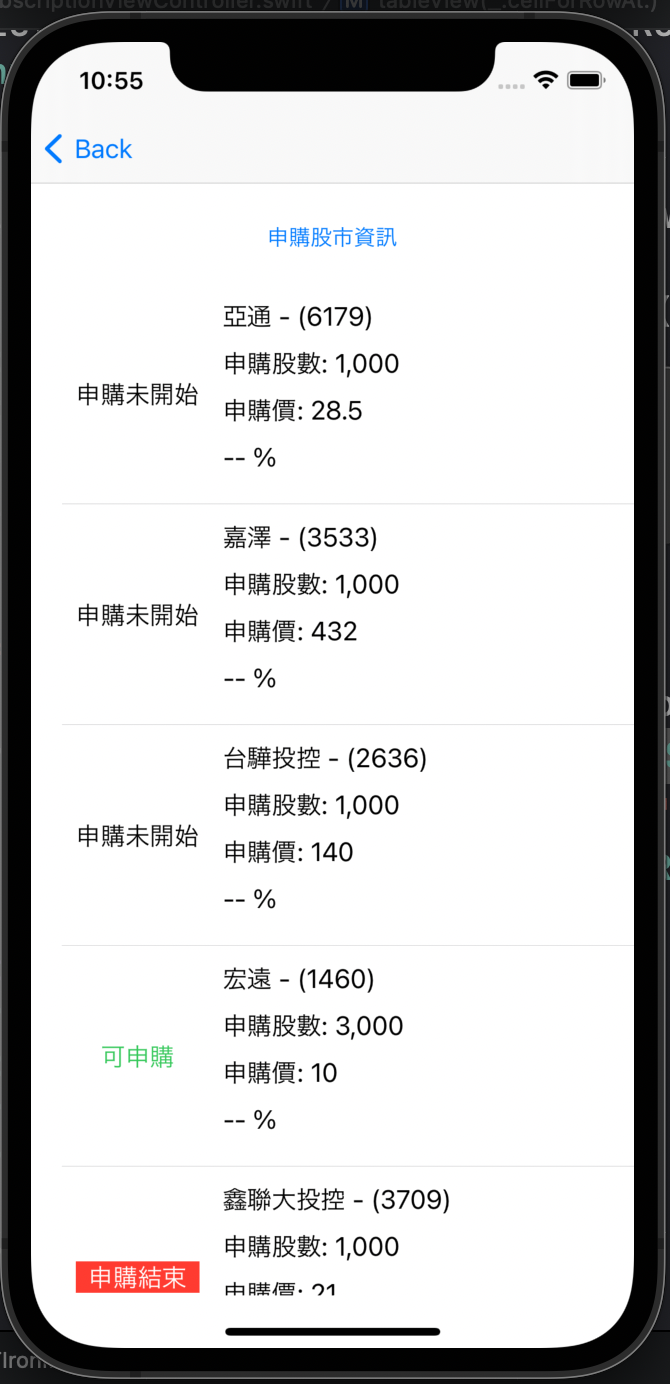
在確定申購狀態後, ViewController 在不同的狀態下,更新對應的 cell UI風格。
有四種狀態,所以就是四種更新 UI 的 func。
private func setBeforeSubscriptionUI(_ cell: StockSubscriptionTableViewCell) {

        cell.stateLabel.text = "申購未開始"
        cell.stateLabel.textColor = .black
        cell.stateLabel.backgroundColor = .clear
    }

    private func setDuringSubscriptionUI(_ cell: StockSubscriptionTableViewCell) {

        cell.stateLabel.text = "可申購"
        cell.stateLabel.textColor = .systemGreen
        cell.stateLabel.backgroundColor = .clear
    }

    private func setFinishedSubscriptionUI(_ cell: StockSubscriptionTableViewCell) {

        cell.stateLabel.text = "申購結束"
        cell.stateLabel.textColor = .white
        cell.stateLabel.backgroundColor = .systemRed
    }

    private func setNotDefinedUI(_ cell: StockSubscriptionTableViewCell) {

        cell.stateLabel.text = "申購狀態未定"
        cell.stateLabel.textColor = .systemGray2
        cell.stateLabel.backgroundColor = .clear
    }
而這個 modify func,是讓 VC 在 cellForRow(at:) 呼叫的,在 cellForRow(at:) 會拿到 info 也會拿到 custom tableViewCell。讓這個 func 處理每個狀態的 UI。
private func modify(_ cell: StockSubscriptionTableViewCell, with info: StockSubscriptionInfo) {

        let state = model.getSubscriptionState(info: info)

        if info.subscriptionRateString == "0" {
            cell.forthSectionLabel.text = "-- %"
        }

        switch state {
        case .beforeSubscription:
            setBeforeSubscriptionUI(cell)
        case .duringSubscription:
            setDuringSubscriptionUI(cell)
        case .finishedSubscription:
            setFinishedSubscriptionUI(cell)
        case .notDefined:
            setNotDefinedUI(cell)
        }
    }
最後,就在 cellForRow(at:) 呼叫這個 func 就完成了
func tableView(_ tableView: UITableView, cellForRowAt indexPath: IndexPath) -> UITableViewCell {

        guard let cell = tableView.dequeueReusableCell(withIdentifier: StockSubscriptionTableViewCell.identifier, for: indexPath) as? StockSubscriptionTableViewCell,
              let info = model.getSubscriptionInfo(at: indexPath) else {
            return UITableViewCell()
        }

        let state = "申購狀態"
        let firstSection = "\(info.stockName) - (\(info.stockCode))"
        let secondSection = "申購股數: \(info.stockCountString)"
        let thirdSection = "申購價: \(info.actualPrice)"
        let forthSection = "中籤率: \(info.subscriptionRateString) %"

        cell.stateLabel.text = state
        cell.firstSectionLabel.text = firstSection
        cell.secondSectionLabel.text = secondSection
        cell.thirdSectionLabel.text = thirdSection
        cell.forthSectionLabel.text = forthSection

        modify(cell, with: info)

        return cell
    }
整個 VC 的程式碼如下
//
//  StockSubscriptionViewController.swift
//  ITIronMan
//
//  Created by Marvin on 2021/9/4.
//

import UIKit

class StockSubscriptionViewController: UIViewController {

    @IBOutlet weak var tableView: UITableView!

    private lazy var model: StockSubscriptionModel = {
        let model = StockSubscriptionModel()
        model.delegate = self
        return model
    }()

    // MARK: - life cycle
    override func viewDidLoad() {
        super.viewDidLoad()
        setupUI()
    }

    // MARK: - private methods
    private func setupUI() {
        tableView.dataSource = self
        tableView.delegate = self
    }

    // MARK: - IBAction
    @IBAction func requestSubscriptionButtonDidTap(_ sender: Any) {
        model.requestStockSubscription()
    }

}

extension StockSubscriptionViewController: UITableViewDelegate, UITableViewDataSource {

    func tableView(_ tableView: UITableView, numberOfRowsInSection section: Int) -> Int {
        return model.count
    }

    func tableView(_ tableView: UITableView, cellForRowAt indexPath: IndexPath) -> UITableViewCell {

        guard let cell = tableView.dequeueReusableCell(withIdentifier: StockSubscriptionTableViewCell.identifier, for: indexPath) as? StockSubscriptionTableViewCell,
              let info = model.getSubscriptionInfo(at: indexPath) else {
            return UITableViewCell()
        }

        let state = "申購狀態"
        let firstSection = "\(info.stockName) - (\(info.stockCode))"
        let secondSection = "申購股數: \(info.stockCountString)"
        let thirdSection = "申購價: \(info.actualPrice)"
        let forthSection = "中籤率: \(info.subscriptionRateString) %"

        cell.stateLabel.text = state
        cell.firstSectionLabel.text = firstSection
        cell.secondSectionLabel.text = secondSection
        cell.thirdSectionLabel.text = thirdSection
        cell.forthSectionLabel.text = forthSection

        modify(cell, with: info)

        return cell
    }

    private func modify(_ cell: StockSubscriptionTableViewCell, with info: StockSubscriptionInfo) {

        let state = model.getSubscriptionState(info: info)

        if info.subscriptionRateString == "0" {
            cell.forthSectionLabel.text = "-- %"
        }

        switch state {
        case .beforeSubscription:
            setBeforeSubscriptionUI(cell)
        case .duringSubscription:
            setDuringSubscriptionUI(cell)
        case .finishedSubscription:
            setFinishedSubscriptionUI(cell)
        case .notDefined:
            setNotDefinedUI(cell)
        }
    }

    private func setBeforeSubscriptionUI(_ cell: StockSubscriptionTableViewCell) {

        cell.stateLabel.text = "申購未開始"
        cell.stateLabel.textColor = .black
        cell.stateLabel.backgroundColor = .clear
    }

    private func setDuringSubscriptionUI(_ cell: StockSubscriptionTableViewCell) {

        cell.stateLabel.text = "可申購"
        cell.stateLabel.textColor = .systemGreen
        cell.stateLabel.backgroundColor = .clear
    }

    private func setFinishedSubscriptionUI(_ cell: StockSubscriptionTableViewCell) {

        cell.stateLabel.text = "申購結束"
        cell.stateLabel.textColor = .white
        cell.stateLabel.backgroundColor = .systemRed
    }

    private func setNotDefinedUI(_ cell: StockSubscriptionTableViewCell) {

        cell.stateLabel.text = "申購狀態未定"
        cell.stateLabel.textColor = .systemGray2
        cell.stateLabel.backgroundColor = .clear
    }
}

extension StockSubscriptionViewController: StockSubscriptionModelDelegate {

    func didRecieveList(_ subscriptionList: [StockSubscriptionInfo], error: Error?) {

        if let error = error {
            print("you got error during subscriptions request: \(error.localizedDescription)")
            return
        }

        tableView.reloadData()
    }
}
而 UI 狀態如下。
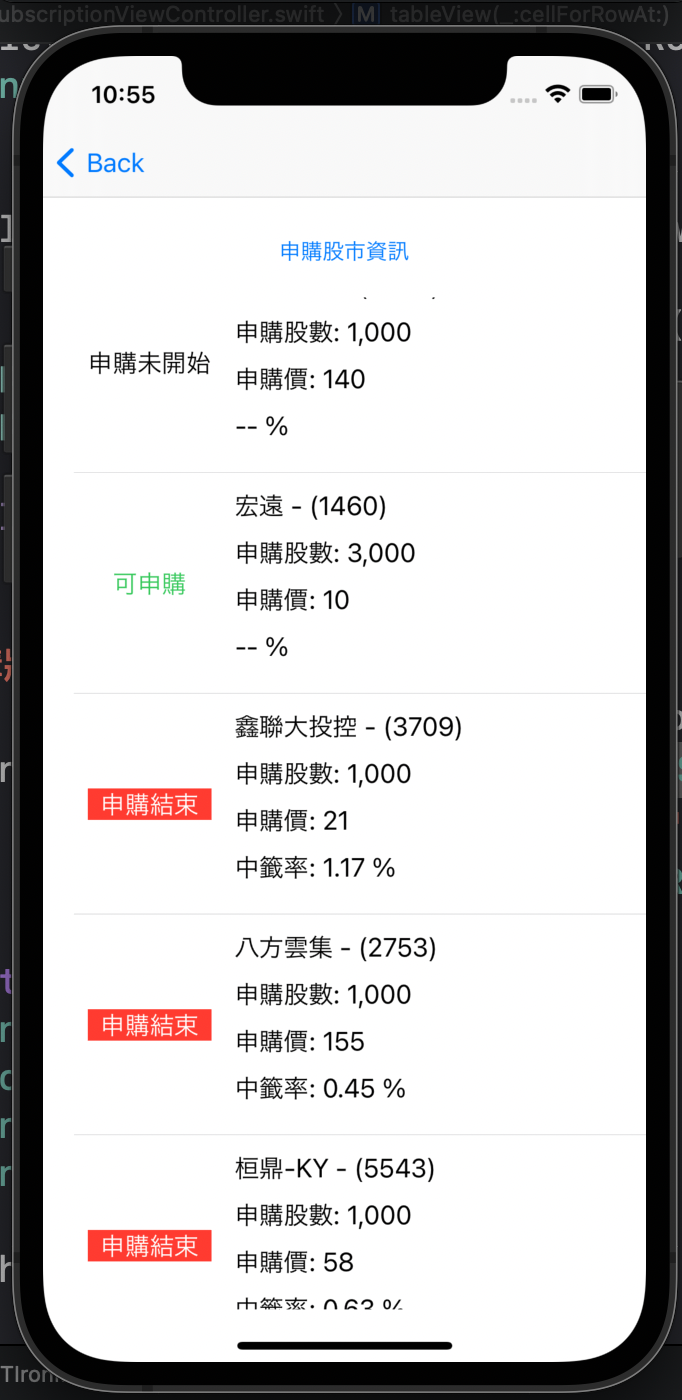
寫到這裡,連一根 K 線都沒有,是不是和一般投資理財用的軟體不同?
沒問題的,下一篇開始,就會進入 K 線的製作。
