如果說特徵臉方法是嬰兒,我會說局部二值方法是會跑會跳的幼兒
局部二值方法(Local Binary Patterns),透過將
圖片中的每一個像素,與其相鄰的其他像素做值的大小比對與加總,得出一個圖片全域相對值
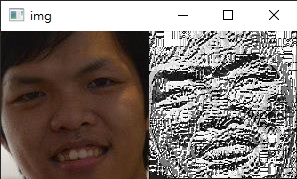
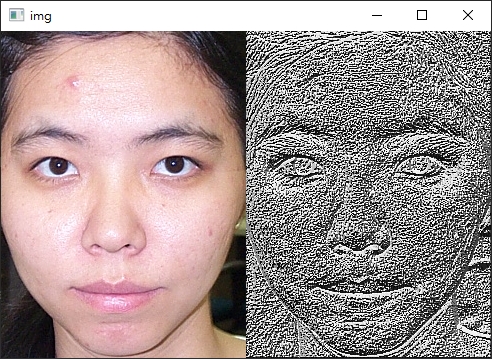
圖片左方是原始人臉,右方是計算LBP後的結果
從上圖有幾個重點可以看出:
理論上,我們是可以透過LBP計算後的特徵值,跟昨天介紹的特徵臉方法一樣,來用作人臉辨識 (只要特徵一樣就表示同一人);
但實際上直接使用LBP的特徵值會受特徵相對位置不一樣而產生很大的誤差(比如說人臉不是照片照、人臉離鏡頭的位置不一樣等等)。
比較可行的方式,是將LBP後的特徵圖片劃分多個等大小的子區域,分別做直方統計圖,
然後真正用來辨識的依據是這些直方統計值組合而成的局部二值直方圖 (Local Binary Patterns Histogram)
講這麼多終於進入今天的重點 -- LBPH
接下來我們會使用OpenCV內建的face_LBPHFaceRecognizer來建立我們的人臉辨識。
face_recognition目錄,新增一個檔案lbp.py
import ntpath
import sys
# resolve module import error in PyCharm
sys.path.append(ntpath.dirname(ntpath.dirname(ntpath.abspath(__file__))))
# 匯入必要套件
import argparse
import random
import time
import cv2
import numpy as np
from imutils import paths
from skimage import feature
from sklearn.metrics import classification_report
from sklearn.model_selection import train_test_split
from sklearn.preprocessing import LabelEncoder
from dataset.load_dataset import images_to_faces
def main():
# 初始化arguments
ap = argparse.ArgumentParser()
ap.add_argument("-i", "--input", type=str, required=True, help="the input dataset path")
args = vars(ap.parse_args())
print("[INFO] loading dataset....")
(faces, labels) = images_to_faces(args["input"])
print(f"[INFO] {len(faces)} images in dataset")
# 將名稱從字串轉成整數 (在做訓練時時常會用到這個方法:label encoding)
le = LabelEncoder()
labels = le.fit_transform(labels)
# 將資料拆分訓練用與測試用;測試資料佔總資料1/4 (方便後續我們判斷這個方法的準確率)
split = train_test_split(faces, labels, test_size=0.25, stratify=labels, random_state=9527)
(trainX, testX, trainY, testY) = split
print("[INFO] training...")
start = time.time()
recognizer = cv2.face_LBPHFaceRecognizer().create(radius=1, neighbors=8, grid_x=8, grid_y=8)
recognizer.train(trainX, trainY)
end = time.time()
print(f"[INFO] training took: {round(end - start, 2)} seconds")
# 辨識測試資料
print("[INFO] predicting...")
start = time.time()
predictions = []
confidence = []
# loop over the test data
for i in range(0, len(testX)):
(prediction, conf) = recognizer.predict(testX[i])
predictions.append(prediction)
confidence.append(conf)
end = time.time()
print(f"[INFO] training took: {round(end - start, 2)} seconds")
print(classification_report(testY, predictions, target_names=le.classes_))
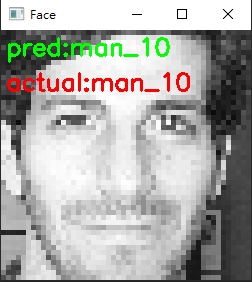
# 隨機挑選測試資料來看結果
idxs = np.random.choice(range(0, len(testY)), size=10, replace=False)
for i in idxs:
predName = le.inverse_transform([predictions[i]])[0]
actualName = le.classes_[testY[i]]
face = np.dstack([testX[i]] * 3)
face = imutils.resize(face, width=250)
cv2.putText(face, f"pred:{predName}", (5, 25), cv2.FONT_HERSHEY_SIMPLEX, 0.8, (0, 255, 0), 2)
cv2.putText(face, f"actual:{actualName}", (5, 60), cv2.FONT_HERSHEY_SIMPLEX, 0.8, (0, 0, 255), 2)
print(f"[INFO] prediction: {predName}, actual: {actualName}")
cv2.imshow("Face", face)
cv2.waitKey(0)
if __name__ == '__main__':
main()
python face_recognition/lbp.py -i dataset/caltech_faces觀看結果:radius與neighbors參數來提高辨識率)
               precision    recall  f1-score   support

        man_1       0.83      1.00      0.91         5
       man_10       1.00      1.00      1.00         6
       man_11       0.86      1.00      0.92         6
       man_13       1.00      1.00      1.00         5
       man_14       1.00      0.86      0.92         7
       man_15       0.86      1.00      0.92         6
        man_2       1.00      1.00      1.00         5
        man_4       1.00      1.00      1.00         6
        man_5       0.86      1.00      0.92         6
        man_7       1.00      1.00      1.00         5
        man_9       1.00      1.00      1.00         6
      woman_1       1.00      1.00      1.00         5
     woman_10       1.00      1.00      1.00         6
      woman_2       1.00      1.00      1.00         5
      woman_5       1.00      0.67      0.80         6
      woman_6       1.00      0.60      0.75         5
      woman_7       1.00      1.00      1.00         6
      woman_8       0.86      1.00      0.92         6
      woman_9       1.00      1.00      1.00         5

     accuracy                           0.95       107
    macro avg       0.96      0.95      0.95       107
 weighted avg       0.96      0.95      0.95       107
# 隨機選取一張照片來看LBP的結果
image_path = random.choice(list(paths.list_images(args["input"])))
image = cv2.imread(image_path)
rects = detect(image)

(x, y, w, h) = rects[0]["box"]
roi = image[y:y + h, x:x + w]

gray = cv2.cvtColor(roi, cv2.COLOR_BGR2GRAY)
lbp = feature.local_binary_pattern(gray, 8, 1, method="default")
lbp = rescale_intensity(lbp, out_range=(0, 255))
lbp = lbp.astype("uint8")

img = np.hstack([roi, np.dstack([lbp] * 3)])
cv2.imshow("img", img)
cv2.waitKey(0)
實際應用中 (比如像Day14前言提到的那種情境),人臉辨識會有各種奇怪的狀況發生:
因此為了要讓辨識模型更加的完善,我們需要讓模型"學習"如何去辨識人臉。
這將是我們明天談論的內容,See you!
