今天要來實作登入功能~!!
這邊要說說之前我剛開始看前後分離框架的不習慣,因為在之前沒分離的開發情況下,
登入的轉頁是依靠後端的判斷,但在前後分離的狀況下,後端變成單純提供資料的地方,
因此轉導頁邏輯就會由前端負責,所以後端再也不用煩惱要把頁面導去哪裡了,專心提供資料就可以了。
我們要如何判斷該使用者的權限呢? 這邊我會採取的方式就是去資料庫根據使用者的帳號把資料撈出來,然後比對加密過後的密碼是否一致,在給予一串JWT作為其之後請求其他連結的身分識別,這代表說除非身分識別過期,不然資料庫其實就只要請求一次資料就好。
JSON Web Token for Java and Android(套件官網)
新增這些套件到pom.xml檔
        <dependency>
			<groupId>io.jsonwebtoken</groupId>
			<artifactId>jjwt-api</artifactId>
			<version>0.11.2</version>
		</dependency>
		<dependency>
			<groupId>io.jsonwebtoken</groupId>
			<artifactId>jjwt-impl</artifactId>
			<version>0.11.2</version>
			<scope>runtime</scope>
		</dependency>
		<dependency>
			<groupId>io.jsonwebtoken</groupId>
			<artifactId>jjwt-jackson</artifactId>
			<version>0.11.2</version>
			<scope>runtime</scope>
		</dependency>
新增登入路徑
package com.stockAPI.controller;

import java.util.HashMap;
import java.util.Map;

import org.springframework.beans.factory.annotation.Autowired;
import org.springframework.web.bind.annotation.GetMapping;
import org.springframework.web.bind.annotation.PathVariable;
import org.springframework.web.bind.annotation.PostMapping;
import org.springframework.web.bind.annotation.RequestBody;
import org.springframework.web.bind.annotation.RequestMapping;
import org.springframework.web.bind.annotation.RestController;

import com.stockAPI.model.APIReturnObject;
import com.stockAPI.model.StockUser;
import com.stockAPI.model.User;
import com.stockAPI.service.JWTService;
import com.stockAPI.service.StockUserService;

@RestController
@RequestMapping("user")
public class UserController {

	@Autowired
	StockUserService stockUserService;

	@Autowired
	JWTService jWTService;

	@GetMapping("testBlock")
	public String testBlock() {
		return "testBlock";
	}

	@GetMapping("testUnblock")
	public String testUnblock() {
		return "testUnblock";
	}

	@PostMapping("login")
	public APIReturnObject login(@RequestBody User user) {
		APIReturnObject result = new APIReturnObject();
		Map<String, Object> data = new HashMap<String, Object>();
		String token = jWTService.generateToken(user);
		result.setMessage("登入成功,取得token");
		data.put("token", token);
		result.setData(data);
		return result;
	}

	@GetMapping("search/{account}")
	public APIReturnObject search(@PathVariable(name="account") String account) {
		APIReturnObject result = new APIReturnObject();
		Map<String, Object> data = new HashMap<String, Object>();
		StockUser  stockUser = stockUserService.getOwnData(account);
		data.put("userData", stockUser.getUser());
		result.setMessage("用戶資料查詢成功");
		result.setData(data);
		return result;

	}

	@PostMapping("create")
	public APIReturnObject create(@RequestBody User user) {
		APIReturnObject result = new APIReturnObject();
		Map<String, Object> data = new HashMap<String, Object>();
		Integer user_id = stockUserService.addUser(user);
		data.put("user_id", user_id);
		result.setMessage("用戶資料新增成功");
		result.setData(data);
		return result;
	}

}
開放登入路徑給所有人登入
package com.stockAPI.config;

import org.springframework.beans.factory.annotation.Autowired;
import org.springframework.context.annotation.Bean;
import org.springframework.security.authentication.AuthenticationManager;
import org.springframework.security.config.annotation.authentication.builders.AuthenticationManagerBuilder;
import org.springframework.security.config.annotation.web.builders.HttpSecurity;
import org.springframework.security.config.annotation.web.configuration.EnableWebSecurity;
import org.springframework.security.config.annotation.web.configuration.WebSecurityConfigurerAdapter;
import org.springframework.security.crypto.bcrypt.BCryptPasswordEncoder;

import com.stockAPI.service.StockUserService;

@EnableWebSecurity
public class SecurityConfig extends WebSecurityConfigurerAdapter {

	@Autowired
	StockUserService stockUserService;

	@Override
    protected void configure(AuthenticationManagerBuilder auth) throws Exception {
		auth.userDetailsService(stockUserService).
		passwordEncoder(new BCryptPasswordEncoder());
    }

    @Override
    protected void configure(HttpSecurity http) throws Exception {
    	http
    		.authorizeRequests()
    		.antMatchers("/user/testUnblock").permitAll()
    		.antMatchers("/user/login").permitAll()
    		.antMatchers("/user/create").hasAuthority("ADMIN") //管理員可以新增使用者資料
    		.antMatchers("/user/search/**").permitAll() //大家都可以查詢資料
    		.and()
    		.csrf().disable();

    }

    //加密器註冊容器
    @Bean
    public BCryptPasswordEncoder bCryptPasswordEncoder() {
        return new BCryptPasswordEncoder();
    }

    //驗證類別註冊容器
    @Override
    @Bean
    public AuthenticationManager authenticationManagerBean() throws Exception {
        return super.authenticationManagerBean();
    }
}
新增JWTService
package com.stockAPI.service;

import java.security.Key;
import java.util.Calendar;
import java.util.Map;
import java.util.stream.Collectors;

import org.springframework.beans.factory.annotation.Autowired;
import org.springframework.security.authentication.AuthenticationManager;
import org.springframework.security.authentication.UsernamePasswordAuthenticationToken;
import org.springframework.security.core.Authentication;
import org.springframework.stereotype.Service;

import com.stockAPI.model.StockUser;
import com.stockAPI.model.User;

import io.jsonwebtoken.Claims;
import io.jsonwebtoken.JwtParser;
import io.jsonwebtoken.Jwts;
import io.jsonwebtoken.security.Keys;

@Service
public class JWTService {

	@Autowired
    private AuthenticationManager authenticationManager;

	 private final String KEY = "StockAPIStockAPIStockAPIStockAPIStockAPIStockAPI";

	 public String generateToken(User user) {
	        Authentication authentication =
            new UsernamePasswordAuthenticationToken(user.getAccount(), user.getPassword());
	        authentication = authenticationManager.authenticate(authentication);
	        StockUser userDetails = (StockUser) authentication.getPrincipal();

	        Calendar calendar = Calendar.getInstance();
	        calendar.add(Calendar.MINUTE, 20);

	        Claims claims = Jwts.claims();
		    claims.put("user_id", stockUser.getUser().getId());
			claims.put("account", stockUser.getUsername());
			claims.put("name", stockUser.getUser().getName());
			claims.put("authority", stockUser.getUser().getAuthority());
	        claims.setExpiration(calendar.getTime());
	        claims.setIssuer("KensStockAPI");

	        Key secretKey = Keys.hmacShaKeyFor(KEY.getBytes());

	        return Jwts.builder()
	                .setClaims(claims)
	                .signWith(secretKey)
	                .compact();
	    }

	 public Map<String, Object> parseToken(String token) {
	        Key secretKey = Keys.hmacShaKeyFor(KEY.getBytes());

	        JwtParser parser = Jwts.parserBuilder()
	                .setSigningKey(secretKey)
	                .build();

	        Claims claims = parser
	                .parseClaimsJws(token)
	                .getBody();

	        return claims.entrySet().stream()
	                .collect(Collectors.toMap(Map.Entry::getKey, Map.Entry::getValue));
	    }

}
Expiration:設定過期時間(可以不加)
Issuer: JWT發行人(可以不加)
還有一些註冊聲明參數 (建議但不強制使用)
Authentication: spring security 提供的驗證介面,他的功能是
1.承載欲驗證資料(account/password)。
2.驗證成功後,此物件會被存到SecurityContexts裡面,之後你可以用SecurityContextHolder.getContext().getAuthentication() 獲得 Authentication物件,
進而call getDetails方法取得使用者資訊。
/**
	 * The credentials that prove the principal is correct. This is usually a **password**,
	 * but could be anything relevant to the <code>AuthenticationManager</code>. Callers
	 * are expected to populate the credentials.
	 * @return the credentials that prove the identity of the <code>Principal</code>
	 */
	Object getCredentials();

/**
	 * Stores additional details about the authentication request. These might be an IP
	 * address, certificate serial number etc.
	 * @return additional details about the authentication request, or <code>null</code>
	 * if not used
	 */
	Object getDetails();

/**
	 * The identity of the principal being authenticated. In the case of an authentication
	 * request with username and password, this would be the **username**. Callers are
	 * expected to populate the principal for an authentication request.
	 * <p>
	 * The <tt>AuthenticationManager</tt> implementation will often return an
	 * <tt>Authentication</tt> containing richer information as the principal for use by
	 * the application. Many of the authentication providers will create a
	 * {@code UserDetails} object as the principal.
	 * @return the <code>Principal</code> being authenticated or the authenticated
	 * principal after authentication.
	 */
	Object getPrincipal();
UsernamePasswordAuthenticationToken繼承了
AbstractAuthenticationToken(實作Authentication介面),
是security提供的簡單驗證類別。
此時看到這裡不知你跟我是否有一樣的疑問,為什麼authentication的用戶資料是在Principal裡面?
authentication = authenticationManager.authenticate(authentication);
StockUser userDetails = (StockUser) authentication.getPrincipal();
這是因為當我們使用UsernamePasswordAuthenticationToken時,
會調用 DaoAuthenticationProvider 協助驗證,而 DaoAuthenticationProvider 繼承自AbstractUserDetailsAuthenticationProvider 但是卻沒有實作驗證方法。
所以我們其實是使用 AbstractUserDetailsAuthenticationProvider #authenticate 的方法。
public Authentication authenticate(Authentication authentication)
		throws AuthenticationException {
	String username = (authentication.getPrincipal() == null) ? "NONE_PROVIDED"
			: authentication.getName();
	user = retrieveUser(username,(UsernamePasswordAuthenticationToken) authentication);
	preAuthenticationChecks.check(user);
	additionalAuthenticationChecks(user,(UsernamePasswordAuthenticationToken) authentication);
	postAuthenticationChecks.check(user);
	Object principalToReturn = user;
	if (forcePrincipalAsString) {
		principalToReturn = user.getUsername();
	}
	return createSuccessAuthentication(principalToReturn, authentication, user);
}
此時可以注意forcePrincipalAsString預設是false,所以我們的principalToReturn才會是用戶資料,不然就只會是username而已
接著讓我們看一下最後關鍵的createSuccessAuthentication方法
/**
	 * Creates a successful {@link Authentication} object.
	 * <p>
	 * Protected so subclasses can override.
	 * </p>
	 * <p>
	 * Subclasses will usually store the original credentials the user supplied (not
	 * salted or encoded passwords) in the returned <code>Authentication</code> object.
	 * </p>
	 * @param principal that should be the principal in the returned object (defined by
	 * the {@link #isForcePrincipalAsString()} method)
	 * @param authentication that was presented to the provider for validation
	 * @param user that was loaded by the implementation
	 * @return the successful authentication token
	 */
	protected Authentication createSuccessAuthentication(Object principal, Authentication authentication,
			UserDetails user) {
		// Ensure we return the original credentials the user supplied,
		// so subsequent attempts are successful even with encoded passwords.
		// Also ensure we return the original getDetails(), so that future
		// authentication events after cache expiry contain the details
		UsernamePasswordAuthenticationToken result = new UsernamePasswordAuthenticationToken(principal,
				authentication.getCredentials(), this.authoritiesMapper.mapAuthorities(user.getAuthorities()));
		result.setDetails(authentication.getDetails());
		this.logger.debug("Authenticated user");
		return result;
	}
結論:
還記得我們在一開始的疑問— 為什麼principal會有用戶資料?
原來在 #createSuccessAuthentication方法中,我們新建一個UsernamePasswordAuthenticationToken,
並且把用戶資料當作principal,因此我們需要用getPrincipal()方法才能取得資料
接下來就到了我們的測試環節了
postman新增登入請求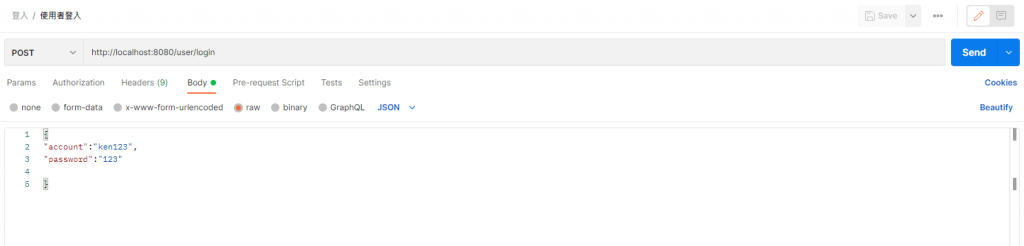
發出請求~~ 成功取得JWT
好的,今天先到這邊,下一篇會告訴大家如何利用JWT通過驗證來獲得特定連結的使用權