本系列文已出版成書「NestJS 基礎必學實務指南:使用強大且易擴展的 Node.js 框架打造網頁應用程式」,感謝 iT 邦幫忙與博碩文化的協助。如果對 NestJS 有興趣、覺得這個系列文對你有幫助的話,歡迎前往購書,你的支持是我最大的寫作動力!
Pipe 經常被用來處理使用者傳入的參數,比如:驗證參數的正確性、型別的轉換等。它有點像是客人畫完點餐單之後,服務生要進行點餐單的檢查。
在 Nest 中,Pipe 支援 Exception 的錯誤處理機制,當在 Pipe 拋出 Exception 時,該次請求就 不會 進入到 Controller 對應的方法裡,這樣的設計方法能夠有效隔離驗證程序與主執行程序,是非常好的實作方式。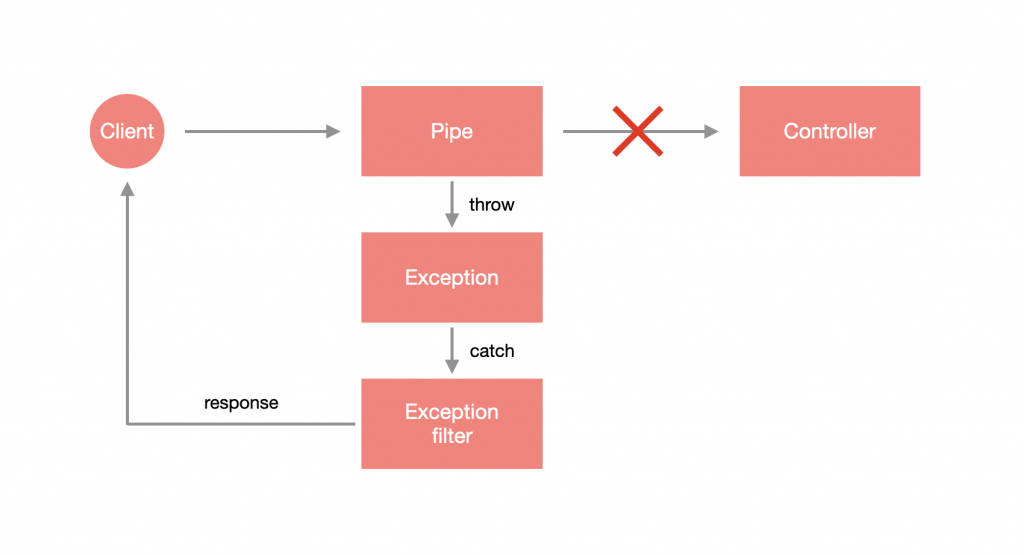
Nest 內建了以下幾個 Pipe 來輔助資料轉型與驗證:
ValidationPipe:驗證資料格式的 Pipe。ParseIntPipe:解析並驗證是否為 Integer 的 Pipe。ParseBoolPipe:解析並驗證是否為 Boolean 的 Pipe。ParseArrayPipe:解析並驗證是否為 Array 的 Pipe。ParseUUIDPipe:解析並驗證是否為 UUID 格式的 Pipe。DefaultValuePipe:驗證資料格式的 Pipe。Pipe 的使用方式很簡單,假設要解析並驗證路由參數是否為 Integer 的話,只需要在 @Param 裝飾器填入路由參數名稱並帶入 ParseIntPipe 即可。以 app.controller.ts 為例,如果 id 解析後為數字,就會透過 AppService 去取得對應的 User 資訊,否則會拋出 Exception:
import { Controller, Get, Param, ParseIntPipe } from '@nestjs/common';
import { AppService } from './app.service';

@Controller()
export class AppController {
  constructor(private readonly appService: AppService) {}

  @Get(':id')
  getUser(@Param('id', ParseIntPipe) id: number) {
    return this.appService.getUser(id);
  }

}
調整 app.service.ts:
import { Injectable } from '@nestjs/common';

@Injectable()
export class AppService {

  getUser(id: number) {
    const users = [
      {
        id: 1,
        name: 'HAO'
      }
    ];
    const user = users.find(x => x.id === id);
    return user || {};
  }
}
透過瀏覽器查看 http://localhost:3000/HAO 會收到錯誤訊息,因為路由參數為 HAO,並不能解析為 Integer:
{
  "statusCode": 400,
  "message": "Validation failed (numeric string is expected)",
  "error": "Bad Request"
}
假設想要更改錯誤訊息,那 ParseIntPipe 就必須實例化並帶入相關參數,以 app.controller.ts 為例,我希望出錯時收到的 HttpCode 是 406:
import { Controller, Get, HttpStatus, Param, ParseIntPipe } from '@nestjs/common';
import { AppService } from './app.service';

@Controller()
export class AppController {
  constructor(private readonly appService: AppService) {}

  @Get(':id')
  getUser(
    @Param('id', new ParseIntPipe({ errorHttpStatusCode: HttpStatus.NOT_ACCEPTABLE }))
    id: number
  ) {
    return this.appService.getUser(id);
  }

}
透過瀏覽器查看 http://localhost:3000/HAO 會得到下方結果:
{
  "statusCode": 406,
  "message": "Validation failed (numeric string is expected)",
  "error": "Not Acceptable"
}
如果想要自訂錯誤訊息的話,可以使用 exceptionFactory 這個參數來指定產生的 Exception。以 app.controller.ts 為例:
import { Controller, Get, NotAcceptableException, Param, ParseIntPipe } from '@nestjs/common';
import { AppService } from './app.service';

@Controller()
export class AppController {
  constructor(private readonly appService: AppService) {}

  @Get(':id')
  getUser(
    @Param(
      'id',
      new ParseIntPipe({
        exceptionFactory: () => new NotAcceptableException('無法解析為數字')
      })
    )
    id: number
  ) {
    return this.appService.getUser(id);
  }

}
透過瀏覽器查看 http://localhost:3000/HAO 會得到下方結果:
{
  "statusCode": 406,
  "message": "無法解析為數字",
  "error": "Not Acceptable"
}
如果覺得內建的 Pipe 無法滿足需求的話,Nest 是可以自訂 Pipe 的,事實上,Pipe 就是一個帶有 @Injectable 的 class,不過它要去實作 PipeTransform 這個介面。Pipe 可以透過 CLI 產生:
$ nest generate pipe <PIPE_NAME>
注意:
<PIPE_NAME>可以含有路徑,如:pipes/parse-int,這樣就會在src資料夾下建立該路徑並含有 Pipe。
這邊我建立一個 ParseIntPipe 在 pipes 資料夾下:
$ nest generate pipe pipes/parse-int
在 src 底下會看見一個名為 pipes 的資料夾,裡面有 parse-int.pipe.ts 以及 parse-int.pipe.spec.ts: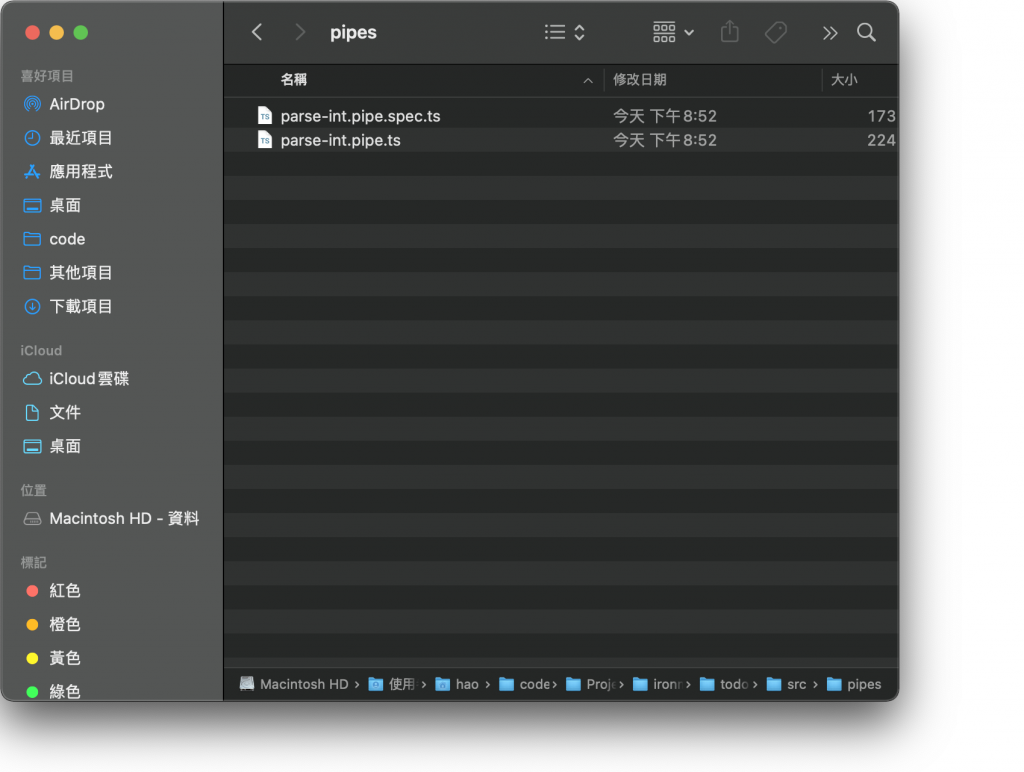
下方為 Pipe 的骨架,會看到有一個 transform(value: any, metadata: ArgumentMetadata) 方法,這就是要做邏輯判斷的地方,其中,value 為傳進來的值,metadata 為當前正在處理的參數元數據:
import { ArgumentMetadata, Injectable, PipeTransform } from '@nestjs/common';

@Injectable()
export class ParseIntPipe implements PipeTransform {
  transform(value: any, metadata: ArgumentMetadata) {
    return value;
  }
}
注意:
PipeTransform後面可以添加兩個 Type,第一個為T,定義傳入的值應該為何種型別,也就是transform裡面的value,第二個為R,定義回傳的資料型別。
這裡我們調整一下 parse-int.pipe.ts,經過 parseInt 之後的 value 是否為 NaN,如果是則會拋出 NotAcceptableException:
import { ArgumentMetadata, Injectable, NotAcceptableException, PipeTransform } from '@nestjs/common';

@Injectable()
export class ParseIntPipe implements PipeTransform<string, number> {
  transform(value: string, metadata: ArgumentMetadata) {
    const integer = parseInt(value);
    if ( isNaN(integer) ) {
      throw new NotAcceptableException('無法解析為數字');
    }
    return integer;
  }
}
接著去修改 app.controller.ts,來套用看看自己設計的 ParseIntPipe:
import { Controller, Get, Param } from '@nestjs/common';
import { AppService } from './app.service';
import { ParseIntPipe } from './pipes/parse-int.pipe';

@Controller()
export class AppController {
  constructor(private readonly appService: AppService) {}

  @Get(':id')
  getUser(
    @Param('id', ParseIntPipe) id: number
  ) {
    return this.appService.getUser(id)
  }

}
透過瀏覽器查看 http://localhost:3000/HAO 會得到下方結果:
{
  "statusCode": 406,
  "message": "無法解析為數字",
  "error": "Not Acceptable"
}
Pipe 在資料驗證這塊是非常實用的功能,不過如果有物件類型的資料要如何驗證呢?這部分我留到下篇再詳細說明。附上今天的懶人包:
@Injectable 的 class,它要去實作 PipeTransform 這個介面。