本系列文已出版成書「NestJS 基礎必學實務指南:使用強大且易擴展的 Node.js 框架打造網頁應用程式」,感謝 iT 邦幫忙與博碩文化的協助。如果對 NestJS 有興趣、覺得這個系列文對你有幫助的話,歡迎前往購書,你的支持是我最大的寫作動力!
簡單來說就是系統發生了錯誤,導致原本程序無法完成的情況,這種時候會盡可能把錯誤轉化為有效資訊。通常一套系統都會針對錯誤做處理,提供有效的錯誤訊息,就如一間大餐廳收到客訴必須出面回應客人,並要讓客人覺得這個回覆是有經過系統整理的,而不是草率回應。
在 JavaScript 中,最常見的拋出錯誤方法就是使用 Error,這個 Error 即為 Exception 的概念,把錯誤訊息包裝起來變成統一格式:
throw new Error('我達達的馬蹄是美麗的錯誤');
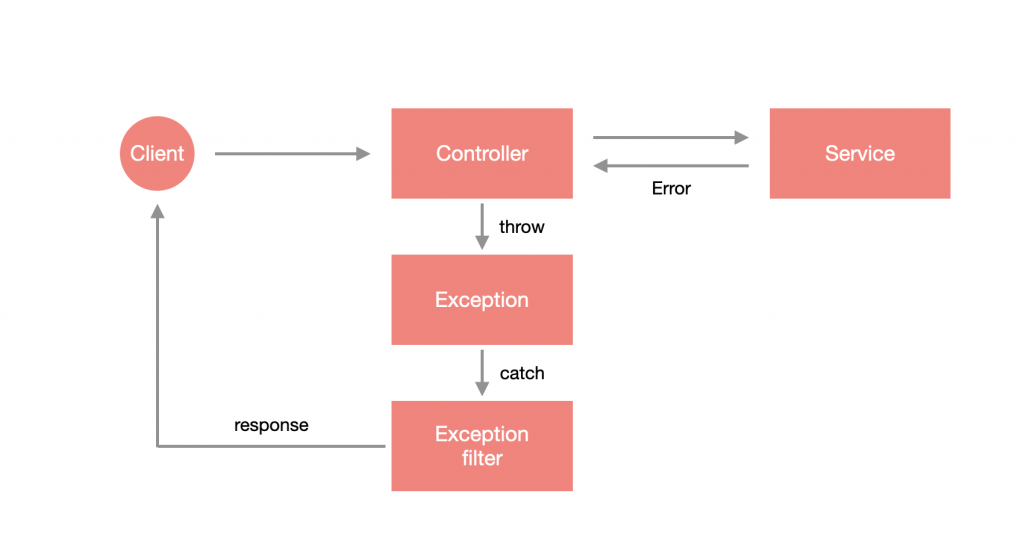
在拋出錯誤後,需要有個機制去捕捉這些錯誤,並從中提取資訊來整理回應的格式,Nest 在底層已經幫我們做了一套錯誤處理機制 - Exception filter,它會去捕捉拋出的錯誤,並將錯誤訊息、HttpCode 進行友善地包裝:
我們可以做個小實驗,修改一下 app.controller.ts 的內容,在 getHello() 裡直接拋出 Error:
import { Controller, Get } from '@nestjs/common';
import { AppService } from './app.service';

@Controller()
export class AppController {
  constructor(private readonly appService: AppService) {
  }

  @Get()
  getHello(): string {
    throw new Error('出錯囉!');
    return this.appService.getHello();
  }
}
這時候透過瀏覽器查看 http://localhost:3000 會發現收到的錯誤資訊跟我們定義的「出錯囉!」不同:
{
  "statusCode": 500,
  "message": "Internal server error"
}
原因是 Nest 內建的 Exception filter 會去偵測拋出的錯誤是什麼類型的,它只能夠接受 Nest 內建的 HttpException 與繼承該類別的 Exception,若不屬於這類型的錯誤就會直接拋出 Internal server error。
Nest 內建的標準 Exception 即為 HttpException,它是一個標準的 class,提供非常彈性的使用體驗,透過給定 constructor 兩個必填參數來自訂錯誤訊息與 HttpCode。這裡先來進行簡單的測試並修改 app.controller.ts:
import { Controller, Get, HttpException, HttpStatus } from '@nestjs/common';
import { AppService } from './app.service';

@Controller()
export class AppController {
  constructor(private readonly appService: AppService) {
  }

  @Get()
  getHello(): string {
    throw new HttpException('出錯囉!', HttpStatus.BAD_REQUEST);
    return this.appService.getHello();
  }
}
透過瀏覽器查看 http://localhost:3000 會發現與我們期望的回應是一致的:
{
  "statusCode": 400,
  "message": "出錯囉!"
}
那如果今天不想要用 Nest 的預設格式怎麼辦?可以把第一個錯誤訊息的參數換成 Object,Nest 會自動 覆蓋格式。這裡一樣做個簡單的測試並修改 app.controller.ts:
import { Controller, Get, HttpException, HttpStatus } from '@nestjs/common';
import { AppService } from './app.service';

@Controller()
export class AppController {
  constructor(private readonly appService: AppService) {
  }

  @Get()
  getHello(): string {
    throw new HttpException(
      {
        code: HttpStatus.BAD_REQUEST,
        msg: '出錯囉!'
      },
        HttpStatus.BAD_REQUEST
      );
    return this.appService.getHello();
  }
}
透過瀏覽器查看 http://localhost:3000 會發現格式已經變成我們預期的樣子了:
{
  "code": 400,
  "msg": "出錯囉!"
}
Nest 有內建一套基於 HttpException 的 Exception 可以使用,讓開發者根據不同的錯誤來選用不同的 Exception,這裡將它們列出來給大家參考:
BadRequestException
UnauthorizedException
NotFoundException
ForbiddenException
NotAcceptableException
RequestTimeoutException
ConflictException
GoneException
HttpVersionNotSupportedException
PayloadTooLargeException
UnsupportedMediaTypeException
UnprocessableEntityException
InternalServerErrorException
NotImplementedException
ImATeapotException
MethodNotAllowedException
BadGatewayException
ServiceUnavailableException
GatewayTimeoutException
PreconditionFailedException
這邊我們挑選 BadRequestException 進行測試並修改 app.controller.ts:
import { BadRequestException, Controller, Get } from '@nestjs/common';
import { AppService } from './app.service';

@Controller()
export class AppController {
  constructor(private readonly appService: AppService) {
  }

  @Get()
  getHello(): string {
    throw new BadRequestException('出錯囉!');
    return this.appService.getHello();
  }
}
這時候透過瀏覽器查看 http://localhost:3000 會得到下方的回應內容:
{
  "statusCode":400,
  "message":"出錯囉!",
  "error":"Bad Request"
}
如果不想用 Nest 的預設格式,同樣可以把參數換成 Object 來覆蓋:
import { BadRequestException, Controller, Get } from '@nestjs/common';
import { AppService } from './app.service';

@Controller()
export class AppController {
  constructor(private readonly appService: AppService) {
  }

  @Get()
  getHello(): string {
    throw new BadRequestException({ msg: '出錯囉!' });
    return this.appService.getHello();
  }
}
透過瀏覽器查看 http://localhost:3000 會發現格式為我們預期的樣子:
{
  "msg": "出錯囉!"
}
前面有提到 HttpException 為標準的 class,這表示我們可以自行設計類別來繼承 HttpException,達到自訂 Exception 的效果。不過大多數情況下不太需要自訂,因為 Nest 提供的 Exception 已經很夠用了!這邊我們先新增一個 custom.exception.ts 在 src/exceptions 底下:
import { HttpException, HttpStatus } from '@nestjs/common';

export class CustomException extends HttpException {
  constructor () {
    super('未知的錯誤', HttpStatus.INTERNAL_SERVER_ERROR);
  }
}
修改 app.controller.ts 進行測試:
import { Controller, Get } from '@nestjs/common';
import { AppService } from './app.service';
import { CustomException } from './exceptions/custom.exception';

@Controller()
export class AppController {
  constructor(private readonly appService: AppService) {
  }

  @Get()
  getHello(): string {
    throw new CustomException();
    return this.appService.getHello();
  }
}
透過瀏覽器查看 http://localhost:3000 會發現與預期結果相同:
{
  "statusCode":500,
  "message":"未知的錯誤"
}
如果希望完全掌握錯誤處理機制的話,Nest 是可以自訂 Exception filter 的,透過這樣的方式來添加 log,或是直接在這個層級定義回傳的格式。Exception Filter 必須要使用 @Catch(...exceptions: Type<any>[]) 裝飾器來捕捉錯誤,可以指定要捕捉特定類別的 Exception,也可以捕捉全部的錯誤,若要捕捉全部就不需要帶任何參數到 @Catch 裡,另外,還需要讓該 class 去實作 ExceptionFilter<T>,它會限制一定要設計 catch(exception: T, host: ArgumentsHost) 這個方法。我們在 src/filters 下新增 http-exception.filter.ts,來建立一個捕捉 HttpException 的 Exception filter:
import { ArgumentsHost, Catch, ExceptionFilter, HttpException } from '@nestjs/common';
import { Response } from 'express';

@Catch(HttpException)
export class HttpExceptionFilter implements ExceptionFilter<HttpException> {
  catch(exception: HttpException, host: ArgumentsHost) {
    const ctx = host.switchToHttp();
    const response = ctx.getResponse<Response>();
    const status = exception.getStatus();
    const message = exception.message;
    const timestamp = new Date().toISOString();

    const responseObject = {
        code: status,
        message,
        timestamp
    };
    response.status(status).json(responseObject);
  }
}
這個範例主要是希望可以捕捉 HttpException,在捕捉時,會獲得該 Exception 以及一個叫 ArgumentsHost 的東西,透過它來取得 Response 物件,進而回傳下方的格式到客戶端:
{
  "code": 400,
  "message": "出錯囉!",
  "timestamp": "2021-09-23T06:45:55.216Z"
}
是一個用來取得當前請求相關參數的 class,它是一個抽象概念,由於 Nest 能夠實作 REST API、WebSocket 與 MicroService,每個架構的參數都會有些不同,這時候透過抽象的方式做統合是最合適的,以 Express 作為底層的 REST API 來說,它封裝了 Request、Response 與 NextFunction,但如果是 MicroService 的話,封裝的內容物又不同了,所以 ArgumentsHost 提供了一些共同介面來取得這些底層的資訊:
透過 getType() 取得當前應用類型,以 REST API 來說,會得到字串 http:
host.getType() === 'http'; // true
透過 getArgs() 取得當前應用類型下封裝的參數,以 Express 為底層的 REST API 來說,即 Request、Response 與 NextFunction:
const [req, res, next] = host.getArgs();
從上面可以得出封裝的參數為 陣列格式,Nest 提供了透過索引值取得參數的方法 - getArgByIndex(index: number):
const req = host.getArgByIndex(0);
以上的方法都是透過對陣列的操作來取得相關參數,但這樣在面對不同架構的重用 會有困難,畢竟不同架構的封裝參數都會不同,這時候可以使用下方的方式來取得相關內容:
const rpcCtx: RpcArgumentsHost = host.switchToRpc(); // MicroService 的封裝內容
const httpCtx: HttpArgumentsHost = host.switchToHttp(); // REST 的封裝內容
const wsCtx: WsArgumentsHost = host.switchToWs(); // WebSocket 的封裝內容
使用方法十分簡單,粗略地分成兩種:
@UseFilters 裝飾器,只會針對該資源套用。@UseFilters 裝飾器,會針對整個 Controller 中的資源套用。@UseFilters 的參數則帶入要使用的 Exception filter。下方為單一資源的範例,修改 app.controller.ts 進行測試:
import { BadRequestException, Controller, Get, UseFilters } from '@nestjs/common';
import { AppService } from './app.service';
import { HttpExceptionFilter } from './filters/http-exception.filter';

@Controller()
export class AppController {
  constructor(private readonly appService: AppService) {
  }

  @Get()
  @UseFilters(HttpExceptionFilter)
  getHello(): string {
    throw new BadRequestException('出錯囉!');
    return this.appService.getHello();
  }
}
下方為 Controller 套用的範例:
import { BadRequestException, Controller, Get, UseFilters } from '@nestjs/common';
import { AppService } from './app.service';
import { HttpExceptionFilter } from './filters/http-exception.filter';

@Controller()
@UseFilters(HttpExceptionFilter)
export class AppController {
  constructor(private readonly appService: AppService) {
  }

  @Get()
  getHello(): string {
    throw new BadRequestException('出錯囉!');
    return this.appService.getHello();
  }
}
上方的兩個範例輸出結果相同,透過瀏覽器查看 http://localhost:3000 :
{
  "code":400,
  "message":"出錯囉!",
  "timestamp":"2021-09-23T07:05:11.102Z"
}
注意:
@UseFilters帶入的 Exception filter 可以是class本身,也可以是實例,他們的差別在於使用class會透過 Nest 依賴注入進行實例的管理,而帶入實例的話則不會。若沒有特別需要的話,還是以帶入class為主。
如果我的 Exception filter 是要套用到每一個資源上的話,不就要替每個 Controller 都添加 @UseFilters 嗎?別擔心,Nest 非常貼心提供了配置在全域的方法,只需要在 main.ts 進行修改即可:
import { NestFactory } from '@nestjs/core';
import { AppModule } from './app.module';
import { HttpExceptionFilter } from './filters/http-exception.filter';

async function bootstrap() {
  const app = await NestFactory.create(AppModule);
  app.useGlobalFilters(new HttpExceptionFilter());
  await app.listen(3000);
}
bootstrap();
透過 useGlobalFilters 來指定全域的 Exception filter,實在是非常方便!
上面的方法是透過模組外部完成全域配置的,如果希望透過依賴注入的方式來實作的話有沒有什麼方式可以達到呢?Nest 確實有提供解決方案,只需要在 AppModule 進行配置,既然是用依賴注入的方式,那就跟 Provider 脫離不了關係,透過指定 token 為 APP_FILTER 來實現,這裡是用 useClass 來指定要建立實例的類別:
import { Module } from '@nestjs/common';
import { APP_FILTER } from '@nestjs/core';
import { AppController } from './app.controller';
import { AppService } from './app.service';
import { HttpExceptionFilter } from './filters/http-exception.filter';

@Module({
  imports: [],
  controllers: [AppController],
  providers: [
    AppService,
    {
      provide: APP_FILTER,
      useClass: HttpExceptionFilter
    }
  ],
})
export class AppModule {}
要如何做好錯誤處理是一門學問,Nest 提供了制式化卻不失彈性的解決方案,透過 Exception 定義錯誤格式,並經由 Exception filter 統一處理這些錯誤,省去了很多麻煩。這邊附上今天的懶人包:
HttpException。HttpException 系列的 Exception 時,會統一回覆 Internal server error。HttpException 可以透過給定 Object 來覆寫格式。
感謝大大的系列文,最近正在學習 NestJS
看到這篇想到一直困擾的問題,前幾篇有看到大大介紹的標準輸出 & 函式庫輸出
不過不像這篇有辦法透過自己客製化一個輸出方法來統一輸出格式
例如:
{
    "status": "OK",
    "data": "hello world"
}
會希望在controller做回傳的動作時,統一去針對輸出來包裝
// ....
return 'hello world';
不知道大大有沒有推薦的方法,或是應該透過套件來實現此作法
你好,確實有方法可以針對輸出值做統一格式,叫 Interceptor,簡單來說就是一個攔截器,可以把 Controller 執行前、後的值 做處理,這部分會在後面篇章做說明,可以期待一下![]()
感謝大大回覆!已訂閱~期待解說~~
咨询一下自訂 Exception、Exception filter的应用场景,只有Exception filter可以自定义Error Code吧?
你好,自訂 Exception 可以讓你自行定義 Http Code,如果要再自訂發生錯誤時的回傳格式,就可以用 Exception filter 來捕捉 Exception