在實際工作中,我們常常會需要某一塊的網頁內容重複出現,像是動態的抓資料然後塞到 table 的 row 裡面。筆者第一份工作剛接觸前端時,連 jQuery 都不太會用,那時候憑著一股傻勁,抓完資料直接用迴圈組字串塞到 table 的 innerHtml,回想起來真是好傻好天真。現在我們有了 Angular 當然不用再這樣傻傻地自幹,我們今天就來介紹三個基礎的 Structural Directive(結構型指令)
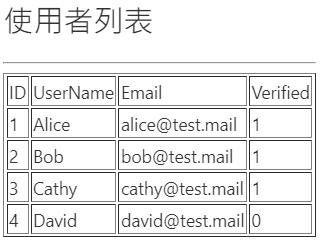
ngFor 指令可以從一個陣列中讀出每一個元素,然後根據這些元素的內容長出 HTML 內容。上面提到的抓資料動態塞到 table row 就非常適合用 ngFor 來處理,因為一個 table 裡的資料格式基本上都是固定的,只要跑迴圈就能一個蘿蔔一個坑,一行一行的把 row 加到 table 裡就能把所有資料顯示出來。
上次我們用 IronmanComponent 來顯示單一使用者的資訊,今天我們來新增一個 component,用 table 顯示一個使用者清單。
在我們加入越來越多自己的東西之後,Angular 自動產生的 HTML 內容會顯得很礙眼,現在可以視個人喜好決定要不要把 刪掉。筆者是留下上面的 ToolBar,然後
<div class="content" role="main">裡除了<router-outlet></router-outlet>全砍了
首先一樣用指令或者 Extension 的功能新增一個 component,這裡筆者就叫他 ironman-list。
  @Input()
  userList: IronmanUser[] = [];
userListFromAppComponent: IronmanUser[] = [
    {
      userId: 1,
      userName: 'Alice',
      email: 'alice@test.mail',
      verified: 1
    },
	// ...
    // 其他資料
    // ...
]
<app-ironman></app-ironman>刪掉或註解 <!-- <app-ironman
[(userInfo)]=userInfoFromAppComponent
(testOuputEvent)=handleTestEvent($event)>
</app-ironman> -->
<app-ironman-list [userList]=userListFromAppComponent></app-ironman-list>
 <tbody>
    <tr *ngFor="let user of userList">
      <td>{{user.userId}}</td>
      <td>{{user.userName}}</td>
      <td>{{user.email}}</td>
      <td>{{user.verified}}</td>
    </tr>
  </tbody>
執行程式,應該就能看到我們只寫了一份 <tr>…</tr> 就長出所有的內容了!這裡我們來稍微解釋一下 ngFor 的語法:
網頁應用中,我們也常常會需要根據資料的某個欄位,來決定要不要顯示某個內容,而這種需求,我們可以很容易地利用 *ngIf 來達到。這裡我們就來就紹一下 *ngIf 的用法。
假設我們今天的需求是:如果某個使用者已經通過認證,那管理員就能點編輯按鈕編輯這個使用者的資料,那我們只要對剛剛的 table 稍作修改,加入一行 *ngIf 的語法,就能達到這樣的效果
<tbody>
    <tr *ngFor="let user of userList">
        <td>{{user.userId}}</td>
        <td>{{user.userName}}</td>
        <td>{{user.email}}</td>
        <td>{{user.verified}}</td>
        <td>
            <button *ngIf="user.verified === 1">編輯</button>
        </td>
    </tr>
</tbody>
上面的程式中,*ngIf 的宿主是 button 元素,而且這個 button 只有在 user.verified 這個屬性等於 1 的時候才會被渲染出來。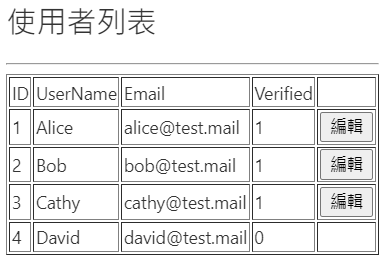
有些時候,我們可能不只需要用二分法來決定頁面的顯示,可能需要根據不同的值來顯示不同的內容,ngIf 雖然能做到,但是程式碼看起來總會覺得有點髒,這時候,ngSwitch 就派上用場了!
首先,先在 app.component.ts 的資料來源中加一筆 verified 有異常值的假資料,不然我們目前只有 0 跟 1 XD
userListFromAppComponent: IronmanUser[] = [
   // 前面不變
    {
      userId: 999,
      userName: 'Bug',
      email: '',
      verified: -1
    },
接著,稍微修改一下 ironman-list.component.html 的內容,把原本單純輸出 verified 的地方改成 ngSwitch
<tbody>
    <tr *ngFor="let user of userList">
      <td>{{user.userId}}</td>
      <td>{{user.userName}}</td>
      <td>{{user.email}}</td>
      <td [ngSwitch]="user.verified">
        <p *ngSwitchCase="1">已認證</p>
        <a *ngSwitchCase="0" href="#">前往認證</a>
        <p *ngSwitchDefault class="text-danger;">BUG</p>
      </td>
      <td>
        <button *ngIf="user.verified === 1">編輯</button>
      </td>
    </tr>
ngSwitch 一樣需要一個宿主,然後在這個宿主裡面,只有條件成立的 case 會被渲染出來。執行程式就會看到我們的 table 根據不同的 verified 屬性值顯示不同的元素,這裡稍微注意一下 ngSwitch 的語法有點不同,switch 的地方是用中括號的屬性繫結,case 的地方才是用 directive(星號)。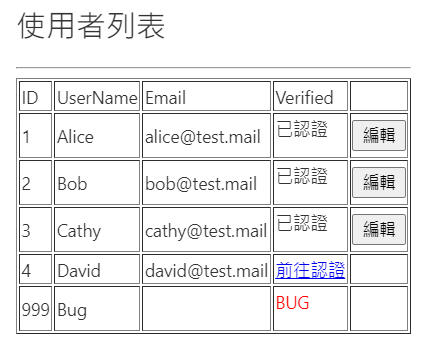
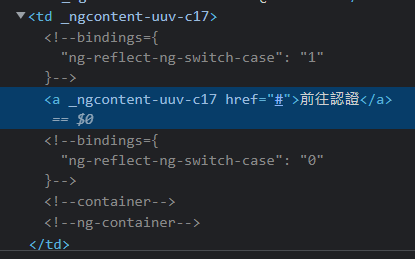
有些時候,如果我們所使用的 CSS 在選取上很難改,擅自增加一個宿主元素可能會讓 CSS 跑掉,這個時候我們可以多寫一個 <ng-container></ng-container> 來當宿主,ng-container 在被編譯成 JS 之後會變成註解,所以就不會影響到 CSS 的目標選取。例如,上面的 ngIf 也可以改成
<td>
    <ng-container [ngSwitch]="user.verified">
      <p *ngSwitchCase="1">已認證</p>
      <a *ngSwitchCase="0" href="#">前往認證</a>
      <p *ngSwitchDefault class="text-danger">BUG</p>
    </ng-container>
</td>
以上就是最基本、常用的三個結構型指令(structural directive),用這三個結構型指令就能讓我們很靈活的決定網頁的內容。明天,我們會介紹一下基本的 Angular 的 HttpClient,這樣我們就真的不用把資料寫死了。