只要你資料集越完整,辨識模型就越強大
這個系列偏重於方法的介紹與使用,因此今天我們不會重頭開始訓練模型,而是使用:
此模型是由Hiroki Taniai的github網站中取得
模型的快速下載點在這
接下來我們就一樣用之前文章中下載的資料集來做孿生網路的人臉辨識吧!
tensorflow-gpu或是其他更高版號的tensorflow)face_recognition目錄下新建一個檔案siamese.py
facenet_keras.h5下載下來import ntpath
import sys
# resolve module import error in PyCharm
import cv2
import numpy as np
sys.path.append(ntpath.dirname(ntpath.dirname(ntpath.abspath(__file__))))
import argparse
import random
from scipy.spatial import distance
from sklearn.preprocessing import normalize
from tensorflow.keras.models import load_model
from dataset.load_dataset import images_to_faces
def l2_normalize(x, axis=-1, epsilon=1e-10):
output = x / np.sqrt(np.maximum(np.sum(np.square(x), axis=axis, keepdims=True), epsilon))
return output
def main():
# 初始化arguments
ap = argparse.ArgumentParser()
ap.add_argument("-i", "--input", type=str, required=True, help="the input dataset path")
ap.add_argument("-m", "--model", type=str, required=True, help="the facenet model path")
args = vars(ap.parse_args())
# 載入模型 (模型輸入為(160, 160)大小的圖片,輸出為128-dimensions embeddings)
model = load_model(args["model"])
# 你可以取消下方的註解看看這個模型的長相
# print(model.summary())
print("[INFO] loading dataset....")
(faces, labels) = images_to_faces(args["input"])
print(f"[INFO] {len(faces)} images in dataset")
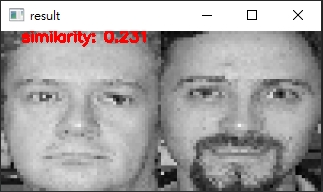
# 隨機抽取圖片檢查相似度 (抽取兩組:一組為同樣的人、一組為不同的人)
classes = np.unique(labels)
idxs = [np.where(labels == cls)[0] for cls in classes]
idx = random.choice(idxs)
pos_ids = random.sample(list(idx), 2)
pos_faces = faces[pos_ids]
pos_label = labels[pos_ids[0]]
neg_face = faces[random.choice(np.where(labels != pos_label)[0])]
# 對這兩組資料進行相似度比對
for compares in (pos_faces, [pos_faces[0], neg_face]):
# 將照片改為模型輸入的大小
img1 = cv2.resize(compares[0], (160, 160))
img2 = cv2.resize(compares[1], (160, 160))
# 將照片由灰階擴展到3-channels
img1 = np.dstack([img1] * 3)
img2 = np.dstack([img2] * 3)
# 預測圖片的embeddings
p1 = model.predict(np.expand_dims(img1, axis=0))
p2 = model.predict(np.expand_dims(img2, axis=0))
# 將結果正規化到[0 ,1]
p1 = normalize(p1)
p2 = normalize(p2)
# 透過判斷歐式距離來比較相似度 (數值越小越相似)
dist = distance.euclidean(p1, p2)
final = np.hstack([img1, img2])
cv2.putText(final, f"similarity: {round(dist, 3)}", (10, 15), cv2.FONT_HERSHEY_SIMPLEX, 0.5, (0, 0, 255), 2)
cv2.imshow("result", final)
cv2.waitKey(0)
if __name__ == '__main__':
main()
python face_recognition/siamese.py -i dataset/caltech_faces -m facenet_keras.h5: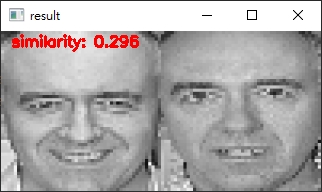
程式碼在這裡