想起小時候常看到的一個廣告:三個願望、一次滿足!
前兩天講到的孿生網路,
提到一個概念:相似度 (similiarity)
藉由比對兩張照片經過CNN處理後的輸出,來判斷是否為同一類別的照片 (或同一人)。
既然要使用CNN來處理圖片,
是否有一種方式可以只使用電腦視覺二人組OpenCV + Dlib來達成呢?
讓我們看下去!
Dlib的作者Davis King,在官方部落格發表了一篇如何使用Dlib來做人臉辨識,
作者在資料清洗與標註 (也就是Deep Learning最最重要的工作 -- 資料準備)下了非常大的功夫,只為了提供一個足夠強大的預訓練模型。
模型的訓練架構是使用triplet networks,
也就是與昨天的CNN網路 -- FaceNet的訓練方式類似 (這個在後面會提到),
有興趣了解細節的也很建議看看這篇由Adam Geitgey發表的人臉辨識原理Step-by-Step。
而使用的方式也非常簡單,讓我們開始動手做吧!
face_recognition目錄下新增一個檔案dlib_with_opencv.py
face_recognition,這個套件是一個Dlib人臉辨識功能的擴充套件,方便我們後續開發使用
load_dataset.py,我們修改程式碼,新增一個函數load_images讓其更有彈性:
 # 匯入必要套件
 import ntpath
 import os
 import pickle
 from itertools import groupby

 import cv2
 import numpy as np
 from imutils import paths

 # 匯入人臉偵測方法 (你可以依據喜好更換不同方法)
 from face_detection.opencv_dnns import detect


 def load_images(input_path, min_size=15):
     # 載入所有圖片
     image_paths = list(paths.list_images(input_path))
     # 將圖片屬於"哪一個人"的名稱取出 (如:man_1, man_2,...),並以此名稱將圖片分群
     groups = groupby(image_paths, key=lambda path: ntpath.normpath(path).split(os.path.sep)[-2])

     # 初始化結果 (images, names)
     images = []
     names = []

     # loop我們分群好的圖片
     for name, group_image_paths in groups:
         group_image_paths = list(group_image_paths)

         # 如果樣本圖片數小於15張,則不考慮使用該人的圖片 (因為會造成辨識結果誤差);可以嘗試將下面兩行註解看準確度的差異
         if (len(group_image_paths)) < min_size:
             continue

         for imagePath in group_image_paths:
             # 將圖片依序載入,取得人臉矩形框
             img = cv2.imread(imagePath)
             # 更新結果
             images.append(img)
             names.append(name)

     # 將結果轉成numpy array,方便後續進行訓練
     images = np.array(images)
     names = np.array(names)
     return (images, names)


 def images_to_faces(input_path):
     """
     將資料集內的照片依序擷取人臉後,轉成灰階圖片,回傳後續可以用作訓練的資料
     :return: (faces, labels)
     """
     # 判斷是否需要重新載入資料
     data_file = ntpath.sep.join([ntpath.dirname(ntpath.abspath(__file__)), "faces.pickle"])
     if os.path.exists(data_file):
         with open(data_file, "rb") as f:
             (faces, labels) = pickle.load(f)
             return (faces, labels)

     (images, names) = load_images(input_path)

     # 初始化結果 (faces, labels)
     faces = []
     labels = []

     # loop我們分群好的圖片
     for (img, name) in zip(images, names):
         rects = detect(img)
         # loop各矩形框
         for rect in rects:
             (x, y, w, h) = rect["box"]
             # 取得人臉ROI (注意在用陣列操作時,順序是 (rows, columns) => 也就是(y, x) )
             roi = img[y:y + h, x:x + w]
             # 將人臉的大小都轉成50 x 50的圖片
             roi = cv2.resize(roi, (50, 50))
             # 轉成灰階
             roi = cv2.cvtColor(roi, cv2.COLOR_BGR2GRAY)

             # 更新結果
             faces.append(roi)
             labels.append(name)

     # 將結果轉成numpy array,方便後續進行訓練
     faces = np.array(faces)

     with open(data_file, "wb") as f:
         pickle.dump((faces, labels), f)

     return (faces, labels)
dlib_with_opencv.py,程式碼與說明如下:
 import ntpath
 import sys

 # resolve module import error in PyCharm
 sys.path.append(ntpath.dirname(ntpath.dirname(ntpath.abspath(__file__))))

 import argparse
 import os
 import pickle
 import time

 import cv2
 import face_recognition
 from sklearn.model_selection import train_test_split

 from dataset.load_dataset import load_images
 from face_detection.dlib_hog_svm import detect as hog_detect
 from face_detection.dlib_mmod import detect as mmod_detect


 def main():
     # 初始化arguments
     ap = argparse.ArgumentParser()
     ap.add_argument("-i", "--input", type=str, required=True, help="the input dataset path")
     ap.add_argument("-e", "--embeddings-file", type=str, required=True,
                     help="the path to serialized db of facial embeddings")
     ap.add_argument("-d", "--detection-method", type=str, default="mmod", choices=["hog", "mmod"],
                     help="the detection method to use")
     args = vars(ap.parse_args())

     print("[INFO] loading dataset....")
     (faces, names) = load_images(args["input"], min_size=10)
     # 由於Dlib處理圖片不同於OpenCV的BGR順序,需要先轉換成RGB順序
     faces = [cv2.cvtColor(face, cv2.COLOR_BGR2RGB) for face in faces]
     print(f"[INFO] {len(faces)} images in dataset")

     # 初始化結果
     known_embeddings = []
     known_names = []

     # 先區分好我們的資料集
     (trainX, testX, trainY, testY) = train_test_split(faces, names, test_size=0.25, stratify=names, random_state=9527)

     # 建立我們的人臉embeddings資料庫
     data = {}
     print("[INFO] serializing embeddings...")
     if os.path.exists(args["embeddings_file"]):
         with open(args["embeddings_file"], "rb") as f:
             data = pickle.load(f)
     else:
         start = time.time()
         for (img, name) in zip(trainX, trainY):
             # 偵測人臉位置
             if args["detection_method"] == "mmod":
                 rects = mmod_detect(img)
             else:
                 rects = hog_detect(img)
             # 將我們偵測的結果(x, y, w, h)轉為face_recognition使用的box格式: (top, right, bottom, left)
             boxes = [(rect[1], rect[0] + rect[2], rect[1] + rect[3], rect[0]) for rect in rects]
             embeddings = face_recognition.face_encodings(img, boxes)
             for embedding in embeddings:
                 known_embeddings.append(embedding)
                 known_names.append(name)

         print("[INFO] saving embeddings to file...")
         data = {"embeddings": known_embeddings, "names": known_names}
         with open(args["embeddings_file"], "wb") as f:
             pickle.dump(data, f)
         end = time.time()
         print(f"[INFO] serializing embeddings done, tooks {round(end - start, 3)} seconds")

     # 用已知的臉部資料庫來辨識測試資料集的人臉
     for (img, actual_name) in zip(testX, testY):
         # 這裡我們直接用face_recognition來偵測人臉
         boxes = face_recognition.face_locations(img, model="cnn")
         embeddings = face_recognition.face_encodings(img, boxes)

         # 辨識結果
         names = []
         for embedding in embeddings:
             matches = face_recognition.compare_faces(data["embeddings"], embedding)
             name = "unknown"
             # matches是一個包含True/False值的list,會比對所有資料庫中的人臉embeddings
             if True in matches:
                 # 判斷哪一個人有最多matches
                 matchedIdexs = [i for (i, b) in enumerate(matches) if b]
                 counts = {}

                 for i in matchedIdexs:
                     name = data["names"][i]
                     counts[name] = counts.get(name, 0) + 1

                 name = max(counts, key=counts.get)
             names.append(name)

         for ((top, right, bottom, left), name) in zip(boxes, names):
             cv2.rectangle(img, (left, top), (right, bottom), (0, 255, 0), 2)
             y = top - 8 if top - 8 > 8 else top + 8
             cv2.putText(img, f"actual: {actual_name}", (left, y - 15), cv2.FONT_HERSHEY_SIMPLEX, 0.5, (0, 255, 255), 2)
             cv2.putText(img, f"predict: {name}", (left, y), cv2.FONT_HERSHEY_SIMPLEX, 0.5, (255, 0, 0), 2)
         img = cv2.cvtColor(img, cv2.COLOR_RGB2BGR)
         cv2.imshow("Result", img)
         cv2.waitKey(0)


 if __name__ == '__main__':
     main()
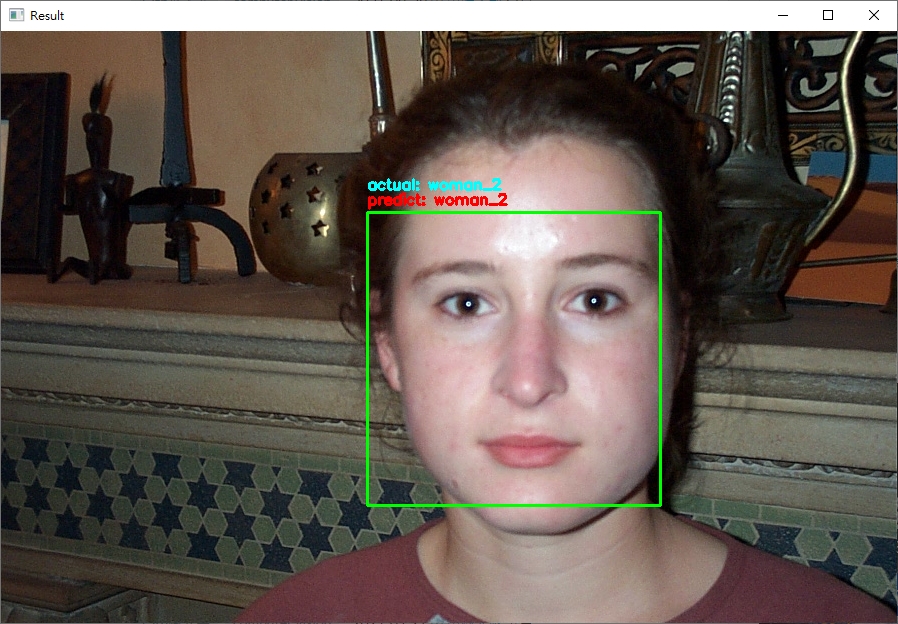
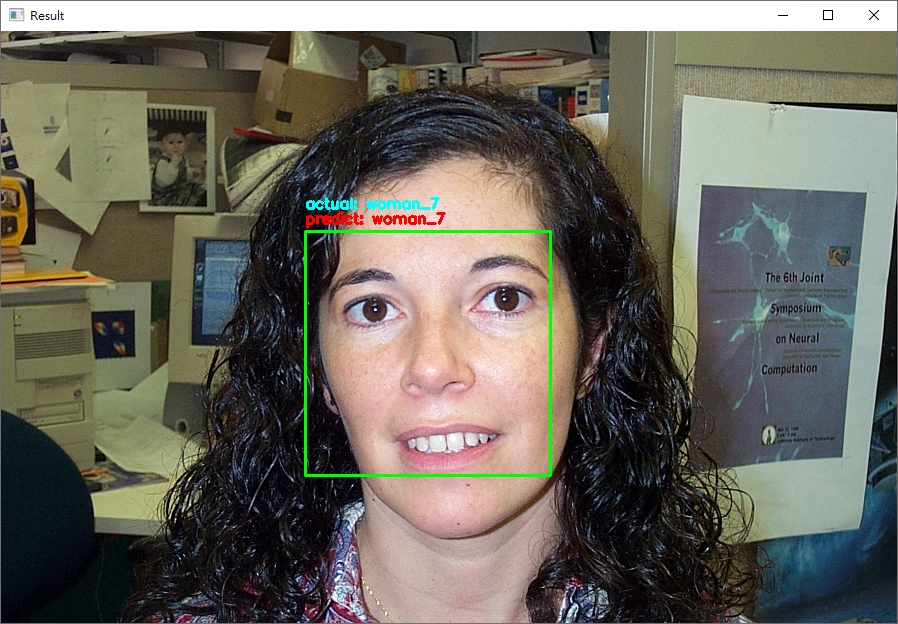
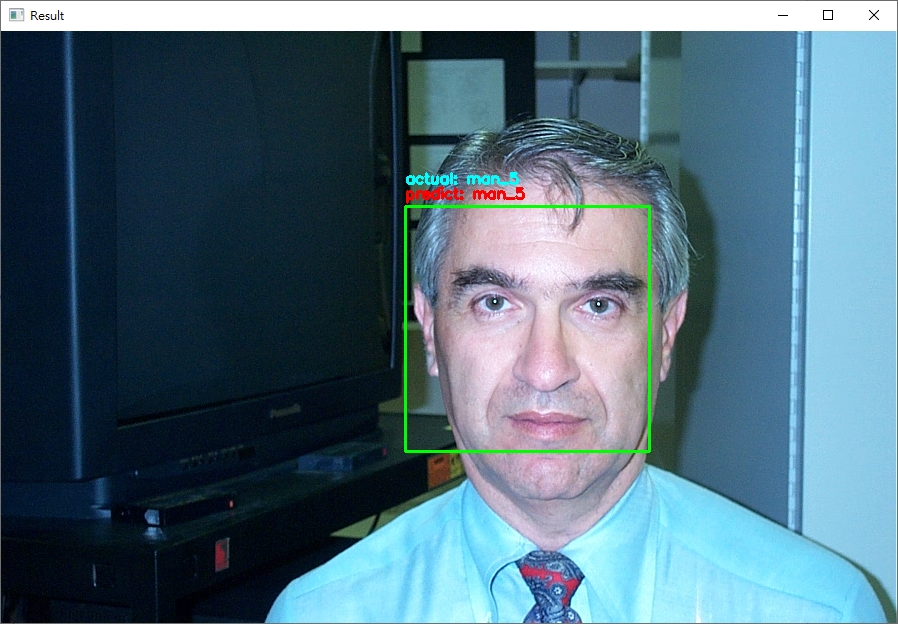
python face_recognition/dlib_with_opencv.py -i dataset/caltech_faces -e embeddings.pickle,輸出的範例結果如下:


ctrl+c終止程式。從結果來看,可以發現辨識的結果基本都是正確的! (無論照片中的人種與性別)。
看到這裡,
其實我們一直都是用CALTECH的資料集,
那如果用我們自己的臉呢?
如果我想要即時辨識呢?
讓我們,繼續看下去。
dataset/caltech_faces目錄下新增一個目錄,以及加入你要辨識的照片 (約10 - 15張即有很好的辨識結果)dlib_with_opencv_realtime.py的檔案,程式碼內容如下:
 import ntpath
 import sys

 # resolve module import error in PyCharm
 sys.path.append(ntpath.dirname(ntpath.dirname(ntpath.abspath(__file__))))

 import argparse
 import os
 import pickle
 import time

 import cv2
 import face_recognition

 from imutils.video import WebcamVideoStream

 from dataset.load_dataset import load_images
 from face_detection.dlib_hog_svm import detect as hog_detect
 from face_detection.dlib_mmod import detect as mmod_detect


 def main():
     # 初始化arguments
     ap = argparse.ArgumentParser()
     ap.add_argument("-i", "--input", type=str, required=True, help="the input dataset path")
     ap.add_argument("-e", "--embeddings-file", type=str, required=True,
                     help="the path to serialized db of facial embeddings")
     ap.add_argument("-d", "--detection-method", type=str, default="mmod", choices=["hog", "mmod"],
                     help="the detection method to use")
     args = vars(ap.parse_args())

     print("[INFO] loading dataset....")
     (faces, names) = load_images(args["input"], min_size=10)
     # 由於Dlib處理圖片不同於OpenCV的BGR順序,需要先轉換成RGB順序
     faces = [cv2.cvtColor(face, cv2.COLOR_BGR2RGB) for face in faces]
     print(f"[INFO] {len(faces)} images in dataset")

     # 初始化結果
     known_embeddings = []
     known_names = []

     # 建立我們的人臉embeddings資料庫
     data = {}
     print("[INFO] serializing embeddings...")
     if os.path.exists(args["embeddings_file"]):
         with open(args["embeddings_file"], "rb") as f:
             data = pickle.load(f)
     else:
         start = time.time()
         for (img, name) in zip(faces, names):
             # 偵測人臉位置
             if args["detection_method"] == "mmod":
                 rects = mmod_detect(img)
             else:
                 rects = hog_detect(img)
             # 將我們偵測的結果(x, y, w, h)轉為face_recognition使用的box格式: (top, right, bottom, left)
             boxes = [(rect[1], rect[1] + rect[3], rect[0] + rect[2], rect[0]) for rect in rects]
             embeddings = face_recognition.face_encodings(img, boxes)
             for embedding in embeddings:
                 known_embeddings.append(embedding)
                 known_names.append(name)

         print("[INFO] saving embeddings to file...")
         data = {"embeddings": known_embeddings, "names": known_names}
         with open(args["embeddings_file"], "wb") as f:
             pickle.dump(data, f)
         end = time.time()
         print(f"[INFO] serializing embeddings done, tooks {round(end - start, 3)} seconds")

     # 啟動WebCam
     vs = WebcamVideoStream().start()
     time.sleep(2.0)
     fps = vs.stream.get(cv2.CAP_PROP_FPS)
     print("Frames per second using cv2.CAP_PROP_FPS : {0}".format(fps))

     while True:
         frame = vs.read()

         img = cv2.cvtColor(frame, cv2.COLOR_BGR2RGB)
         boxes = face_recognition.face_locations(img, model="cnn" if args["detection_method"] == "mmod" else "hog")
         embeddings = face_recognition.face_encodings(img, boxes)

         # 辨識結果
         names = []
         for embedding in embeddings:
             matches = face_recognition.compare_faces(data["embeddings"], embedding)
             name = "unknown"
             # matches是一個包含True/False值的list,會比對所有資料庫中的人臉embeddings
             if True in matches:
                 # 判斷哪一個人有最多matches
                 matchedIdexs = [i for (i, b) in enumerate(matches) if b]
                 counts = {}

                 for i in matchedIdexs:
                     name = data["names"][i]
                     counts[name] = counts.get(name, 0) + 1

                 name = max(counts, key=counts.get)
             names.append(name)

         for ((top, right, bottom, left), name) in zip(boxes, names):
             cv2.rectangle(img, (left, top), (right, bottom), (0, 255, 0), 2)
             y = top - 8 if top - 8 > 8 else top + 8
             cv2.putText(img, f"{name}", (left, y), cv2.FONT_HERSHEY_SIMPLEX, 0.5, (255, 0, 0), 2)
         img = cv2.cvtColor(img, cv2.COLOR_RGB2BGR)
         cv2.imshow("Result", img)

         key = cv2.waitKey(1) & 0xFF
         if key == ord("q"):
             break


 if __name__ == '__main__':
     main()

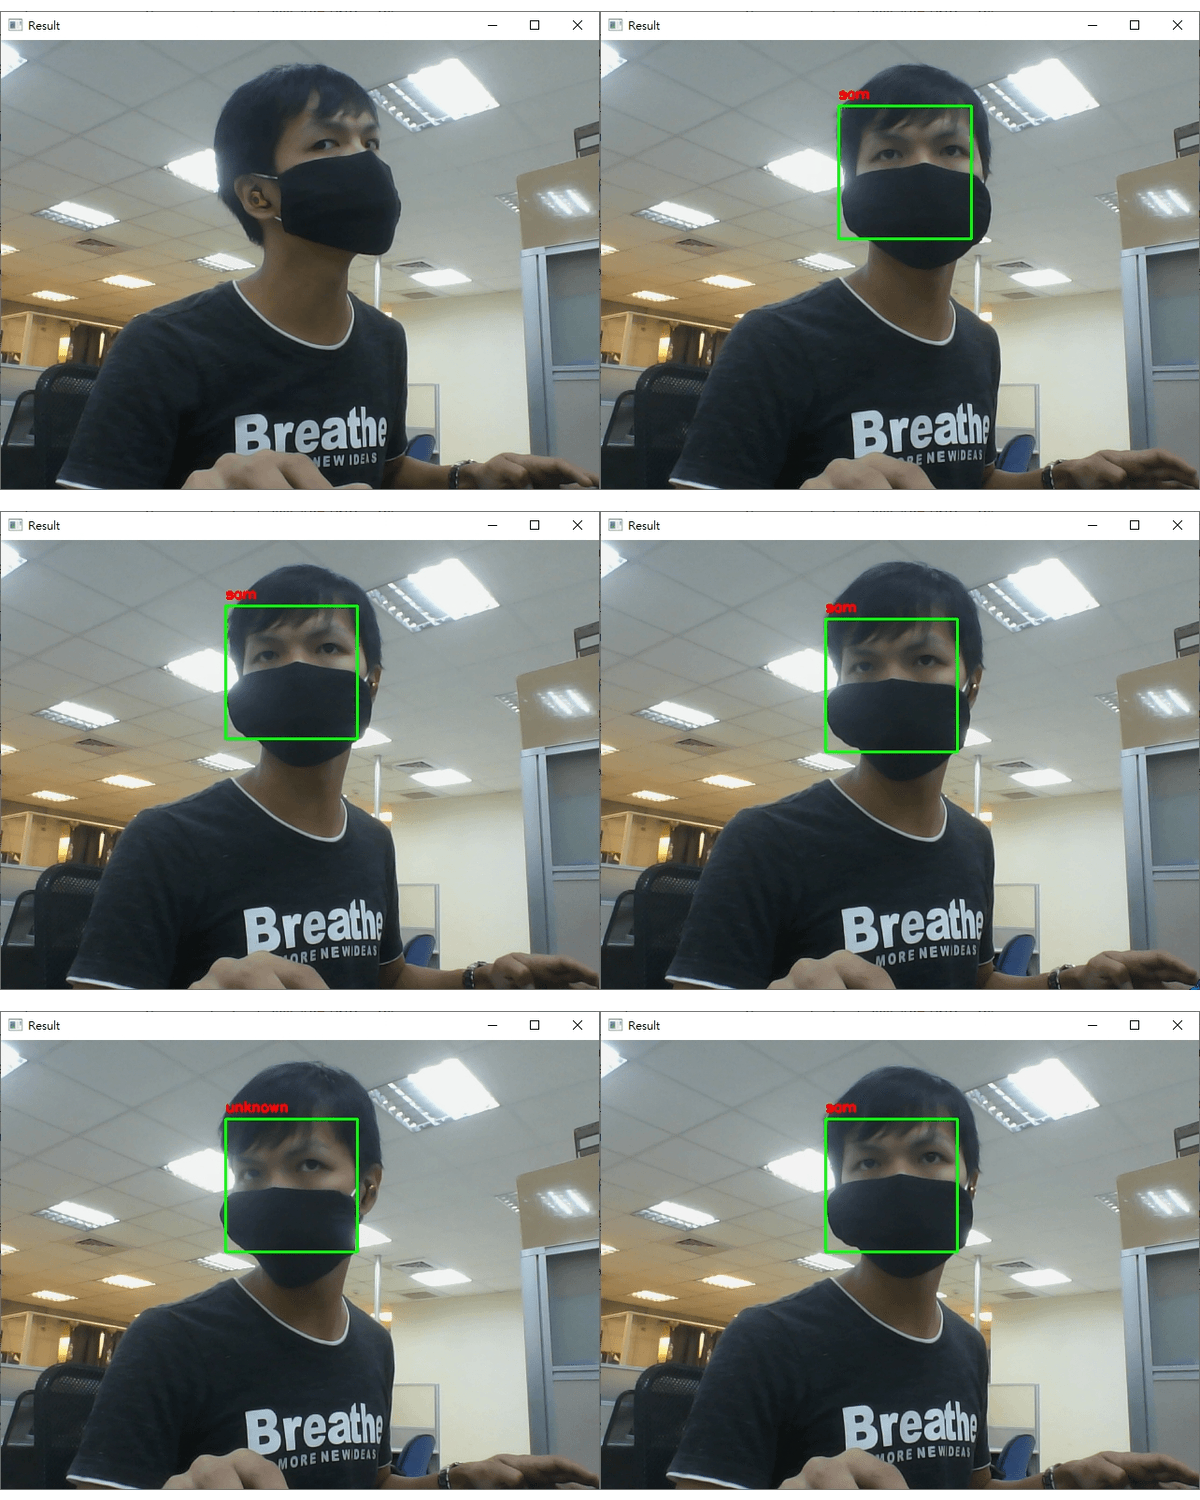
注意在辨識的過程中,我刻意將臉轉個角度出現"unknown"字樣;如果辨識的人臉不在資料庫就顯示"unknown"。
-d hog來使用Dlib特徵檢測偵測人臉GPU的Dlib來實作;否則你如果像我一樣做即時應用會有很慘不忍賭的狀況發生...今天的內容就到這邊,
希望你也可以用今天的方法建立一個屬於自己的人臉辨識系統!
程式碼傳送門在這

請問您在dlib_with_opencv_realtime.py這個專案下 所打的 from dataset.load_dataset import load_images 是從哪裡宣告的呢 因為我打上去都是紅底線
您好,
在執行的過程是否有發生錯誤呢?
如果沒有,那錯誤是可以忽略的喔 (可能是IDE環境無法找到)
如果執行會發生錯誤,建議您:
load_dataset.py內是否有新增load_images函數希望對你有幫助!
請問您在dlib_with_opencv_realtime.py這個專案下
Traceback (most recent call last):
File "C:/Users/ADMIN/PycharmProjects/pythonProject4/face_detection/dataset/dlib_with_opencv_realtime.py", line 17, in
from dataset.load_dataset import load_images
ModuleNotFoundError: No module named 'dataset.load_dataset'
如果遇到這個狀況可以怎麼處理
缺少函數,請參考本篇文章第3步驟喔~
不好意思可以請問怎麼新增函數嗎
你的新增函數是指步驟3的部分嗎?
load_images(input_path, min_size=15)整個方法。完成後的load_dataset.py可以參考github上的這個檔案
你好~
你這邊使用Dlib人臉辨識功能的擴充套件
face_recognition (版本:0.3.0)
由於版本已經無法下載只能下載1.0.0或更舊0.2.0
使用其他版本會影響辨識嗎?
不好意思,因為這系列的文章時間已有點久,部分套件可能會有過時的情形。
建議可以先升級到最新版測試看看,比較不會遇到之前版本的bug;
可能會碰到方法的參數不同或deprecated (但剛剛大概看了一下,在本系列內用到的方法應該沒有太大的差別),可以試著解看看。
有其他問題可以留言在這或github上,有空看到我會盡快回覆
祝你順利 :)