什麼是貝茲曲線?它能創造一連串平滑的曲線,被應用在PS和AI中的鋼筆、以及常見的CSS Animation,換句話說,你學會了貝茲曲線,就大概懂一半網頁動畫了,它厲害的地方在於,用一個很簡單並直覺的方式來設定動畫,加上其可視化的特性,在上述例子中都能很輕鬆的運用。
像是在這個網站用滑鼠拉動控制桿後,就可以輕易地拿到參數,把它複製到CSS Animation的設定中,就能輕鬆產生動畫。
起初是沒打算拿貝茲曲線來作文章的,CSS已經有框架可以用了,為什麼我們還要用JS從底層實作一遍呢?這個論點大致上沒錯,不過,昨晚睡前我不經意看到了這部影片:The Beauty of Bézier Curves
這部影片,是我目前為止看過講的最簡單易懂的貝茲曲線,包含很完整的綱要和學習步驟,當然,裡面還是包含了一些數學,但重要的是,它有談到如何透過簡化的公式實現美麗的貝茲曲線,並且,我們的眼光可以不侷限於CSS的框架,透過多條貝茲曲線的連接,可以輕鬆實現昨天所說的「尋路問題」,並打破原先的隨機性和不可預測性。
雖然是推薦大家看原版英文的影片(有CC字幕),享受質感,不過還是提供大家英文苦手的選擇:bilibibli的翻譯版本

這邊我們設計一個向量物件,來描述貝茲曲線的四個基本點,名稱和教學中採用一致的(p0, p1, p2 ,p3)
function vector(x, y){
    this.x = x;
    this.y = y;
}
function bezierCurves(x0, y0, x1, y1, x2, y2, x3, y3){
    this.p0 = new vector(x0, y0);
    this.p1 = new vector(x1, y1);
    this.p2 = new vector(x2, y2);
    this.p3 = new vector(x3, y3);
    this.timestamp = Date.now();
    this.lifeTime = 2;
}
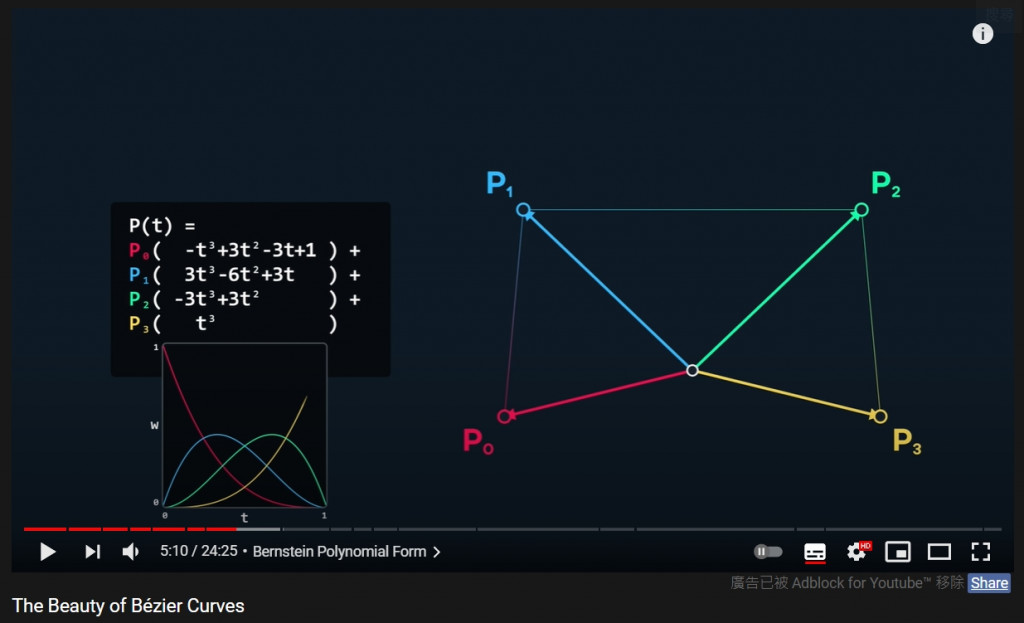
然後把路徑的公式描繪出來,為了能清楚呈現多項式中的次方項,採用Math.pow的寫法,而不是t x t x t,一樣是在原型上添加方法
bezierCurves.prototype.Path = function(){
    let P = function(a, b){
        return Math.pow(a, b);
    }
    return {'x': x0 * (-1 * P(t ,3) + 3 * P(t ,2) - 3 * P(t ,1) + 1 )
                +x1 * ( 3 * P(t ,3) - 6 * P(t ,2) + 3 * P(t ,1))
                +x2 * (-3 * P(t ,3) + 3 * P(t ,2))
                +x3 * ( 1 * P(t ,3)),
            'y': y0 * (-1 * P(t ,3) + 3 * P(t ,2) - 3 * P(t ,1) + 1 )
                +y1 * ( 3 * P(t ,3) - 6 * P(t ,2) + 3 * P(t ,1))
                +y2 * (-3 * P(t ,3) + 3 * P(t ,2))
                +y3 * ( 1 * P(t ,3))}
}
然後我們試著讓一條新的貝茲曲線接上舊的,一樣是設計animeList跑迴圈時所呼叫的NextFrame方法:
bezierCurves.prototype.NextFrame = function(){
    // 計算下一偵的位置(0~1)
    let dT = (Date.now() - this.timestamp) / 1000 / this.lifeTime;
    if(dT <= 1){
        let point = bezierCurves.prototype.Path(dT);
        context.save();
        context.translate(pointX, pointY);
        context.drawImage(mouseImg, -mouseImg.width/2, -mouseImg.height/2);
        context.restore();
    }
    else{
        // 製作一個閉環
        let newObject = new bezierCurves(this.p3.x, this.p3.y,
                                         this.p3.x * 2 - this.p2.x,
                                         this.p3.y * 2 - this.p2.y,
                                         this.p0.x * 2 - this.p1.x,
                                         this.p0.y * 2 - this.p1.y,
                                         this.p0.x, this.p0.y);
        let index = animeList.indexOf(this);
        delete animeList[index];
        animeList[index] = newObject;
    }
}
有點快睡著了,打code打到度估,今天就先這樣了不好意思><,這幾天有空再回來補demo吧!
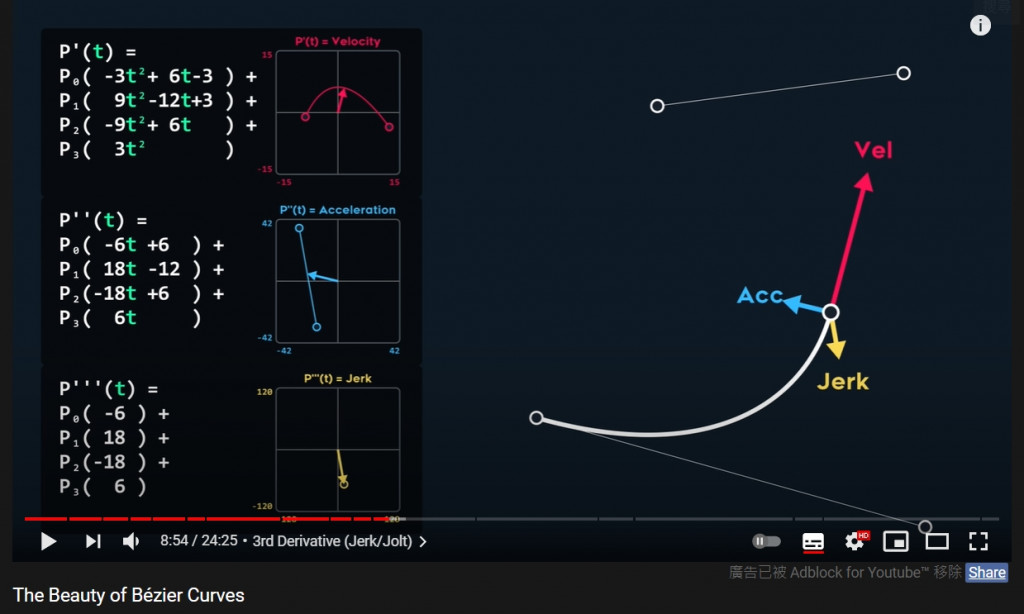
其他:
bezierCurves.prototype.Velocity = function(){
    let P = function(a, b){
        return Math.pow(a, b);
    }
    return {'x': x0 * (-3 * P(t ,2) +  6 * P(t ,1) - 3 )
                +x1 * ( 9 * P(t ,2) - 12 * P(t ,1) + 3 )
                +x2 * (-9 * P(t ,2) +  6 * P(t ,1))
                +x3 * ( 3 * P(t ,2)),
            'y': y0 * (-3 * P(t ,2) +  6 * P(t ,1) - 3 )
                +y1 * ( 9 * P(t ,2) - 12 * P(t ,1) + 3 )
                +y2 * (-9 * P(t ,2) +  6 * P(t ,1))
                +y3 * ( 3 * P(t ,2))}
}
bezierCurves.prototype.Acceleration = function(){
    let P = function(a, b){
        return Math.pow(a, b);
    }
    return {'x': x0 * ( -6 * P(t ,1) +  6 )
                +x1 * ( 18 * P(t ,1) - 12 )
                +x2 * (-18 * P(t ,1) +  6 )
                +x3 * (  6 * P(t ,1)),
            'y': y0 * ( -6 * P(t ,1) +  6 )
                +y1 * ( 18 * P(t ,1) - 12 )
                +y2 * (-18 * P(t ,1) +  6 )
                +y3 * (  6 * P(t ,1))}
}
bezierCurves.prototype.Jerk = function(){
    let P = function(a, b){
        return Math.pow(a, b);
    }
    return {'x': x0 * ( -6 )
                +x1 * ( 18 )
                +x2 * (-18 )
                +x3 * (  6 ),
            'y': y0 * ( -6 )
                +y1 * ( 18 )
                +y2 * (-18 )
                +y3 * (  6 )}
}
