Hei,我是Charlie!
在Day17當中,我們完成了後端的結帳功能,在今天我們將完成前端的結帳功能跟結帳成功頁面。
================================◉‿◉=================================
首先建立createOrder.vue,然後在購物車的結帳按鈕中導向他:
<b-button variant="info" @click="createOrder">結帳</b-button>

createOrder(){
  window.location.href = "/#/createorder"
  window.location.reload()
},
然後在createOrder.vue當中建立template,template當中會包含可以數量增減的部分:
<div id="carts" style="margin-top: 15px;">
	<b-row v-for="item in carts" :key="item.id">
		<b-col cols="2">
			<img :src="'http://localhost:8000' + item.product.img" style="width:150px;height: 150px;" alt="">
		</b-col>
		<b-col cols="3">
			<h4>{{ item.product.name }}</h4>
		</b-col>
		<b-col cols="3">
			<b-form-spinbutton id="product_id_spin" v-model="item.amount" min="1" max="100" @change="fixAmount(item.id)"></b-form-spinbutton>
		</b-col>
		<b-col cols="2">
			<h4>${{ item.product.price * item.amount }}</h4>
		</b-col>
		<b-col cols="2">
			<b-button variant="danger" @click="deleteCart(item.id)">刪除</b-button>
		</b-col>
	</b-row>
	<hr>
	<b-row>
		<b-col cols="8"></b-col>
		<b-col cols="2">
			<h5>共計 {{ itemCount }} 件</h5>
		</b-col>
		<b-col cols="2">
			<h5>總計: {{ total }}</h5>
		</b-col>
	</b-row>
	<hr>
	<b-row>
		<b-col cols="10"></b-col>
		<b-col cols="2"><b-button variant="info">確認結帳</b-button></b-col>
	</b-row>
</div>
其中total跟itemCount是使用computed的方式,讓變數可以監聽item的變化:
computed: {
  total: function(){
    var sum = 0
    this.carts.forEach((item) => {
      sum += item.amount * item.product.price
    })
    return sum
  },
  itemCount: function(){
    var sum = 0
    this.carts.forEach((item) => {
      sum += item.amount
    })
    return sum
  }
},
其他的話在購物車的程式碼都有,可參考 Day13
所以成果會像這樣:

再來是結帳的部分,先在apis裡面新增order.js,新增打結帳後端的程式碼:
import axios from 'axios'
import {host,port} from '@/apis/constant.js'

export function createOrderData(username,token){
  return axios.post(`http://${host()}:${port()}/userorder`,{
    "username":username
  },{
    headers:{
      "AUTHORIZATION":token
    }
  })
}
接著在createOrder.vue當中的結帳button綁定:
<b-col cols="2"><b-button variant="info" @click="checkout">確認結帳</b-button></b-col>
接著新增checkout方法:
checkout(){
var username = window.localStorage.getItem("username")
var token = window.localStorage.getItem("token")
createOrderData(username,token).then((response) => {
  if(response.data.code == STATUS_OK){
    this.$fire({type:"success",text:"結帳成功"}).then(() => {
      window.location.href = "/#/index"
      window.location.reload()
    })
  }else{
    this.$fire({type:"error",text:response.data.data})
  }
})
},
測試: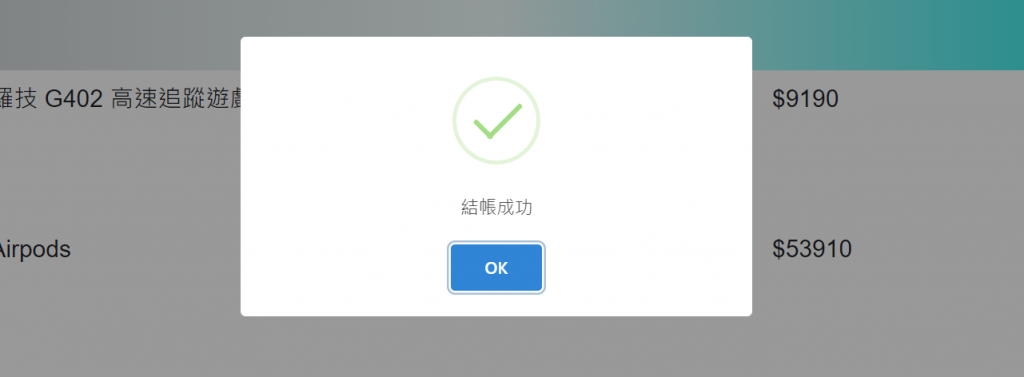

因為目前還沒有金流的部分,所以按下去就會結帳成功,而之後我們將串接paypal付款,就可以有金流付款的動作。
================================◉‿◉=================================
Day18結束了!今天我們完成了結帳前端的部分,而明天我們將先介紹PayPal的部分,See ya next day!