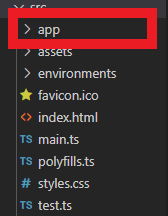
還記得我們昨天說到的主程式區塊嗎 ?

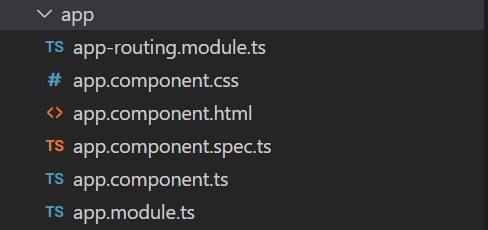
讓我們把app資料夾打開來,可以看到裡面的內容物長這樣。

接著打開app.component.html,並且把裡面的內容都清空。
打指令開啟專案時,只會看到空白畫面。
ng serve --open
此時在app.component.html加上
<ul>
<li>Test1</li>
<li>Test2</li>
</ul>
儲存後,Vscode就會幫我們自動重新編譯喔!
你會看到畫面上出現

可以發現我們更改的結果已經顯示在上面了
打開 app.component.ts檔案
import { Component } from '@angular/core';

@Component({
  selector: 'app-root',
  templateUrl: './app.component.html',
  styleUrls: ['./app.component.css']
})
export class AppComponent {
  title = 'StockAngular';
}
此時你是否注意到Component這個字眼呢?
以下讓我來說明Component的功用
Components are the main building block for Angular applications. Each component consists of:
An HTML template that declares what renders on the page
A Typescript class that defines behavior
A CSS selector that defines how the component is used in a template
Optionally, CSS styles applied to the template
從文件上可以看出,Angular對Component的定義就是必須包含至少三個元件
1.html模板(app.component.html)
2.一個ts檔案定義這些元件的設定 (app.component.ts)
3.CSS selector: 當外面要引用這個組件時需要使用的名稱定義,此處定義是app-root
打開index.html
<!doctype html>
<html lang="en">
<head>
  <meta charset="utf-8">
  <title>StockAngular</title>
  <base href="/">
  <meta name="viewport" content="width=device-width, initial-scale=1">
  <link rel="icon" type="image/x-icon" href="favicon.ico">
</head>
<body>
  <app-root></app-root> #由此引入appComponent
</body>
</html>
4.對template的css設定(可選)
這裡其實體現了Angular跟傳統前端不一樣的地方。
傳統情況我們寫前端是DOM元素主導,而Angular框架則是交由組件來主導,
透過組件我們可以更好的降低程式之間的耦合性。
import { NgModule } from '@angular/core';
import { RouterModule, Routes } from '@angular/router';

const routes: Routes = [];

@NgModule({
  imports: [RouterModule.forRoot(routes)],
  exports: [RouterModule]
})
export class AppRoutingModule { }
路由模組
顧名思義就是這個檔案是負責管理你的網頁打什麼網址會導到哪個組件去。
讓我們先新建一個測試組件 Component-Test1
ng generate component Test1 #新增組件CLI指令 也可以簡化成 ng g c Test1

CREATE src/app/test1/test1.component.html (20 bytes)
CREATE src/app/test1/test1.component.spec.ts (619 bytes)
CREATE src/app/test1/test1.component.ts (271 bytes)
CREATE src/app/test1/test1.component.css (0 bytes)
UPDATE src/app/app.module.ts (471 bytes) #幫我們自動在模組管理的類別中引入新的組件
可以發現 Angular CLI 會自動在app資料夾內再新增一個資料夾是test1,
裡面新增的內容除了沒有app-routing.module.ts&app.module.ts之外
其他都跟app資料夾裡面的東西一樣
此時讓我們來設定Component-Test1的路由,打開app-routing.module.ts
import { NgModule } from '@angular/core';
import { RouterModule, Routes } from '@angular/router';
import { Test1Component } from './test1/test1.component';

const routes: Routes = [
  { path: 'test1', component: Test1Component } #新增路由配置
];

@NgModule({
  imports: [RouterModule.forRoot(routes)],
  exports: [RouterModule]
})
export class AppRoutingModule { }
接著是app.component.html
# routerLink:使元素成為路由連結,並透過router-outlet開啟組件的模板
<ul>
<li><a routerLink="/test1">Test1</a></li>
<li>Test2</li>
</ul>

<router-outlet></router-outlet>
點下去就可以發現tes1 works的字樣出現囉~!

從上述介紹可以知道,Angular會將各種應用模組化,將程式碼依照功能分類成各式組件,各司其職的去執行,不但讓功能好維護,也降低程式間的耦合性,那管理著這些模組的檔案是什麼呢?
就是接著要介紹的 app.module.ts
import { NgModule } from '@angular/core';
import { BrowserModule } from '@angular/platform-browser';

import { AppRoutingModule } from './app-routing.module';
import { AppComponent } from './app.component';
import { Test1Component } from './test1/test1.component';

@NgModule({
  declarations: [
    AppComponent,
    Test1Component
  ],
  imports: [
    BrowserModule,
    AppRoutingModule
  ],
  providers: [],
  bootstrap: [AppComponent],
})
export class AppModule { }
NgModule metadata does the following:
- Declares which components, directives, and pipes belong to the module.
- Makes some of those components, directives, and pipes public so that other module's component >templates can use them.
- Imports other modules with the components, directives, and pipes that components in the >current module need.
- Provides services that other application components can use.
簡單來說就是規範什麼樣的組件、service.....在app模組可以使用或開放給其他模組也可以使用,並且也設定如果要使用app模組要先載入什麼東西。
那今天就先講到這裡了喔~~
