(轉眼間到最後兩天,發現想談及的主題談不完,所以最後這兩篇整合寶石的文章會特別長~,因為如果照之前的量切分的話,這兩天會是五天的量,但那就超過 30 天了。)
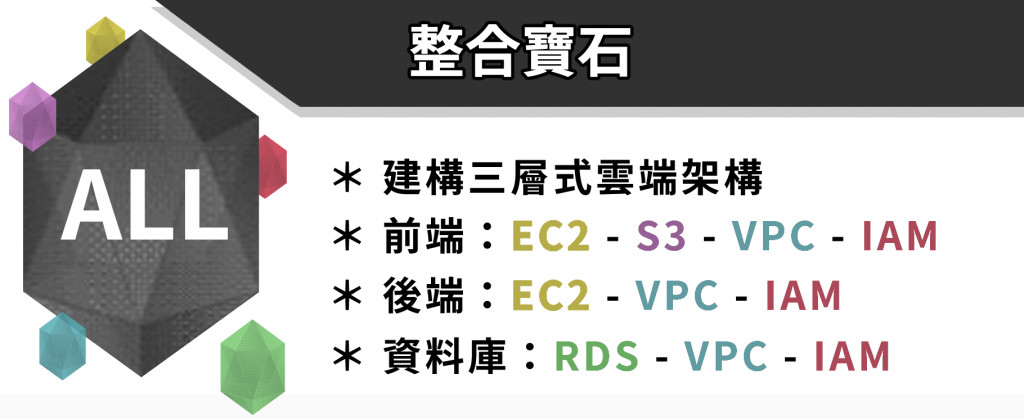
我們最後一個寶石「整合寶石」:不論我們個別學習了多少個 AWS 服務,最重要的還是如何將其整合,並運用到實際工作上。因此本文將對 AWS 進行總專案實作演練,透過整合前面五大寶石,來建構起業界常見的「三層式雲端架構」!
【Lab】建構三層式雲端架構(上)(本文):
【Lab】建構三層式雲端架構(下):
那我們開始吧!
首先,以 Root user 登入,如下圖: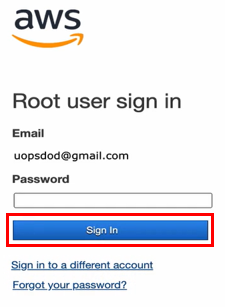
在 AWS Management Console 頁面搜尋 IAM 服務並進入,如下圖: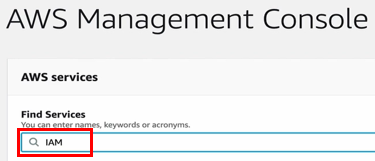
為了允許開發者去擁有他們所需要的開發權限,第一步要進入 Policies 頁面(下圖#1),點擊 Create policy (下圖#2)進行建造 Policy 的動作。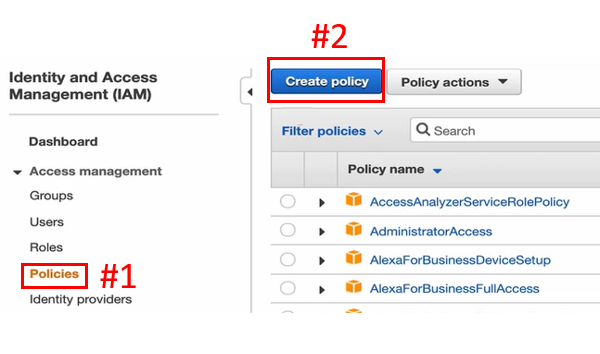
第一個假設想賦予的是使用VPC相關功能的權限,而在 AWS 之中,VPC 相關功能被歸類在 EC2 的 Service 底下,點擊 Choose a service (下圖#1),搜尋 EC2 (下圖#2),再點下方 EC2 (下圖#3)。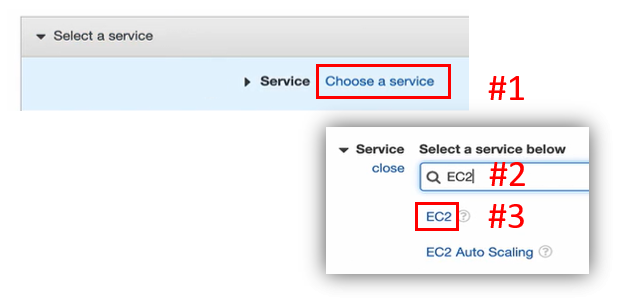
在 Actions 項目設定,勾選 All EC2 actions,如下圖: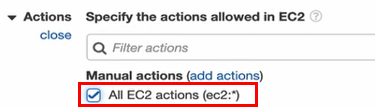
展開 Resources (下圖#1),選擇 All resources (下圖#2),套用到所有 Resources。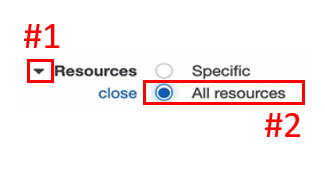
到此便把 VPC 及 EC2 相關權限都加上去了,如下圖: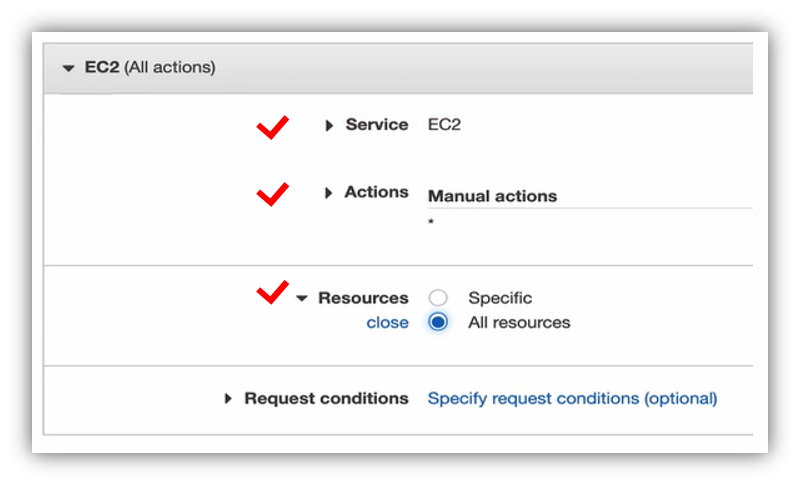
把 VPC 及 EC2 相關權限都加上去之後,縮小 EC2 的權限設定(下圖#1),再按 Add additional permissions (下圖#2),來新增 RDS 權限。
按下 Choose a service (下圖#1),搜尋列輸入 RDS (下圖#2),點下面的 RDS (下圖#3)。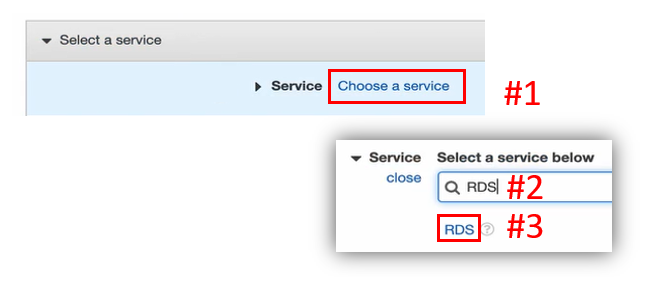
在 Actions 項目下,勾選 All RDS actions,如下圖: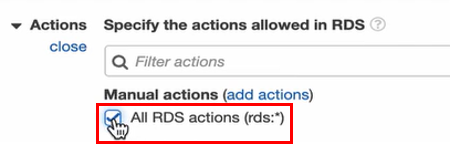
打開 Resources (下圖#1),選 All resources (下圖#2),套用到所有的 Resources。
到此便把 RDS 相關權限加上去了,如下圖: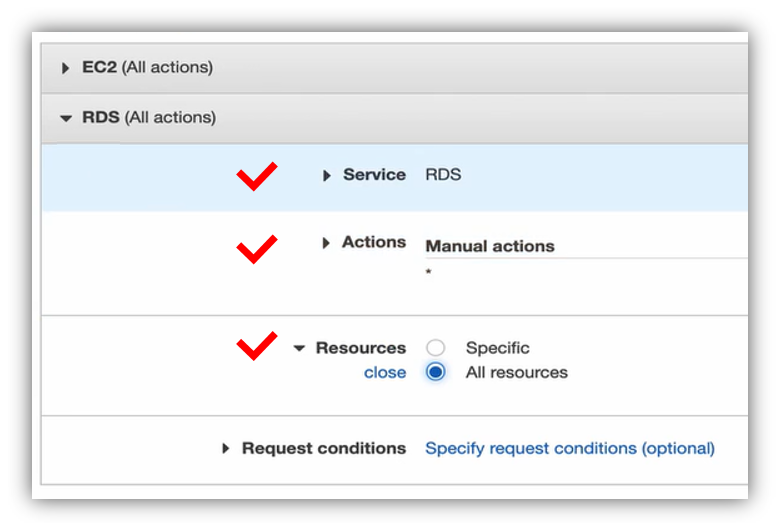
RDS 權限新增完成後,縮小 RDS 的權限設定(下圖#1),點 Add additional permissions (下圖#2),以新增 S3 權限。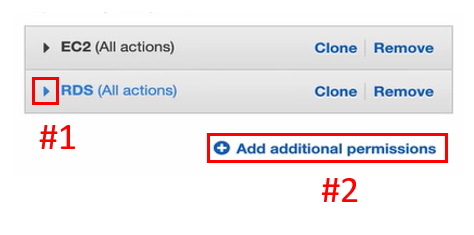
點擊 Choose a service (下圖#1),查找 S3 (下圖#2),按下方的 S3 (下圖#3)。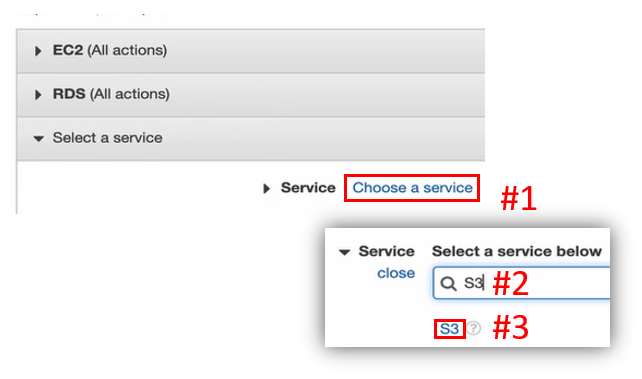
Actions 項目,勾選 All S3 actions,如下圖: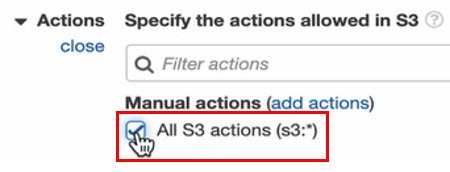
展開 Resources (下圖#1),選 All resources (下圖#2),套用到所有的 Resources。
到此便把 S3 相關權限加上去了,如下圖: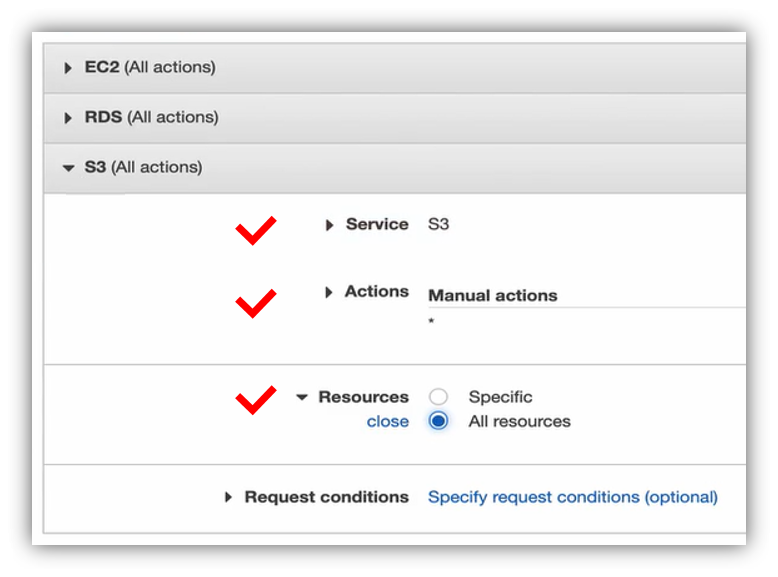
S3 權限新增完成後,縮小 S3 的權限設定(下圖#1)。
到此便已把曾經介紹過的 VPC、EC2、RDS 及 S3 服務所需要的權限都加進此 Policy 中了,但實際上,在創建 RDS 跟 EC2 的時候,其實還需要用到 Role 相關權限。
所以接下來點擊 Add additional permissions (下圖#2),把 Role 相關權限也加上去,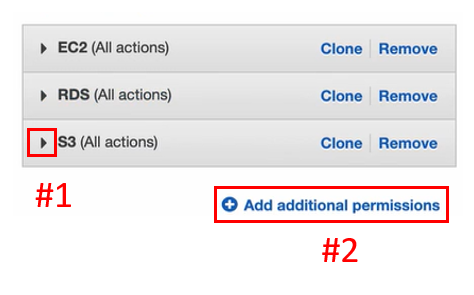
點擊 Choose a service (下圖#1),搜尋 IAM 服務(下圖#2),按下方的 IAM (下圖#3)。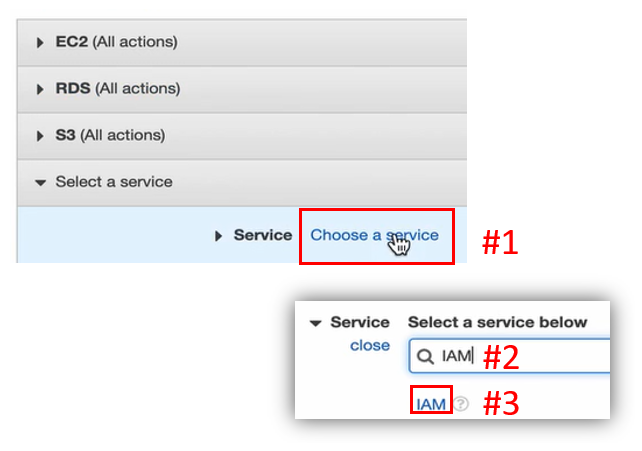
由於 IAM 是一項需要安全性更高的服務,所以跟 EC2、RDS、S3 不一樣,IAM 的 Actions項目並非全部套用,故此處篩選出 Role 相關的權限(下圖#1),再勾選 ListRoles (下圖#2)、CreateRole (下圖#3)及 PassRole (下圖#4)的權限。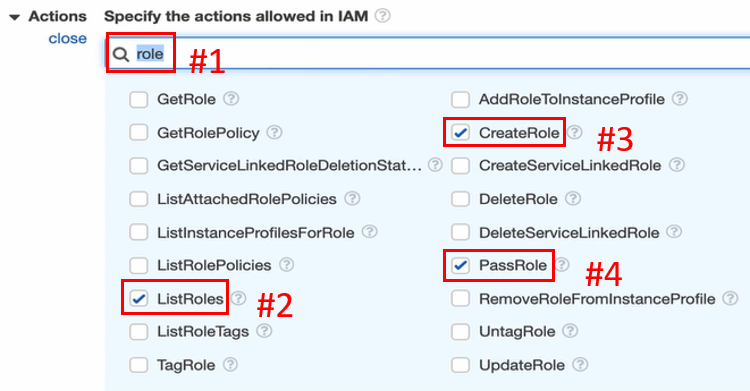
除了 Role 相關權限外,還需要新增另外一個叫作 List Instance Profiles (下圖#1)的權限。
List Instance Profiles 權限是特別用於創建EC2的時候,EC2服務會在後面創建一個叫作 Instance Profile 的東西,來連結到 IAM Role,所以把 ListInstanceProfiles 打勾(下圖#2)。
再來展開 Resources (下圖#1),選 All resources (下圖#2),套用到所有的 Resources,但事實上,我們真正需要套用到的是 EC2 跟 RDS 相關的 Resources。
到此便把 IAM 相關權限加上去了,如下圖: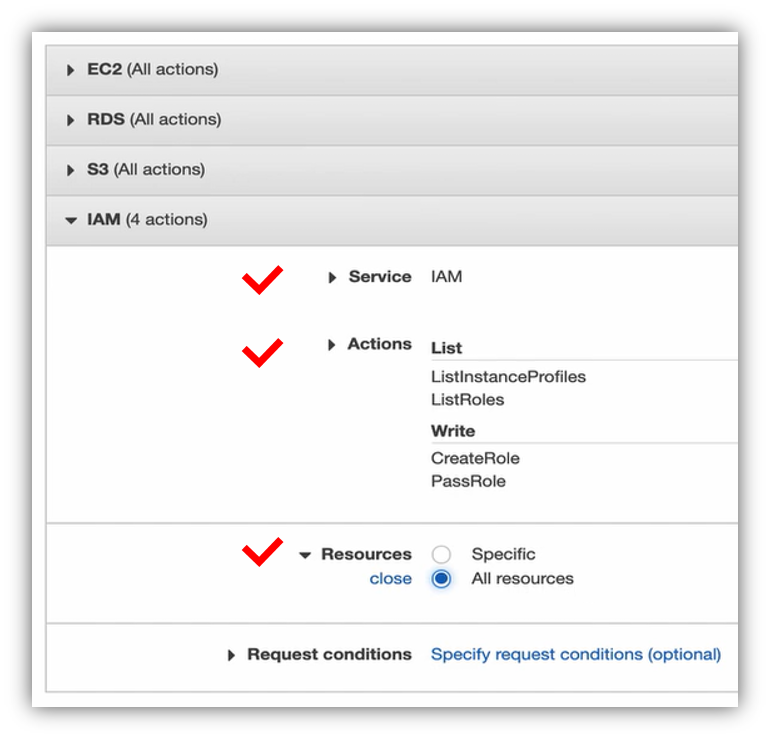
IAM 權限新增完成後,縮小 IAM 的權限設定(下圖#1)。如此便完成 Policy 的建置,點擊右下 Review policy 到下一步(下圖#2)。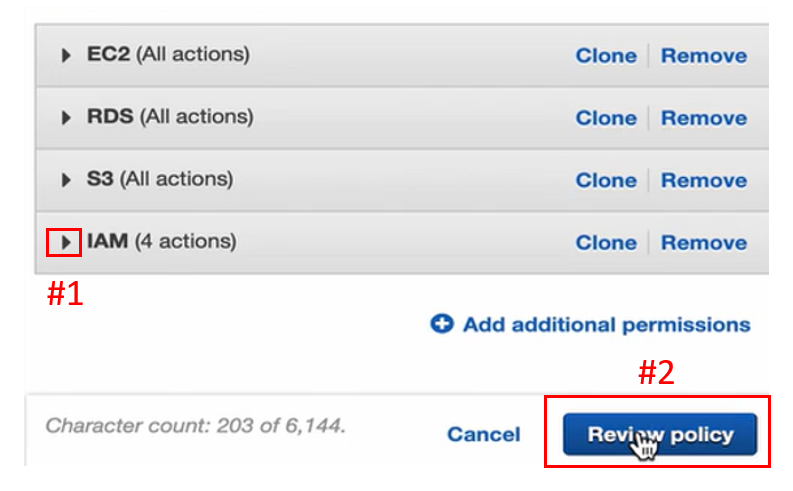
建立 Policy 名稱(下圖#1),Description 同名稱(下圖#2),點擊頁面右下 Create policy 創建 Policy(下圖#3)。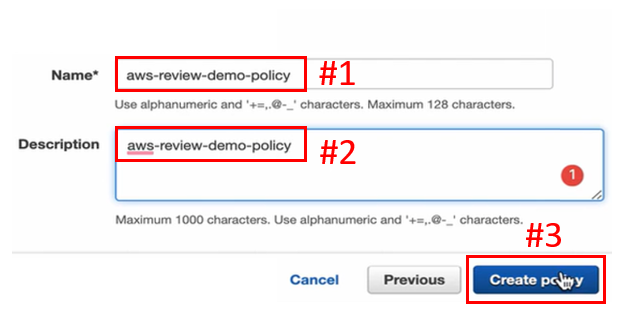
建置好 Policy,在搜尋列搜尋剛才建立的 Policy 名稱(下圖#1),即可看到 Policy 被成功創建了(下圖#2)。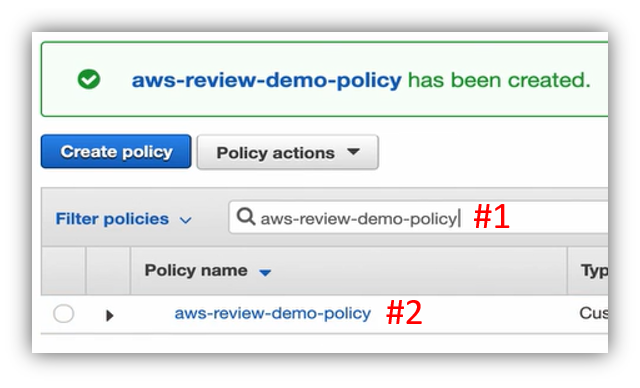
點擊左方列表的 Users (下圖#1),按下 Add user (下圖#2),設定 User 建立。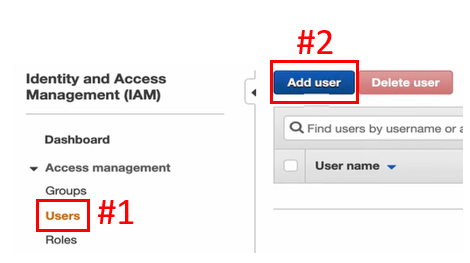
建立 User 名稱(下圖#1),勾選 Programmatic access (下圖#2)給予程式相關權限,也勾選 AWS Management Console access (下圖#3)賦予 Console 權限。
再來點選 Custom password (下圖#4)幫忙建立密碼,不勾 User must create a new password at next sign-in (下圖#4),這樣 User 就不需要再設定新的密碼,最後點擊 Next: Permissions 下一步(下圖#6)。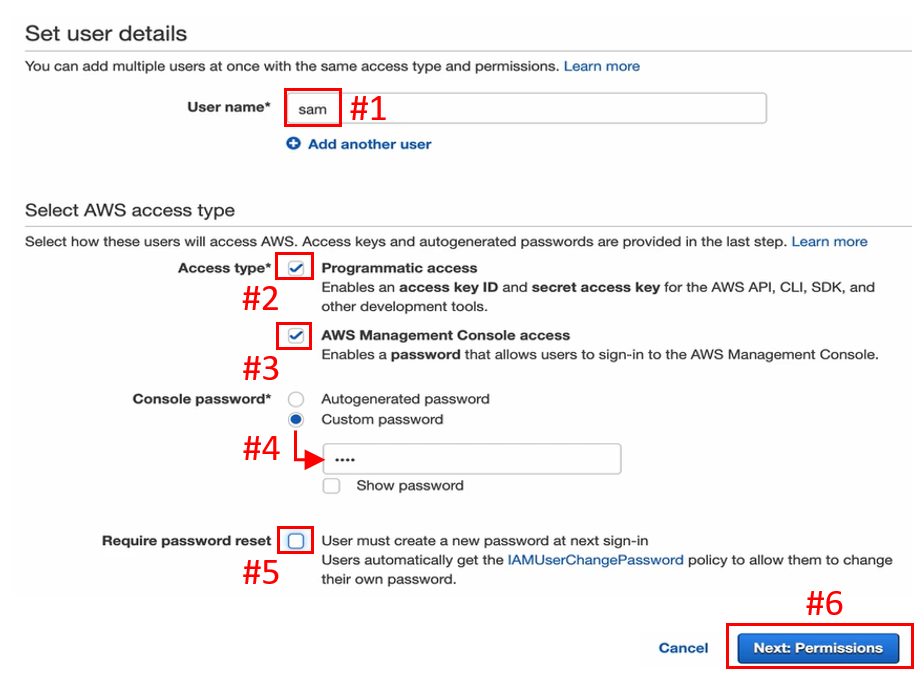
略過 Permissions 設定,點擊 New Tags 下一步(下圖#1)。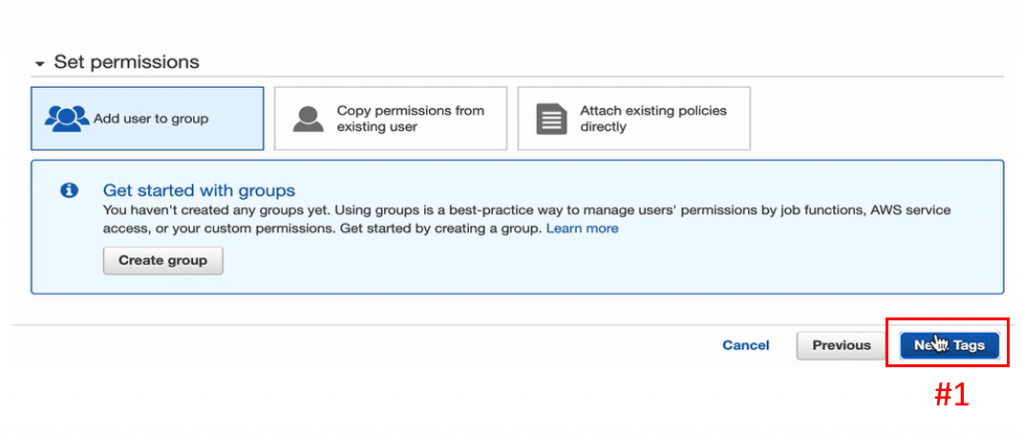
跳過 Tags 設定,點擊 Next: Review (下圖#1),進到下一步。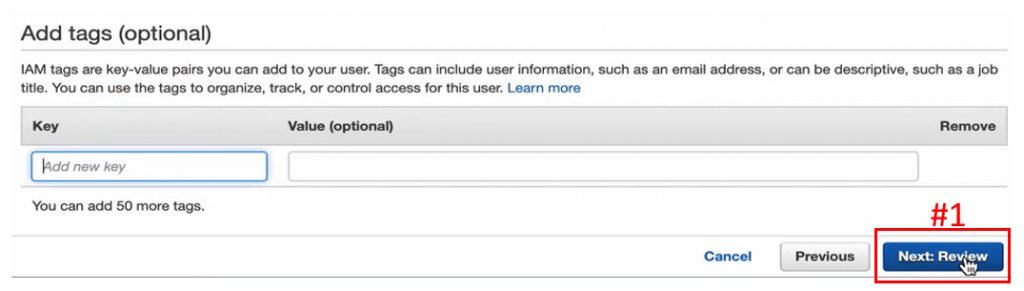
Review 確認後,點擊 Create user (下圖#1)建立 User。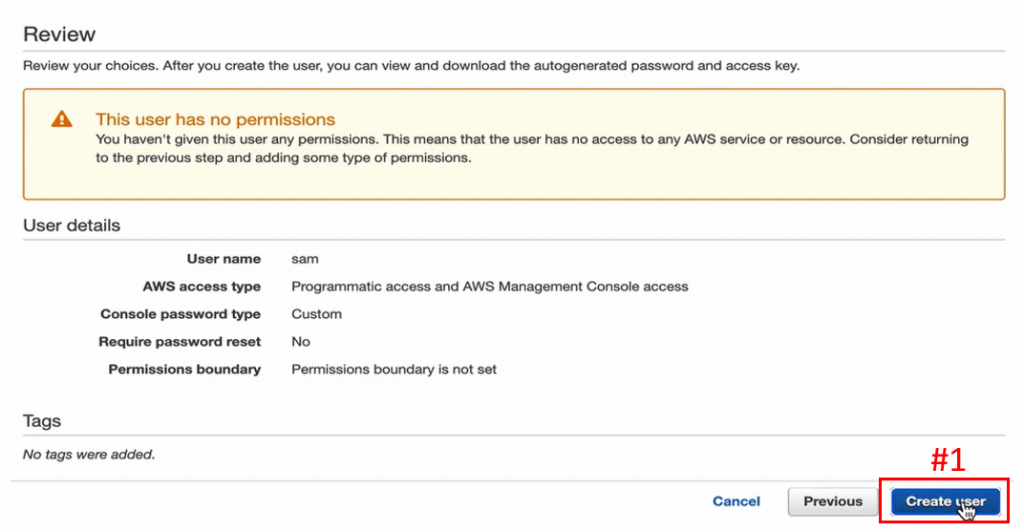
點擊 Close 關閉(下圖#1)。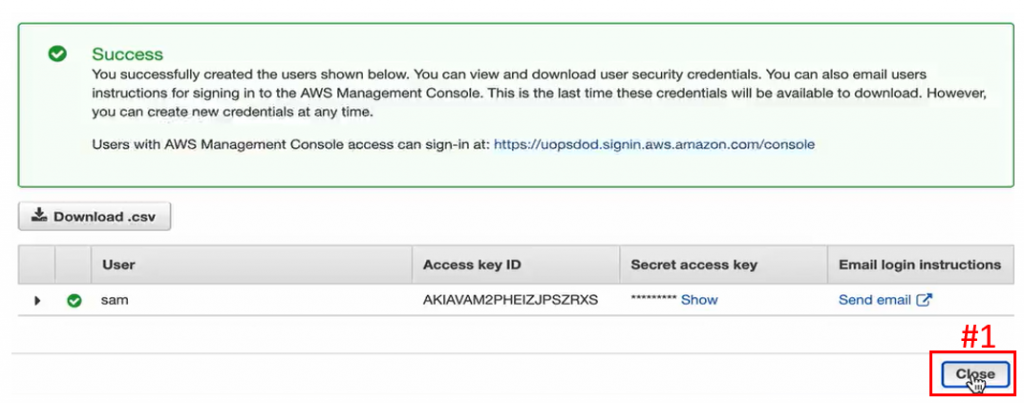
即完成第一個 User 建立,如下圖: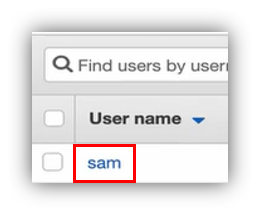
再來創建第二個 User,點擊 Add user,如下圖: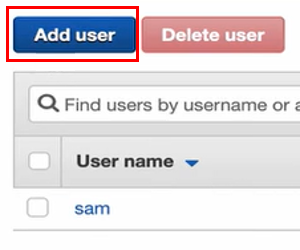
建立 User 名稱(下圖#1),勾選 Programmatic access (下圖#2)給予程式相關權限,也勾選 AWS Management Console access (下圖#3)賦予 Console 權限。
再來點選 Custom password (下圖#4)幫忙建立密碼,不勾 User must create a new password at next sign-in (下圖#4),這樣 User 就不需要再設定新的密碼,最後點擊 Next: Permissions 下一步(下圖#6)。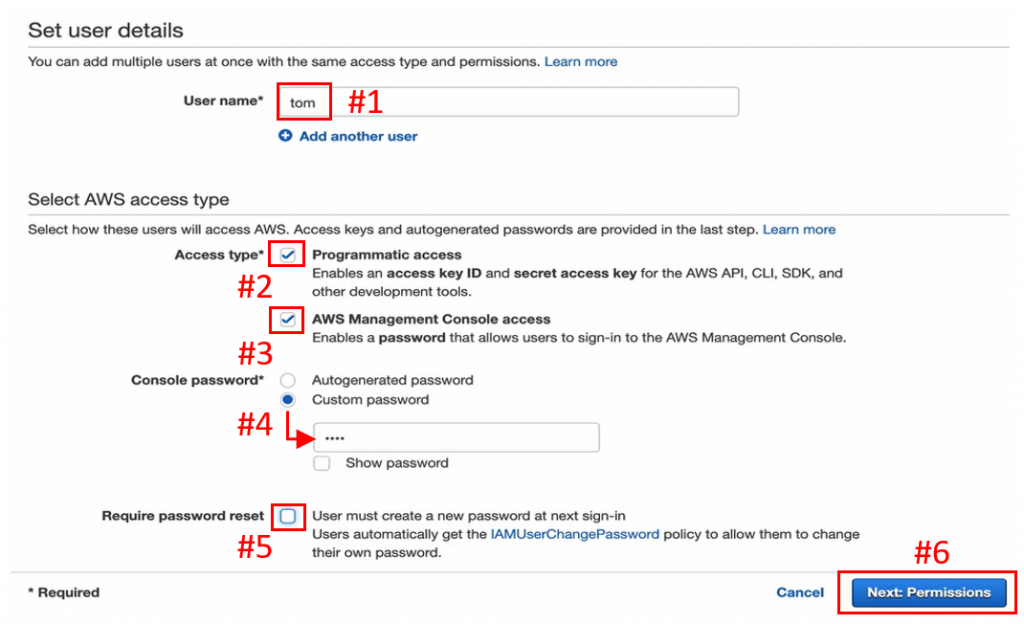
略過 Permissions 設定,點擊 New Tags 下一步(下圖#1)。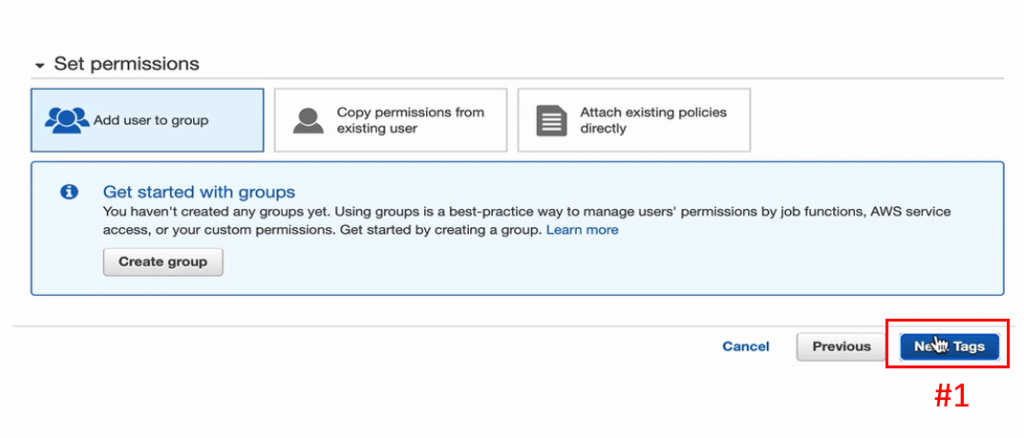
跳過 Tags 設定,點擊 Next: Review (下圖#1),進到下一步。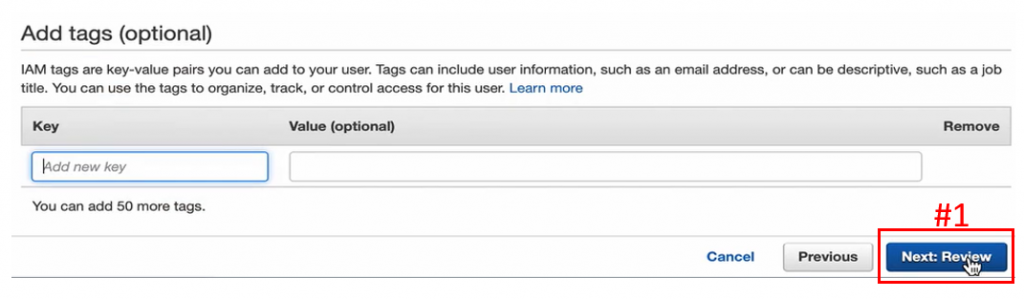
Review 確認後,點擊 Create user (下圖#1)建立 User。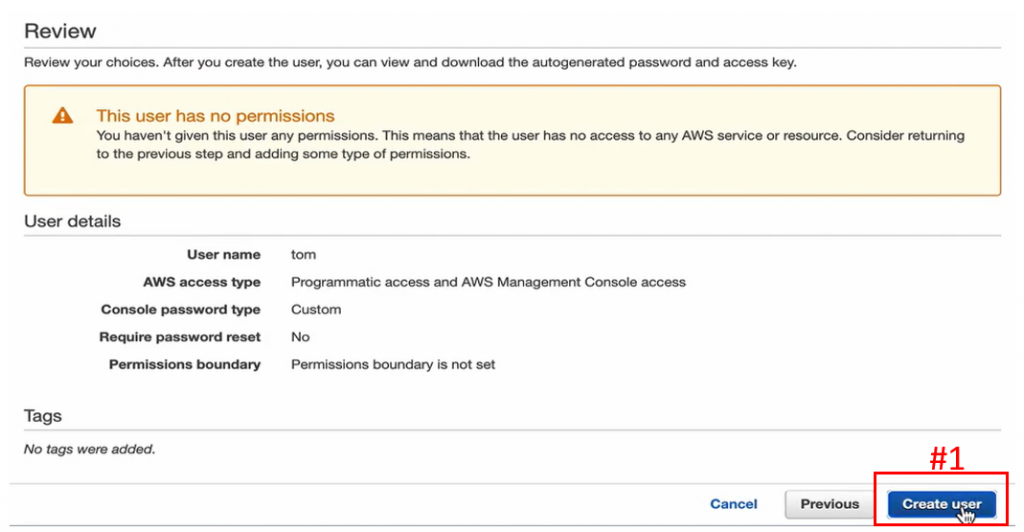
點擊 Close 關閉(下圖#1)。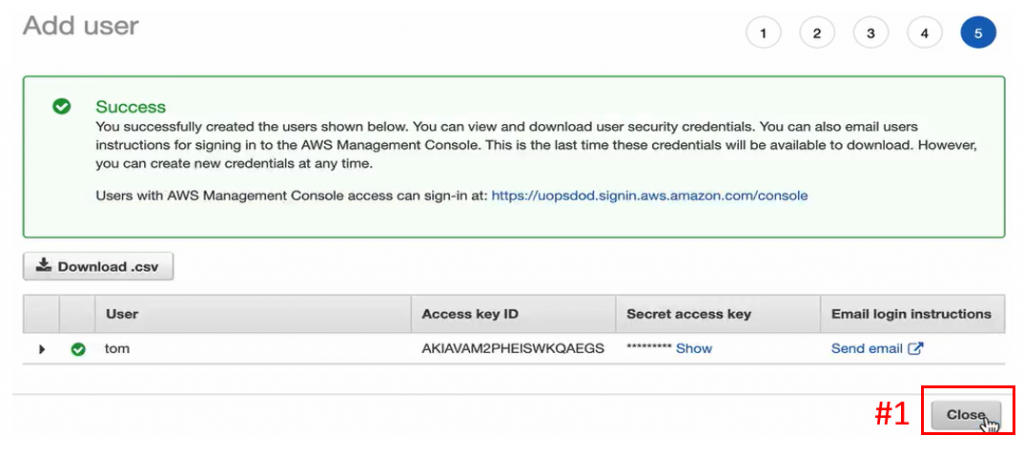
即完成第二個 User 建立,如下圖:
從左方列切換至 Groups 介面(下圖#1),點擊 Create New Group (下圖#2)創建 Group。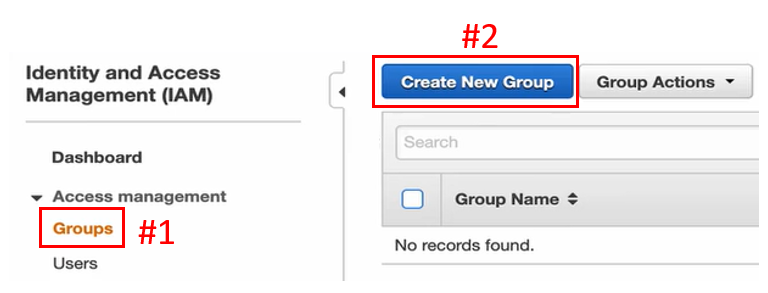
建立 Group 名稱(下圖#1),此 Group 是為開發人員創造的,按下 Next Step 進到下一步(下圖#2)。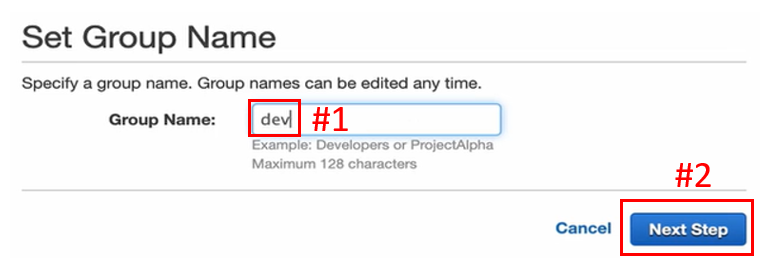
搜尋剛才建立的 Policy (下圖#1),勾選 Policy (下圖#2),點擊 Next Step 下一步(下圖#3)。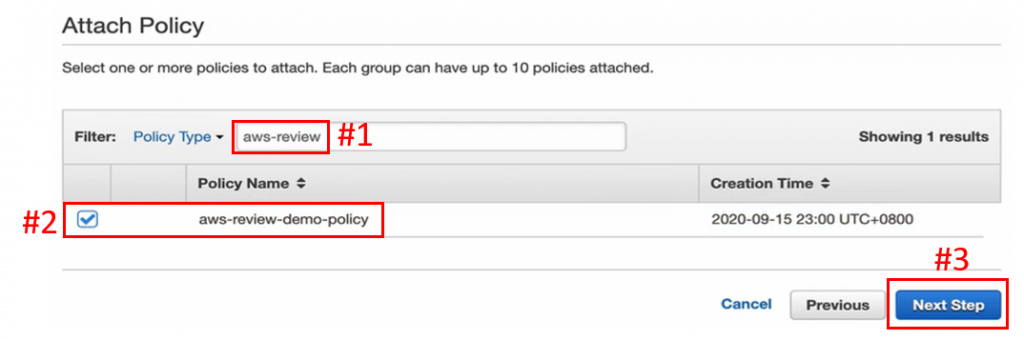
Review 確認後,點擊 Create Group 創建 Group (下圖#1)。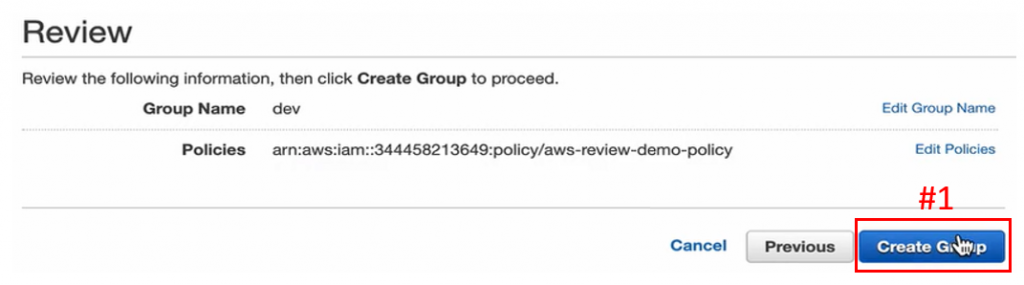
Group 即被成功建立,如下圖: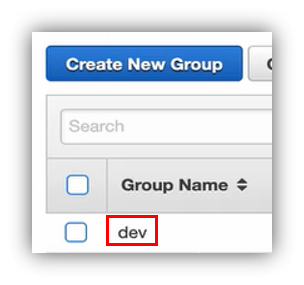
點進 Group 頁面(下圖#1)。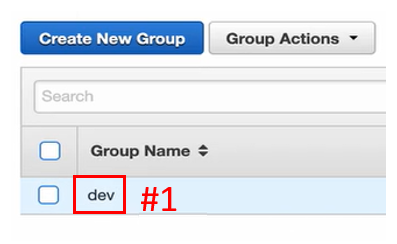
點擊 Users 下方的 Add Users to Group (下圖#1),來往 Group 中加入 User。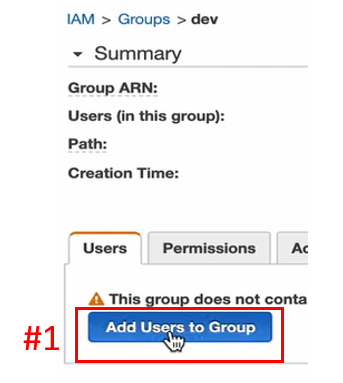
選擇要加入的 User (下圖#1),點擊 Add Users 加入到 Group 裡面(下圖#2)。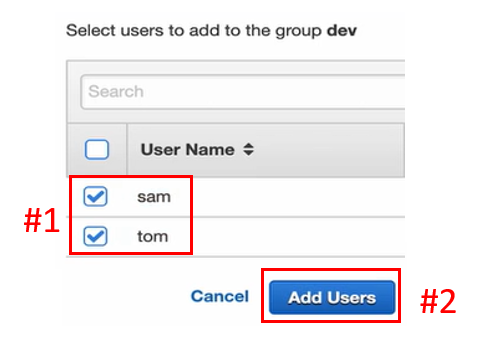
下方切換至 Permissions (下圖#1),就會看到加入此 Group 中所有的 IAM User,擁有先前創立的 Policy 賦予的權限(下圖#2)。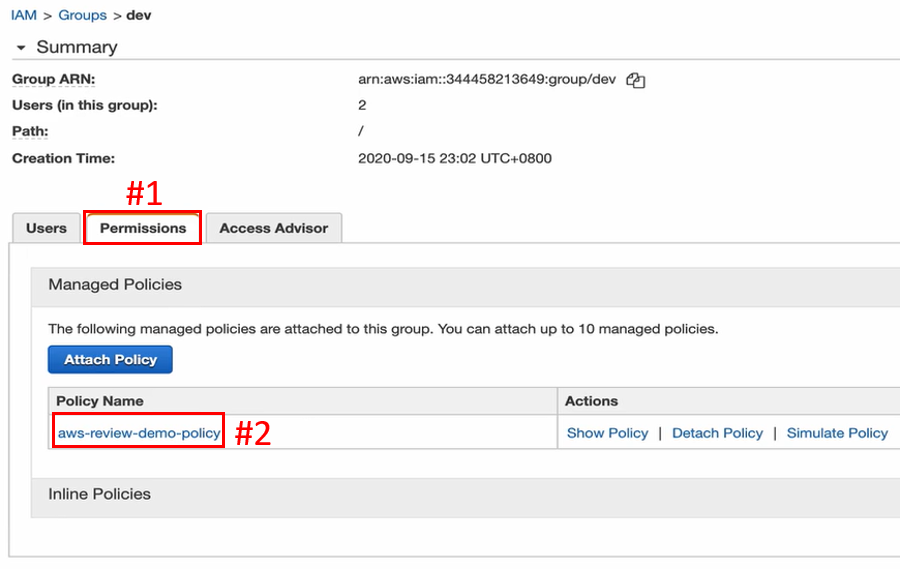
稍後的實作演練中,將需要一台 EC2 Instance 去跟 S3 溝通,所以要先把 Role 建立起來。
左方列表切換至 Roles (下圖#1),點擊 Create role (下圖#2),來開始建立 Role。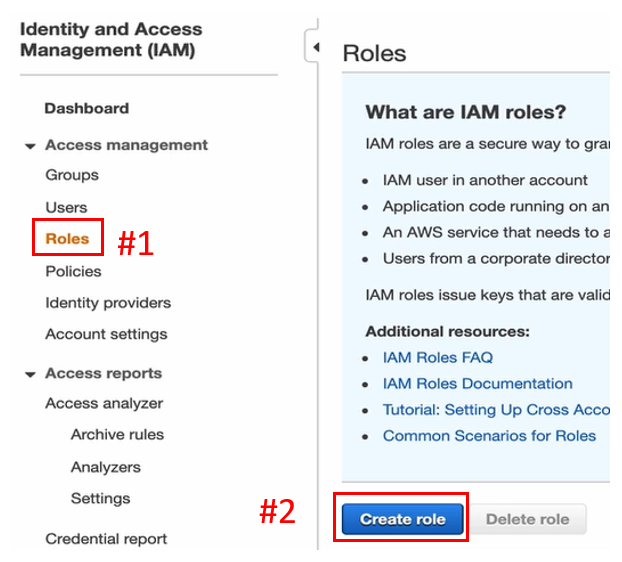
選擇 EC2 服務(下圖#1),按 Next: Permissions 下一步(下圖#2)。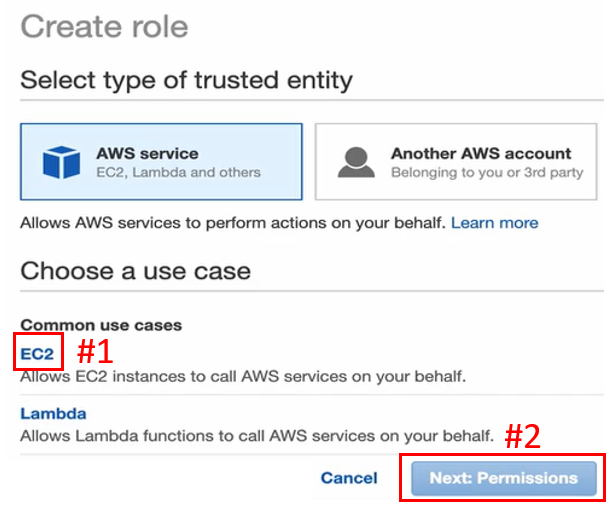
搜尋列輸入 S3 (下圖#1),勾選下方 AmazonS3FullAccess (下圖#2),點擊右下 Next: Tags (下圖#3)。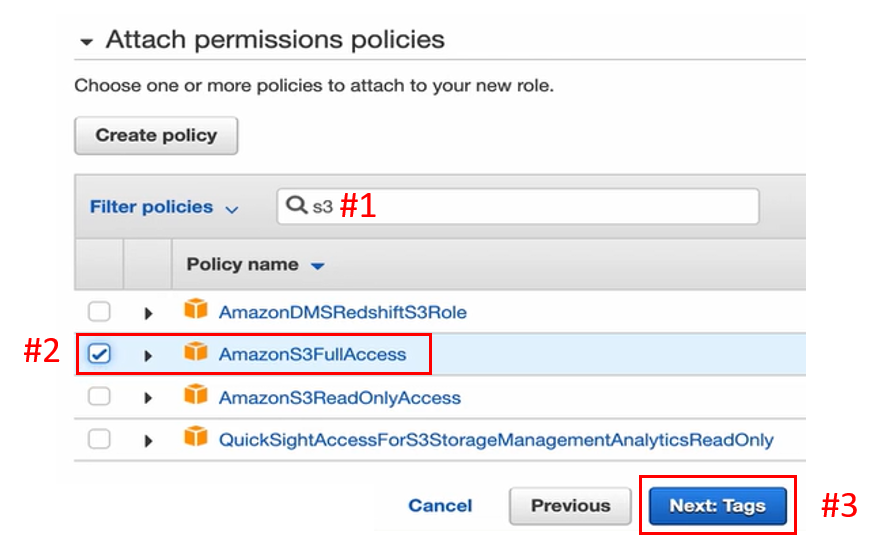
跳過 Tags 設定,點擊 Next: Review (下圖#1)。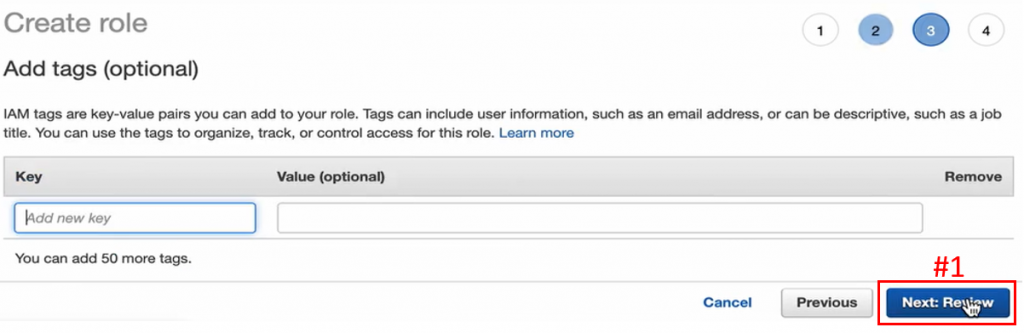
建立 Role 名稱(下圖#1),Description 敘述與名稱相同(下圖#2),按下 Create role 完成 Role 的建立(下圖#3),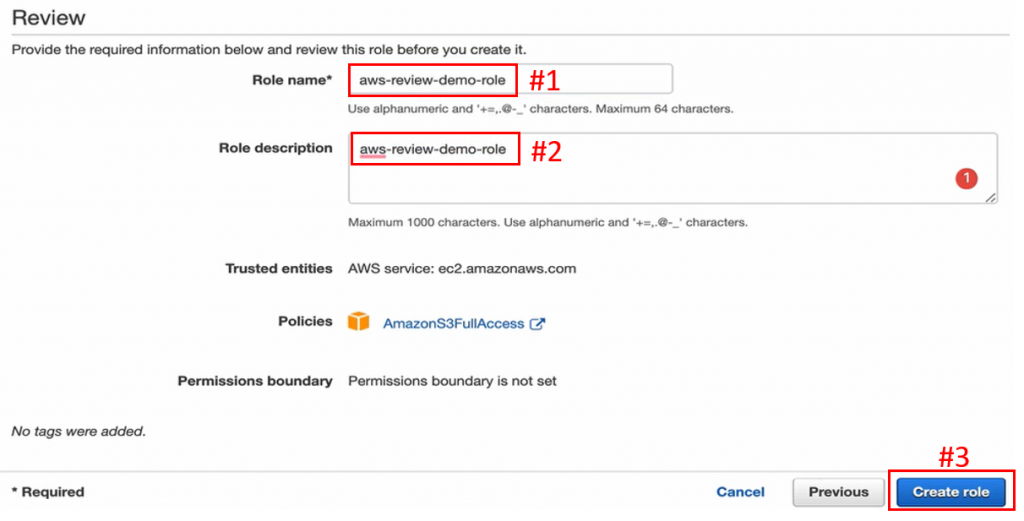
Role 建立後,在搜尋列搜尋剛才建立的 Role 名稱(下圖#1),即可看到 Role 成功建立(下圖#2)。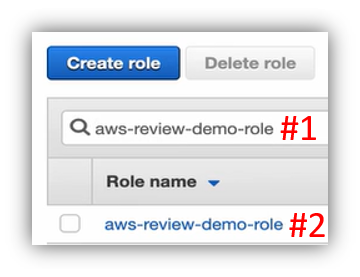
到此便完成 IAM 的前置設定,接著點擊頁首的 Account 名(下圖#1),按下方 Sign Out 登出(下圖#2)。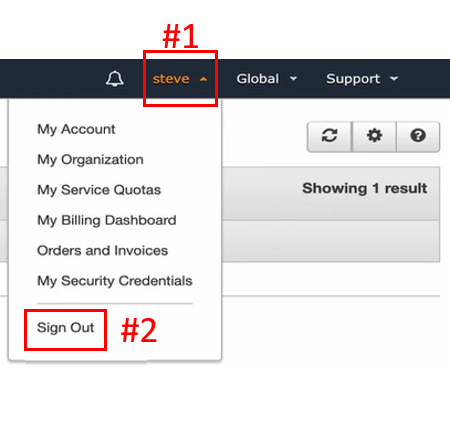
跳轉頁面後,點進 Log back in (下圖#1)。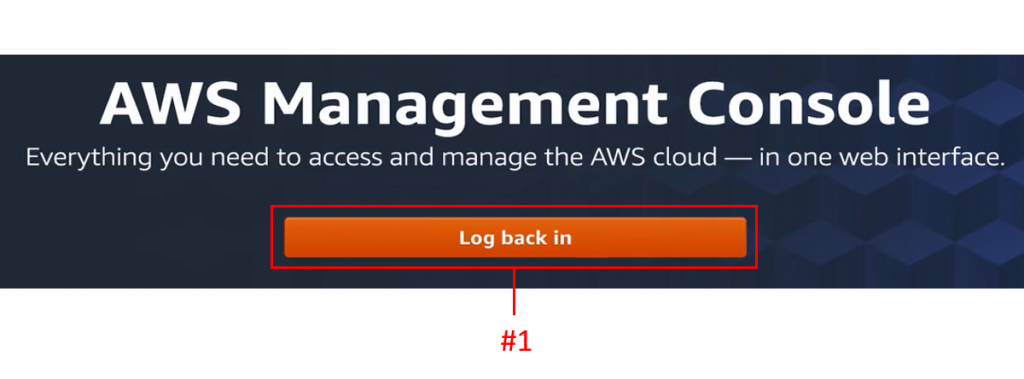
這次不用 Root user 登入,而是點擊 Sign in to a different account,用另一個 Account 登入,如下圖:
選擇 IAM user (下圖#1),鍵入 Account Alias (下圖#2),點擊 Next 下一步(下圖#3)。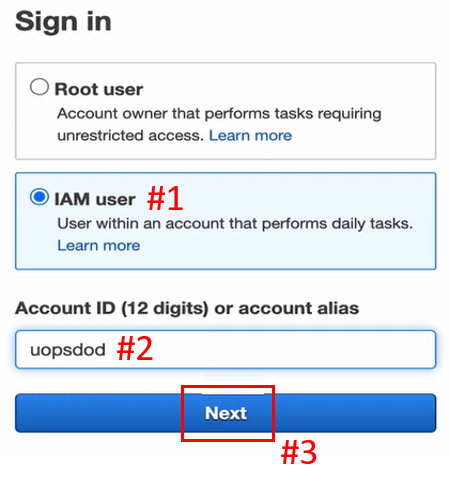
輸入先前創建的 IAM user name (下圖#1),鍵入密碼(下圖#2),再點擊 Sign in 登入(下圖#3)。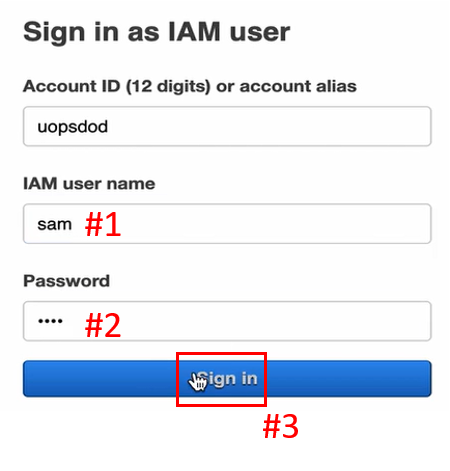
在 AWS Management Console 頁面,搜尋 VPC (下圖#1),點進 VPC (下圖#2)。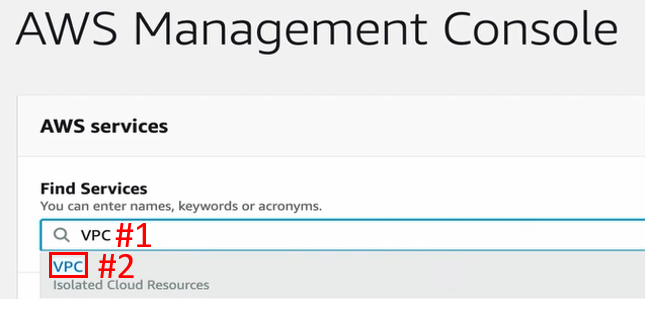
左方列表切換至 Your VPCs (下圖#1),按右頁面右上角的 Create VPC (下圖#2)。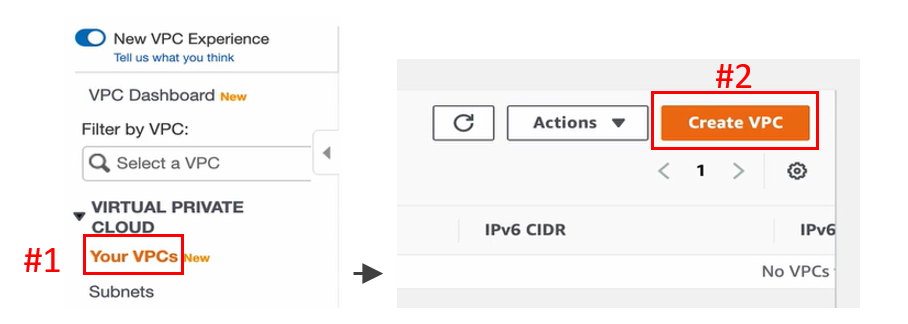
創建 VPC 名稱(下圖#1),給予 IP 範圍(下圖#2) ,點擊頁面右下方的 Create VPC 建立 VPC(下圖#3),。
即會跳轉到建立好的 VPC 頁面,如下圖: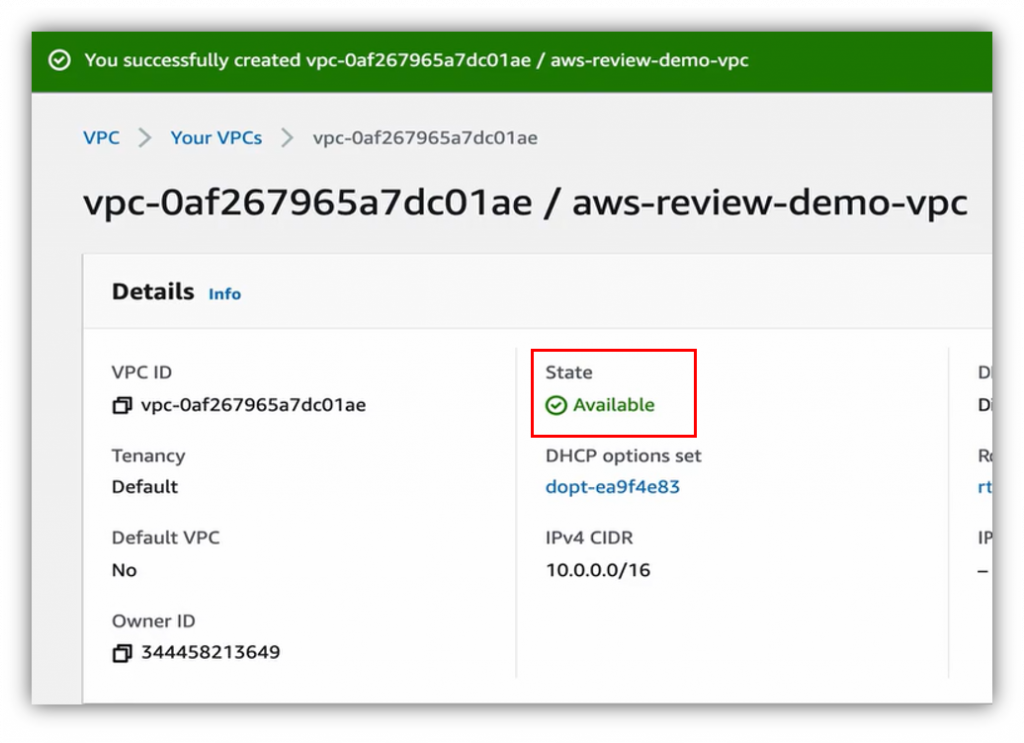
VPC 創建完畢,切換至 Subnets (下圖#1),按下 Create subnet (下圖#2),來進行建立 Subnet 的動作。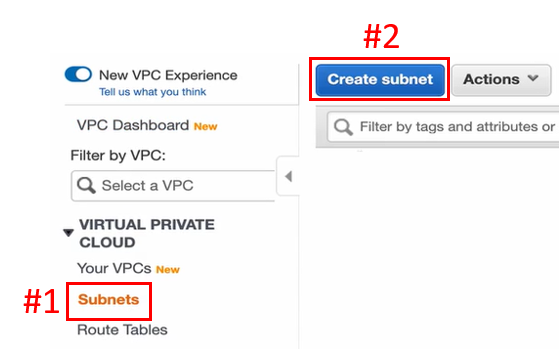
建立 Public Subnet 的名稱(下圖#1),選擇先前所建的 VPC (下圖#2),放進想放的 Availability Zone (下圖#3),給予 IP 範圍 (下圖#4),點擊 Create (下圖#5),建立 Public Subnet。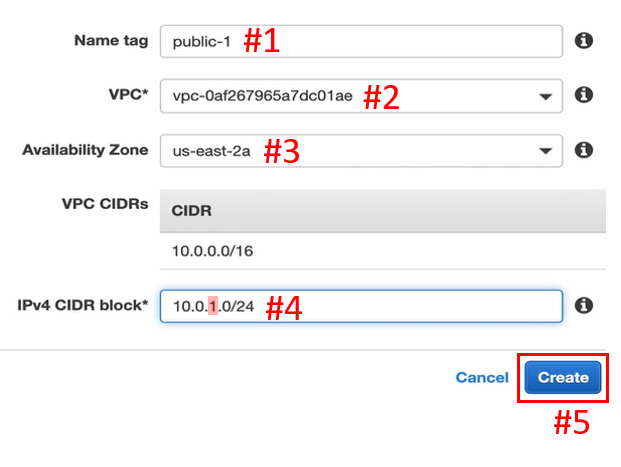
點擊 Close 關閉(下圖#1)。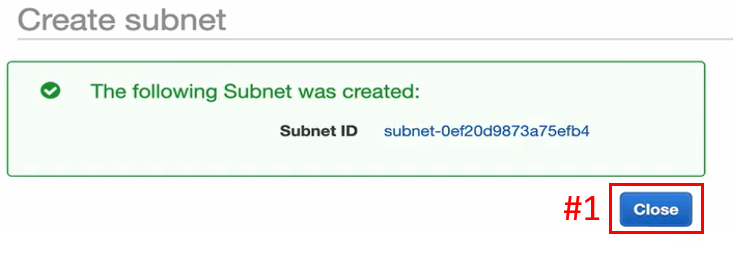
即會看到 Public Subnet 被成功建立,如下圖:
點擊 Create subnet (下圖#1),創建第一個 Private Subnet。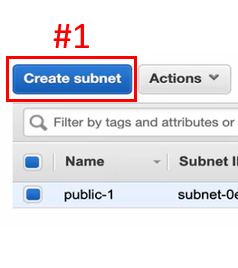
建立 Private Subnet 的名稱(下圖#1),選擇先前所建的 VPC (下圖#2),放進與 Public Subnet 不同的 Availability Zone (下圖#3),給予 IP 範圍 (下圖#4),點擊 Create (下圖#5),建立 Private Subnet。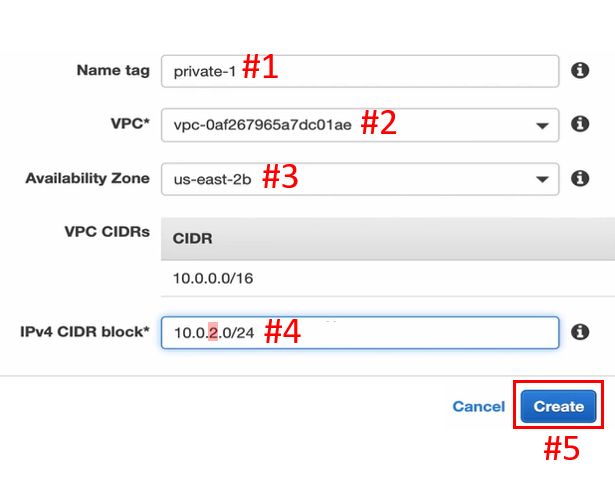
按下 Close 關閉(下圖#1)。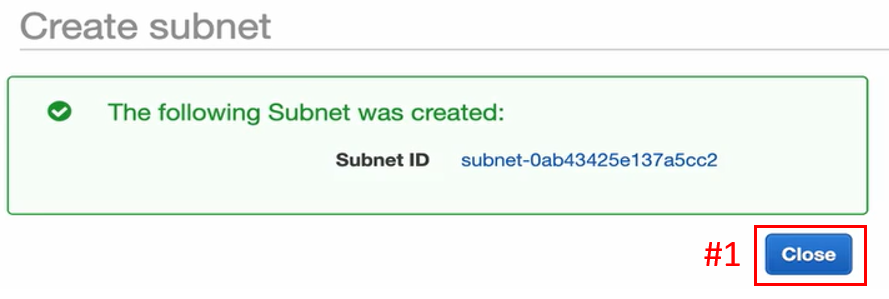
即會看到第一個 Private Subnet 被成功建立,如下圖: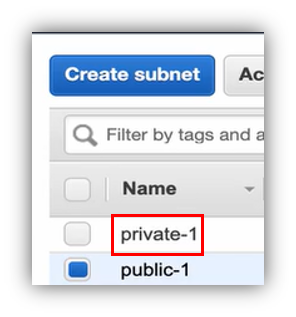
按下 Create subnet (下圖#1),創建第二個 Private subnet 。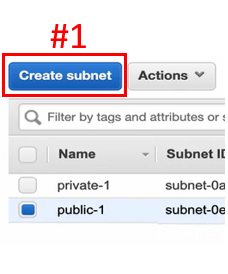
建立 Private subnet 的名稱(下圖#1),選擇先前所建的 VPC (下圖#2),放到與 Public Subnet 跟其它 Private subnet 不同位置的 Availability Zone (下圖#3),給予 IP 範圍 (下圖#4),點擊 Create (下圖#5),建立 Private subnet。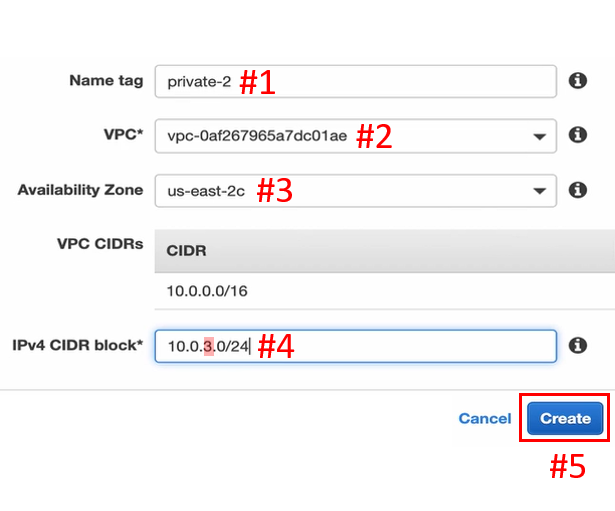
點 Close 關閉(下圖#1)。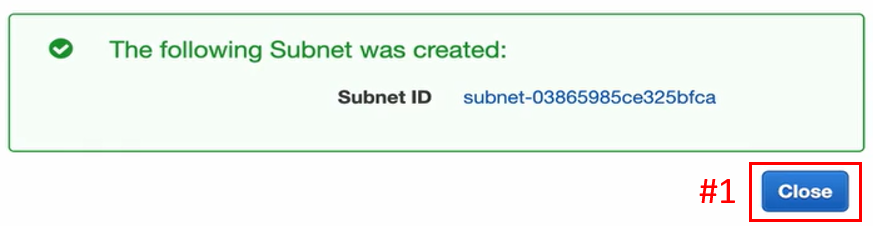
即可看到第二個 Private Subnet 被成功建立,如下圖: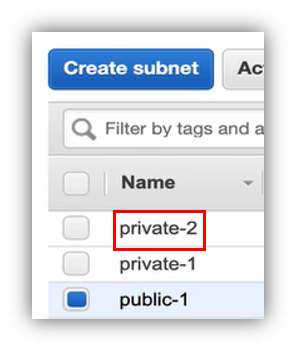
所謂的Public Subnet,有一個最重要的要素就是 Public Subnet 的 Route Table 要能夠連到 IGW。
點擊左方列表 Internet Gateways (下圖#1),按下 Create internet gateway 創造一個 Internet Gateway (下圖#2)。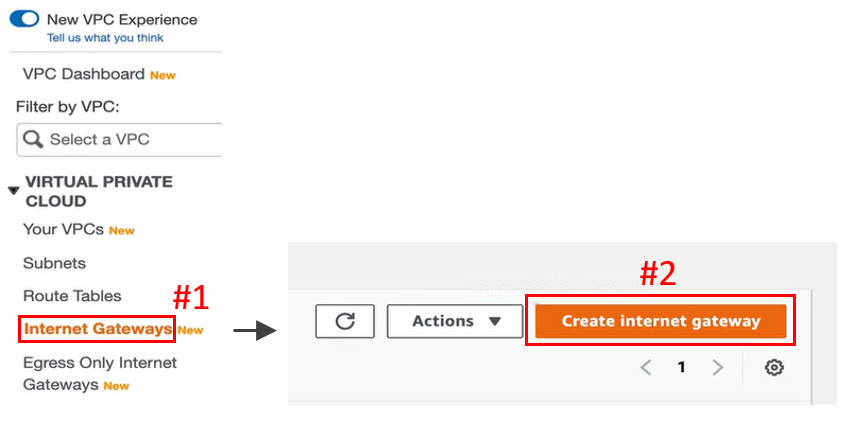
建立 Internet Gateway 名稱(下圖#1),點擊 Create internet gateway 建立 Internet Gateway (下圖#2)。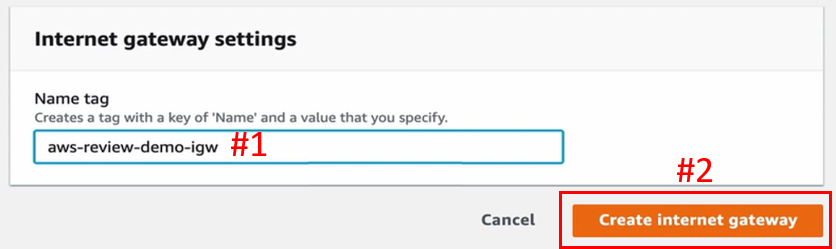
Internet Gateway 建立完畢後,點開右上 Actions 選單(下圖#1),按下 Attach to VPC 設定連接 VPC (下圖#2)。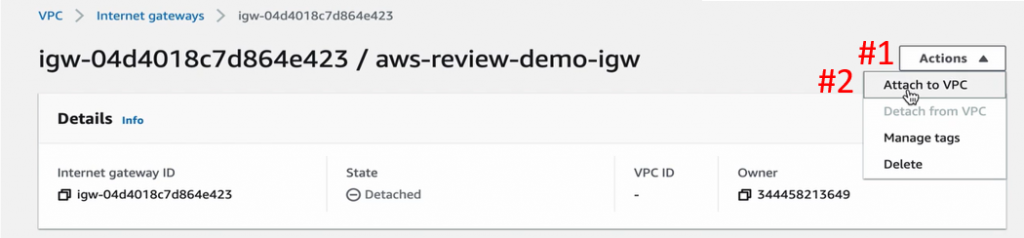
進到 Attach to VPC 頁面,選擇要連接的 VPC (下圖#1),按下 Attach internet gateway (下圖#2),完成連接 IGW 的動作。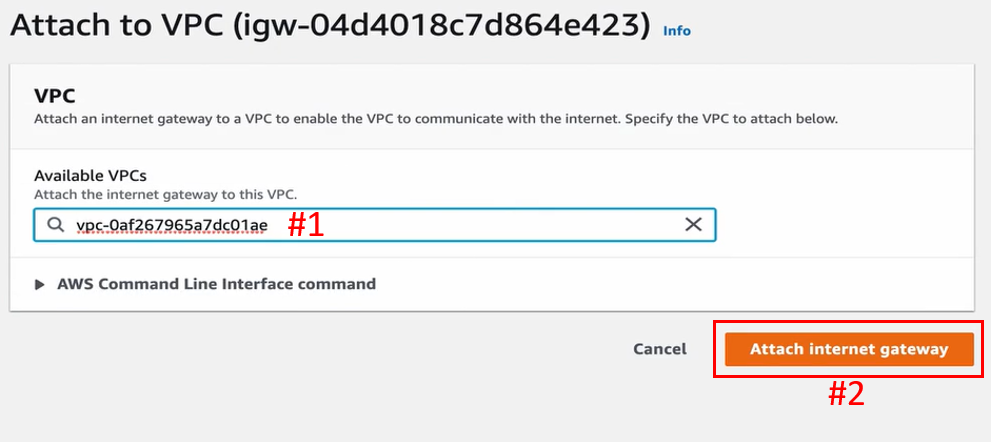
即會跳轉到 VPC 成功連結 IGW 的頁面,如下圖: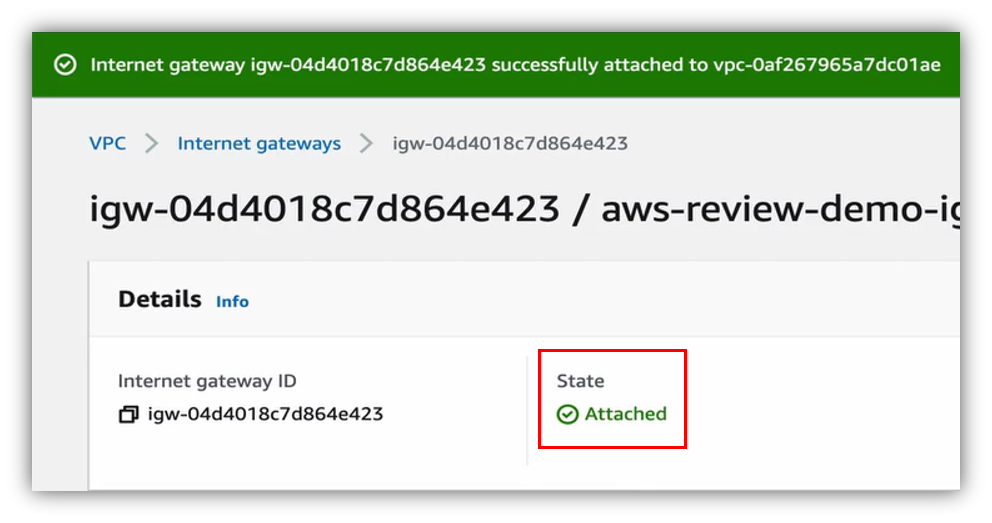
連接 IGW 完畢後,點進左列表 Subnets (下圖#1),勾選右方頁面的 Public 的 Subnet (下圖#2),下方切換至 Route Table (下圖#3),點進下方所示的 Route Table (下圖#4),來進入 Public Subnet 的 Route table 介面。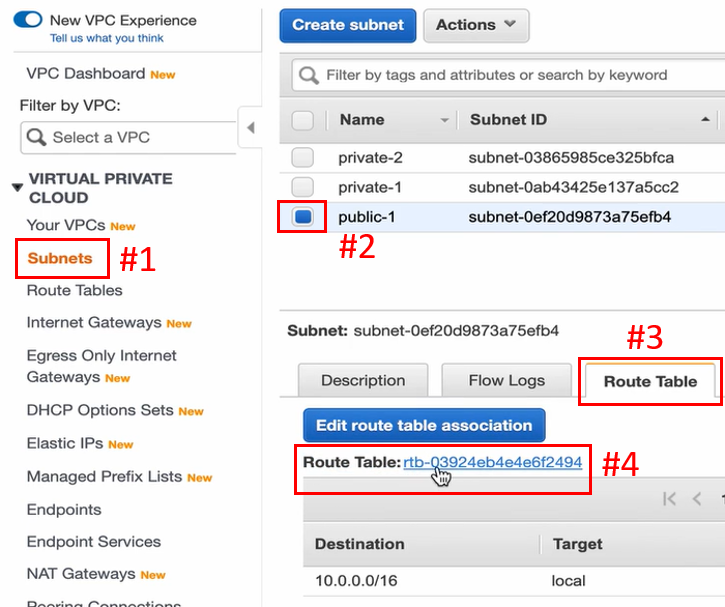
到 Route Table 介面後,下方切換至 Routes (下圖#1),按下 Edit routes 編輯(下圖#2)。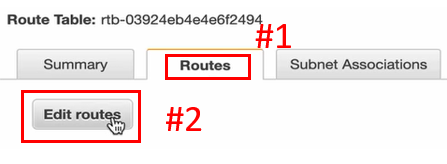
預設的 Route (下圖#1)可以讓我們跟其它 Subnet 互通,這邊保持原樣。
按下 Add route (下圖#2),Destination 輸入 0.0.0.0/0 (下圖#3),讓所有要到 Internet 的請求,Target 下一站都要先去 Internet Gateway (下圖#4),並選擇剛才建造的 Internet Gateway (下圖#5),點擊頁面右下的 Save routes 儲存(下圖#6)。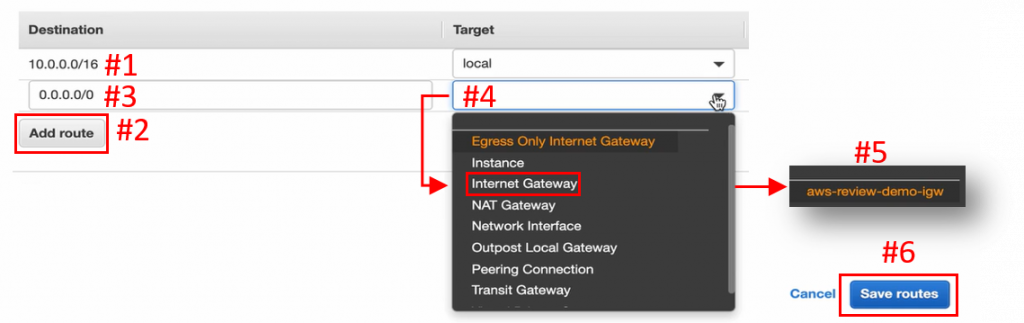
按 Close 關閉(下圖#1)。
如此,我們便擁有一個 Public subnet (下圖#1),之後只要 Instance 也有 Public IP 的話,便可以與 Internet 溝通,到此便完成了 VPC 環境的建立。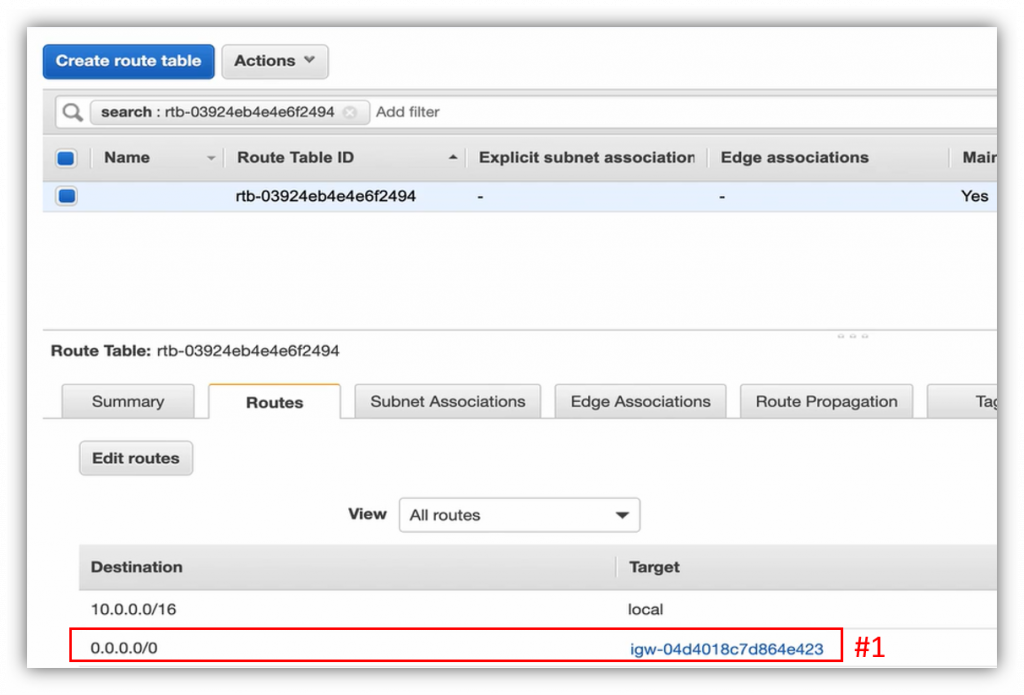
VPC 環境的建立完畢後,再來進行建立資料庫的動作。
首先,點擊左方列表下方的 Security Groups (下圖#1),點擊右頁面右上角的 Create security group (下圖#2),建造一個新的 Security Group。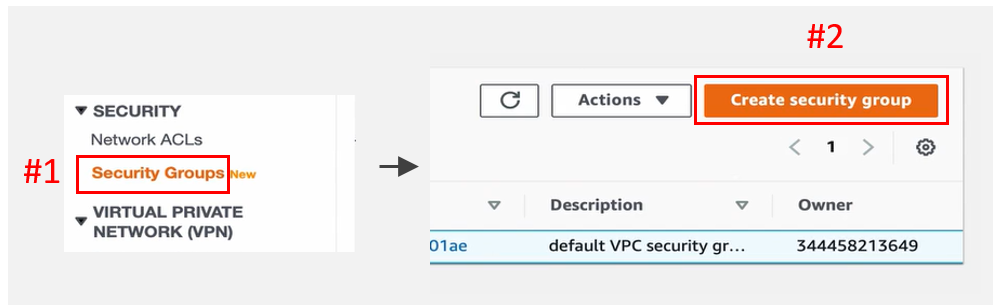
建立 Security Group 名稱(下圖#1),Description 敘述同名稱(下圖#2),選擇先前建造的 VPC (下圖#3)。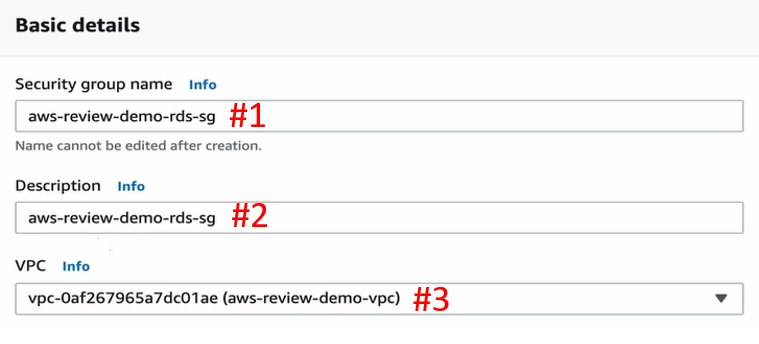
點擊 Add rule 新增一個 Rule (下圖#1),Type 選擇 MYSQL/Aurora 讓大家可以去連(下圖#2),Source 來源 IP 選擇全部(下圖#3),最後下拉到頁尾,按右下 Create security group 建立 SG (下圖#4)。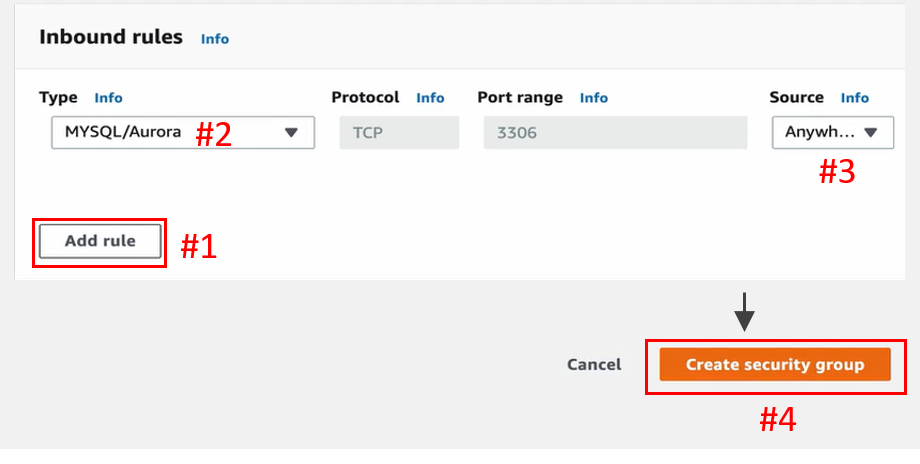
完成之後就有 Security Group 可以使用,如下圖: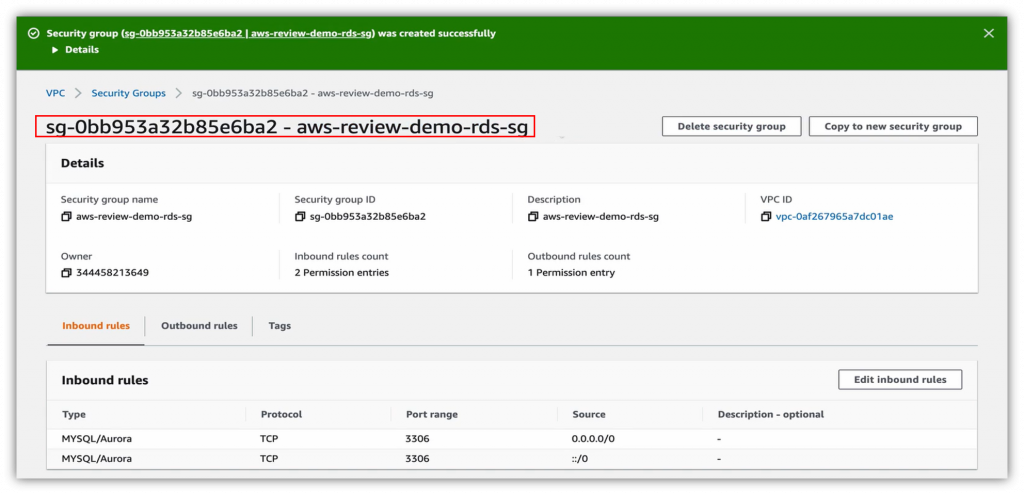
Security Group 建立完畢後,展開頁首左上角的 Services (下圖#1),搜尋輸入 rds (下圖#2),新分頁開啟 RDS (下圖#3)。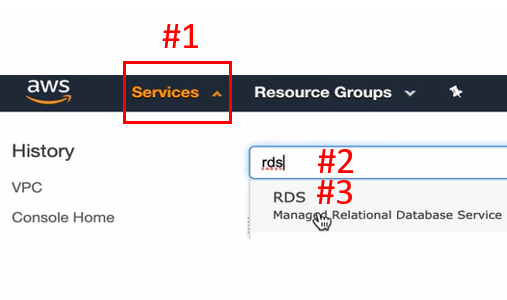
到達 RDS 介面後,點擊左方列表的 Subnet groups (下圖#1),按下右邊頁面右上角的 Create DB Subnet Group (下圖#2),設定建造 Subnet Group。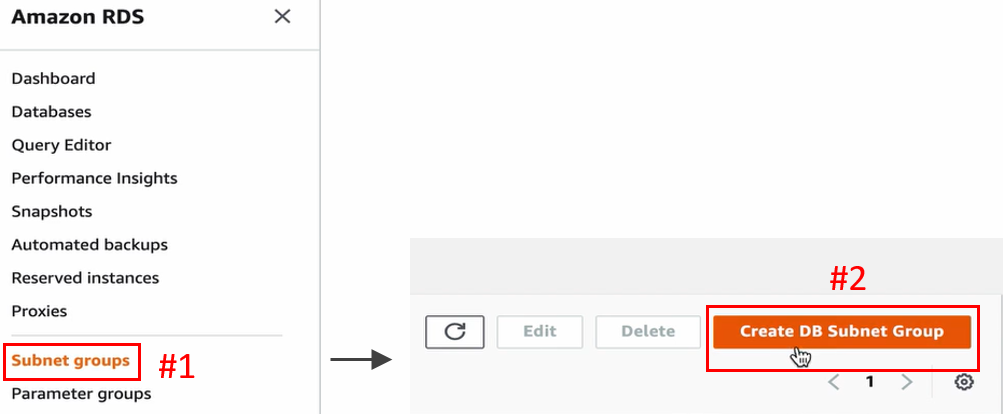
建立 Subnet Group 名稱(下圖#1),敘述與名稱相同(下圖#2),選擇先前建造的 VPC (下圖#3)。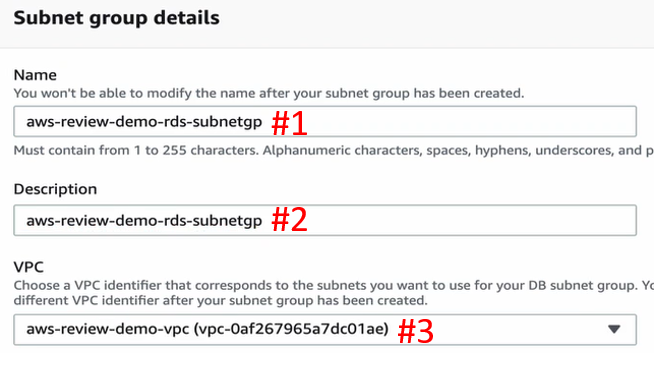
Availability Zones 選擇 Private Subnet 所放置的 Availability Zone (下圖#1),Subnets 選擇加入 Availability Zone 內的 Subnet (下圖#2)。
也就是說目前要加入到 Subnet Group 裡的 Subnet 都是 Private Subnet (下圖#3),而 Private Subnet 是沒有對 Internet 的連線。最後點擊右下的 Create 建立 Subnet Group(下圖#4)。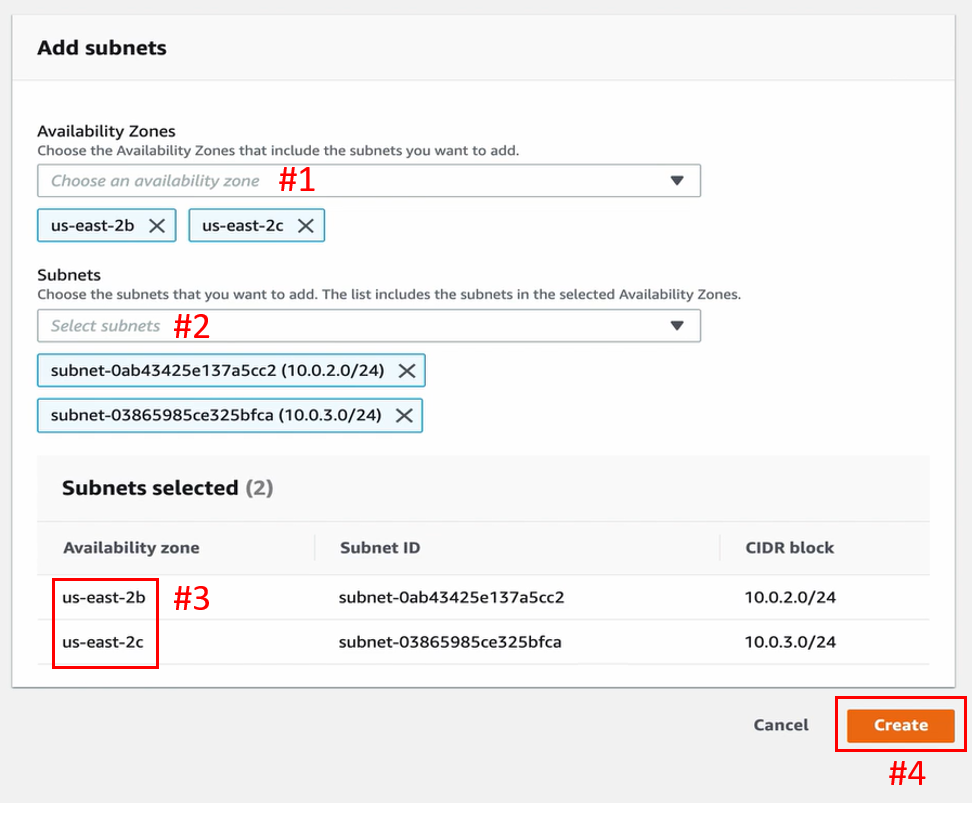
如此 Subnet Group 便被成功創建(下圖#1)。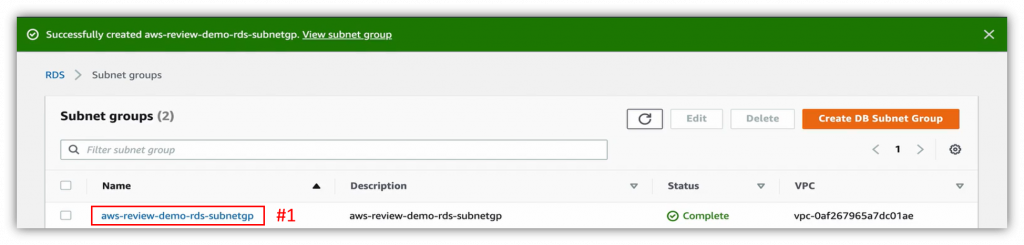
點擊左方列表的 Databases (下圖#1),按下右邊頁面右上的 Create database (下圖#2),設定建立資料庫。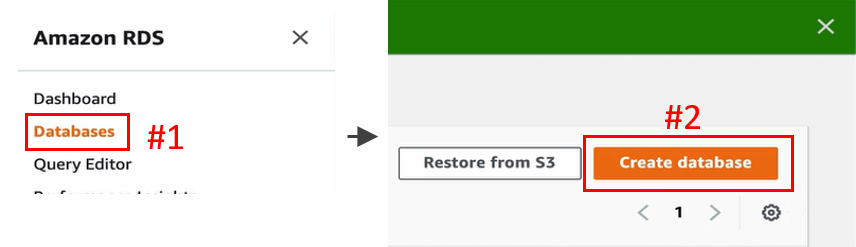
點選 Standard Create 選擇一般的創造流程,如下圖: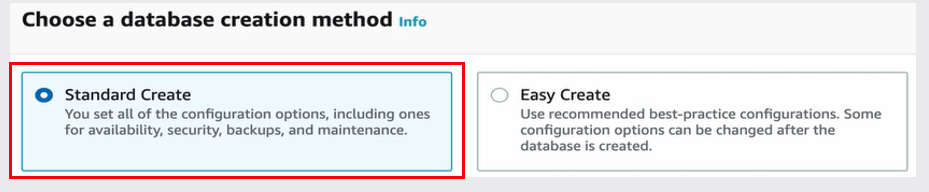
Engine type 一樣選擇 MySQL,如下圖: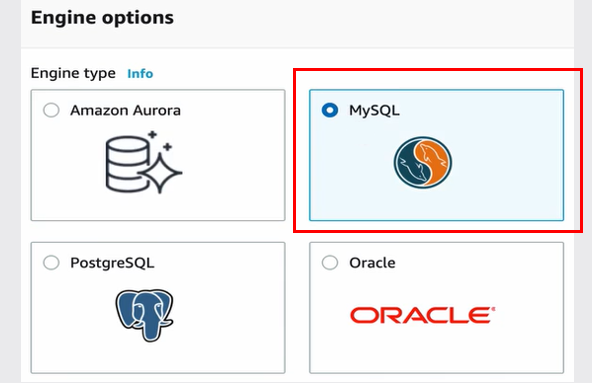
Templates 選擇 Production,如下圖: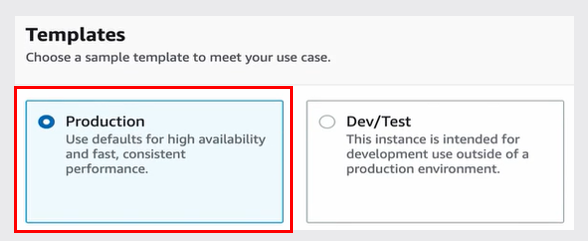
建立 DB instance 資料庫名稱(下圖#1),設定 Master username 及密碼(下圖#2)。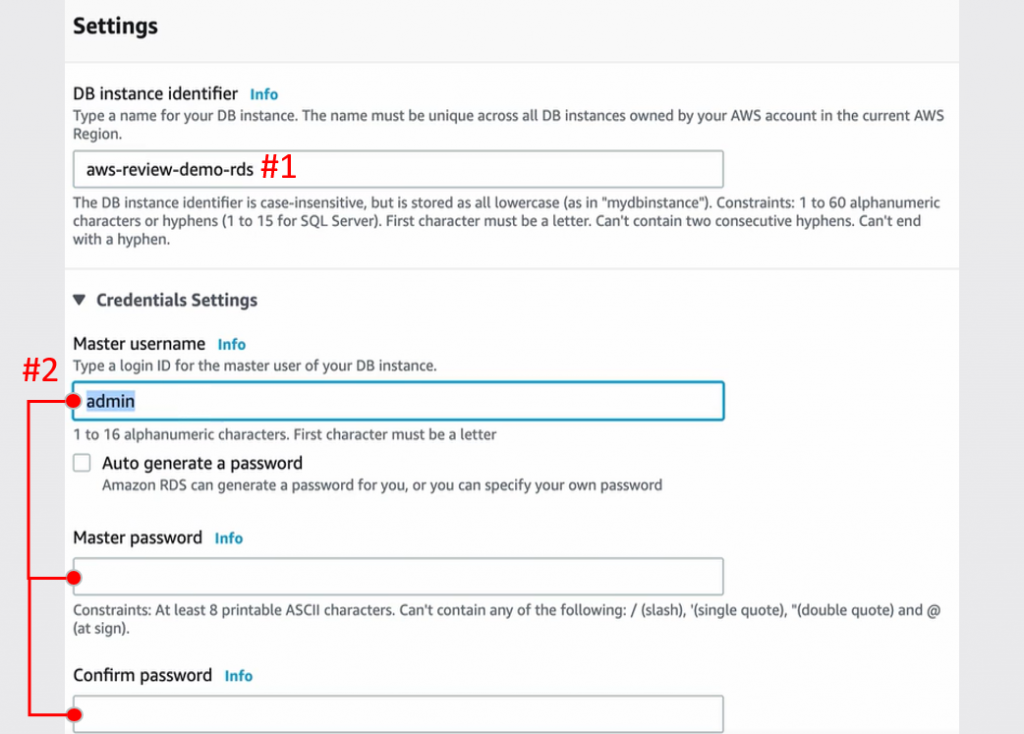
DB instance size 決定底層的 EC2 Instance 要用到多好,選擇預設的 Standard classes 即可,如下圖: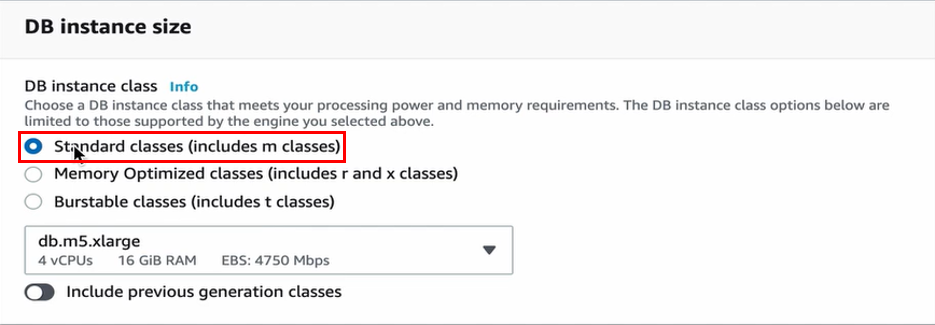
Storage 儲存資源部分,底層 EBS Volume 選擇使用更好的 Provisioned IOPS ( SSD ) (下圖#1),起始儲存空間 ( Allocated storage ) 給予 100 GiB (下圖#2),Provisioned IOPS 給 1000 GiB (下圖#3),Storage autoscaling 給 1000 GiB (下圖#4),使能夠從初始空間的 100 GiB (下圖#2),一路根據需求上升到 1000 GiB (下圖#4)。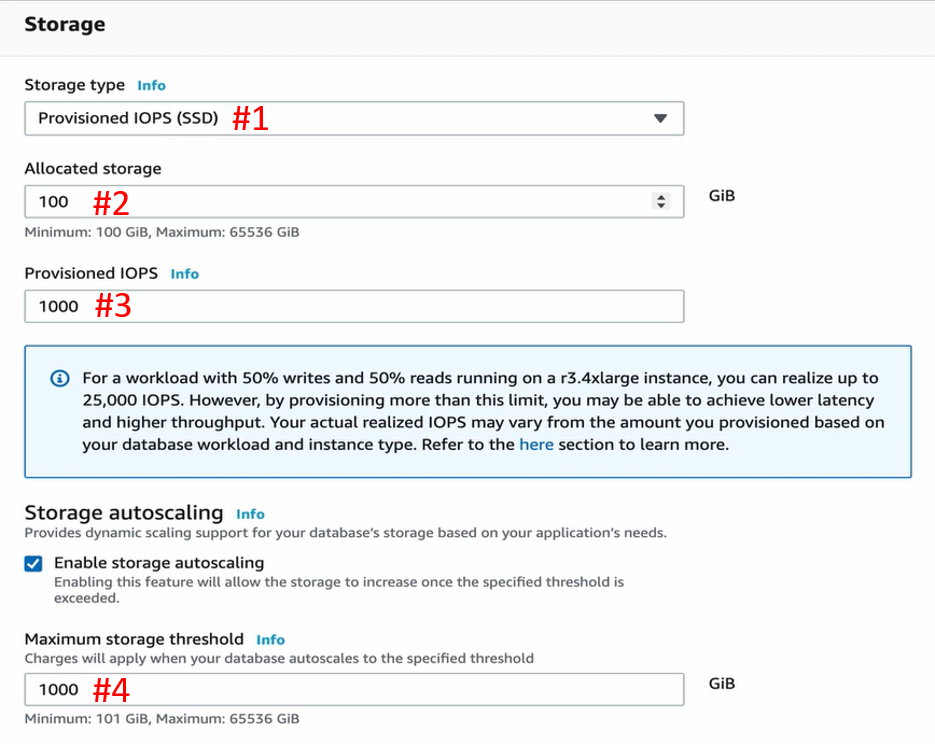
選擇使用 Multi-AZ (下圖#1),使能夠有一台 Master 和另一台 Standby 在不同的 AZ 之中,以擁有更高的 Availability。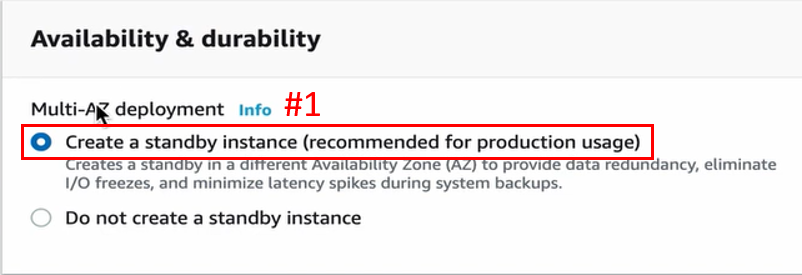
選擇 VPC (下圖#1),展開 Additional connectivity configuration (下圖#2),選擇 Subnet group (下圖#3),Public access 點選 No (下圖#4),把 Existing VPC security group 下的 default 點叉叉取消(下圖#5),再選擇先前新增的 Security Group (下圖#6),Database port 則維持 3306 (下圖#7)。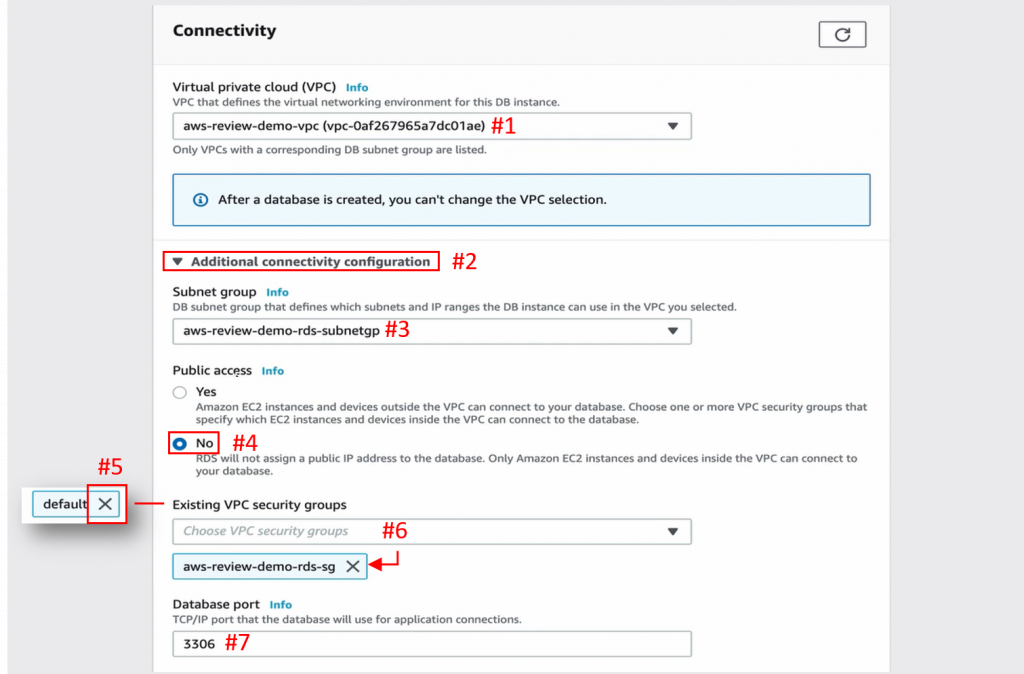
Database authentication 選擇一般密碼驗證方式即可,如下圖: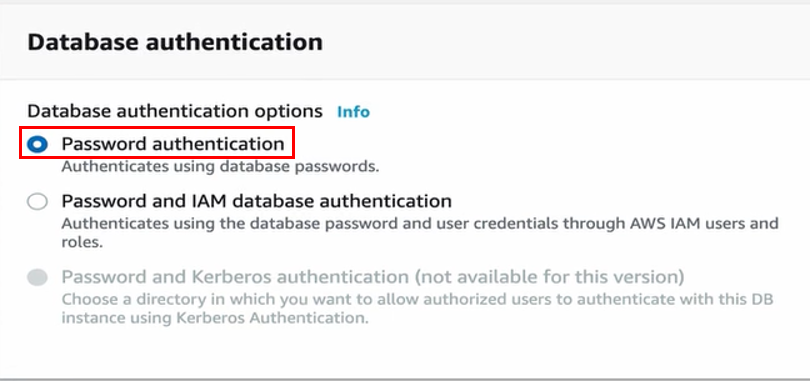
展開 Additional configuration (下圖#1),雖然有警示符號(下圖#3)表示我們沒有權限列出表來(下圖#2),但沒關係,設定皆照預設即可。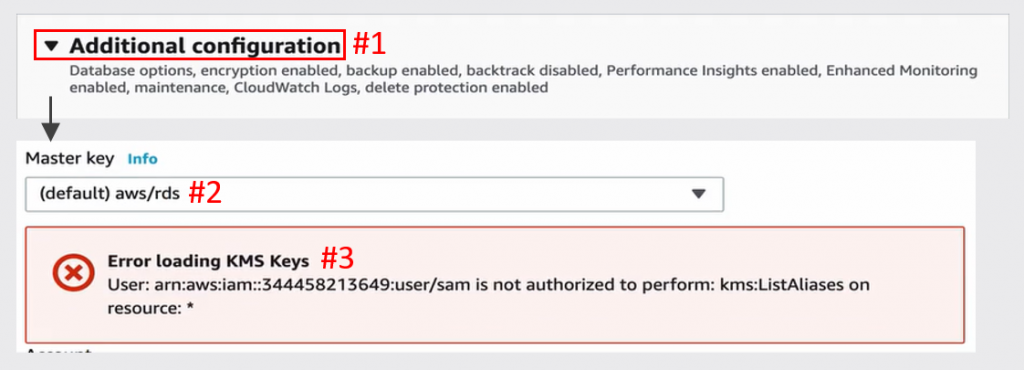
Monitoring Role 的 Role (下圖#1)指的就是 IAM Role,也就是為什麼先前設定 IAM Policy 的時候,要讓當下登入帳號的開發者擁有創建新 IAM Role 的權限;而下方灰字(下圖#2)意思是,當我們去建造資料庫的時候,它會幫忙建造一個 IAM Role 出來。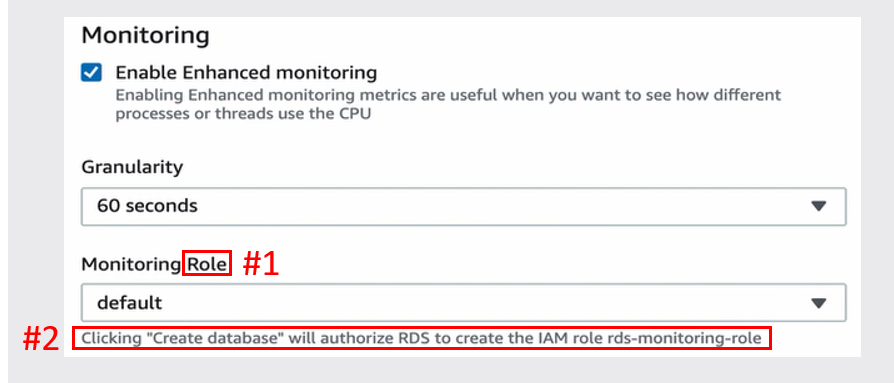
最後,拉到頁尾,點擊右下 Create database,創建資料庫,如下圖: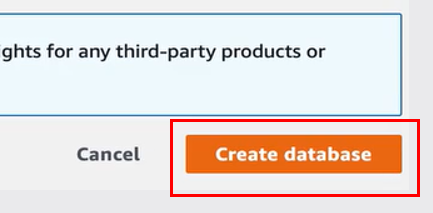
等待大約 20 分鐘(下圖#1),資料庫即會創建完畢(下圖#2)。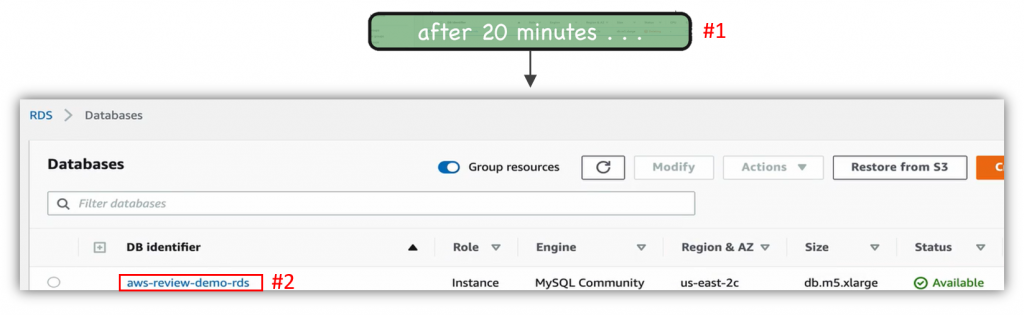
接下來,建立 EC2 Instance 以連進此資料庫。
展開頁首左方的 Services (下圖#1),在搜尋列輸入 EC2 (下圖#2),新分頁開啟下方 EC2 (下圖#3)。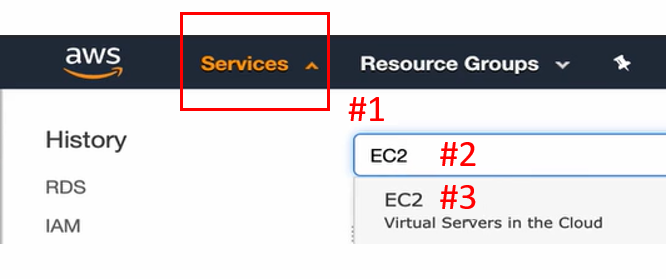
點進左方列表的 Isntances (下圖#1),再點擊右方頁面的 Launch instance (下圖#2),設定建立 EC2 Isntance。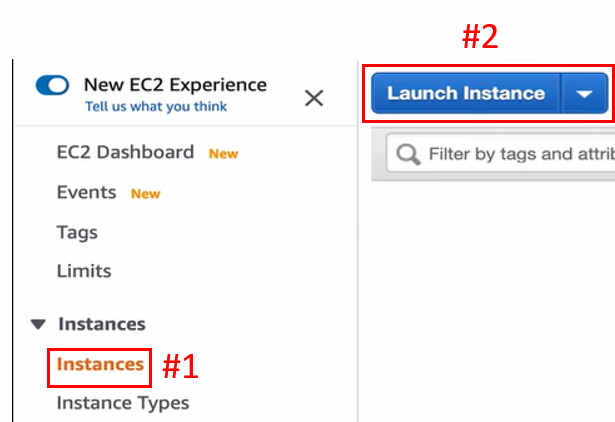
按下第一個的 Select (下圖#1)。
Instance Type 預設即可,點擊右下 Next: Configure Instance Details 下一步,如下圖:
Network 選擇先前創建的 VPC (下圖#1),Subnet 選擇 Public Subnet (下圖#2),Public IP 選 Enable (下圖#3),點擊右下 Next: Add Storage 下一步(下圖#4)。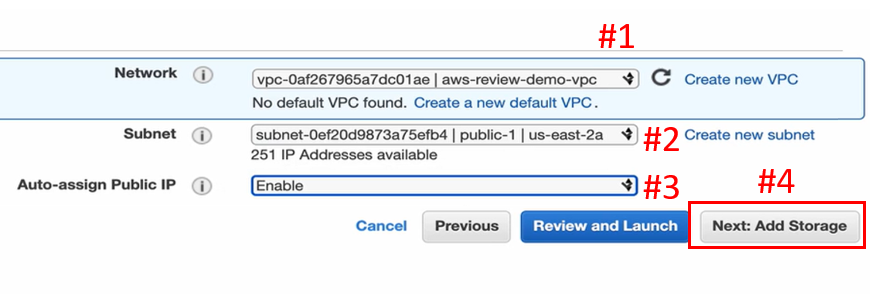
Storage 儲存資源預設即可,點擊右下 Next: Add Tags 下一步(下圖#1)。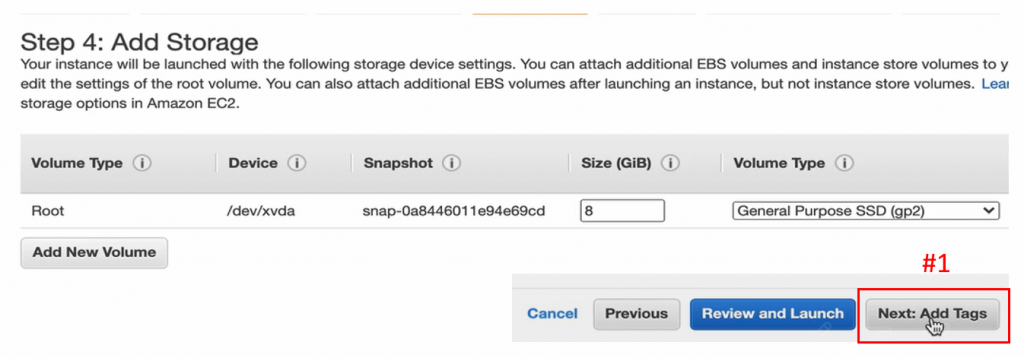
略過 Tag 設定,點擊右下 Next: Configure Security Group 下一步(下圖#1)。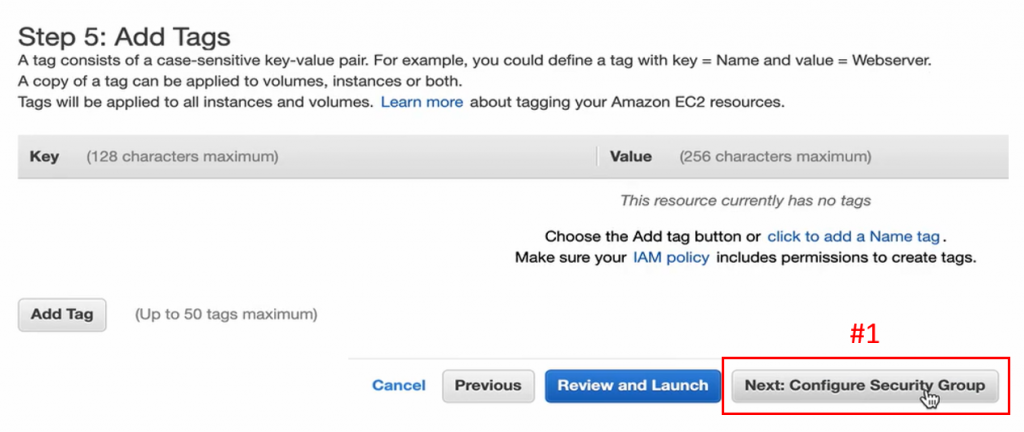
按下 Add Rule (下圖#1),開啟一個為 8080 的 Port (下圖#2),對所有 IP 來源都開放(下圖#3),最後點擊 Review and Launch (下圖#4)下一步。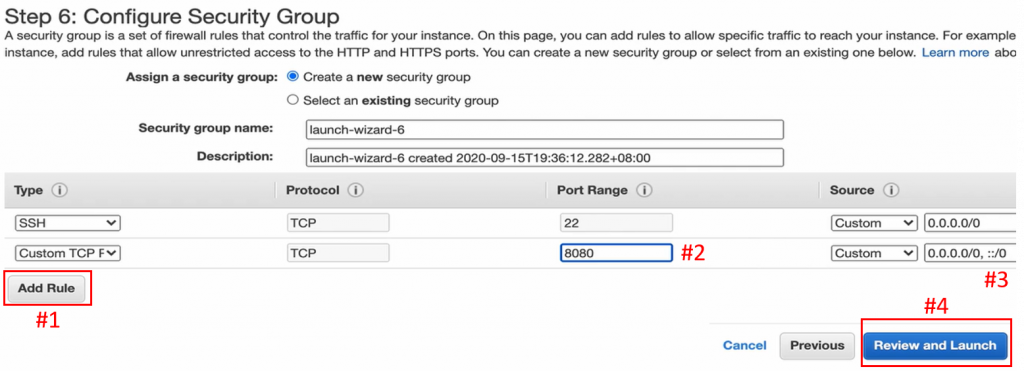
直接點擊右下 Launch,如下圖: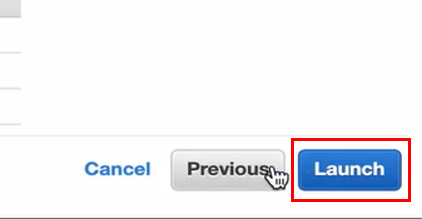
選擇創建一個 Key Pair (下圖#1),建立 Key Pair 名稱(下圖#2),按下 Download Key Pair 下載(下圖#3),再點擊 Launch Instances。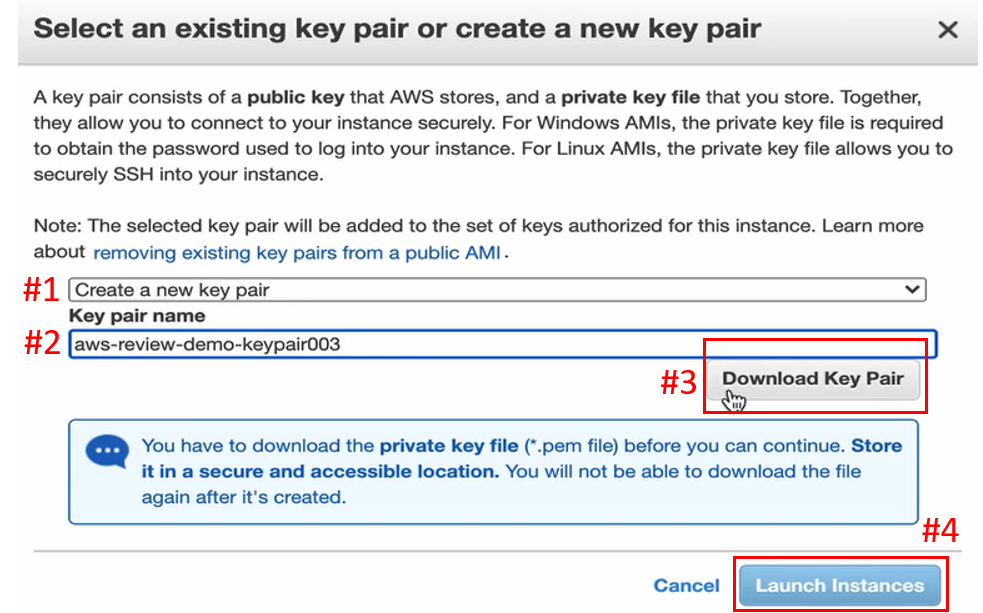
點擊 View Instance,如下圖: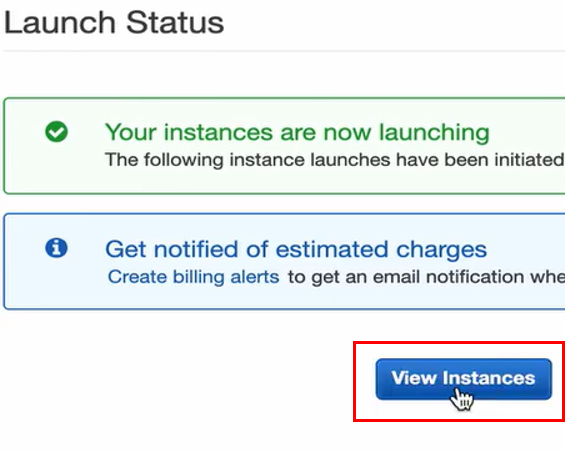
這台 Instance 將成為我們後端的 EC2 Instance,而等待 Instance 建立的過程中(下圖#1),可以先建立名稱(下圖#2)。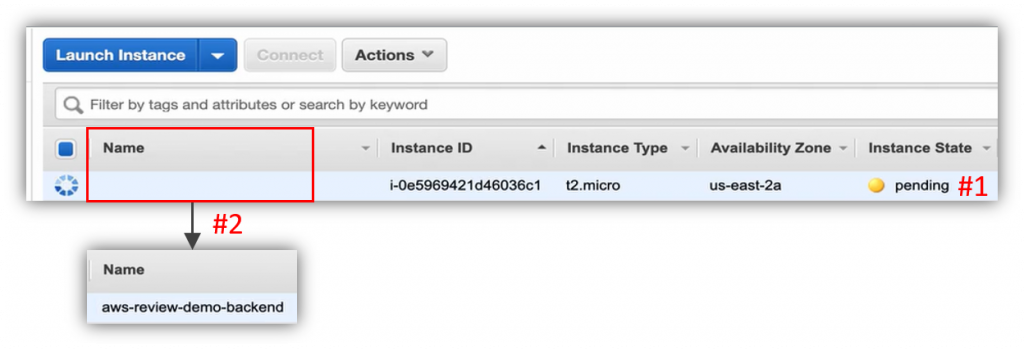
待 Instance 建立完成(下圖#1),點擊上方 Connect (下圖#2)。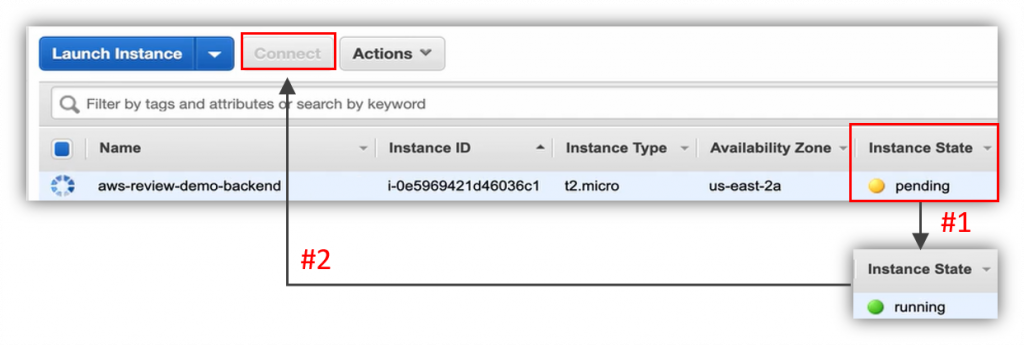
複製指令,如下圖: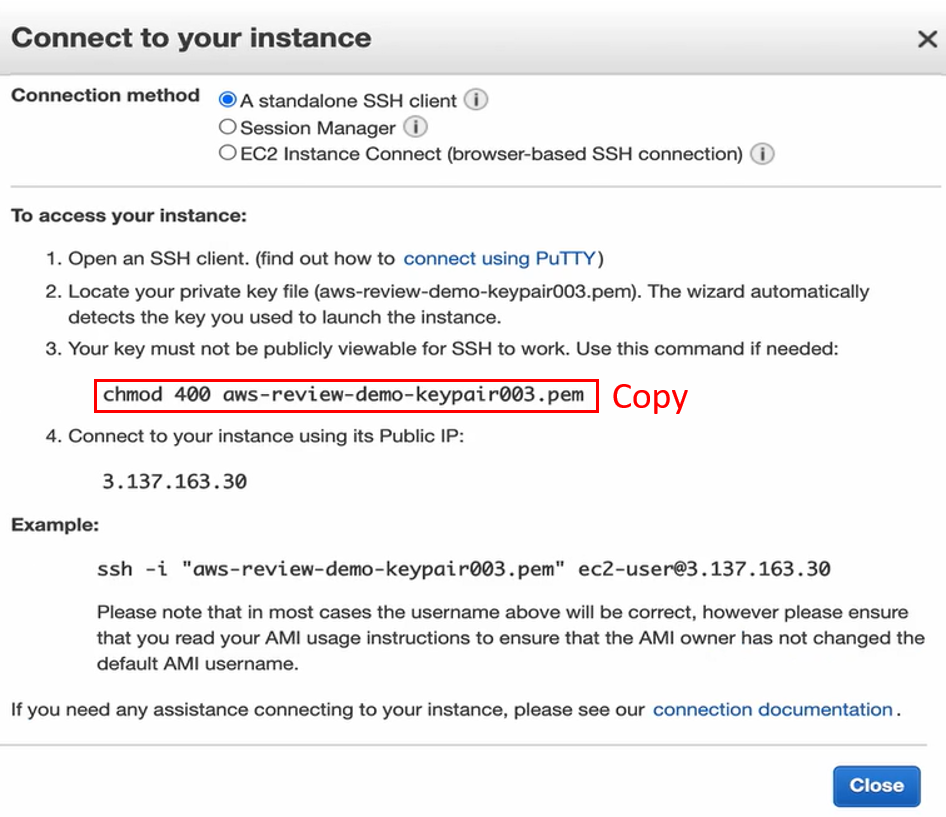
開啟 Terminal,先 cd 到下載 Key Pair 的地方(下圖#1),再貼上剛才複製的指令(下圖#2),修改 Key Pair 的權限。
再回到 EC2 頁面,複製指令,如下圖: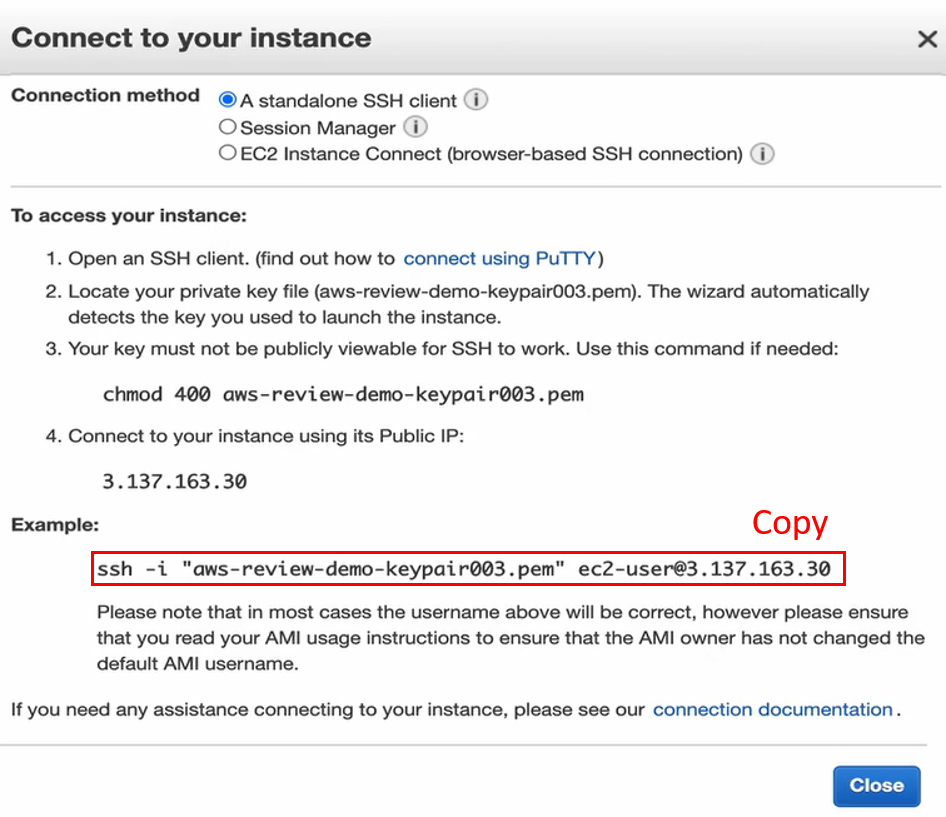
回到 Terminal,貼上剛才複製的指令(下圖#1),輸入 yes (下圖#2),即能進入 EC2 Instance (下圖#3)。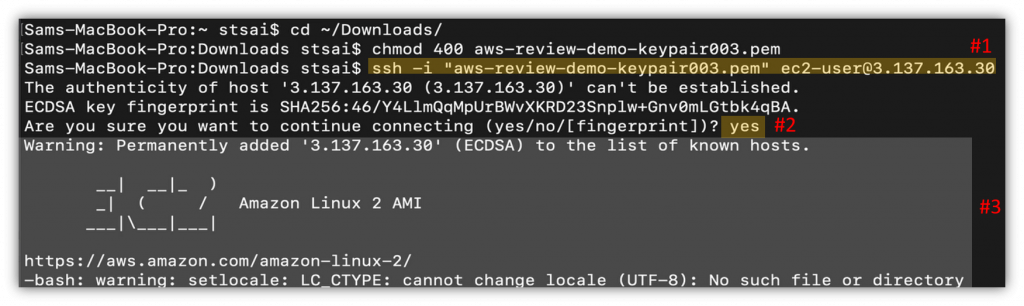
再來要透過這台 EC2 連進去,在 Primary Subnet 的資料庫。
首先安裝 MySQL,如下圖:
等待 MySQL 安裝完畢(下圖#1):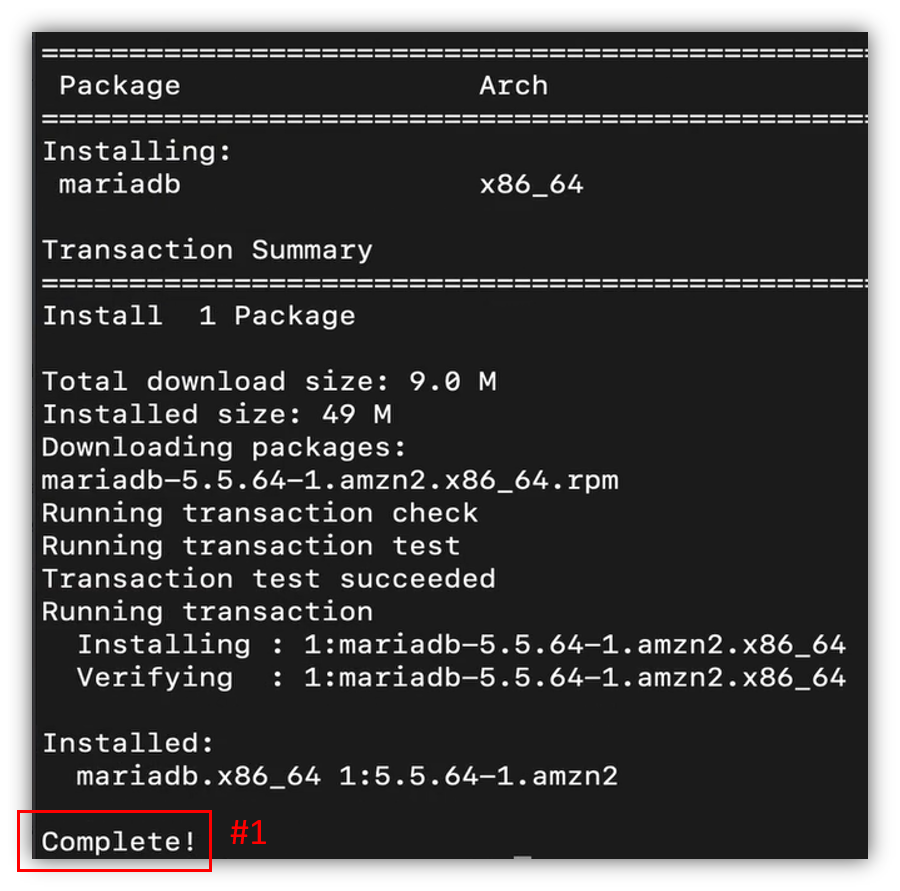
回到 RDS 介面,複製 Endpoint,如下圖: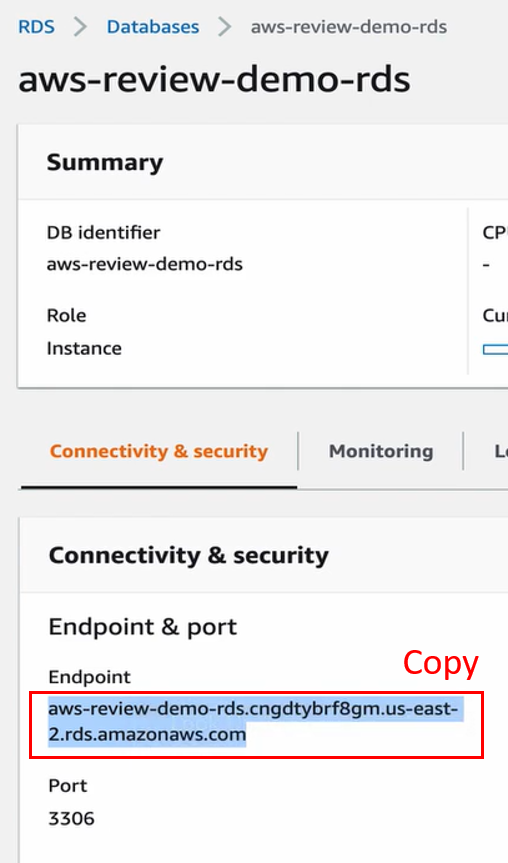
切換到 Terminal,輸入 mysql -h 加 Endpoint (下圖#1);-u 加 Username (下圖#);而 -p 指以一般密碼方式登入(下圖#3),輸入密碼(下圖#4),即可連進資料庫(下圖#5)。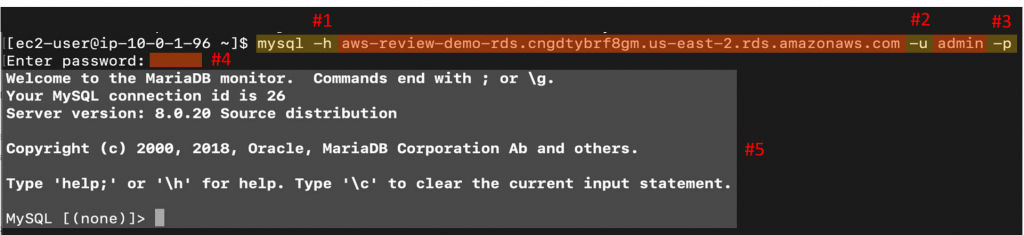
輸入 create database Database 名稱;,創建 Database (下圖#1);輸入 use Database 名稱;,進入 Database (下圖#2)。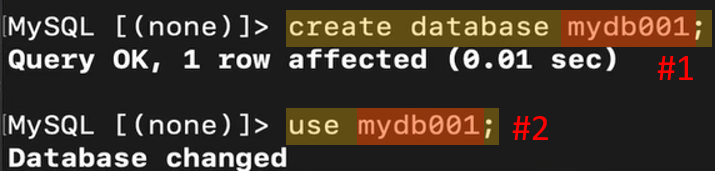
輸入 create table Table 名稱 ( 欄位名稱 資料型態 );,創建 Table,欄位跟欄位間則以 "," 分開,如下圖:
輸入 insert into Table 名稱 ( 欄位名稱 ) VALUES ( 欄位值 );,往 Table 中插入資料,欄位跟欄位間以 "," 分開,如下圖:
輸入 select * From Table 名稱;,查看 Table 內容,如下圖: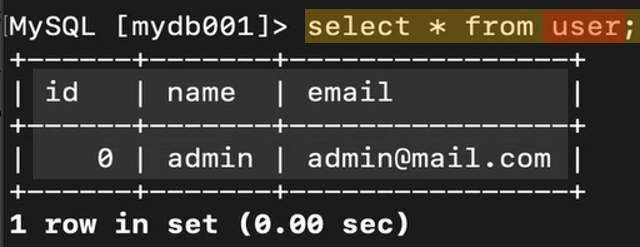
到此,便完成了資料庫初始資料的建立。輸入 exit (下圖#1),離開資料庫,再輸入 clear (下圖#2),清空畫面以保後續畫面整潔。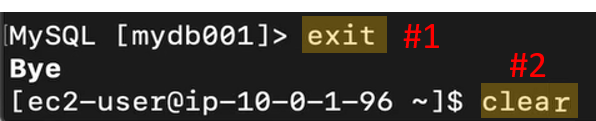
再來要建立我們後端的伺服器,這邊將會使用 Docker 這項技術,來讓我們專注在雲端的服務功能上,而不是單一的程式碼的開發模式上。所以這邊一切跟 Docker 相關的東西,都代表了一個意義,它代表了我們的應用程式。
首先,下載 Git,如下圖:
等待 Git 下載完畢(下圖#1)。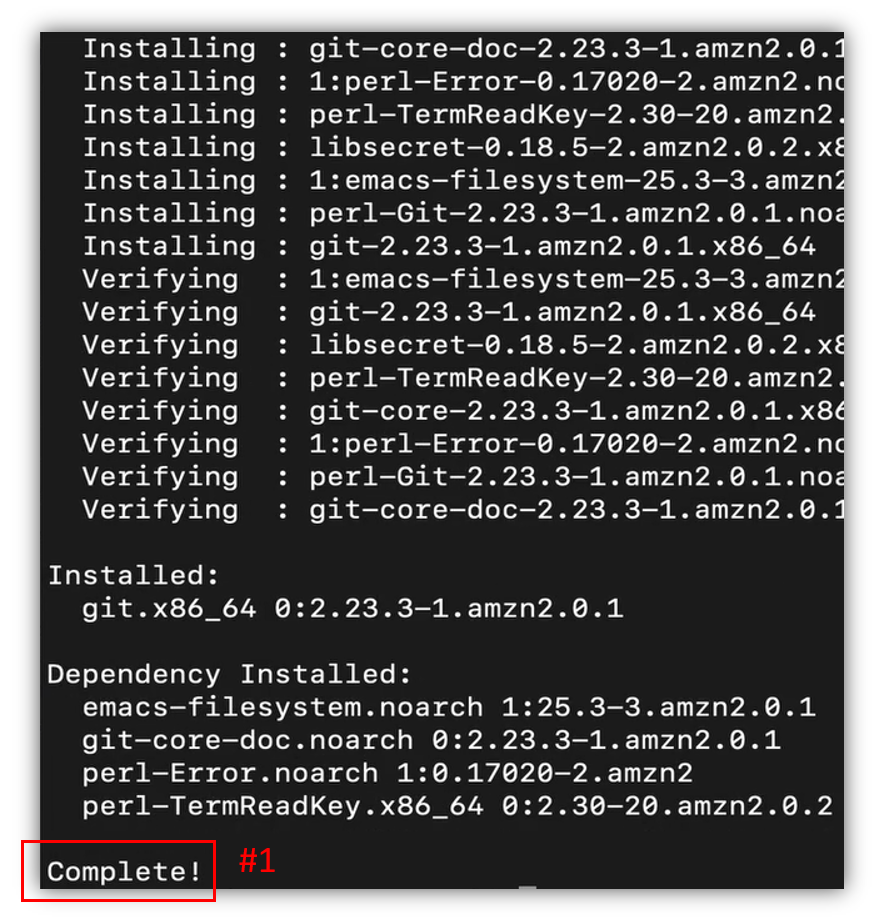
再來下載 Docker,如下圖:
等待 Docker 下載完畢(下圖#1)。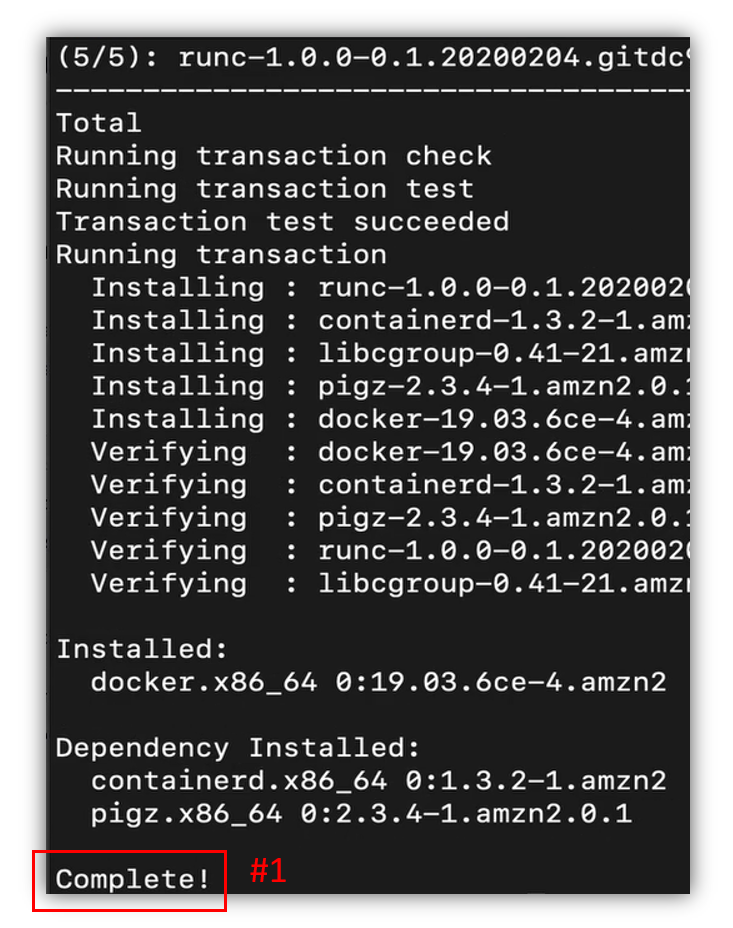
下載完畢後,輸入 sudo service docker start 指令(下圖#1),即開啟 Docker 伺服器(下圖#2)。
透過指令(下圖#1),下載 docker-compose (下圖#2)。
透過 chmod (下圖#1)改變 docker-compose (下圖#2)指令的權限。
建立指令連結,方便未來使用,如下圖:
到此,便完成此後端伺服器所需要的套件們。
接下來,利用 git clone (下圖#1)下載 Project (下圖#2)。
輸入 ls 看到目錄(下圖#1), cd 進目錄(下圖#2)。
進到目錄後,再輸入 ls (下圖#1),可以看到多個檔案目錄,而這次要到的是代表後端伺服器的 app_new (下圖#2),cd 進去 app_new (下圖#3)。
進到 app_new 之後,輸入 ls (下圖#1),可以看到一個資料夾(下圖#2)跟一個檔案(下圖#3),app是我們的後端伺服器所需要的東西,docker-compose.yml 則代表所有一切 Docker 所需要設定的東西。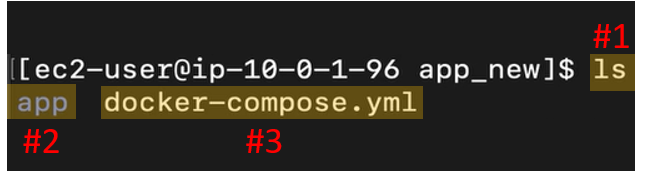
再輸入 ls -a (下圖#1),打開隱藏的檔案,接下來輸入 sudo vi .env (下圖#2),來修改 .env 檔案,順便看一下裡面有什麼。
進到檔案後,會看到內容有 4 個參數,USER 對應到所建立的 User 名稱(下圖#1);PASSWORD 對應到所建立的密碼(下圖#2)。在正式環境下當然不能這麼用,但為了 DEMO,所以直接先放在這邊。
DATABASE (下圖#3)則是對應到剛剛 EC2 連到資料庫之後,所建立的 Create Database 的名稱,而最重要的是 DB_HOST_IP (下圖#4)接下來要去做更新。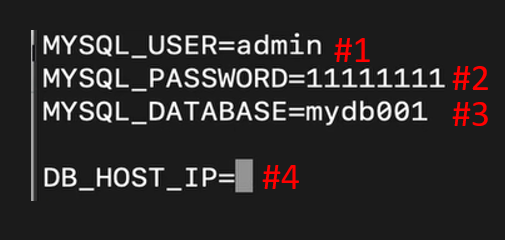
打上小寫 a,進入編輯模式,如下圖: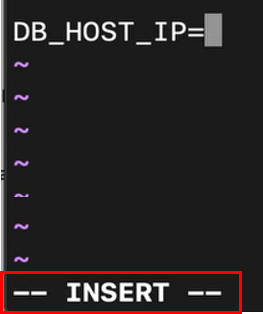
回到 RDS 頁面,複製 Endpoint,如下圖: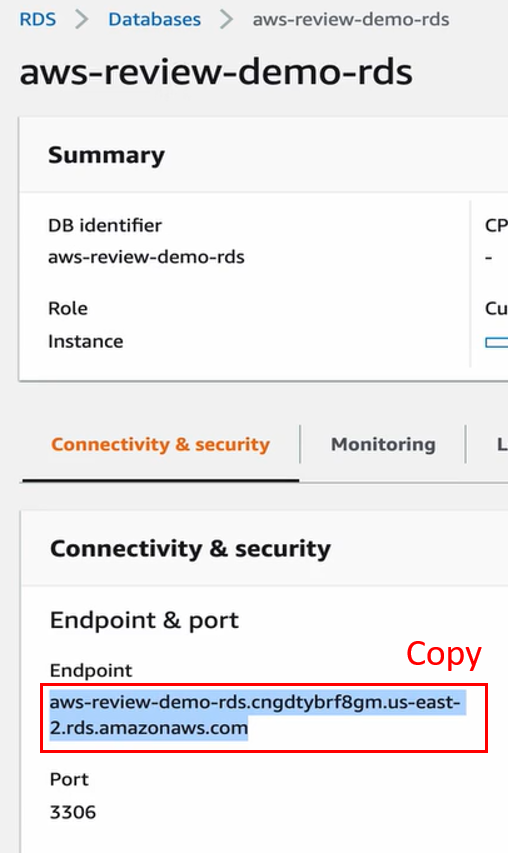
回到 Terminal 貼上(下圖#1),再按 ESC,離開編輯模式(下圖#2)。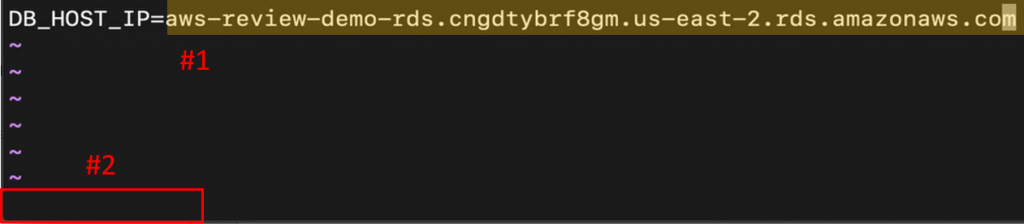
打上冒號,看到下方出現後,再打 w 寫入 q 退出,如下圖: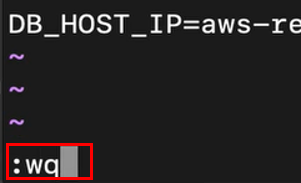
輸入 cat .env 檢查(下圖#1),可以看到參數列表都改好了(下圖#2)。
無論是用任何語言開發,Java、Python 或者是 JavaScript,應用程式都會有某個地方需要去設定跟資料庫的連線方式。也就是說,這些參數都會在某個網頁框架之中,找到相對應的位置。
完成參數設定後,輸入 docker-compose 指令,打包程式碼,如下圖:
等待成功打包(下圖#1)。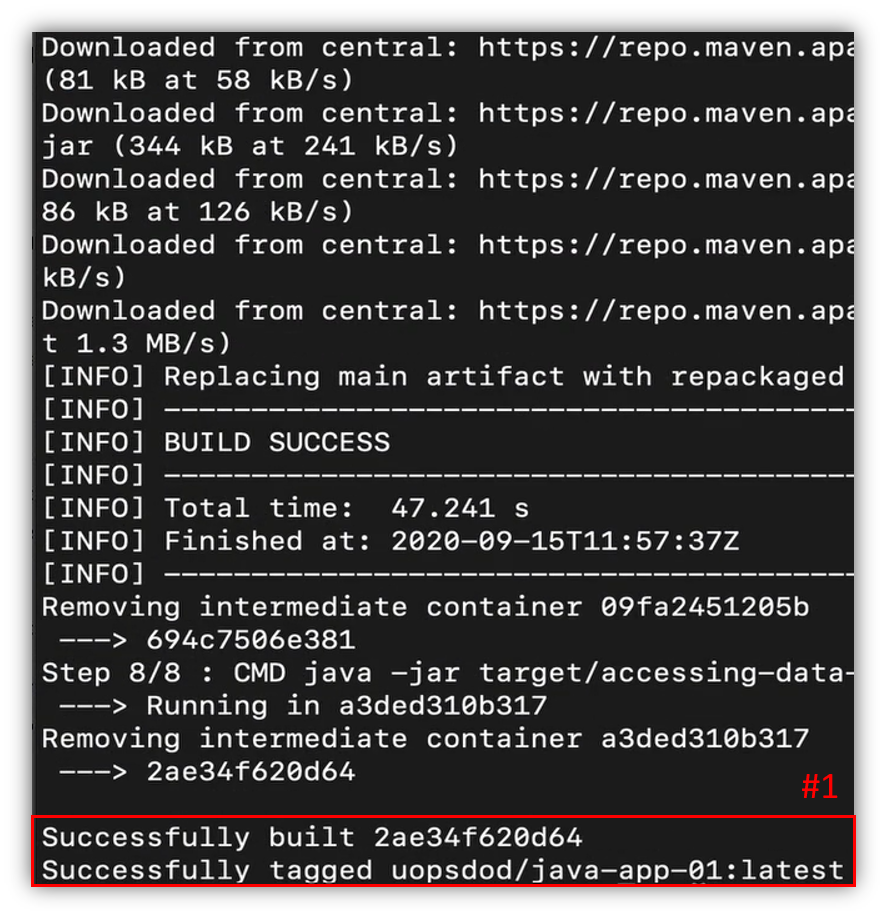
打包完成之後,輸入 sudo docker-compose up,啟動後端應用程式,如下圖:
等待後端應用程式啟動完畢,如下圖: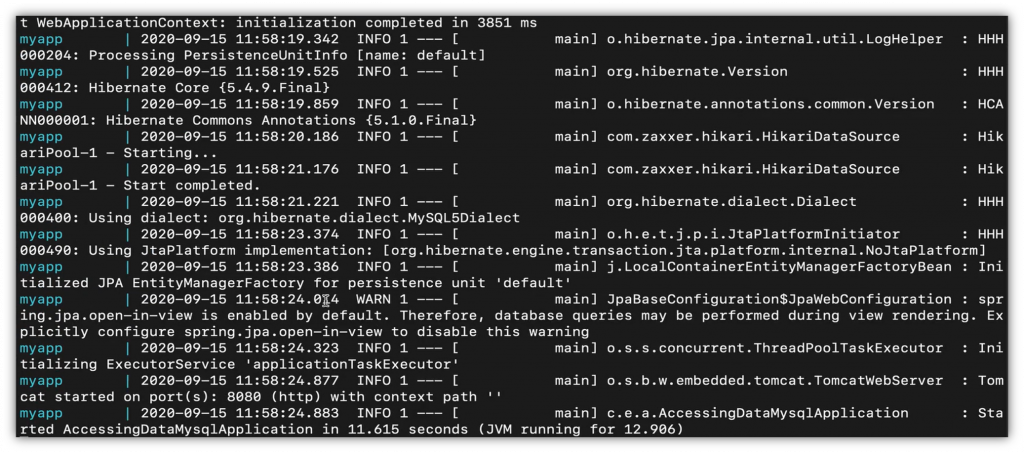
回到 EC2 介面,複製後端伺服器這台 EC2 的 Public ID,如下圖: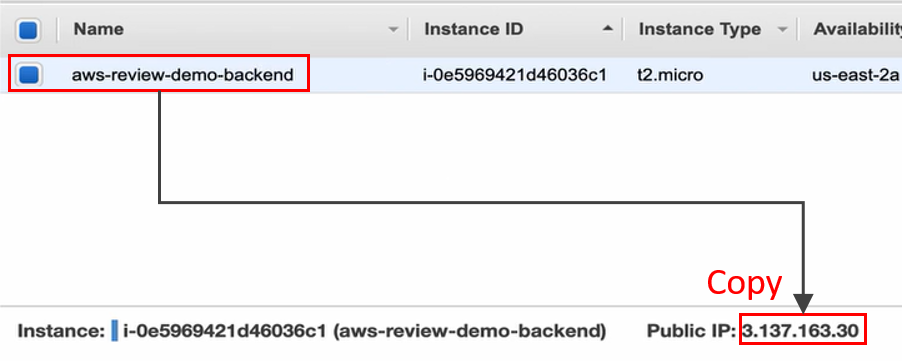
開啟新分頁,貼上 Public ID,後面配上 Security Group 所開放的 Port,也就是輸入 :8080,再打上 /demo/all,這是這個 Public ID 的後端應用程式對外開放的一個 API,Enter 進入後便能看到剛剛在資料庫所建立的資料,如下圖:
到此,便證實後端應用程式已經成功跟資料庫連結。
回到EC2介面,點擊 Launch Instance,如下圖: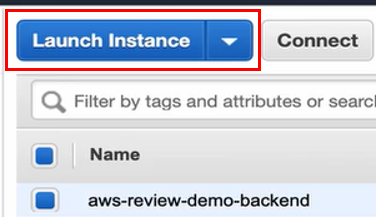
按下第一個的 Select (下圖#1)。
Instance Type 預設即可,點擊右下 Next: Configure Instance Details 下一步,如下圖: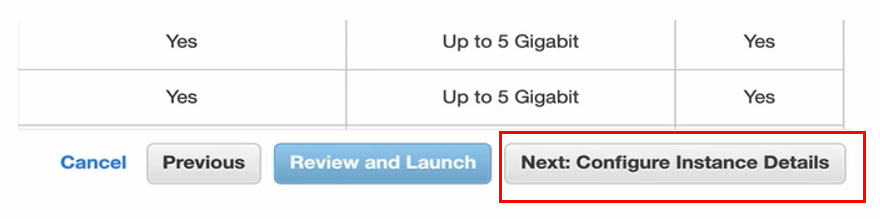
Network 選擇先前創建的 VPC (下圖#1),Subnet 選擇 Public Subnet (下圖#2),Public IP 選 Enable (下圖#3),特別不一樣的是 IAM role 要選擇先前建立的 Role (下圖#4),讓這台 EC2 Instance 有權限去與 S3 Service 互通,再點擊右下 Next: Add Storage 下一步(下圖#5)。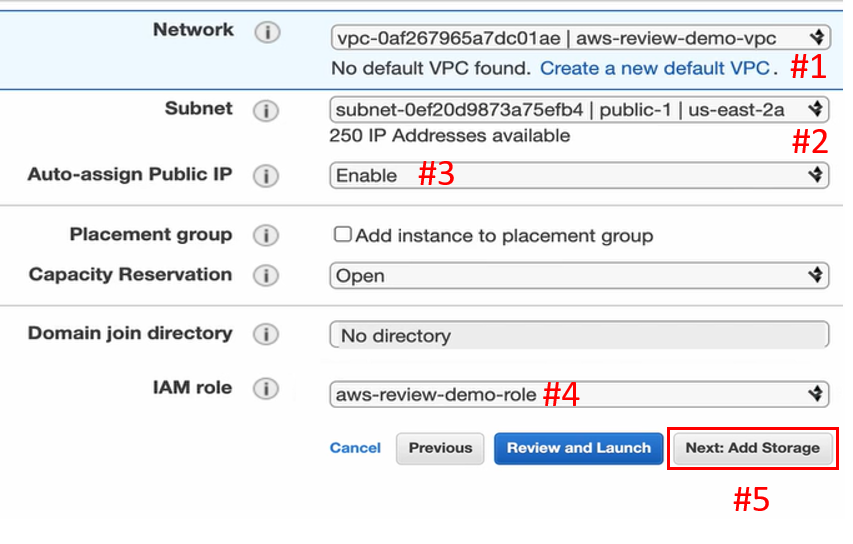
Storage 儲存資源預設即可,點擊右下 Next: Add Tags 下一步(下圖#1)。
略過 Tag 設定,點擊右下 Next: Configure Security Group 下一步(下圖#1)。
按下 Add Rule (下圖#1),前端開放的 Port 為 3000 Port (下圖#2),對所有 IP 來源都開放(下圖#3),最後點擊 Review and Launch (下圖#4)下一步。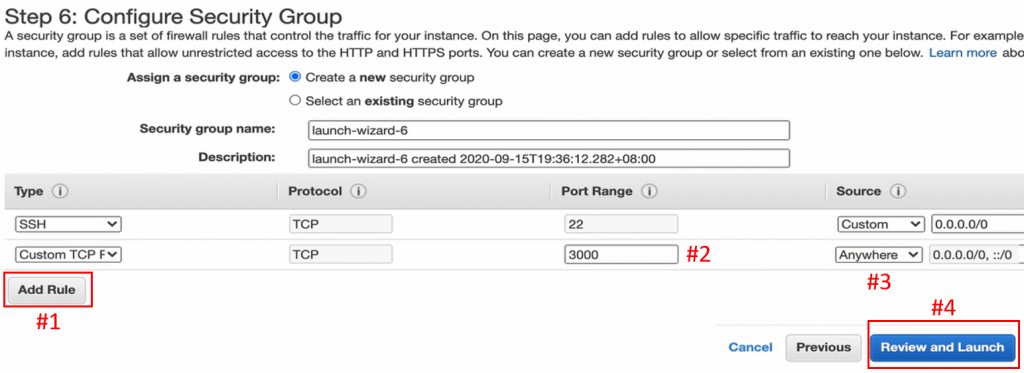
直接點擊右下 Launch,如下圖:
選擇 Key Pair (下圖#1),使用先前的創建過的 Key Pair (下圖#2),打勾(下圖#3),再點擊 Launch Instances (下圖#4)。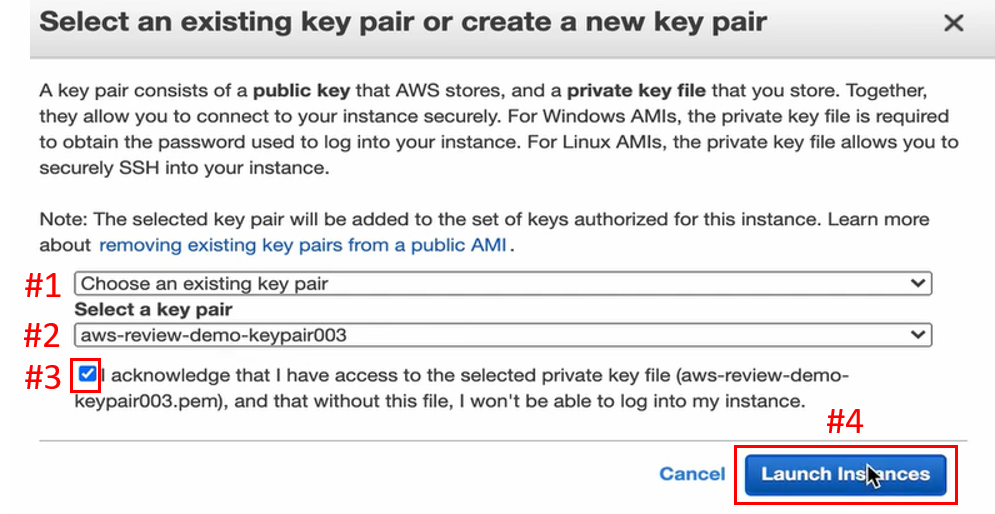
點擊 View Instance,如下圖:
等待 Instance 建立的過程中(下圖#1),可以先建立名稱(下圖#2)。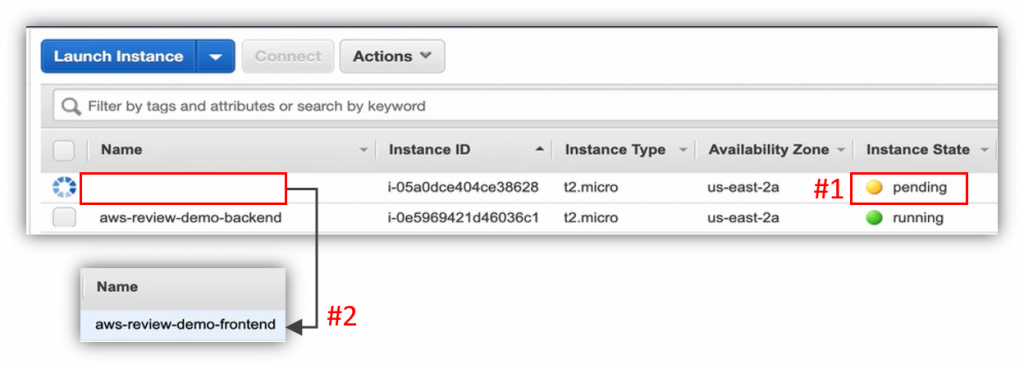
待 Instance 建立完成(下圖#1),點擊上方 Connect (下圖#2)。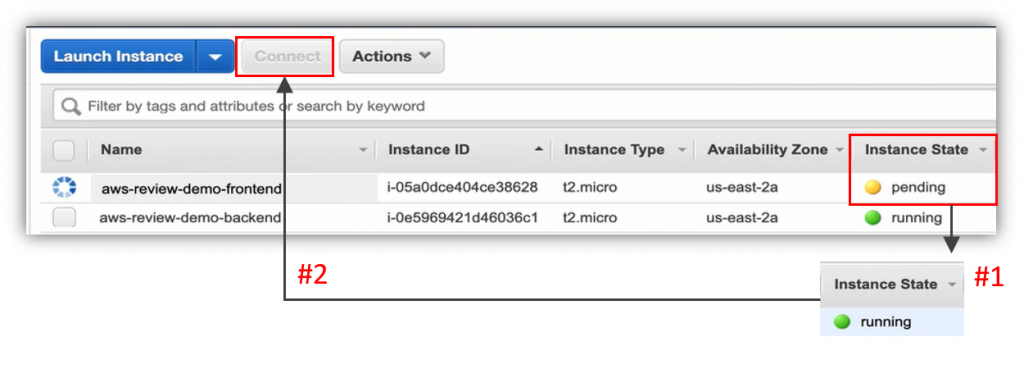
直接複製 ssh 指令,如下圖: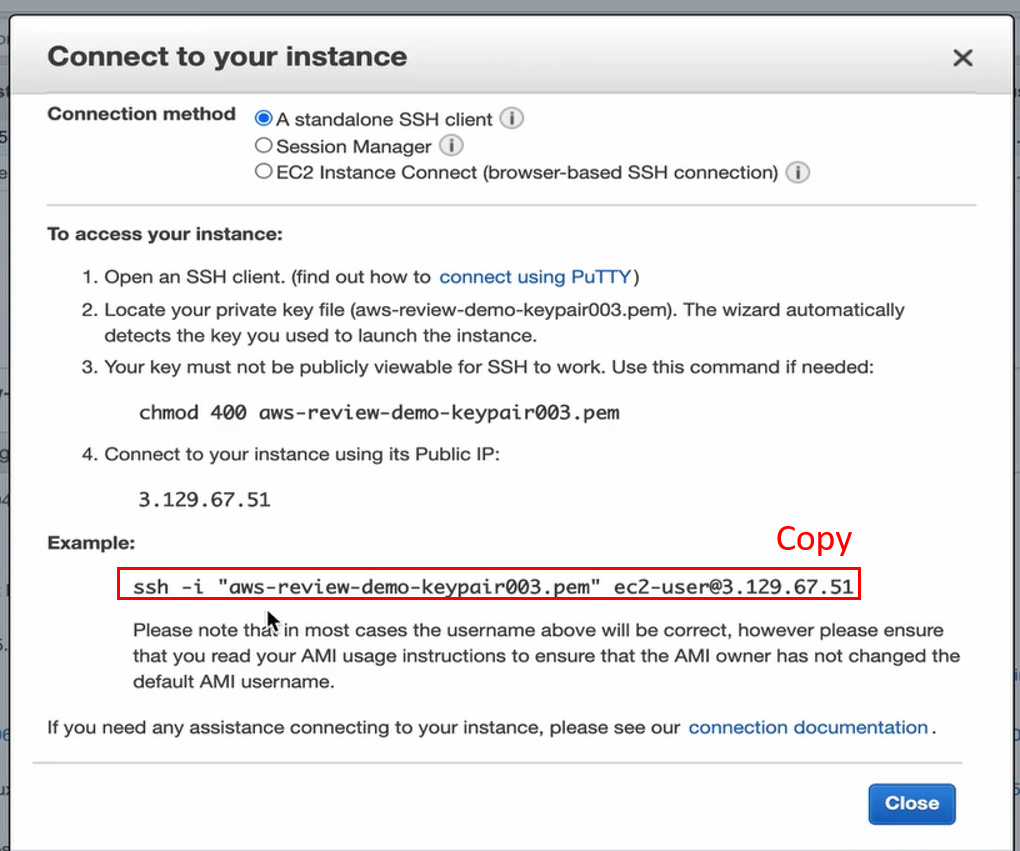
為了將後端與前端區別開來,開啟另一新的 Terminal,cd 到下載 Key Pair 的地方(下圖#1),再貼上剛才複製的指令(下圖#2),輸入 yes (下圖#3),連接 EC2 (下圖#4)。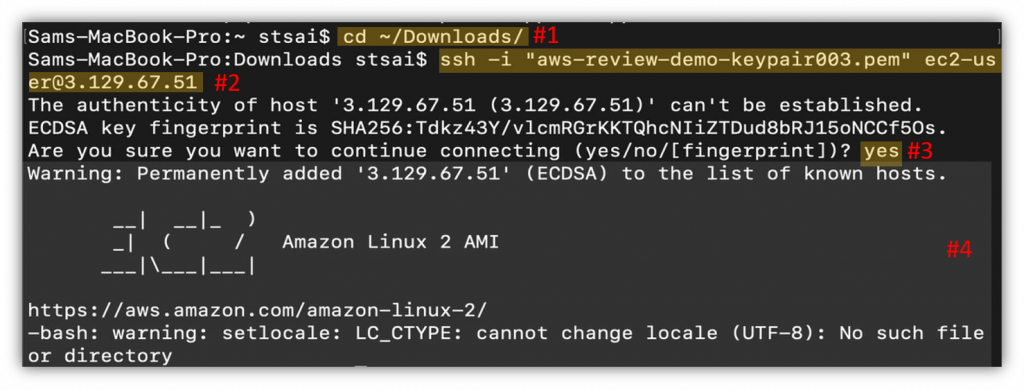
接著透過類似的步驟,利用 Docker 把前端伺服器給啟起來。
首先,下載 Git,如下圖:
等待 Git 下載完畢(下圖#1)。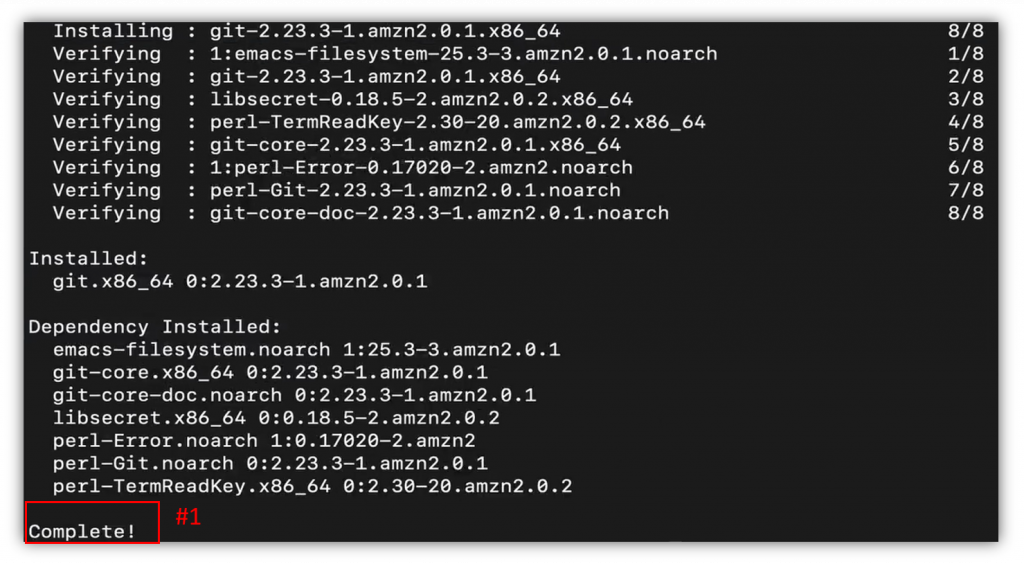
下載 Docker,如下圖:
等待 Docker 下載完畢(下圖#1)。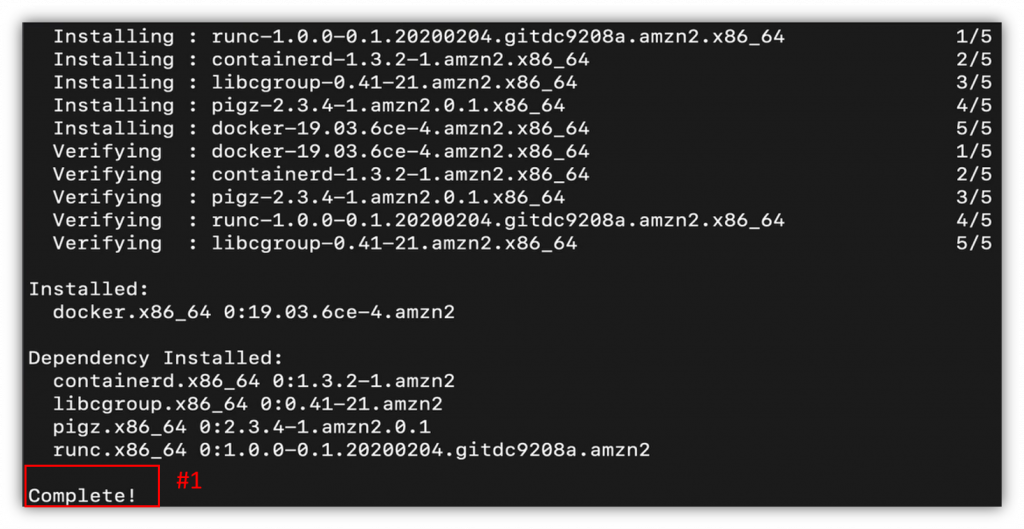
利用指令(下圖#1),啟動 Docker(下圖#2)。
利用指令(下圖#1),下載 docker-compose(下圖#2)。
修改 docker-compose 指令權限,如下圖:
建立 docker-compose 指令連結,如下圖:
到此,完成前端伺服器的套件下載。
利用 git clone 指令(下圖#1),下載專案(下圖#2)。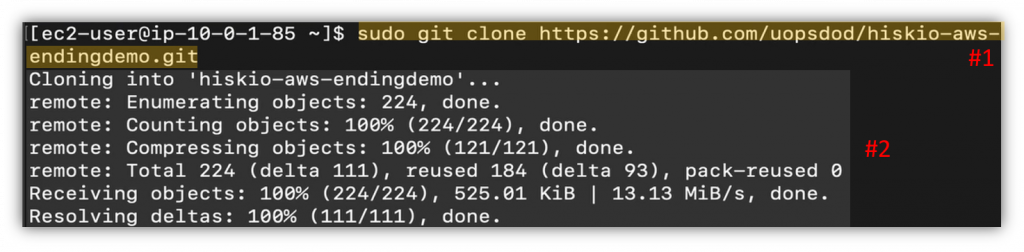
cd 進第一層目錄(下圖#1),輸入 ls 查看(下圖#2),可以看到代表前端應用程式的 web_new 目錄 (下圖#3)。
cd 進入 web_new 目錄(下圖#1),輸入 ls (下圖#2),可以看到 docker-compose.yml,代表的是 Docker 所需要的設定檔;web 則是代表前端應用程式所需要的東西。
鍵入 ls -a 打開隱藏的檔案(下圖#1),輸入 sudo vi .env 進入修改(下圖#2)。
回到 EC2 介面,前端要連到後端的 API,所以需要後端的 Public IP,勾選後端伺服器(下圖#1),複製其 Public IP (下圖#2)。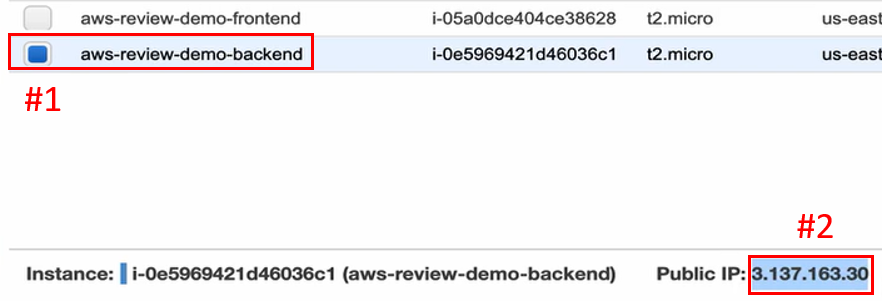
回到 Terminal,此處 IP 代表後端伺服器的位置(下圖#1),按小寫 a 進入編輯模式,將剛才複製的後端伺服器 Public IP 貼上替代(下圖#2),按 ESC,輸入 :wq (下圖#3),離開 .env。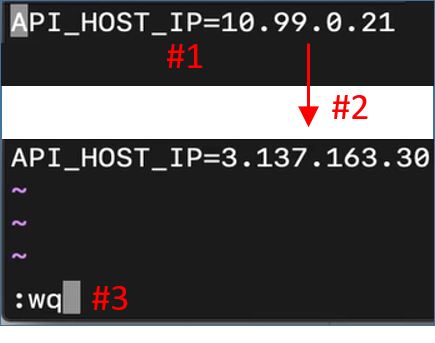
輸入 cat .env 檢查內容(下圖#1),可以看到參數已更新到最新的後端 EC2 Public IP (下圖#2)。
接下來,利用 docker-compose build 打包前端應用程式,如下圖:
等待前端應用程式打包完成(下圖#1)。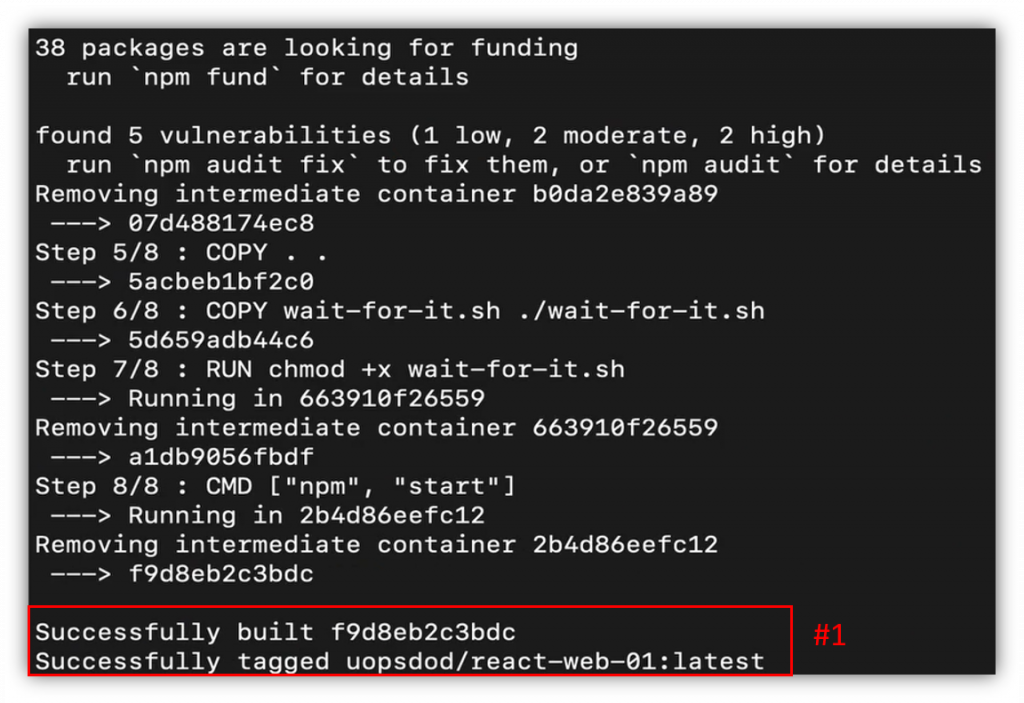
透過 docker-compose up 啟動前端應用程式,如下圖:
等待前端應用程式啟動完成(下圖#1)。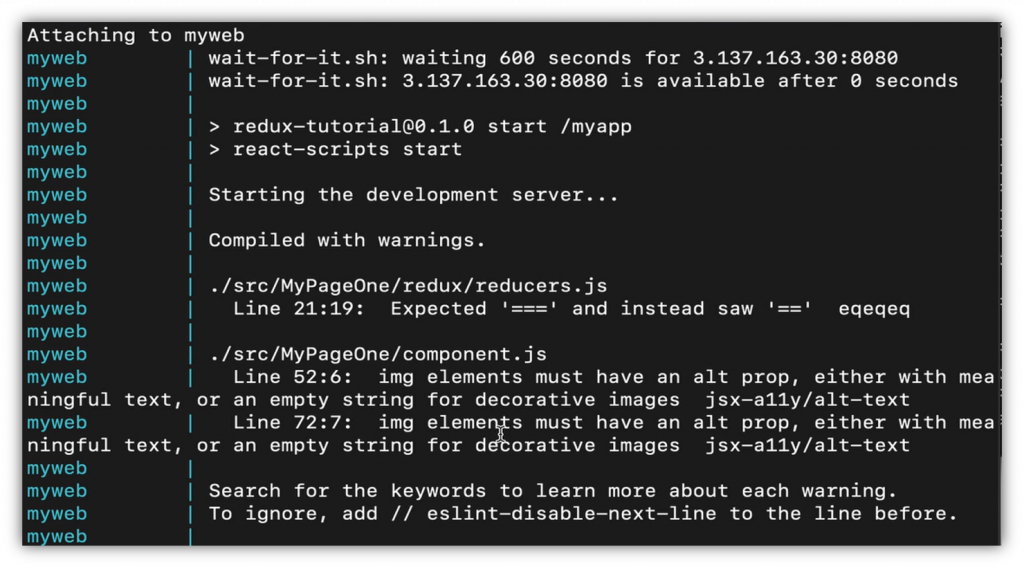
啟動前端應用程式後,想嘗試連進首頁。
先回到 EC2 介面,選擇前端伺服器(下圖#1),複製前端頁面的 Public IP (下圖#2)。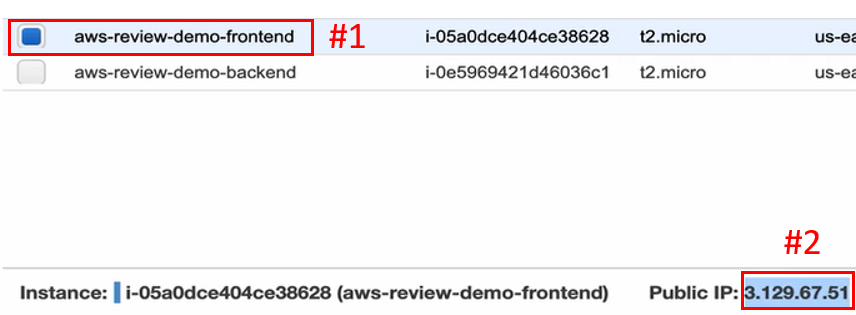
開啟新分頁,貼上前端 Public IP (下圖#1),配上 Security Group 開放的 3000 Port,進入此位址便能看到前端頁面。而此處呼叫了一個 List API 跟後端伺服器互動,就能看到最一開始在資料庫所建構的那一筆資料(下圖#2)。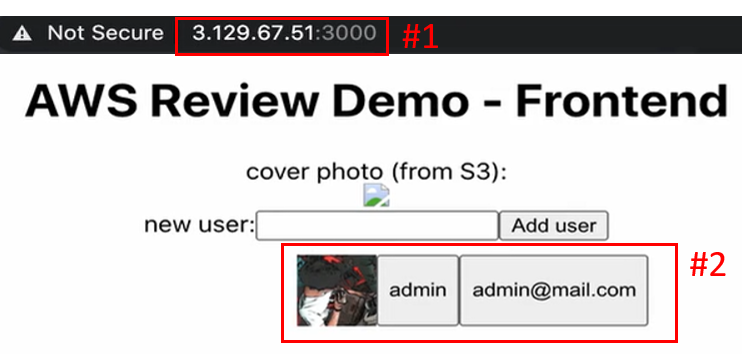
同樣的,也可以透過 Create API 來創建一個新的 User。假設創建 sam003,點擊 Add user (下圖#1),就能看到 sam003 的加入(下圖#2)。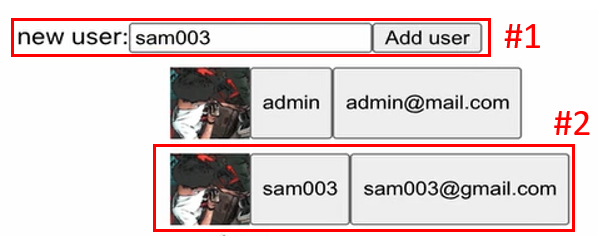
而回到後端伺服器,頁面上 1 筆資料的狀態(下圖#1),經過重新整理頁面,即可看到 API 變成回傳 2 筆資料的狀態(下圖#2)。
到此,前端頁面跟後端頁面透過 API 交流,後端頁面跟資料庫建立連線,基本上便完成了一個 3 層式架構的部署。
回到前端頁面,發現首頁的照片 cover photo 沒有顯示出來(下圖#1),點擊瀏覽器右上角(下圖#2),往下找到 More Tools (下圖#3),按 Developer Tools (下圖#4),把開發者工具打開。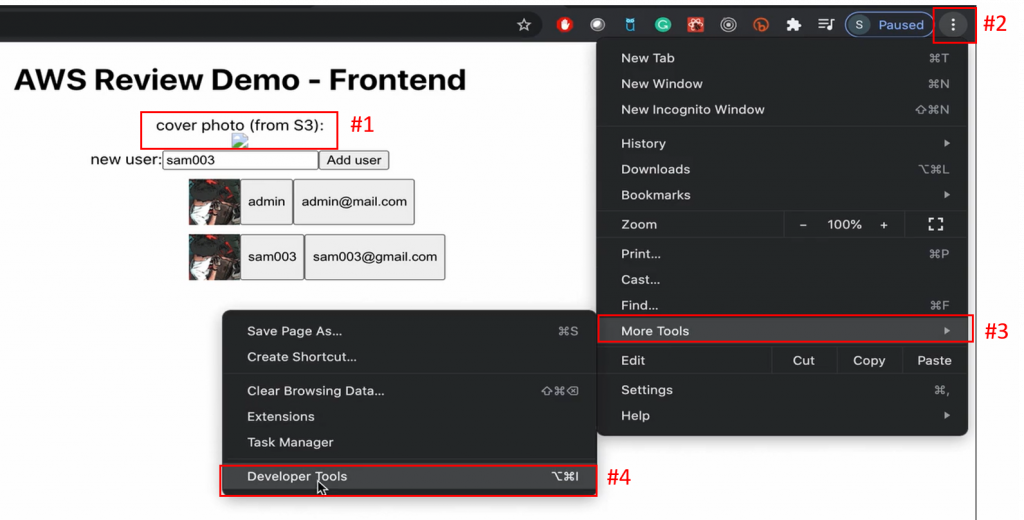
點擊開發者工具左上指標(下圖#1),點看圖片的 HTML (下圖#2),接下來要做的是,把封面照片放到 S3 上面,並把這邊的網址改成圖片的位址(下圖#3)。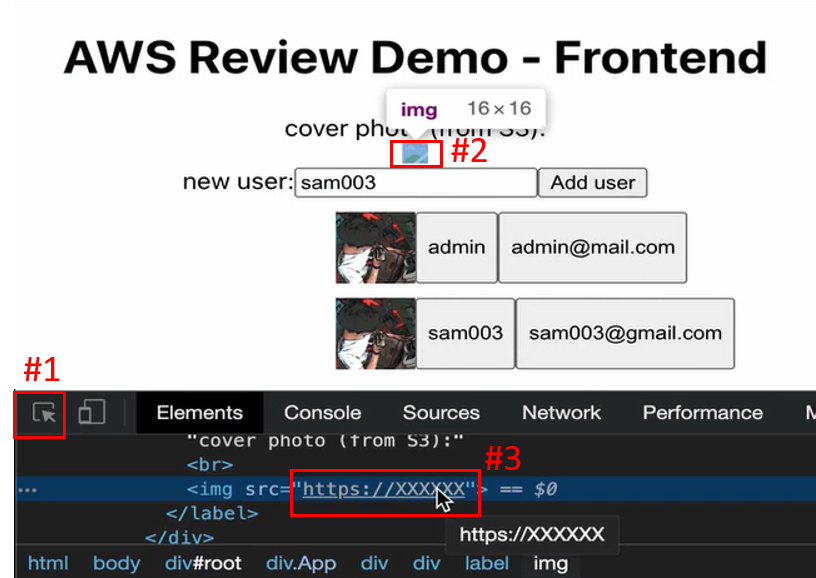
回到前端 Terminal,利用 Crtl + C 終止前端應用程式的啟動,如下圖:
在創建前端 EC2 的時候,有給它一個 IAM Role,所以可以用這台 EC2 跟 S3 Service 進行交流。
利用 s3api create-bucket 創建 Bucket (下圖#1),給予名稱(下圖#2),設置 Region 到 EC2 所在地區(下圖#3),根據文件需求加上設定(下圖#4),並且 LocationConstraint 放上同一個地區(下圖#5)。
創建 Bucket 後,透過 list-buckets 查看(下圖#1),即可看到剛才創建的 Bucket (下圖#2)。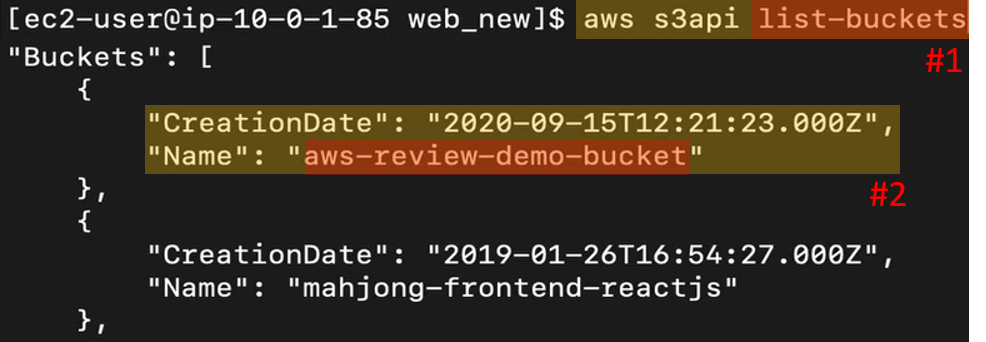
在專案裡面,其實已存有封面圖片。
打上 ls 看到 web 目錄底下的 public 目錄(下圖#1),可以看到圖片(下圖#2),選擇其中一個檔案放到 S3 的 Bucket 裡面。
輸入 aws s3 cp (下圖#1),cp 是 Copy 的意思。加上檔案位址(下圖#2),配上剛才建立的 Bucket 名稱(下圖#3)。
在 aws s3 利用 ls 查看剛才創建的 Bucket (下圖#1),即可看到成功放上圖片到 Bucket (下圖#2)。
這些步驟所要展示的是,這台 EC2 Instance 透過 IAM Role 獲得了去跟 S3 Service 互動的權限。
回到 EC2 介面,點開左上角 Service (下圖#1),搜尋列輸入 S3 (下圖#2),新分頁開啟 S3 (下圖#3)。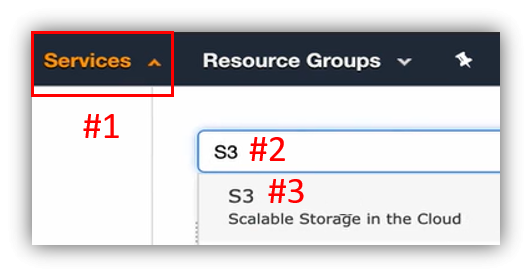
可看到剛才在 EC2 Instance 建立的 Bucket 出現在 S3,點擊進入 Bucket,如下圖: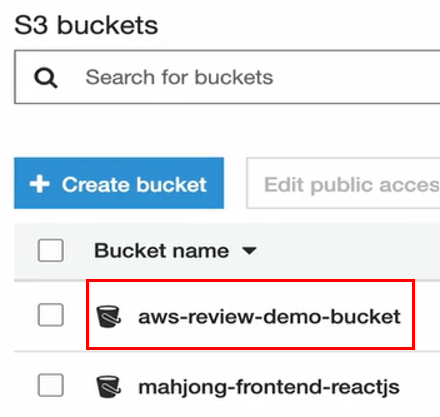
Bucket 中有剛才放上的檔案(下圖#1),接下來要讓這個檔案可以對 Public 開放。
首先檢查 Bucket 層級的 Permissions (下圖#1),確認 Block all public access 是 off 的狀態(下圖#2)。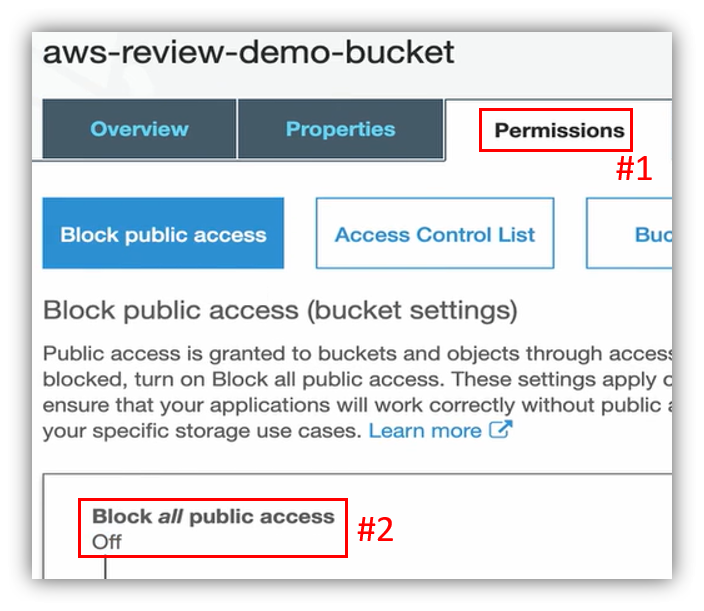
完成後,我們就點進圖片檔(下圖#2)。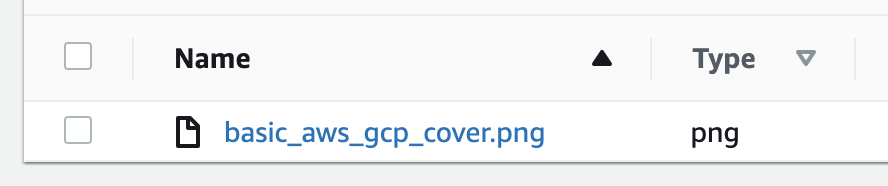
再來看到 Permissions (下圖#1),打勾 Public access (下圖#2)。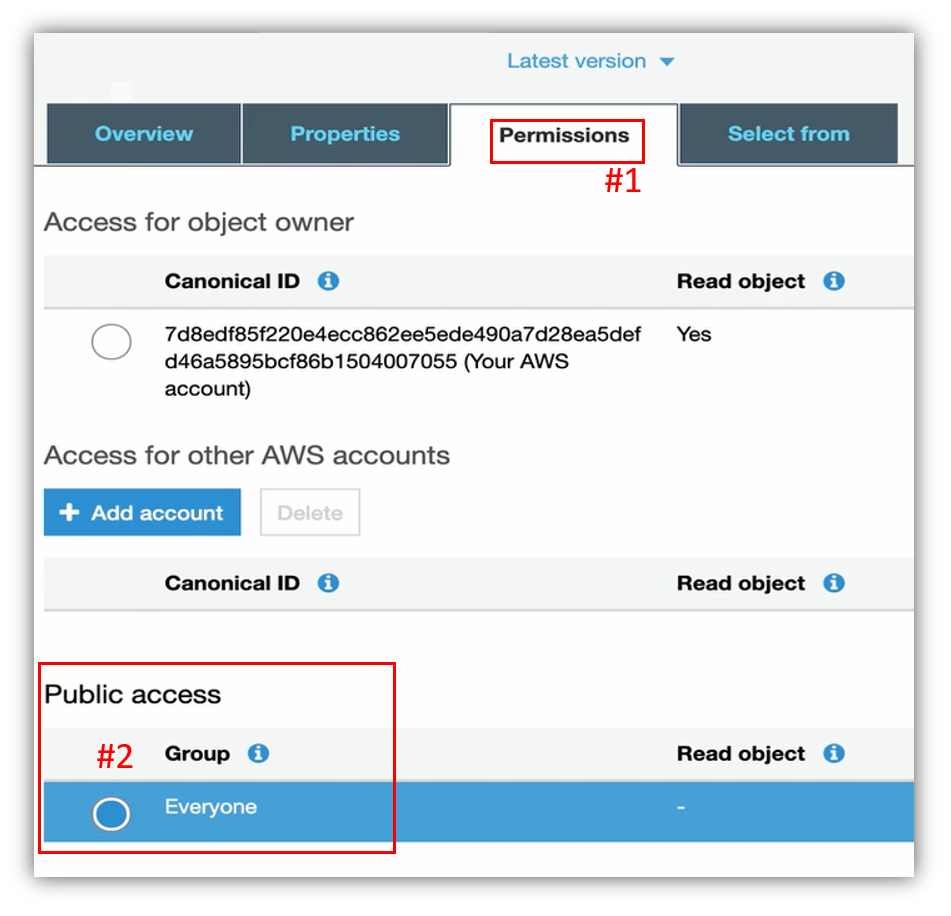
開放 Read object 讀的權限(下圖#3),按下 Save (下圖#4)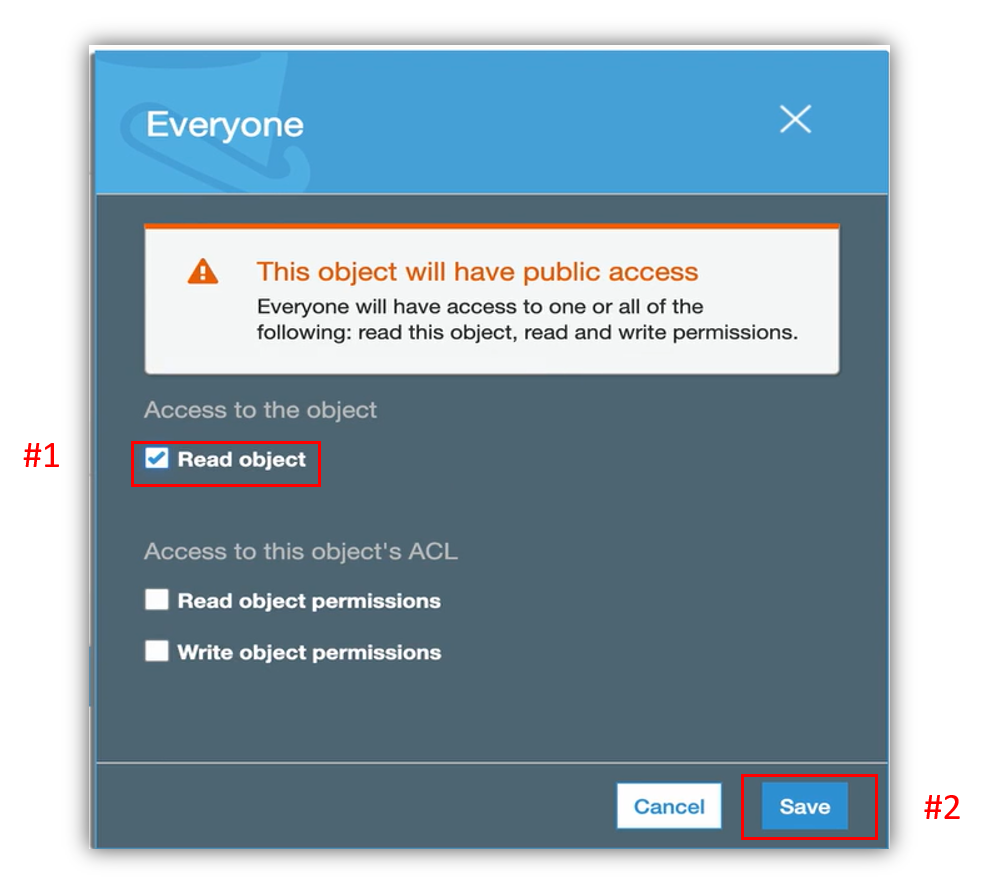
回到 Overview (下圖#1),複製 Object URL 連結(下圖#2)。
回到 Terminal,接下來對前端頁面進行修改。
打上 sudo vi 配上前端頁面檔案,如下圖:
按 ↓ 一路往下找到圖片的程式碼,如下圖: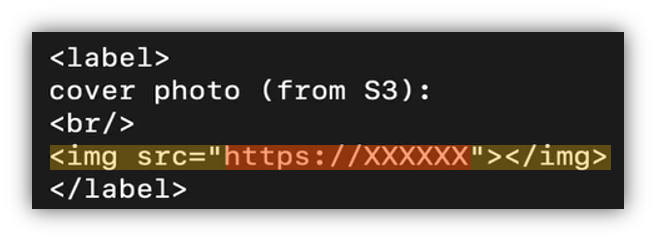
按小寫 a 進入編輯模式(下圖#1),替代為先前複製的 Object URL (下圖#2)。
按 ESC,輸入 :wq 寫入並離開(下圖#1)。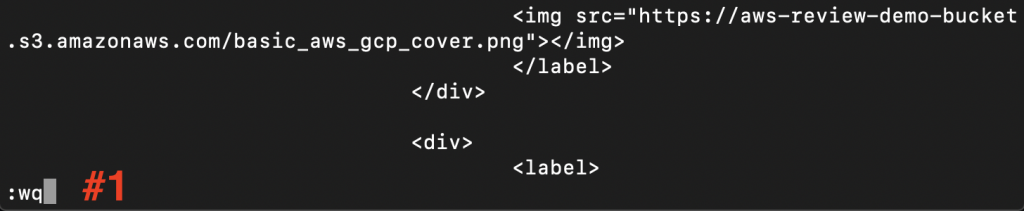
完成修改後,再一次利用 docker-compose build 打包前端應用程式,如下圖:
等待前端應用程式打包完成(下圖#1)。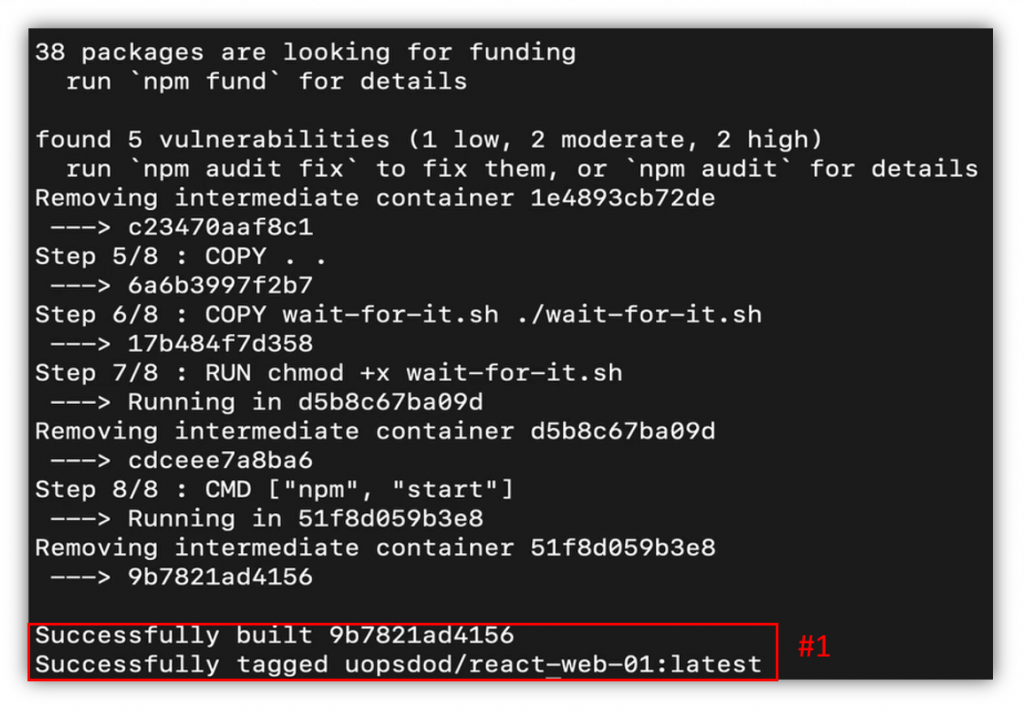
透過 docker-compose up 啟動前端應用程式,如下圖:
等待前端應用程式的啟動,如下圖: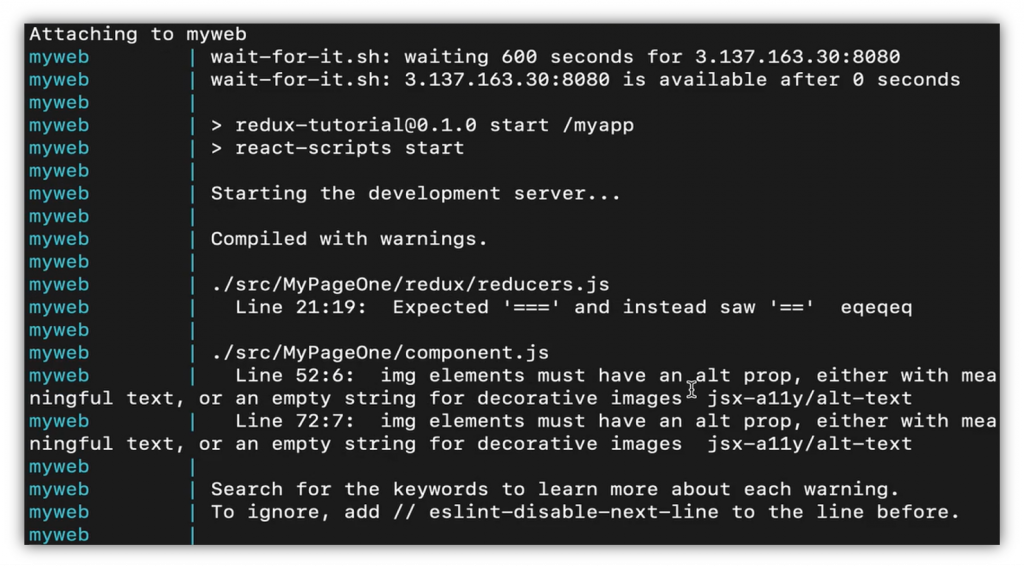
前端應用程式啟動之後,回到前端首頁重新整理,即可看到成功在前端頁面拿到放在 S3 上的圖片,如下圖: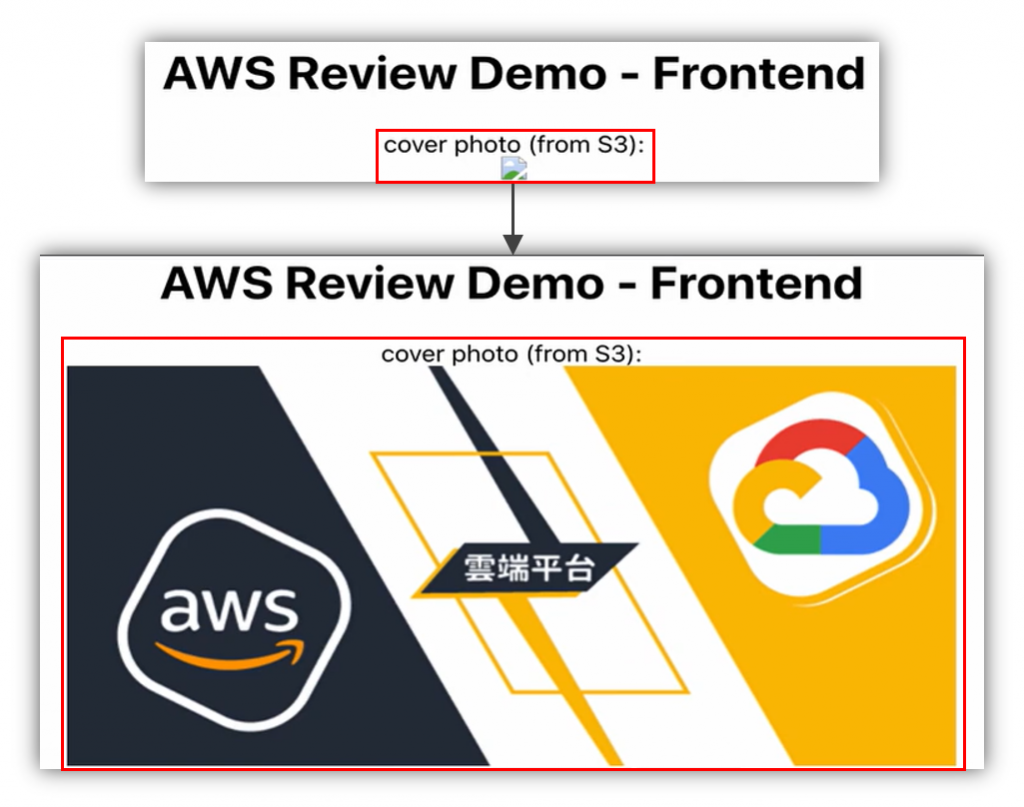
以上經由 IAM 的前置設定與使用、VPC 環境建置、資料庫創建、EC2 Instance 建立、資料庫連結、資料庫初始資料的設立、Docker 應用程式的運用、前端伺服器與後端伺服器的連結、頁面內容互動與修改的實作,得到了與 AWS 相關的實務經驗。
那麼明天,我們將接著看到「整合寶石:【Lab】建構三層式雲端架構(下)」!


 iThome鐵人賽