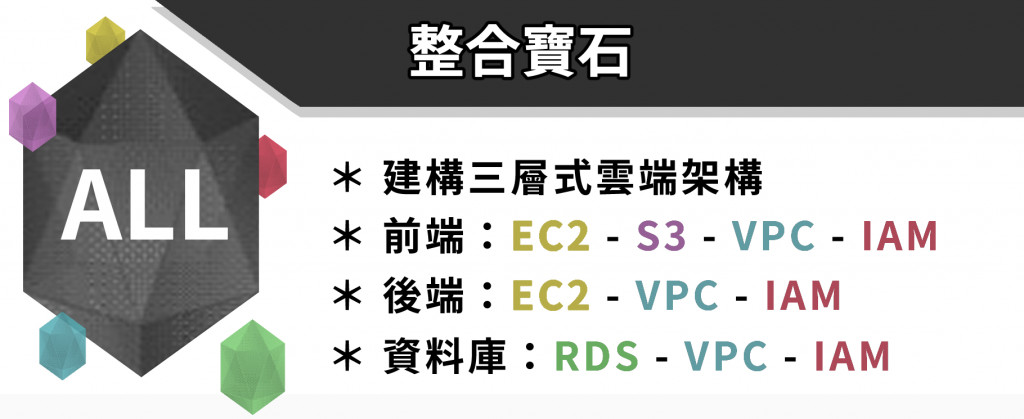
本文將繼上篇 【Lab】建構三層式雲端架構(上),實作下半部分的內容,包含檔案控管、RDS/EC2/S3 的節省成本、備份還原與資源清理。
想預防有人誤刪圖片,首先要回到 S3 的介面,切回 Bucket 階層,如下圖: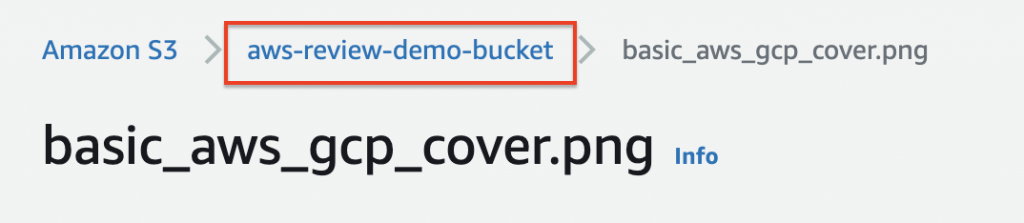
切換至 Properties (下圖#1),進入 Versioning 設定(下圖#2),點選 Enable 開啟(下圖#3),按下 Save 儲存設定(下圖#4)。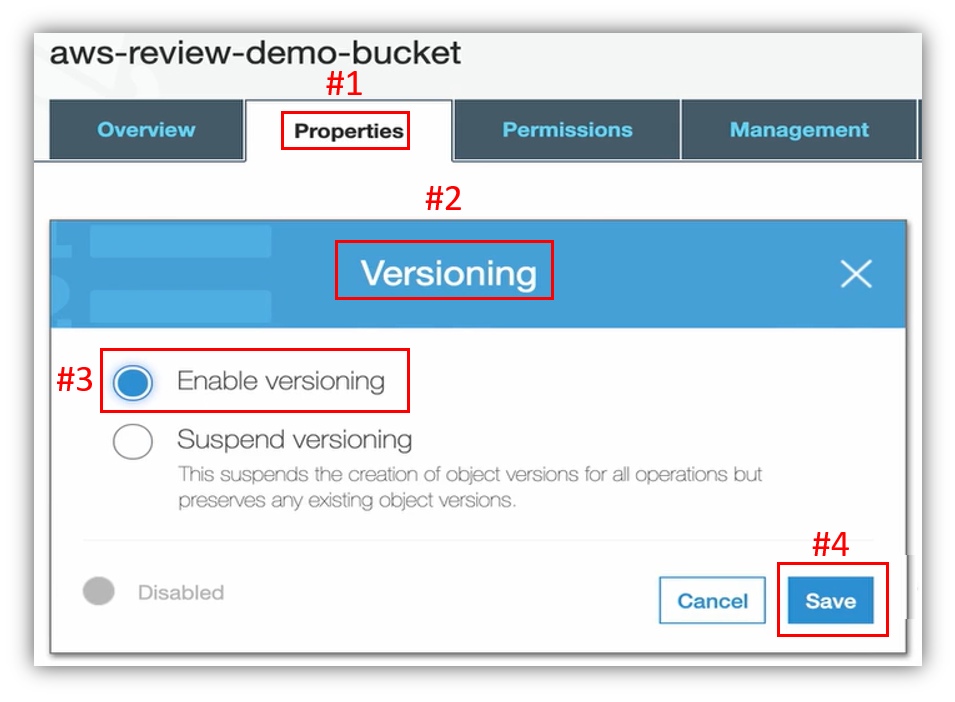
切回 Overview (下圖#1),假設同事不小心把檔案砍掉,勾選檔案(下圖#2),從 Action (下圖#3),按下 Delete (下圖#4)。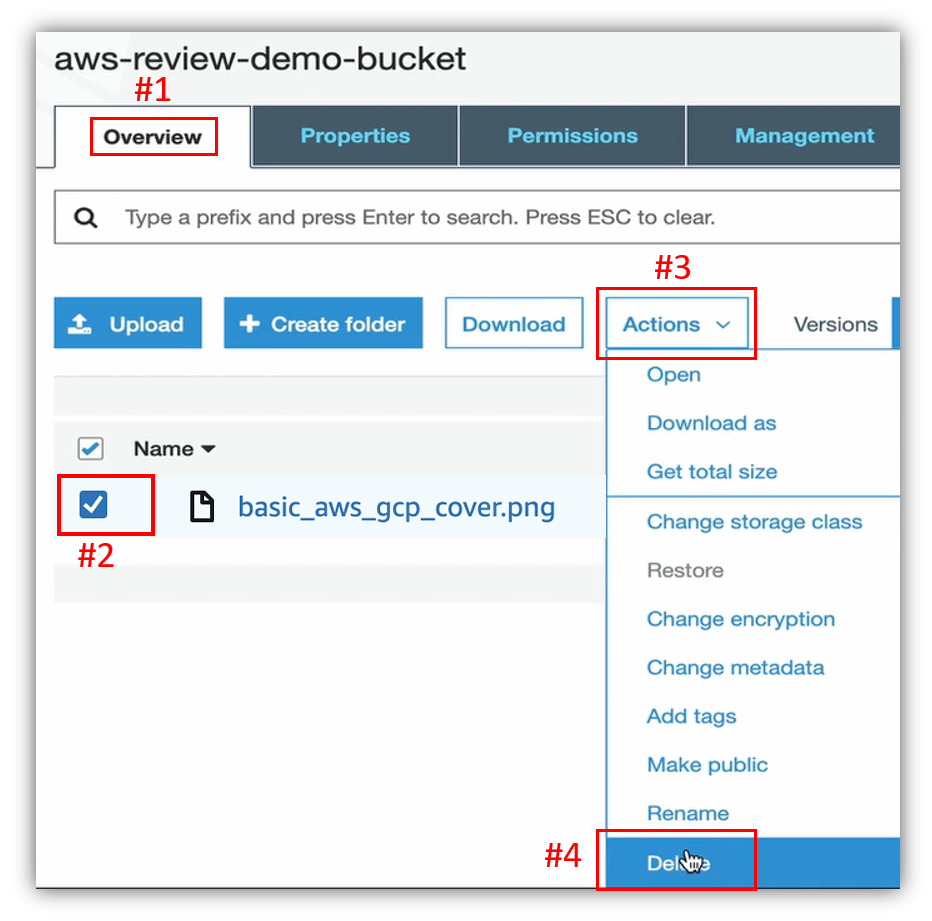
點擊 Delete 確認刪除(下圖#1)。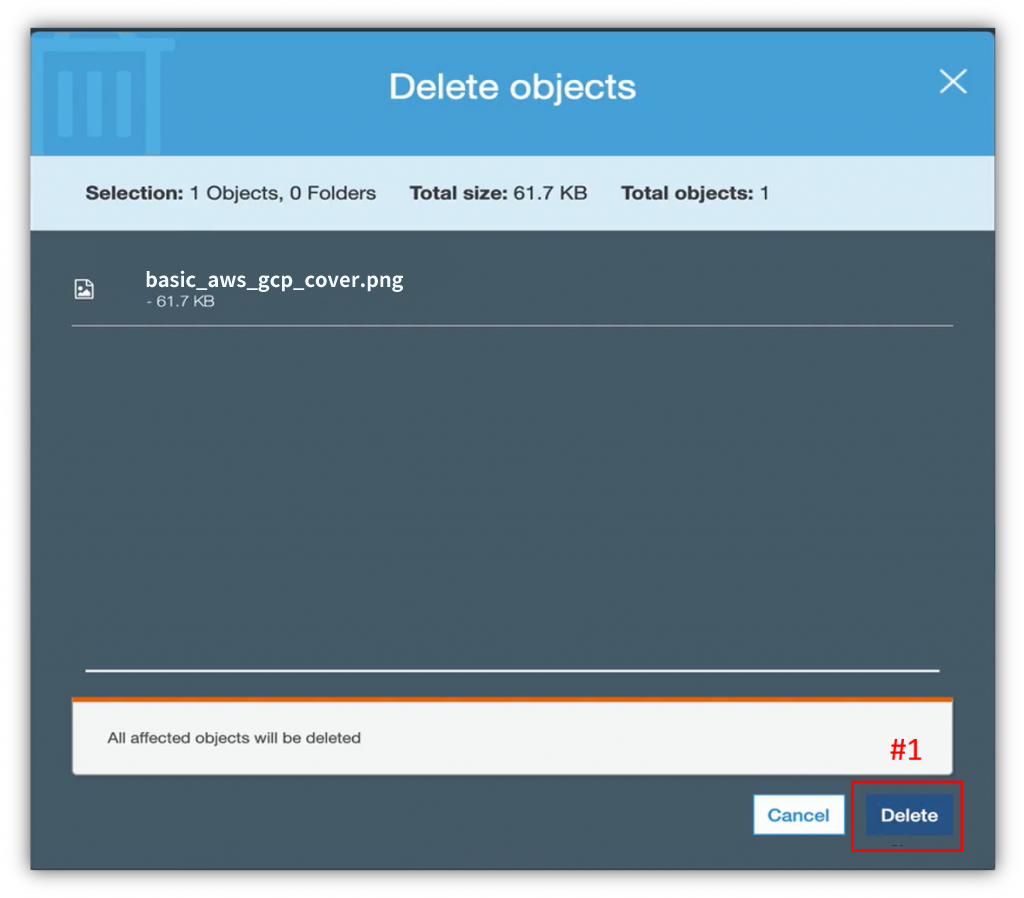
圖片被刪除,Bucket 變成空的,如下圖: 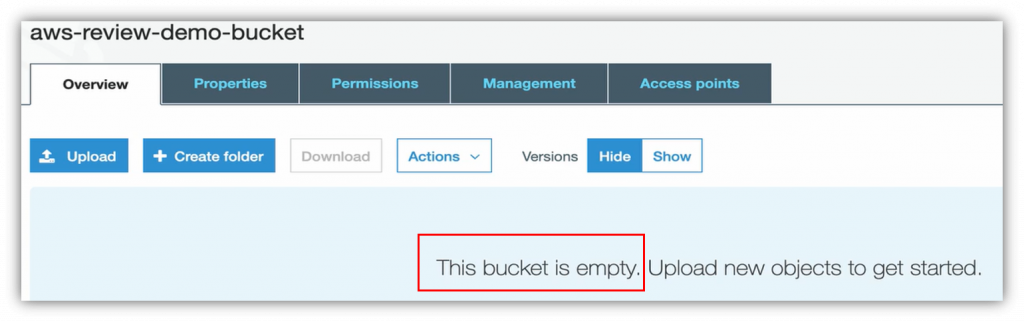
回到前端首頁,重新整理,會發現圖片還在(下圖#1),這是因為目前存有 Cache,所以清除 Cache 後再一次重新整理,也就是說,在 S3 上的圖片誤刪後,未來使用者進入首頁就會看不到圖片(下圖#2)。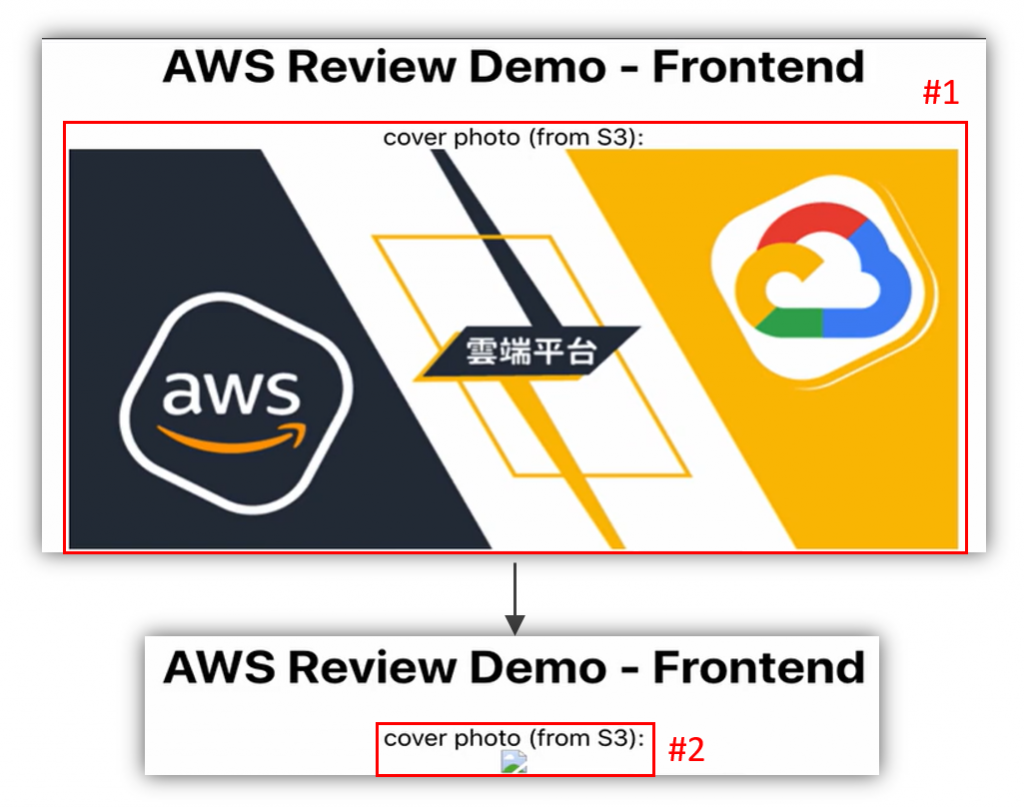
回到 S3,由於有即時開啟 Versioning 功能,所以按下 Show (下圖#1),被刪除的檔案又會出現,只是多出 Delete marker (下圖#2)。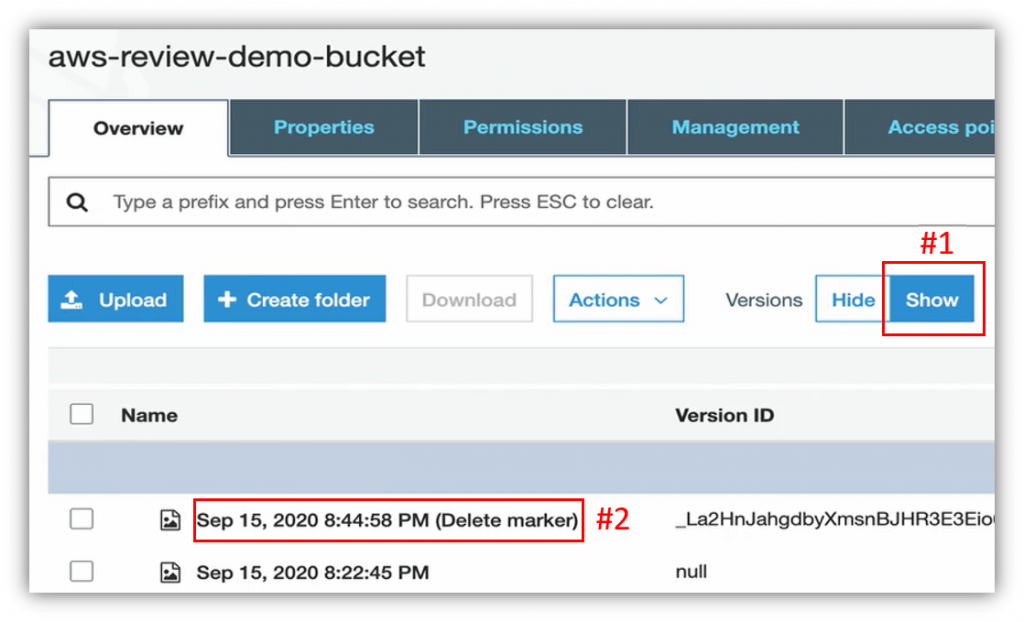
想回復檔案,刪除 Delete marker 檔案即可;勾選 Delete marker 檔案(下圖#1),點 Action(下圖#2),按下 Delete (下圖#3)。
點擊 Delete 確定刪除 Delete marker (下圖#1)。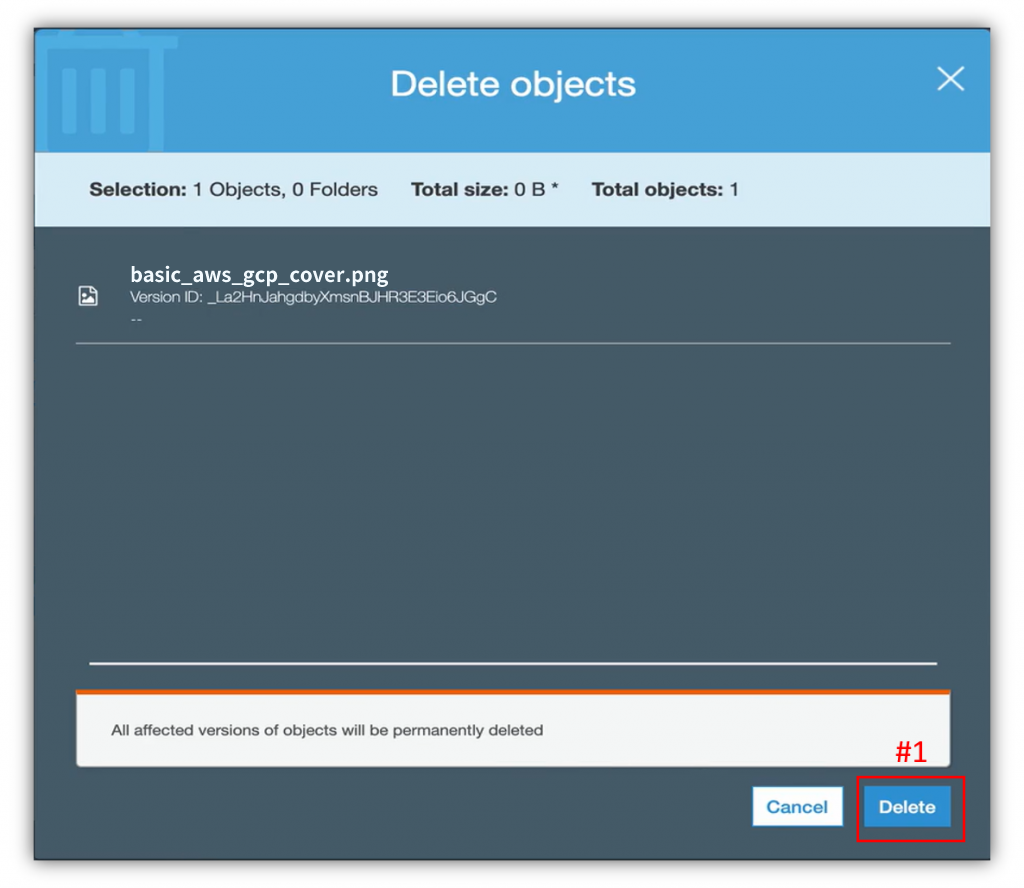
可以看到 Bucket 頁面剩下之前的版本(下圖#1)。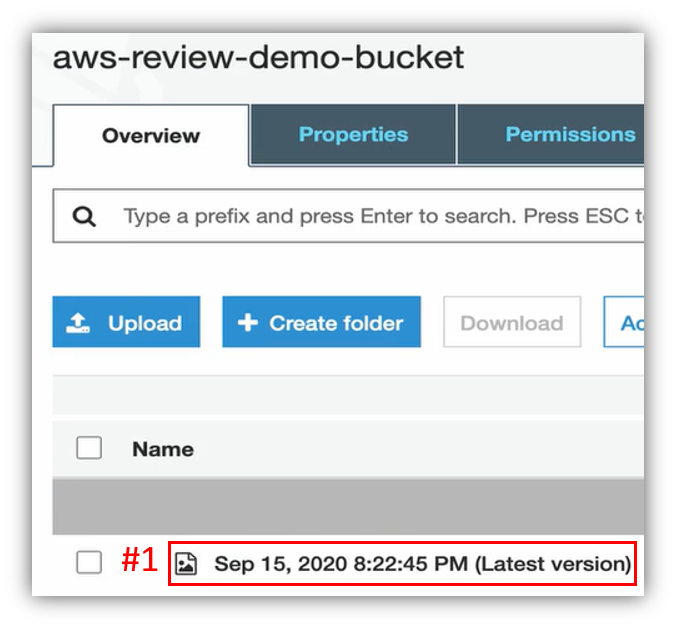
回到前端首頁,清空 Cache 並重新整理,便能看到首頁圖又回來了,如下圖: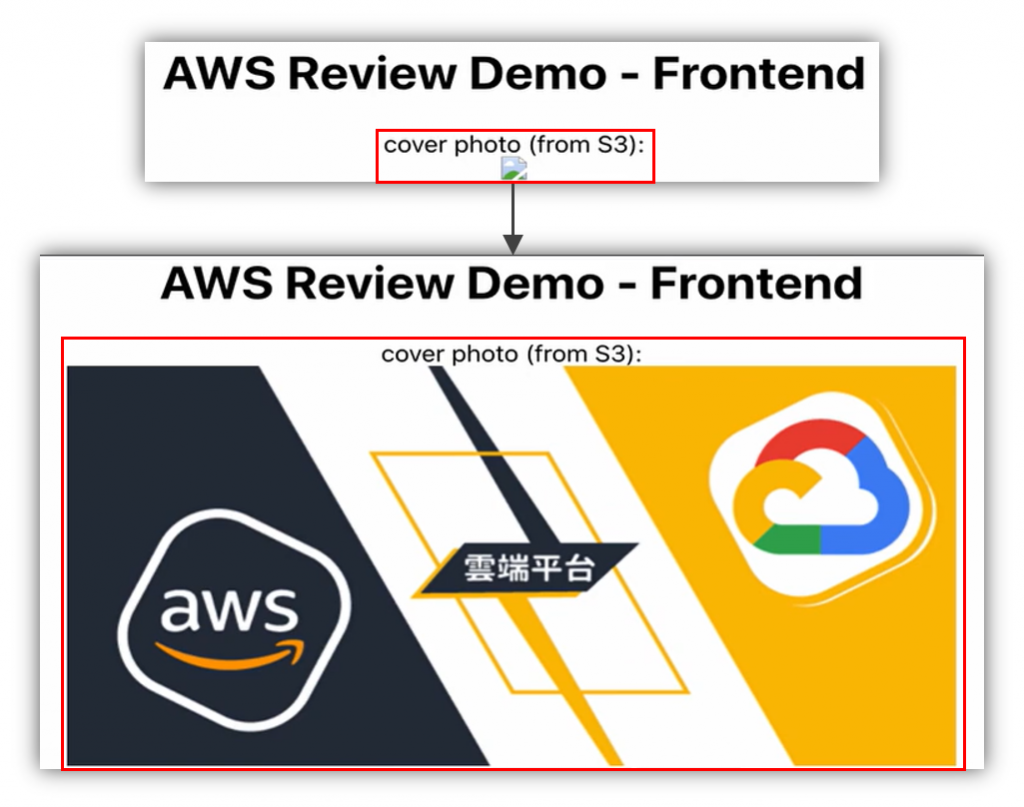
假設現在大環境經濟蕭條,這間公司決定把所有營運項目都先暫停個半年,身為工程師的我們可以做些什麼來幫公司節省一些成本呢?這邊就來示範我們一連串已經學過的備份還原功能,首先是把跟運算資源相關的資源給停掉,甚至砍掉。
首先到 RDS 介面,切換至左方列表 Databases (下圖#1),選擇資料庫(下圖#2),透過右方 Actions (下圖#3),選擇 Stop 設定停止動作(下圖#4)。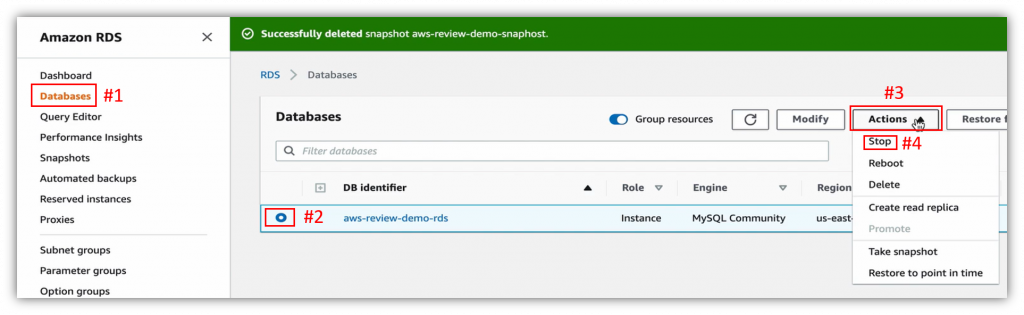
選擇 Yes 建立 Snapshot (下圖#1),並給予名稱(下圖#2),再點擊右下 Yes, Stop Now 確定停止(下圖#3)。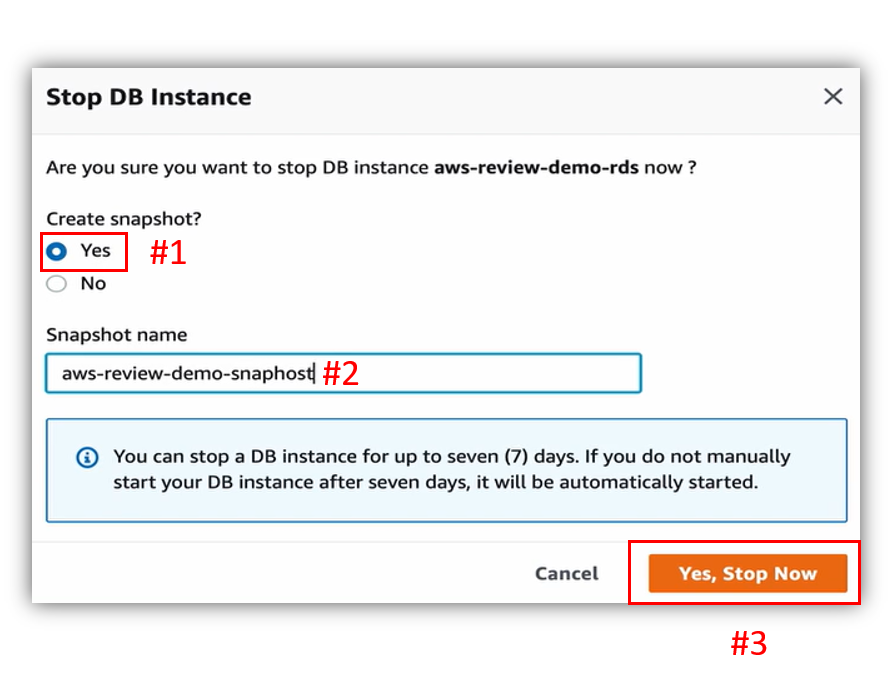
等待大約 20 分鐘後(下圖#1),Database 的狀態就會從 Available (下圖#2)轉為 Stopped 停止(下圖#3)。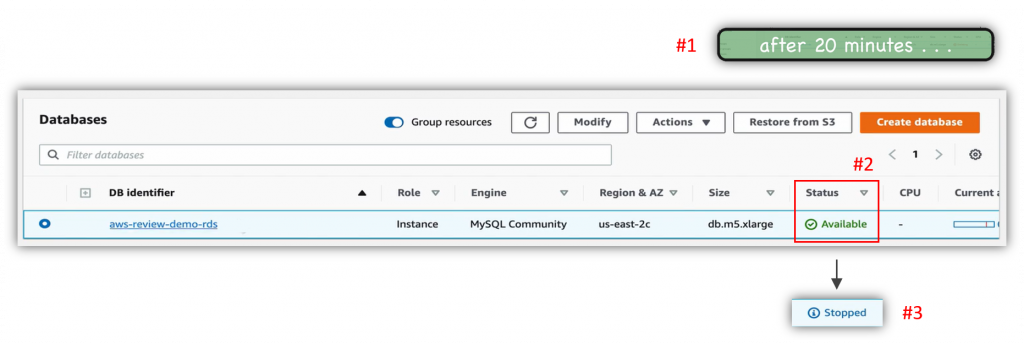
再來進入左方列表 Snapshots (下圖#1),可以看到右方頁面有剛才創建的 Snapshot (下圖#2),裡面有資料庫所有的備份資料,再往右看可以看到 Status 是 available 狀態(下圖#3),這是代表 Snapshot 建立成功的意思。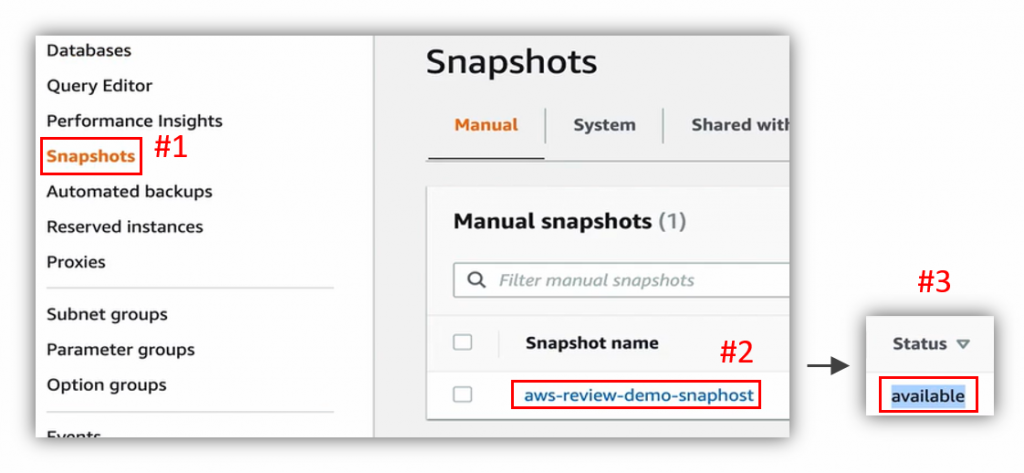
再從左方列表回到 Databases (下圖#1)。這邊來討論一下,當 Stop 一個 RDS Instance 的時候,就可以節省運算資源的部分花費,但底下的 EBS Volume 還是會繼續算錢,所以如果真的要省錢,假設要半年不做事的話,選擇資料庫(下圖#2),從 Actions (下圖#3),直接整個 Delete 掉(下圖#4)。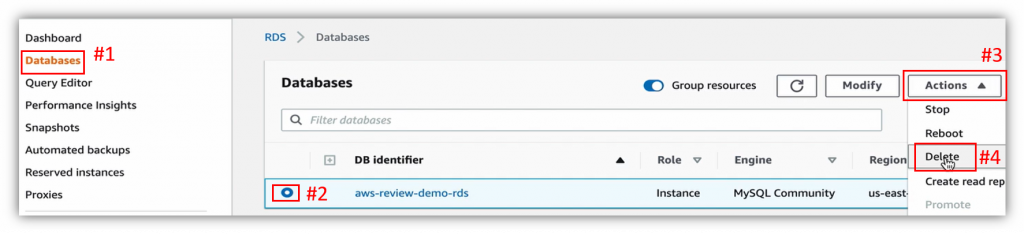
但進行 Delete 前,會發現 deletion protection 是啟動狀態(下圖#1),按 Close 關閉提示訊息(下圖#2)。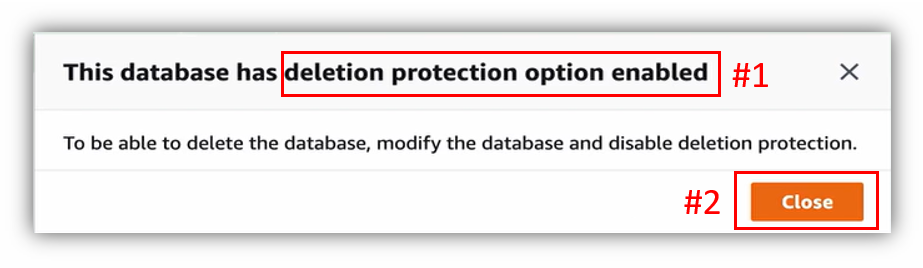
進入 Modify 設定,如下圖: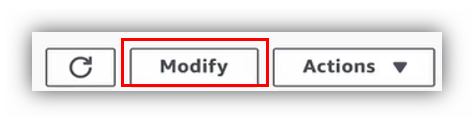
把 Enable deletion protection 取消(下圖#1),點擊右下 Continue (下圖#2)。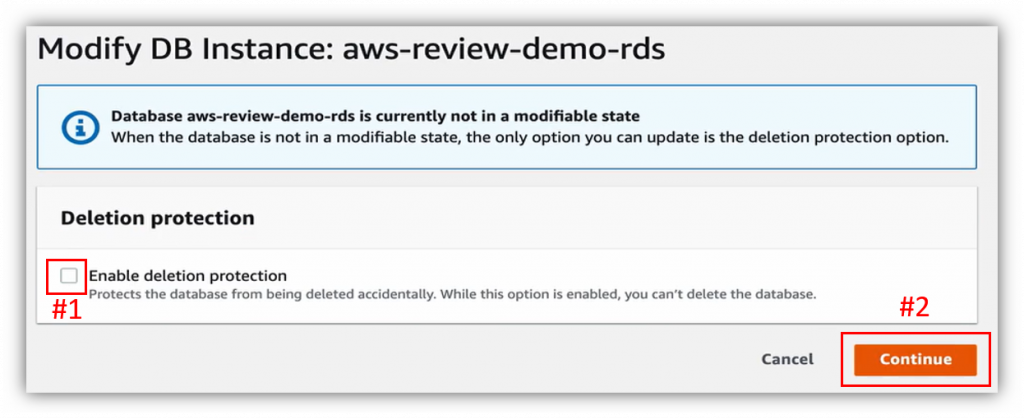
點擊右下 Modify DB Instance 確認 Modify (下圖#1)。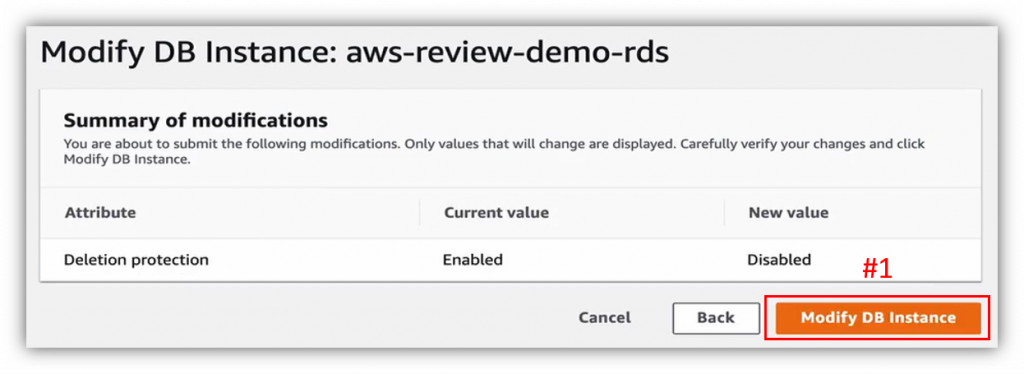
展開 Actinos,點選 Delete,進行剛才無法進行的設定刪除動作。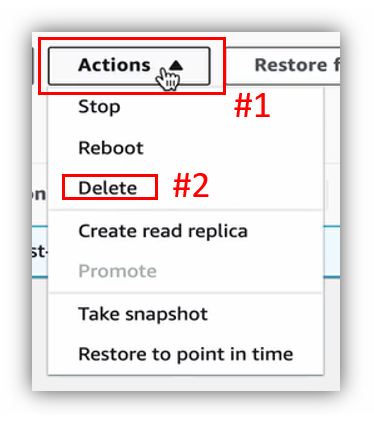
由於先前已創造過 Snapshot,所以取消 Create Snapshot 的選項(下圖#1),不需要再創造一個 Snapshot,也不用保留自動備份(下圖#2),勾選 Acknowledge 確認(下圖#3),輸入 delete me (下圖#4),點擊 Delete 刪除(下圖#5)。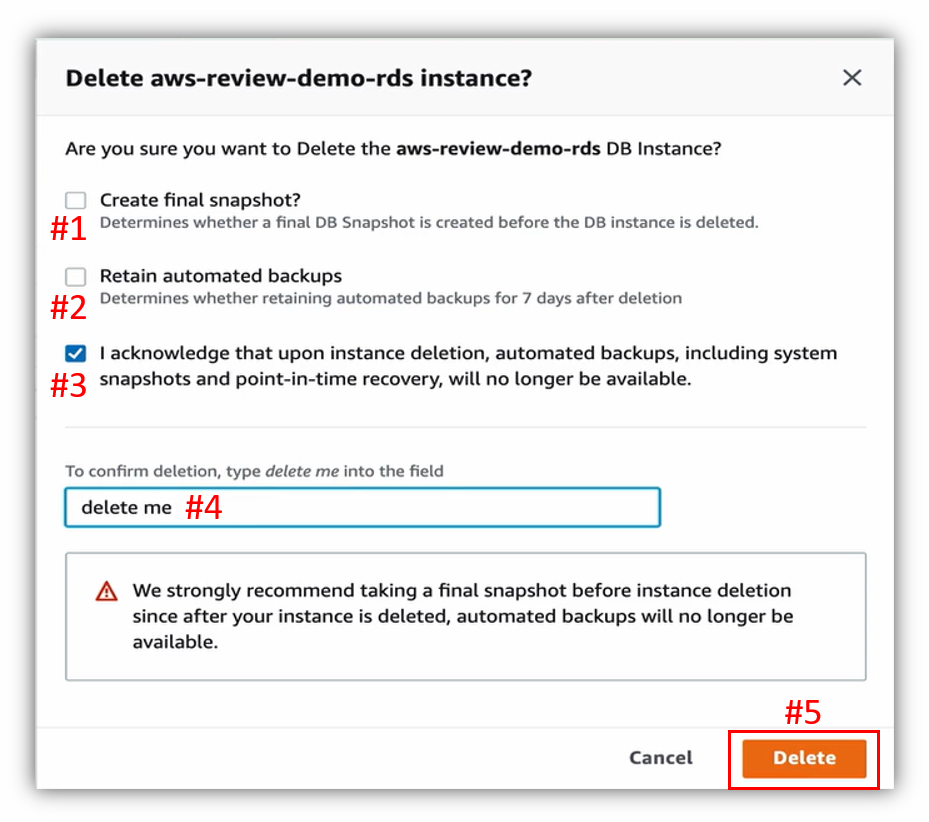
等待大約 20 分鐘後(下圖#1),即完成 RDS 的部分停機準備(下圖#2)。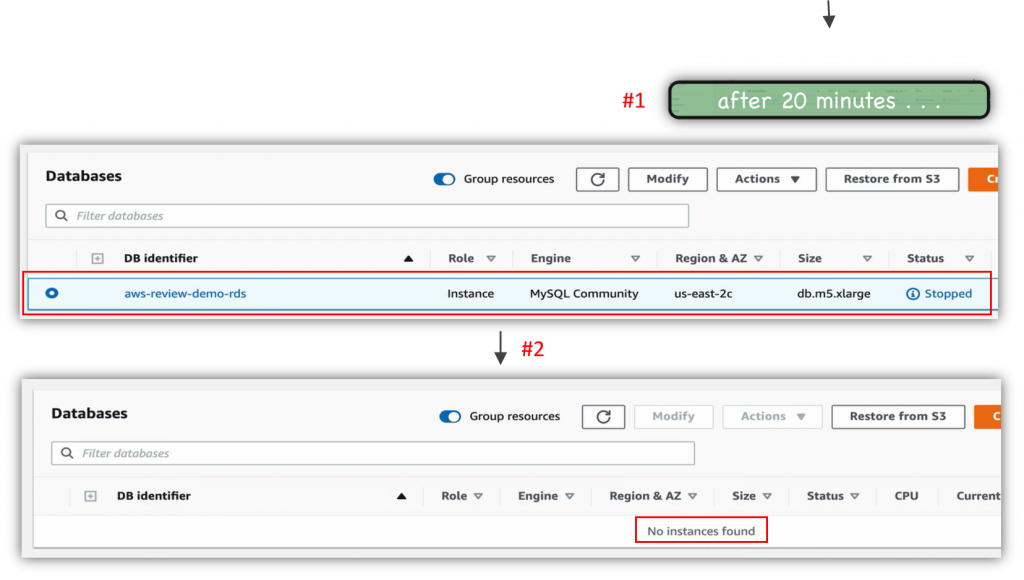
到 EC2 Instances 頁面,勾選前端及後端伺服器(下圖#1),從 Actions (下圖#2),選到 Instance State (下圖#3),點擊 Stop (下圖#4),進行停止動作。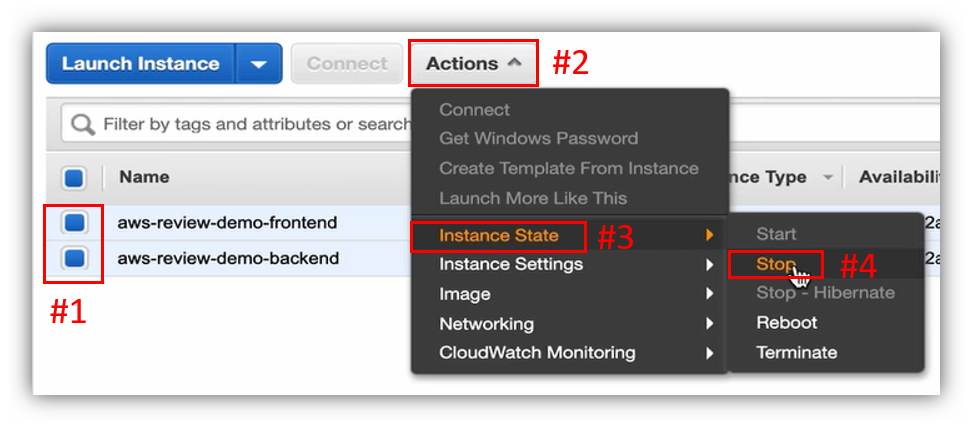
點擊 Yes, Stop 確定停止(下圖#1)。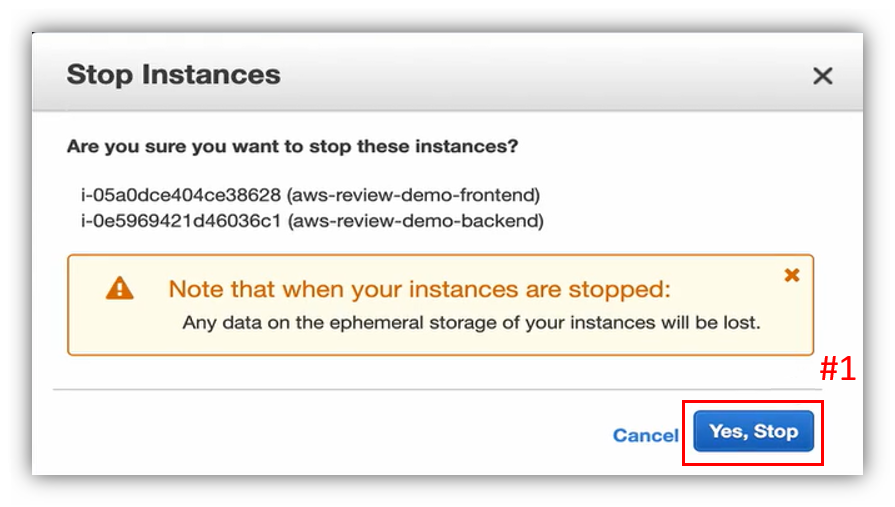
EC2 Instance 停止後(下圖#1),接下來再對各自的 EC2 建立 AMI 做永久備份。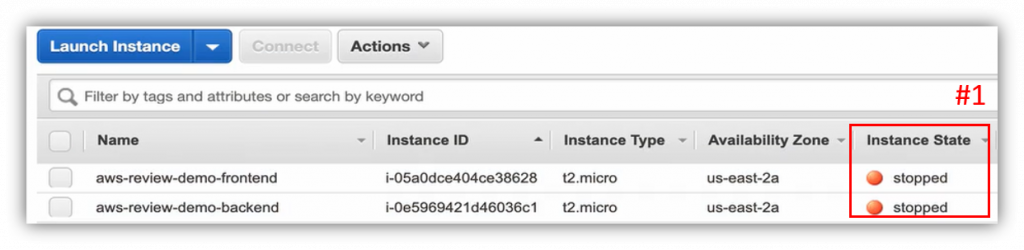
選擇後端伺服器(下圖#1),從 Actions (下圖#2)選 Image (下圖#3),按下 Create Image (下圖#4)。
給予名稱(下圖#1),敘述與名稱相同(下圖#2),直接點擊右下 Create Image (下圖#3)。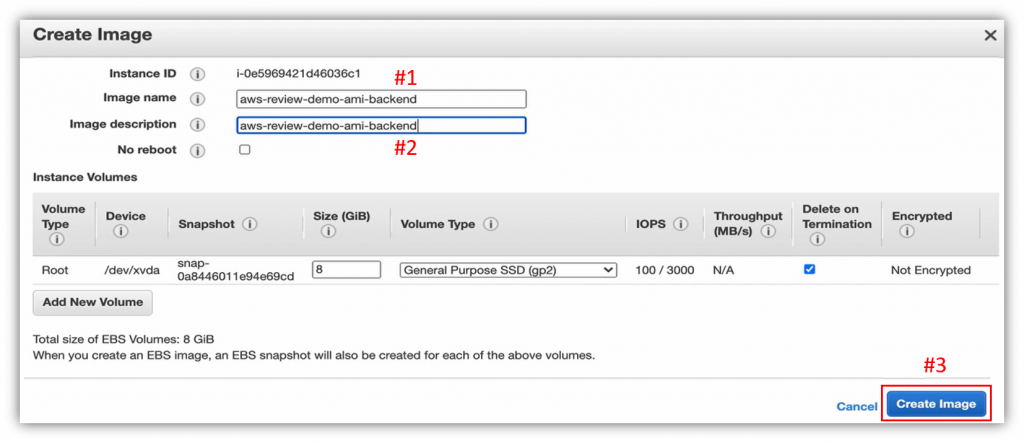
按下 Close (下圖#1),關閉視窗。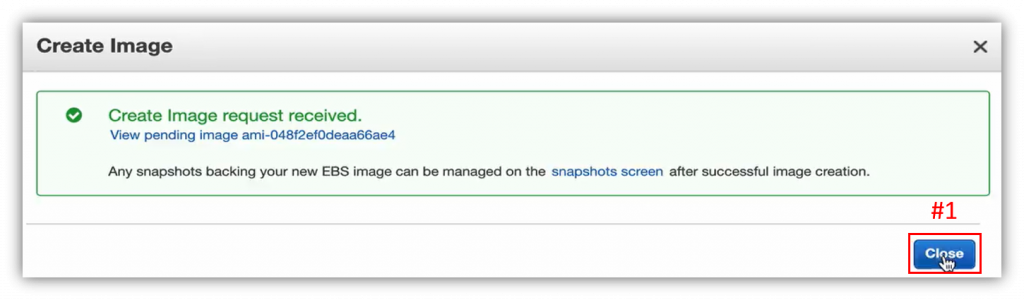
選擇前端伺服器(下圖#1),從 Actions (下圖#2)選 Image (下圖#3),按下 Create Image (下圖#4)。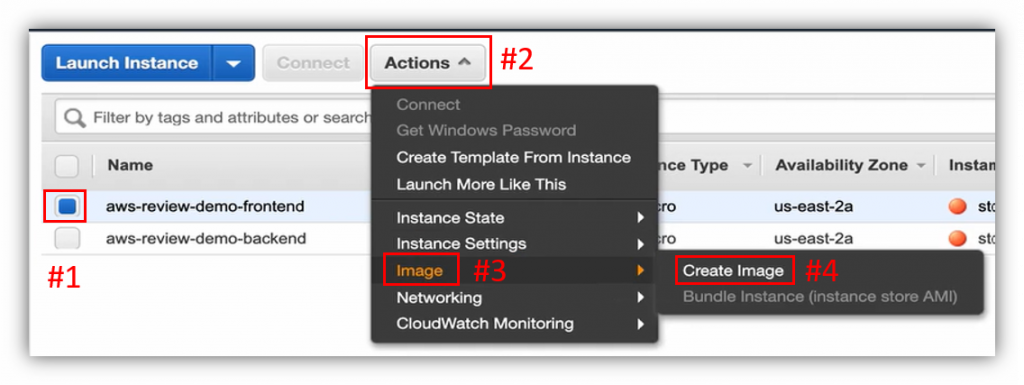
給予名稱(下圖#1),敘述與名稱相同(下圖#2),直接點擊右下 Create Image (下圖#3)。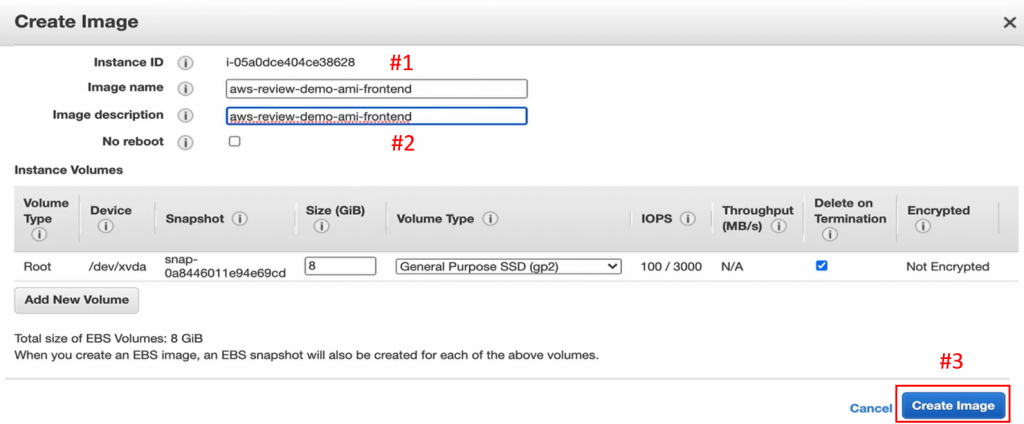
按下 Close (下圖#1),關閉視窗。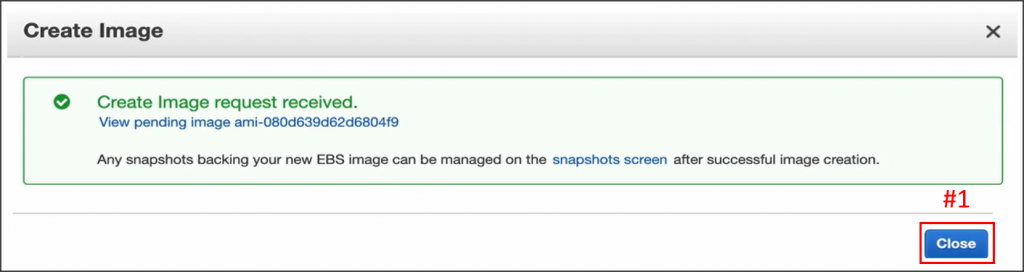
切換至左方列表 AMIs (下圖#1)。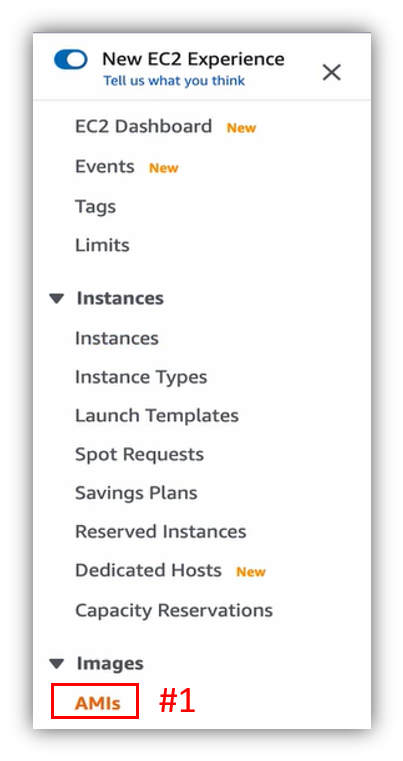
等右方 Status 從 pending 轉為 available,便完成 AMI 建立,如下圖:
由於停止了 EC2,便省下了運算資源的成本,但是 EC2 底下的 EBS Volume 仍然計費中,所以真的要省長期的話,就必須全部砍掉。
勾選前端及後端 EC2 (下圖#1),從 Actions (下圖#2)到 Instance State (下圖#3),按下 Terminate (下圖#4),進行整個清掉的動作。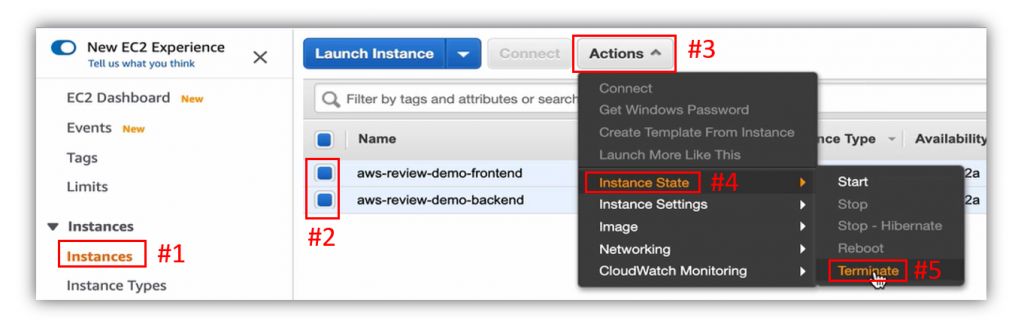
點擊 Yes, Terminate 確定(下圖#1)。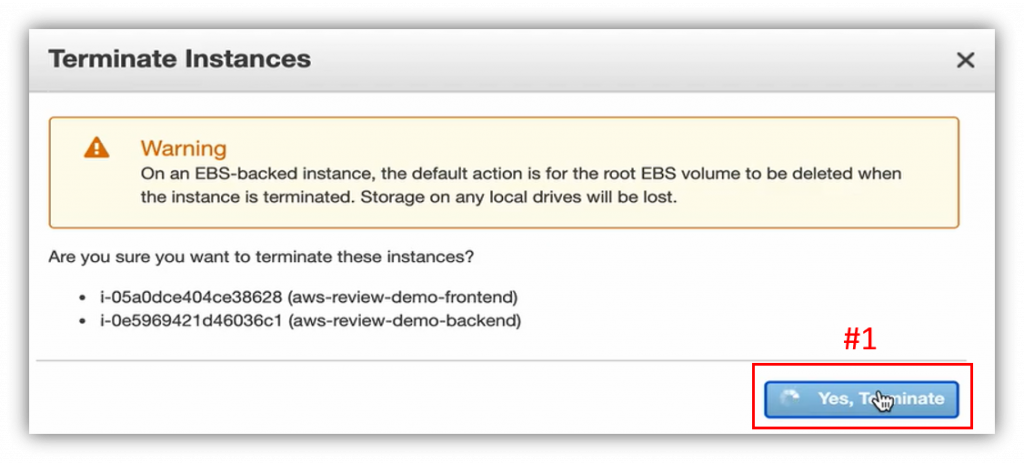
狀態變為 Terminated (下圖#1),如此便完成了 EC2 的永久保存機制,最後留下的就是先前所創建的兩個 AMI 而已。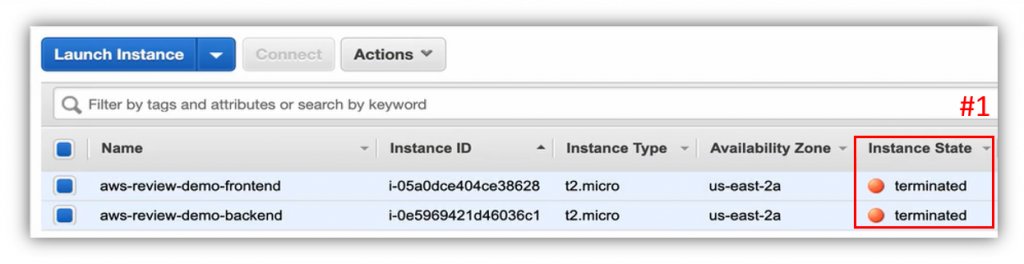
假設就這樣過了大半年,經濟慢慢恢復,公司決定把專案重新啟動。
首先,回到 RDS 介面,切至左方列表 Snapshot,右方頁面勾選先前為 RDS 建立的 Snapshot,從 Actions 點 Restore snapshot,進行還原動作設定。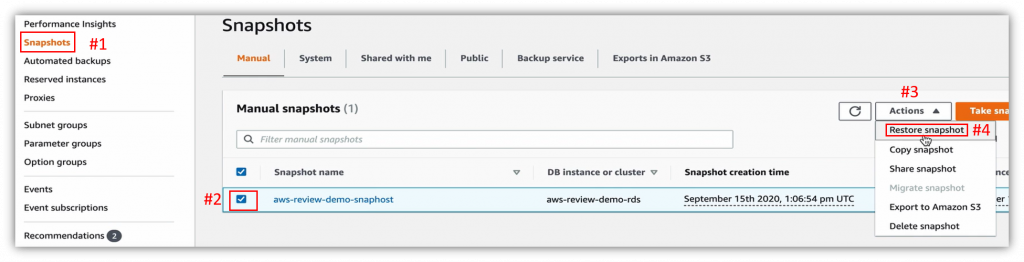
Engine 選擇 MySQL Community (下圖#1)。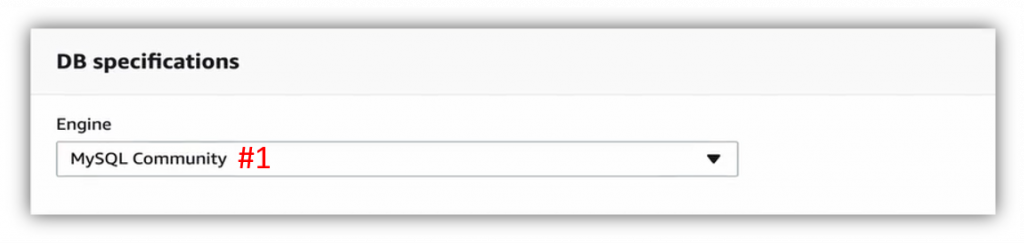
建立名稱(下圖#1)。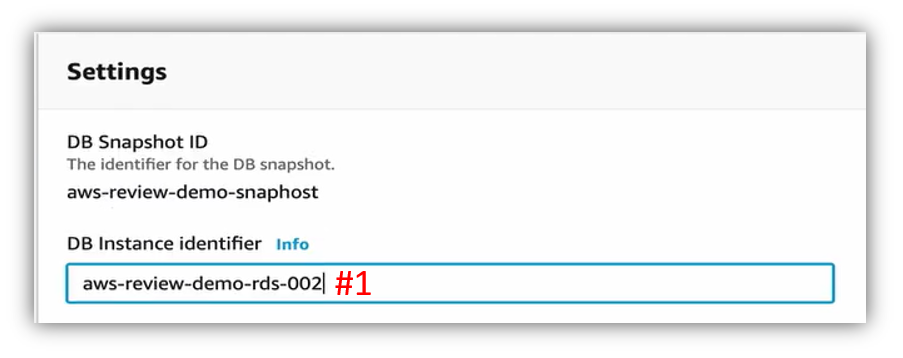
網路選擇先前創建的 VPC (下圖#1),展開 Additional connectivity configuration (下圖#2),選擇 Subnet Group (下圖#3),不需要 Public access (下圖#4),Security Group 取消掉 default (下圖#5)並加上之前建造的 Security Group (下圖#6),Port 維持 3306 (下圖#7)。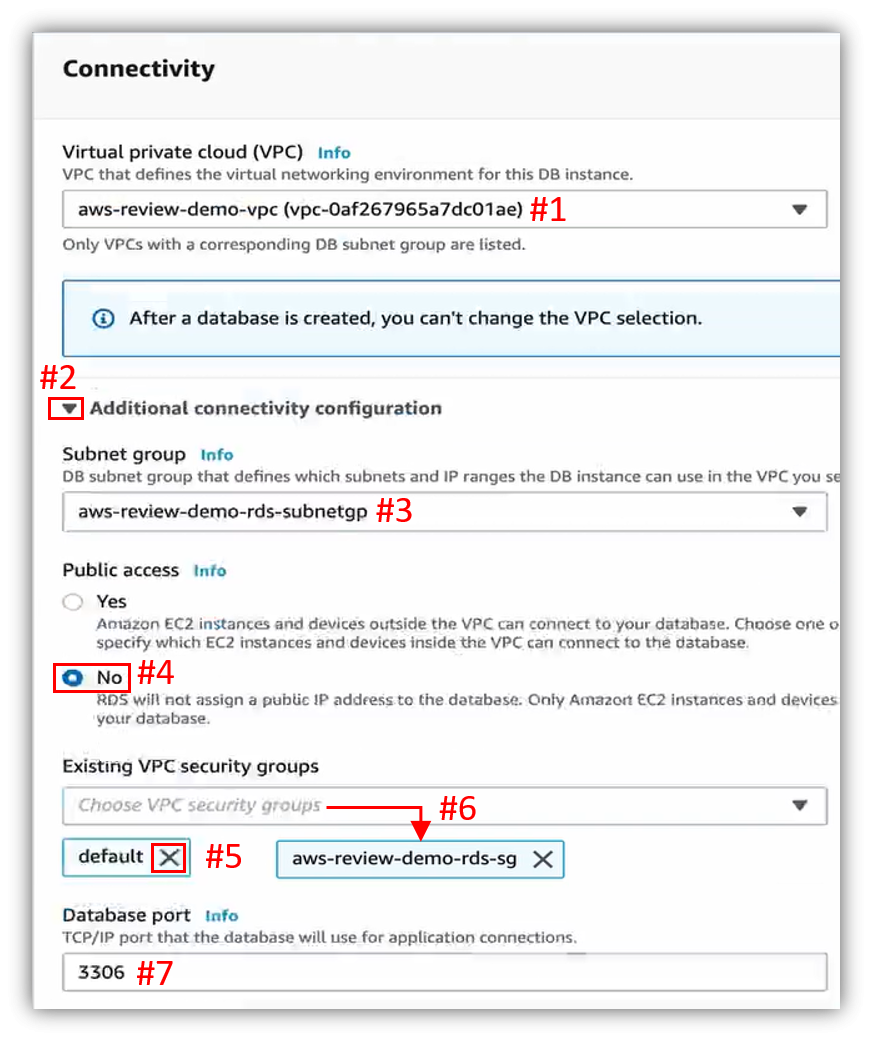
底層 EC2 選擇標準的即可,如下圖: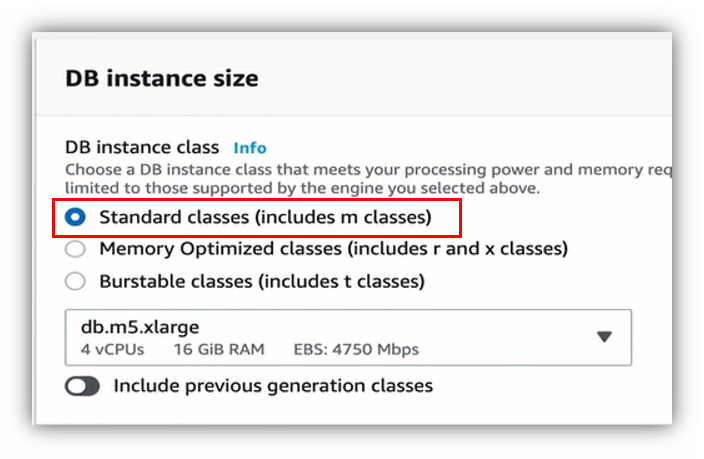
Availability 一樣使用 Multi-AZ,如下圖: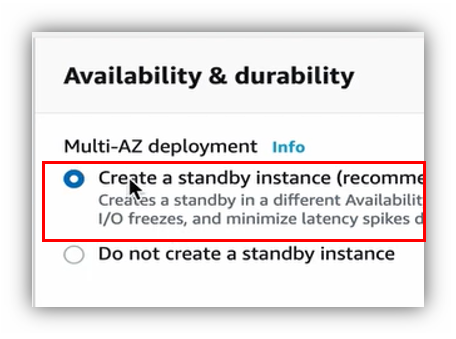
其餘設定照舊,拉到頁尾,點擊右下 Restore DB Instance (下圖#1)。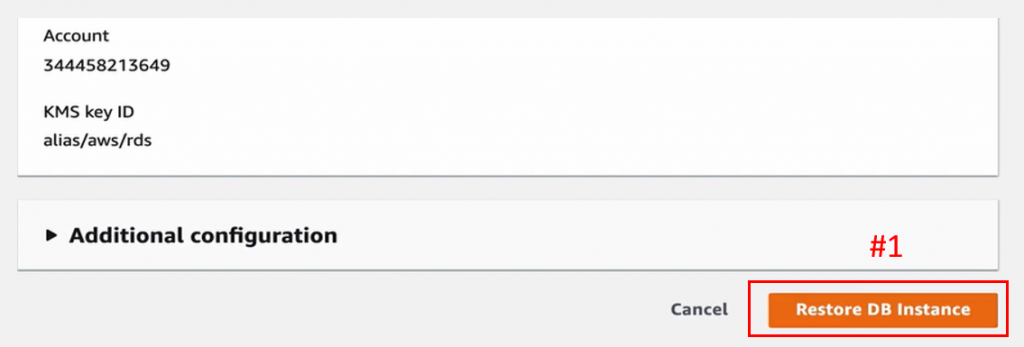
等待大約 20 分鐘(下圖#1),資料庫即完成復原(下圖#2)。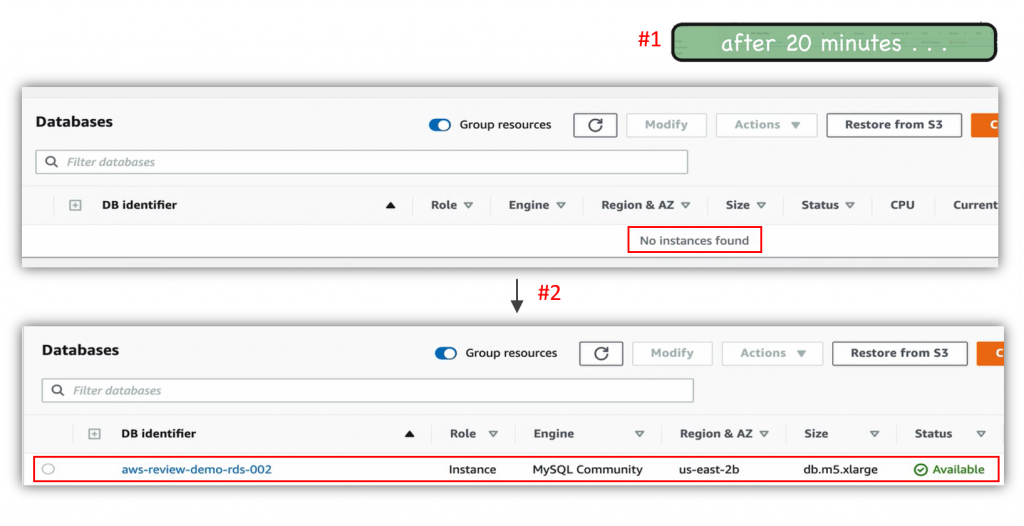
到 EC2 介面的 AMIs 頁面(下圖#1),勾選後端 AMI (下圖#2),從 Actions 按 Launch (下圖#3)。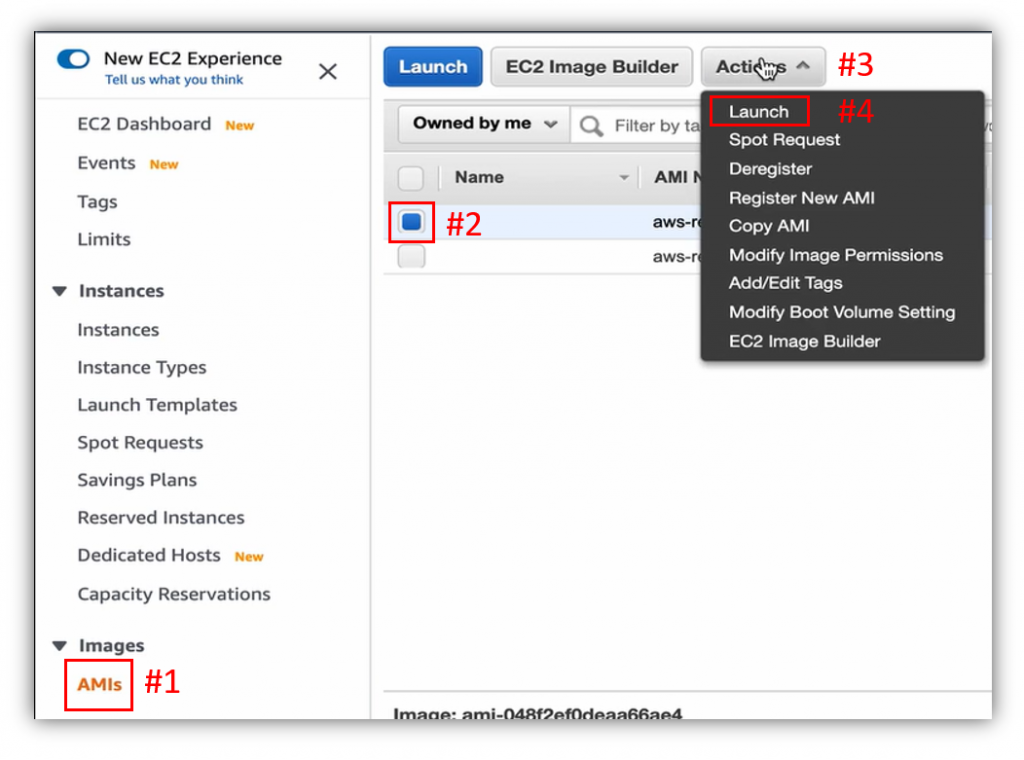
Instance Type 預設即可,點擊 Next: Configure Instance Details 下一步(下圖#1)。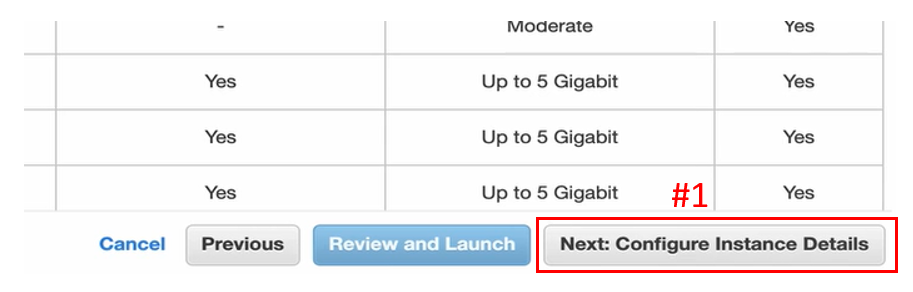
Network 選擇先前創造的 VPC (下圖#1),Subnet 選擇 Public Subnet (下圖#2),Enable Public IP (下圖#3),點擊右下 Next: Add Storage 下一步(下圖#4)。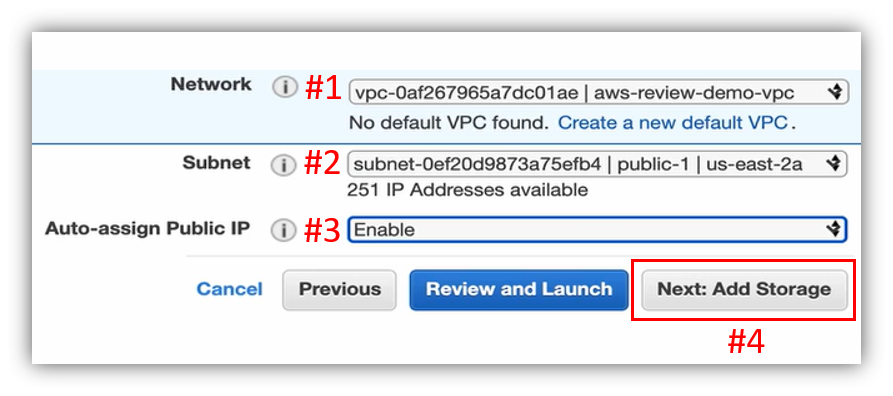
此處的 Snapshot (下圖#1)是從 AMI 上面拿下來的,所以會包含之前所擁有的所有檔案以及套件下載,點擊 Next: Add Tags 下一步(下圖#2)。
跳過 Tags 設定,點擊 Next: Configure Security Group 下一步(下圖#1)。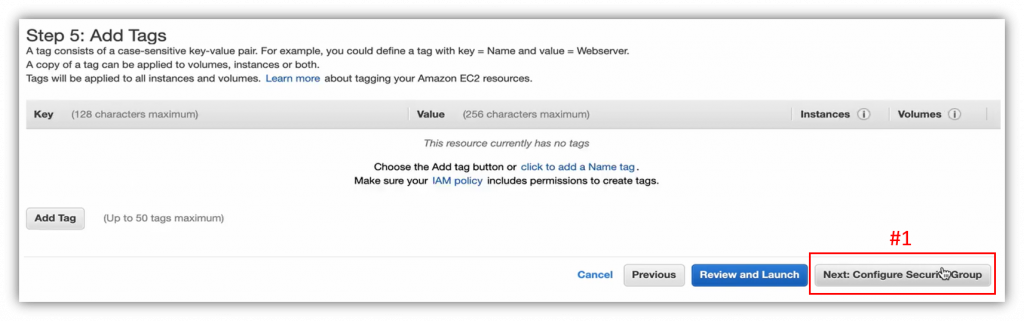
Security Group 的部分,按下 Add Rule 新增(下圖#1),開放 8080 Port (下圖#2),點擊 Review and Launch 下一步(下圖#3)。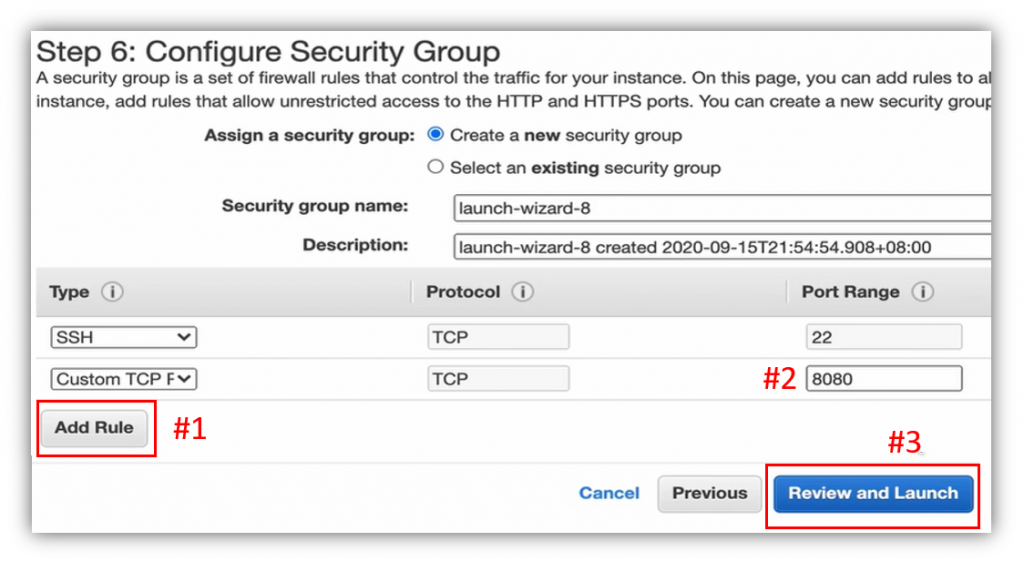
點擊 Launch (下圖#1)。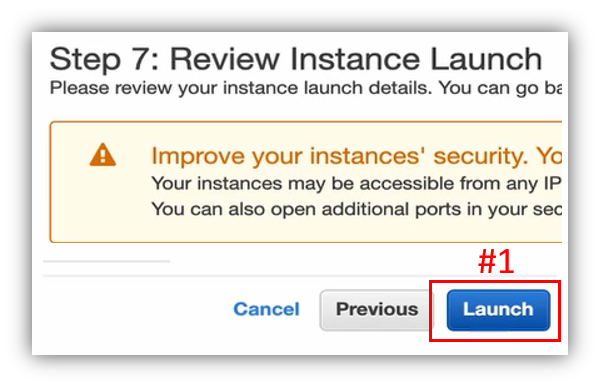
選擇一個已存在的 Key Pair (下圖#1),選之前使用過的 Key Pair (下圖#2),勾選 Acknowledge 確認(下圖#3),點擊 Launch Instance (下圖#4)。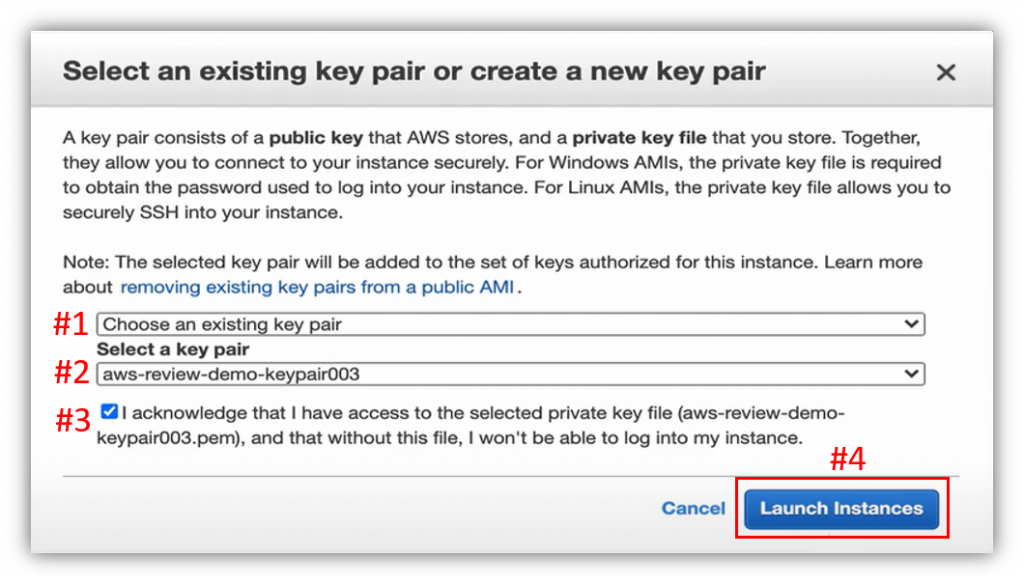
點擊 View Instance (下圖#1)。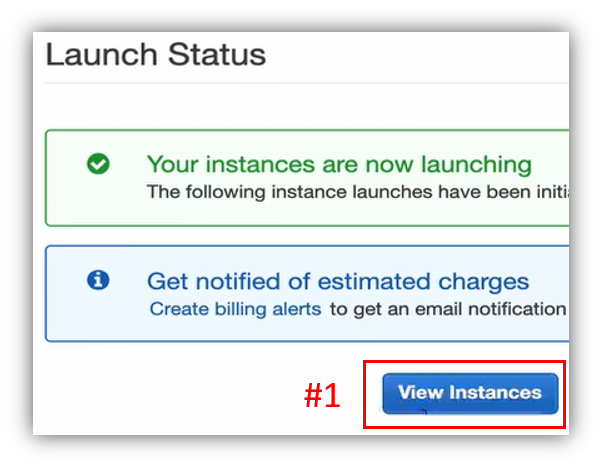
在後端啟動的過程中(下圖#1),可以先建立名稱(下圖#2)。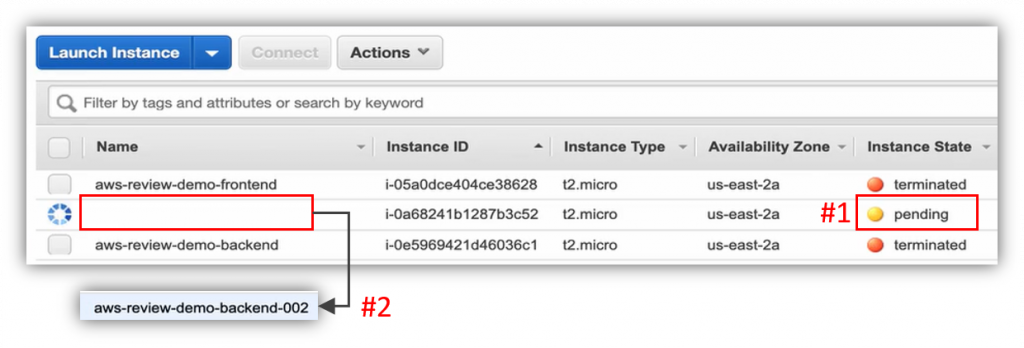
後端啟動後(下圖#1),勾選啟動的後端(下圖#2),再點擊 Connect (下圖#3)。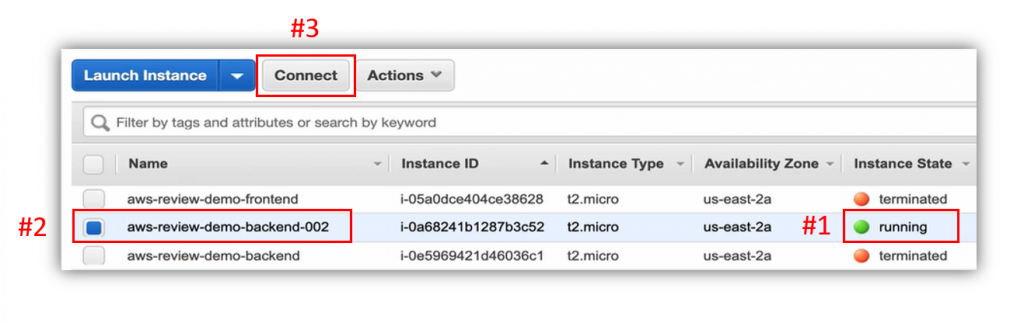
複製 ssh 指令,如下圖: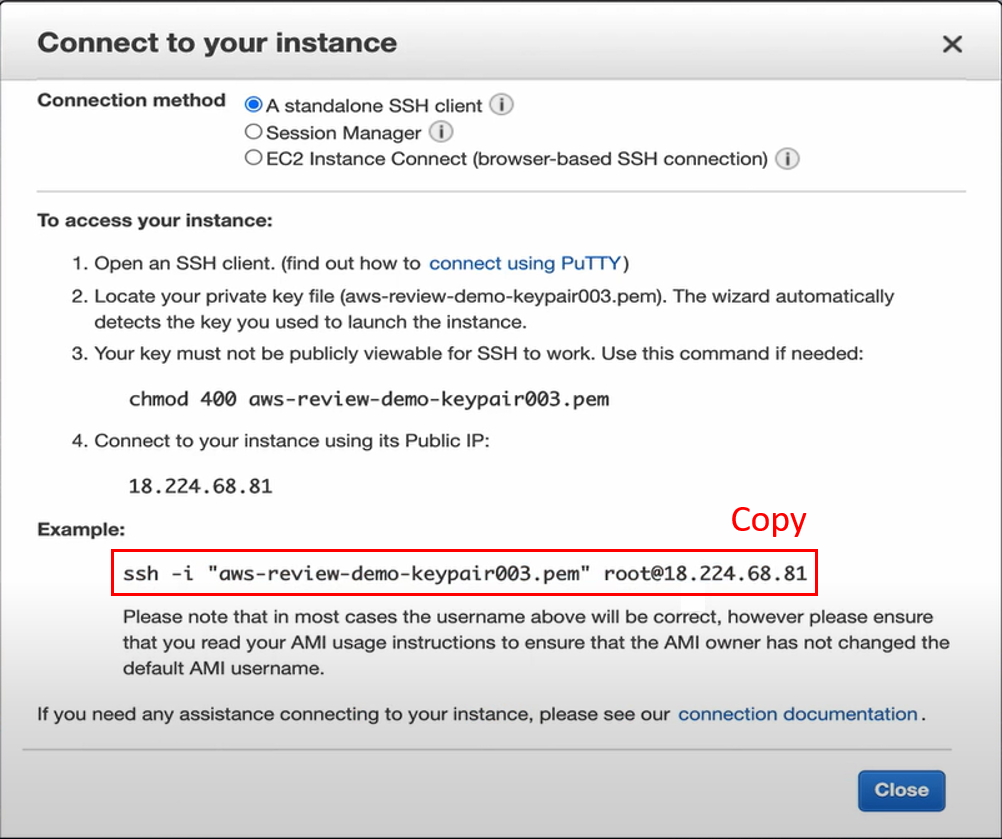
回到後端 Terminal,貼上 ssh 指令,把 root 改為 ec2-user (下圖#1),Enter 後輸入 yes (下圖#2)。
由於 Instance 是從 AMI 復原的,故所有的套件、專案都還在,直接 cd 到 app_new 的位置(下圖#1),sudo vi .env 修改參數(下圖#2)。
小寫 a 進入編輯模式(下圖#1),修改 DB_HOST_IP 為空(下圖#2)。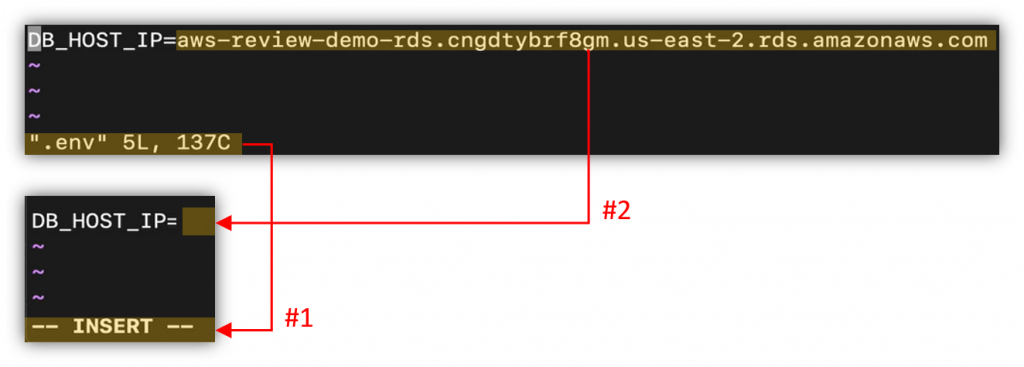
回到 RDS 的 Databases 頁面(下圖#1),點進新的 RDS (下圖#2)。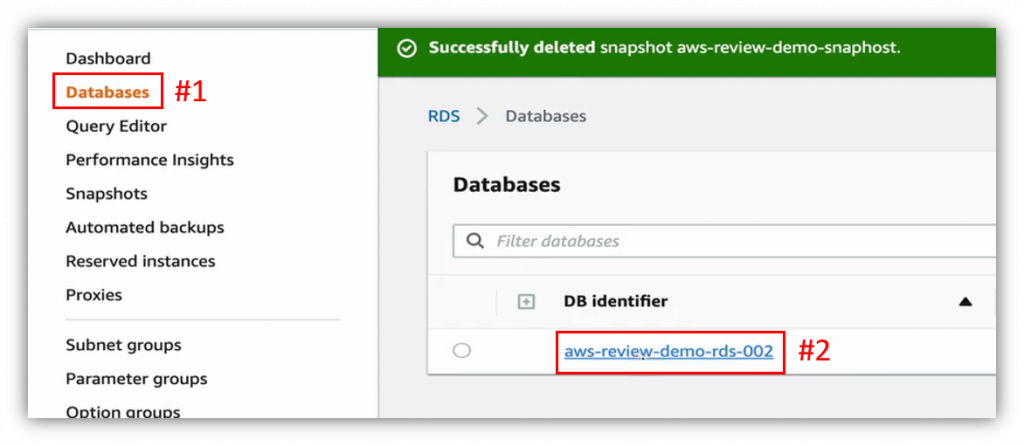
複製 Endpoint,如下圖: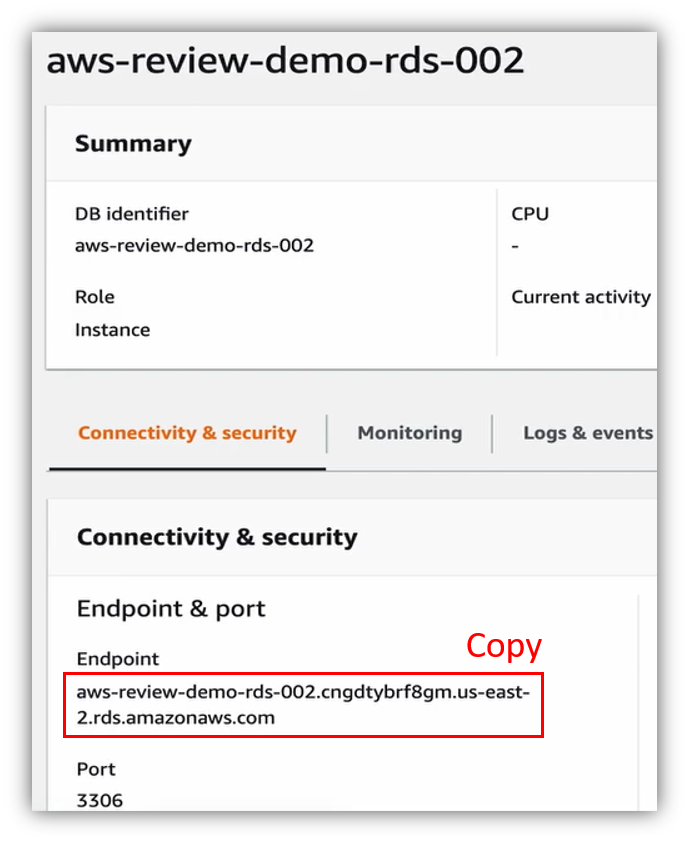
回到後端 Terminal,在 DB_HOST_IP 貼上 Endpoint (下圖#1),ESC 離開編輯模式,:wq (下圖#2)寫入並結束修改。
利用 sudo service docker start 指令(下圖#1),啟動 Docker Service (下圖#2)。
透過 docker-compose up 指令啟動後端應用程式,如下圖:
等待後端應用程式啟動完畢,如下圖: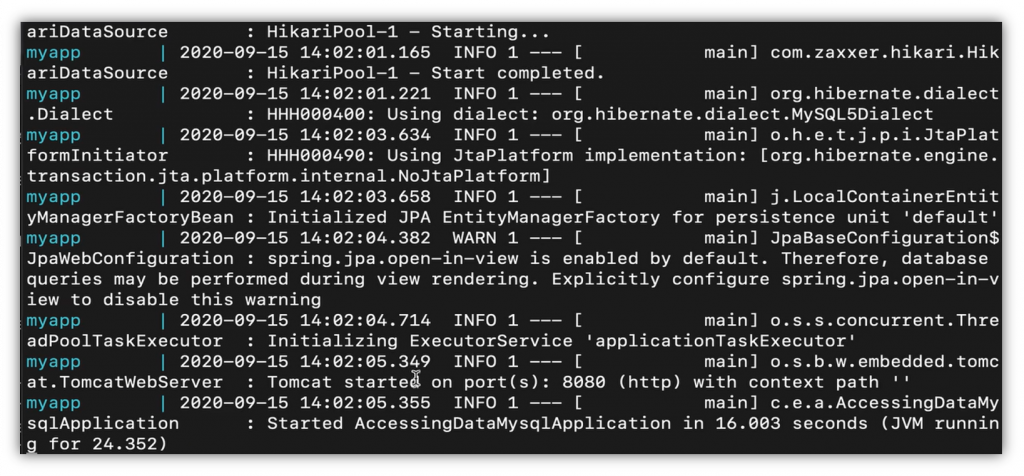
回到 EC2 的 Instance (下圖#1),勾選新復原的後端 EC2 Instance (下圖#2),複製 Public IP (下圖#3)。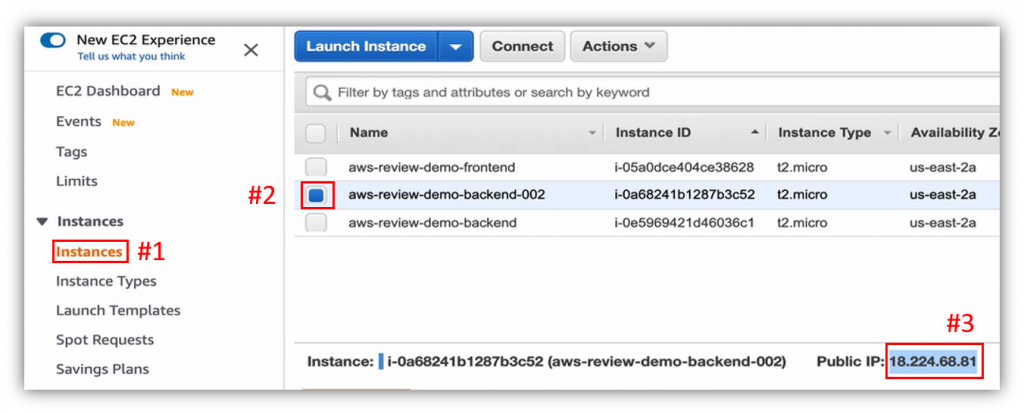
到後端分頁,把先前的 IP 位置取代為新複製的 Public IP,也就成功透過 API 拿到資料庫裡面的資料,如下圖: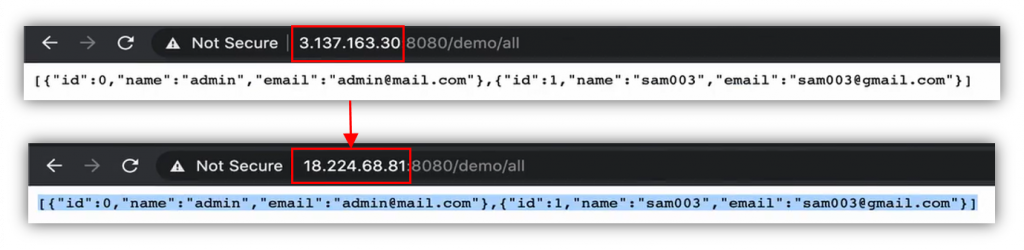
回到 EC2 的 AMIs (下圖#1),選擇前端 AMI (下圖#2),點擊 Actions (下圖#3)的 Launch (下圖#4)。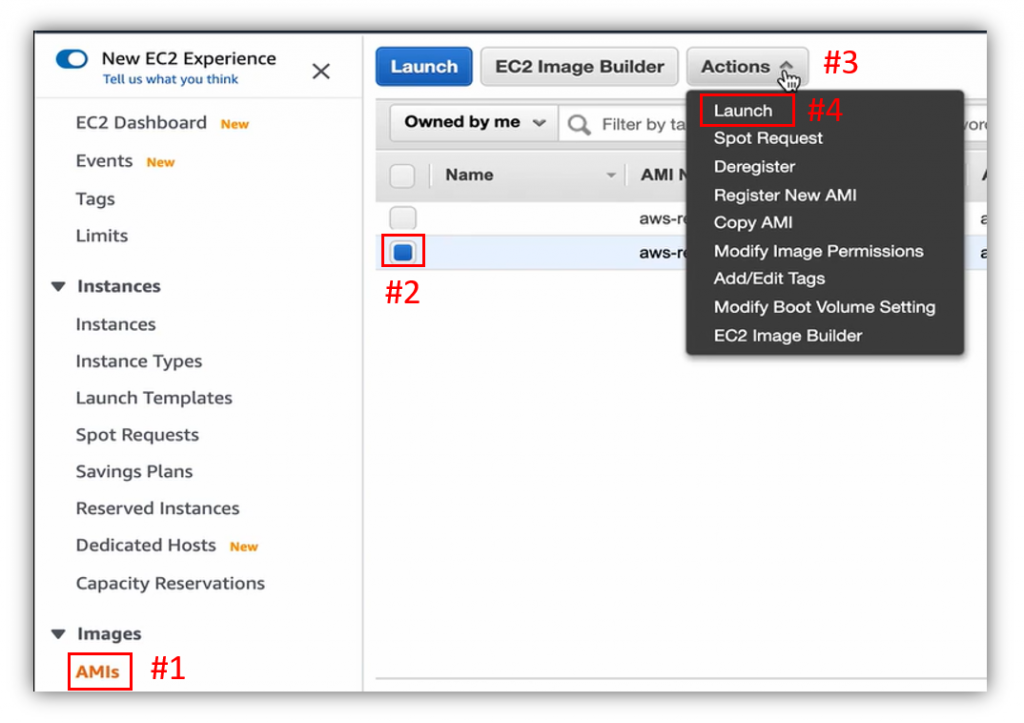
Instance Type 預設即可,點擊 Next: Configure Instance Details 下一步(下圖#1)。
Network 選擇先前創造的 VPC (下圖#1),Subnet 選擇 Public Subnet (下圖#2),Enable Public IP (下圖#3),IAM Role 選擇先前創建的 Role (下圖#4),點擊右下 Next: Add Storage 下一步(下圖#5)。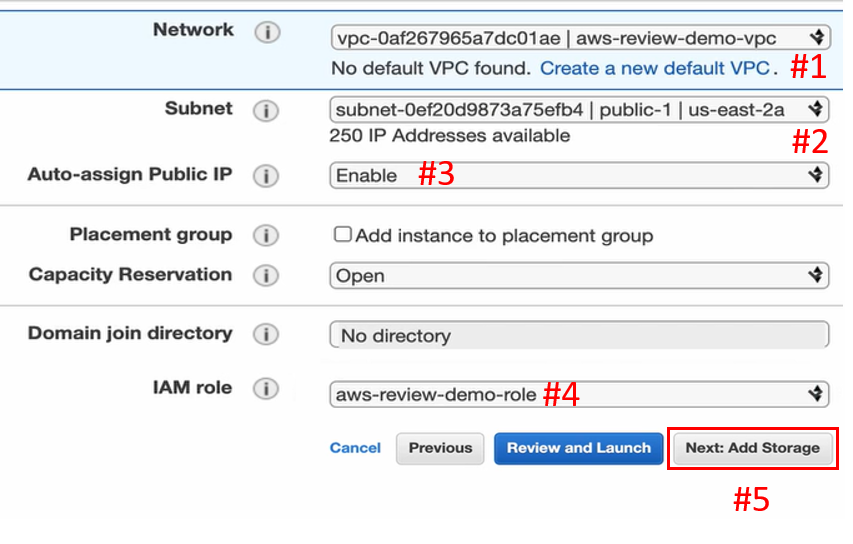
此處的 Snapshot (下圖#1)是從 AMI 上面拿下來的,所以會包含之前所擁有的所有檔案以及套件下載,點擊 Next: Add Tags 下一步(下圖#2)。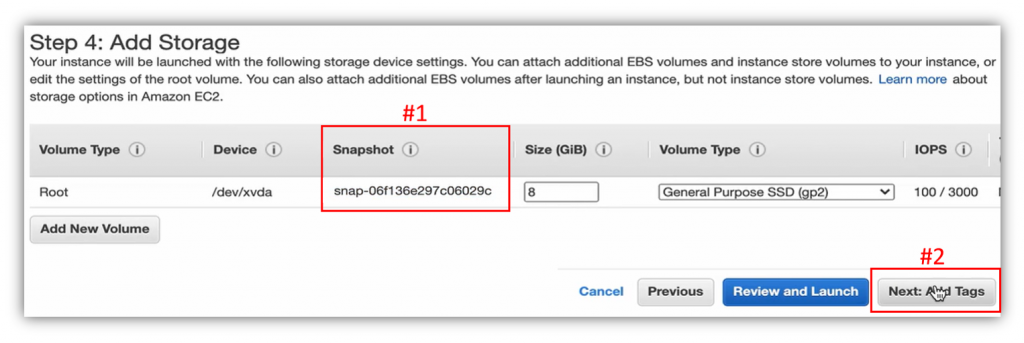
跳過 Tags 設定,點擊 Next: Configure Security Group 下一步(下圖#1)。
Security Group 的部分,按下 Add Rule 新增(下圖#1),開放 3000 Port (下圖#2),選擇 Anywhere 對任何 IP 開放(下圖#3),點擊 Review and Launch 下一步(下圖#4)。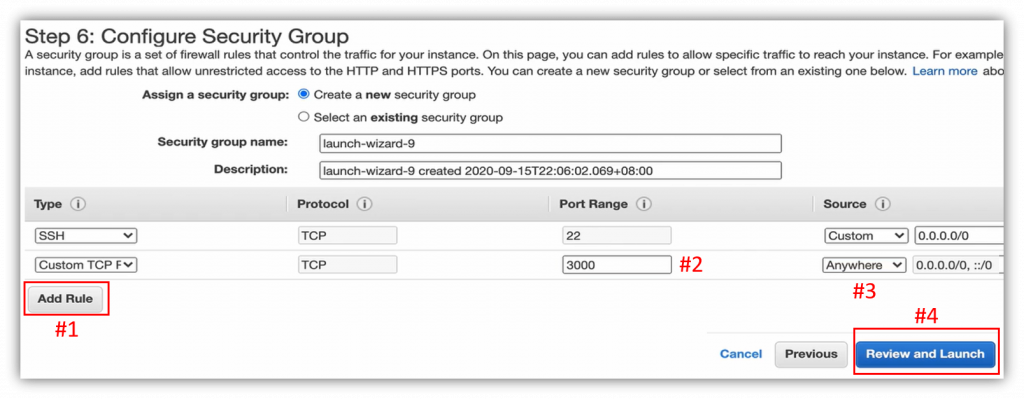
點擊 Launch (下圖#1)。
選擇一個已存在的 Key Pair (下圖#1),使用現有的 Key Pair (下圖#2),勾選 Acknowledge 確認(下圖#3),點擊 Launch Instance (下圖#4)。
點擊 View Instance (下圖#1)。
在前端啟動的過程中(下圖#1),可以先建立名稱(下圖#2)。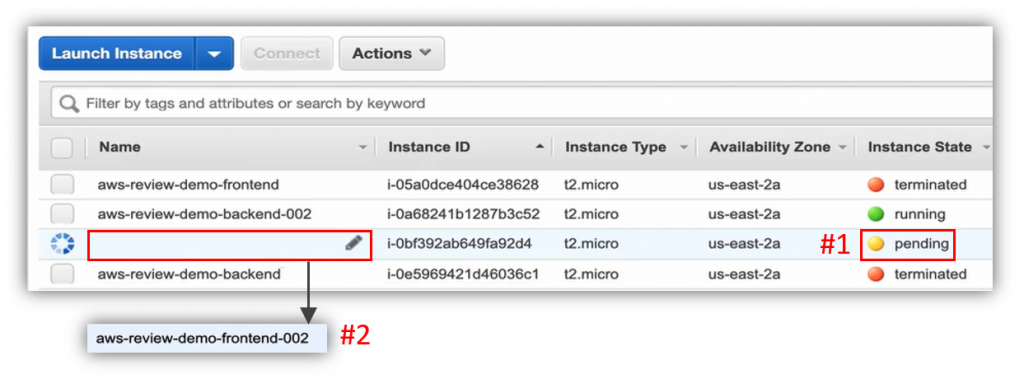
前端啟動後(下圖#1),勾選啟動的前端(下圖#2),再點擊 Connect (下圖#3)。
複製 ssh 指令,如下圖: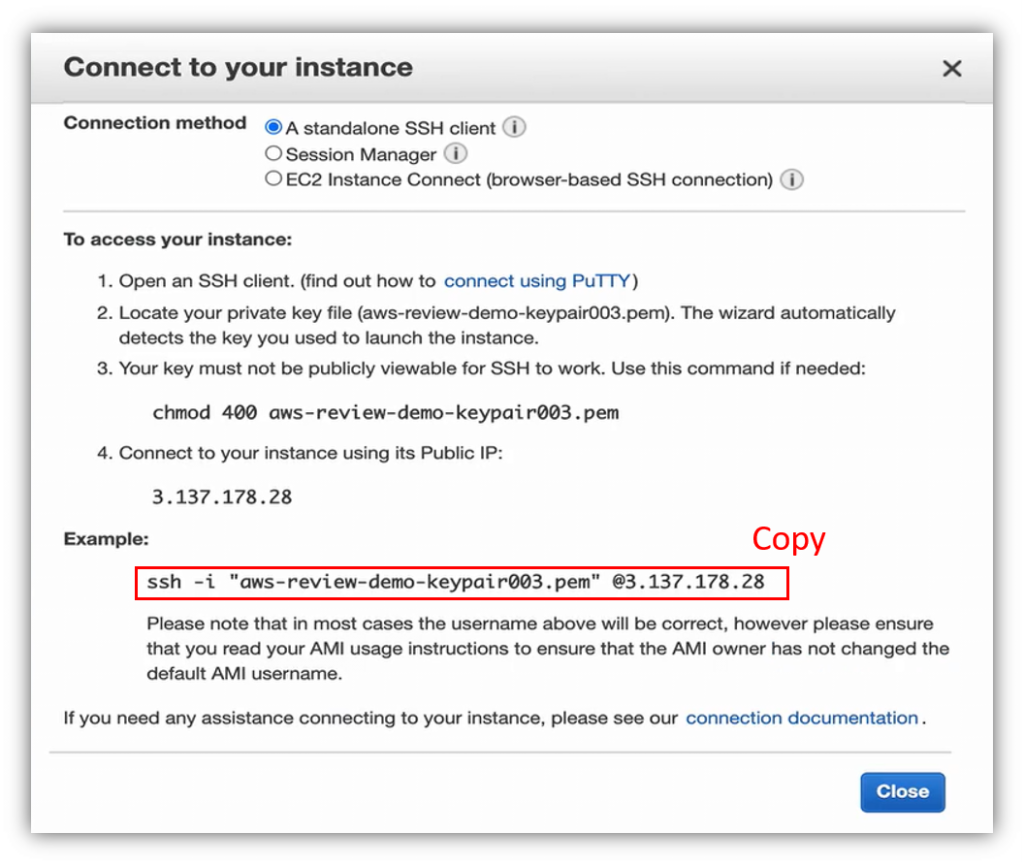
回到前端 Terminal,貼上 ssh 指令,把 root 改為 ec2-user (下圖#1),Enter 後輸入 yes (下圖#2)。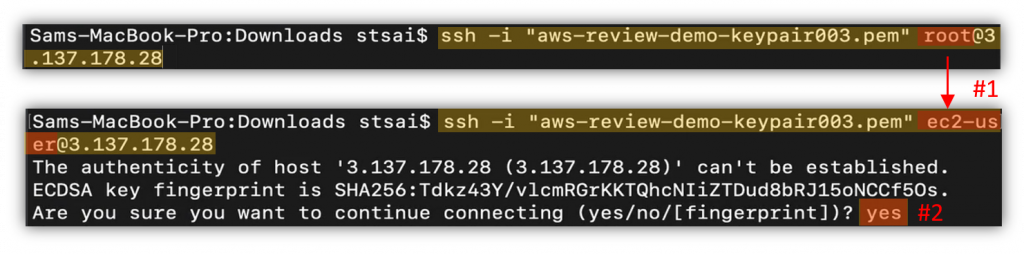
由於 Instance 是從 AMI 復原的,故所有的套件、專案都還在,直接 cd 到 web_new 的位置(下圖#1),sudo vi .env 修改參數(下圖#2)。
小寫 a 進入編輯模式,修改 DB_HOST_IP 為空,如下圖: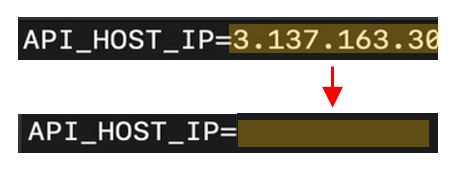
回到 EC2 的 Instance 頁面(下圖#1),勾選復原的後端伺服器(下圖#2),複製 Public IP (下圖#3)。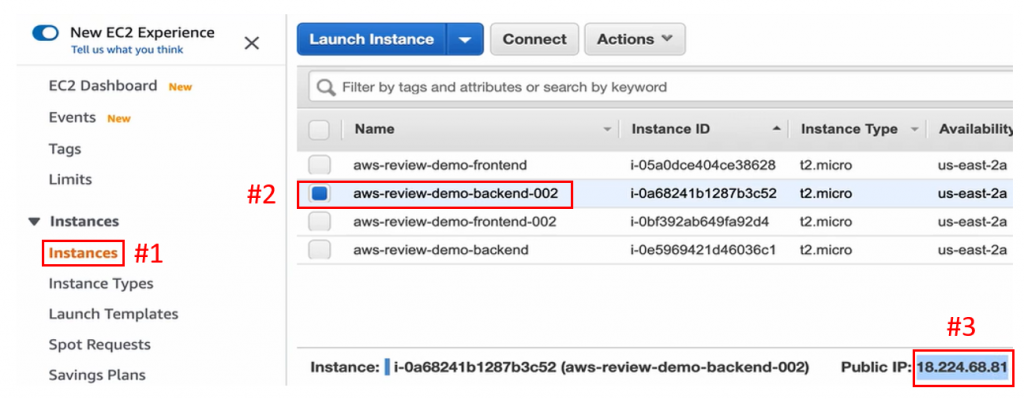
回到前端 Terminal,在 DB_HOST_IP 貼上復原的後端伺服器 Public IP (下圖#1),ESC 離開編輯模式,輸入 :wq (下圖#2)寫入並結束修改。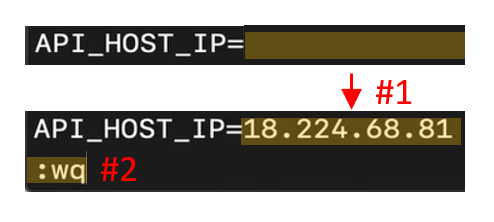
透過 sudo service docker start (下圖#1),啟動 Docker Service (下圖#2)。
利用 docker-compose up 啟動前端應用程式,如下圖:
等待前端應用程式啟動,如下圖: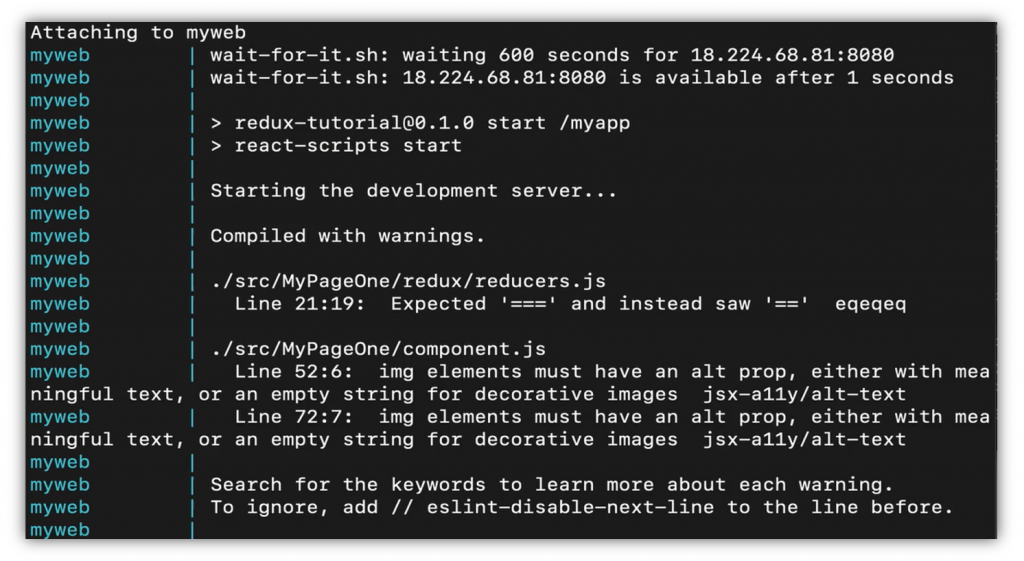
回到 EC2 的 Instance (下圖#1),勾選新復原的前端 EC2 Instance (下圖#2),複製 Public IP (下圖#3)。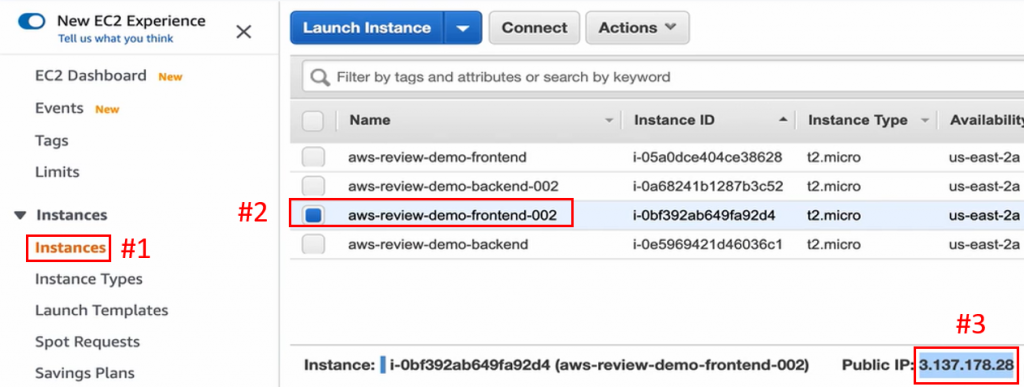
到前端首頁,把先前的 IP 位置取代為新複製的 Public IP,就能看到經過半年,我們透過先前為備份所建立的 Snapshot AMI,一次還原了 3 層式的架構,前端頁面從 S3 上面拿到圖片檔,並且透過 API 跟後端溝通,拿到資料庫的資料,如下圖: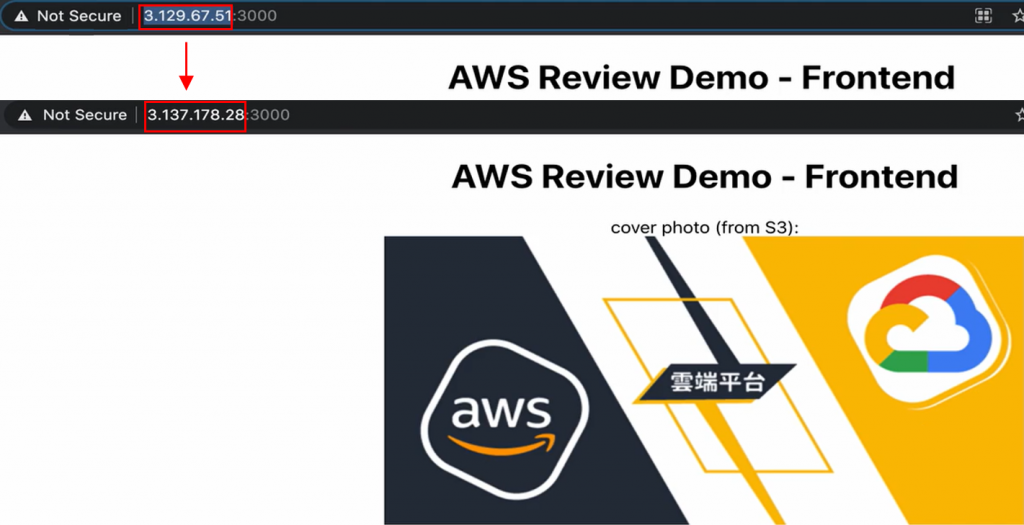
以上,就是我們針對在本課程中所學到的所有 AWS 服務的一整套專案部署。
進到 RDS 的 Databases (下圖#1),點選 Database (下圖#2),點擊 Actions (下圖#3)的 Delete (下圖#4)進行刪除動作。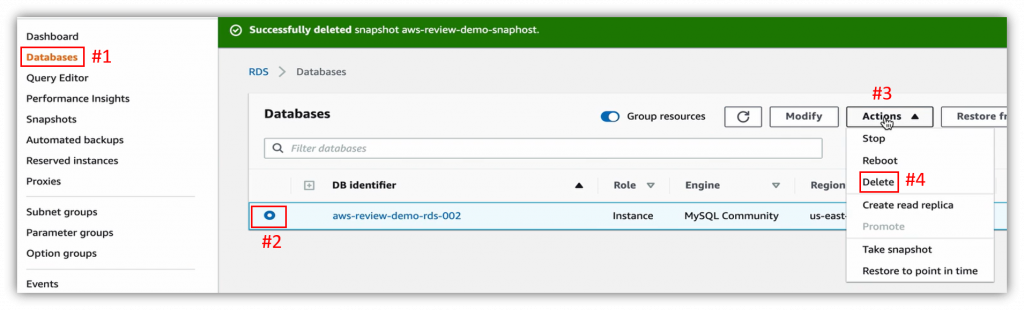
取消 Create Snapshot 的選項(下圖#1),也不用保留自動備份(下圖#2),勾選 Acknowledge 確認(下圖#3),輸入 delete me (下圖#4),點擊 Delete 刪除(下圖#5)。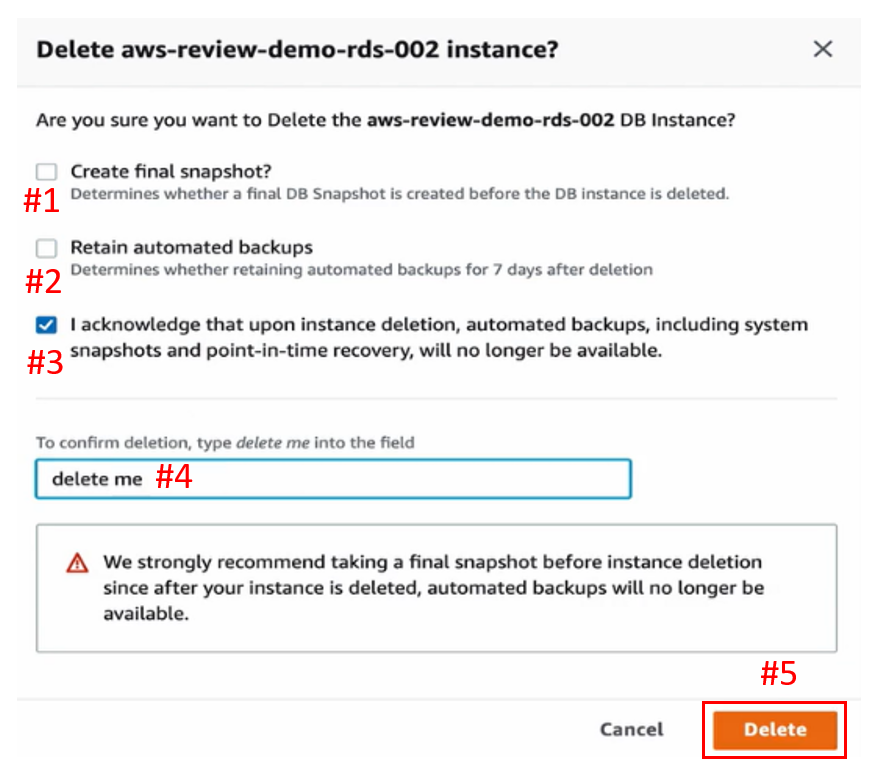
等待大約 20 分鐘後(下圖#1),即完成 Database 的刪除(下圖#2)。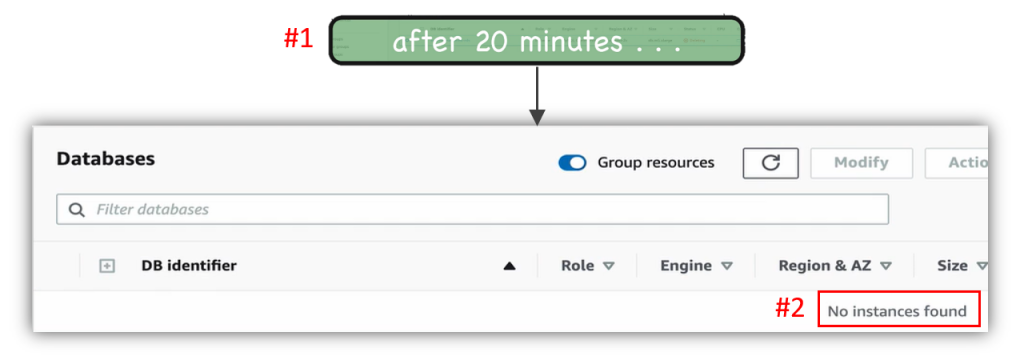
再到 Snapshots 頁面(下圖#1),勾選 Snapshot (下圖#2),點擊 Actions (下圖#3)的 Delete snapshot (下圖#4),進行 Snapshot 的刪除動作。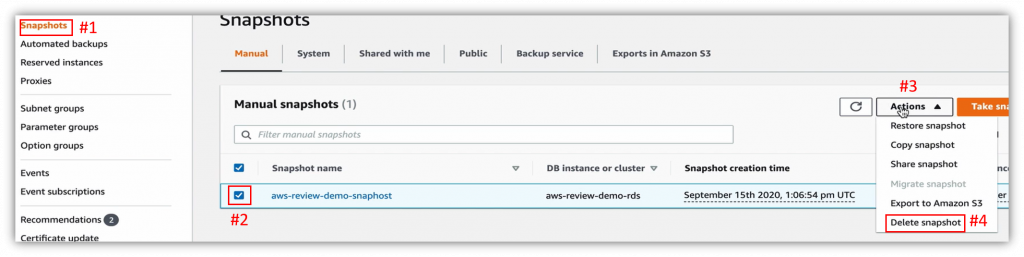
點擊 Delete 刪除(下圖#1)。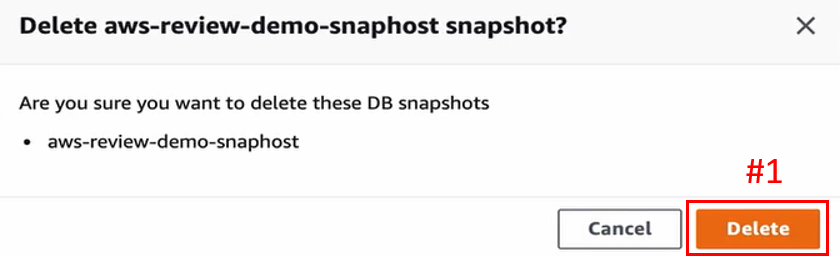
Snapshot 就會被刪除(下圖#1)。
到 Subnet Groups 頁面(下圖#1),勾選 Subnet Group (下圖#2),點擊 Delete (下圖#3)進行刪除 Subnet Group 的動作。
點擊 Delete (下圖#1),確定刪除 Subnet Group。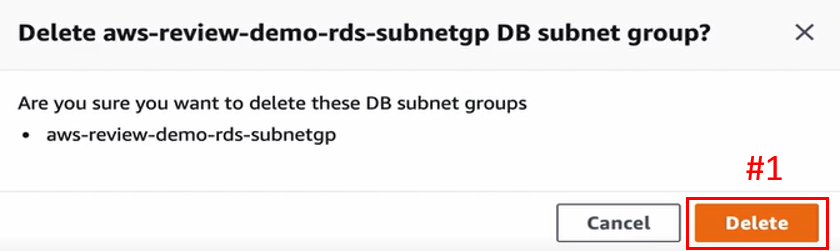
Subnet Group 就會被刪除(下圖#1)。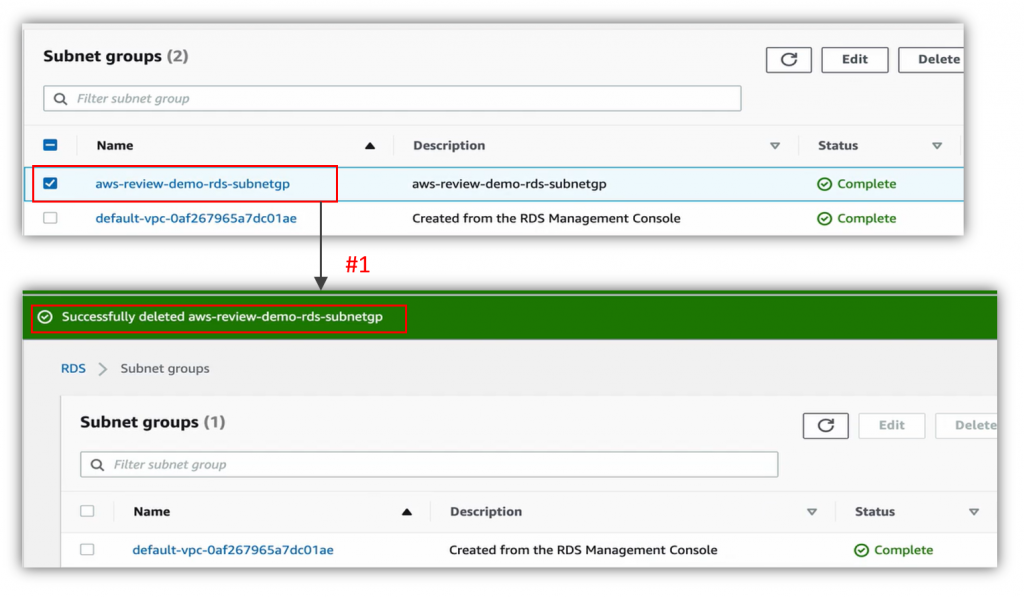
以上,便完成 RDS 的清理部分。
勾選前端及後端 EC2 (下圖#1),從 Actions (下圖#2)到 Instance State (下圖#3),按下 Terminate (下圖#4),進行整個清掉的動作。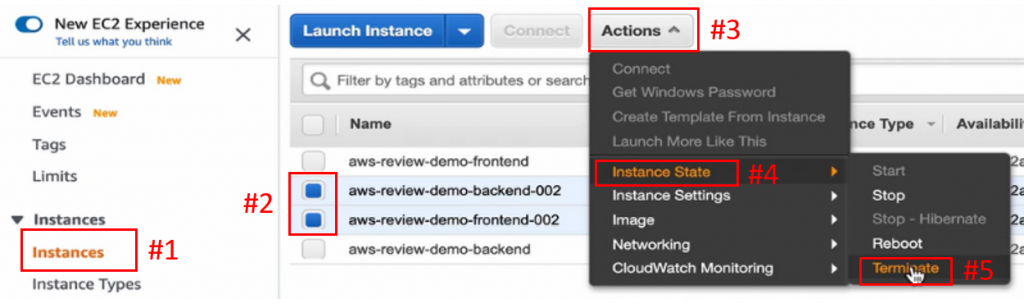
點擊 Yes, Terminate 確定(下圖#1)。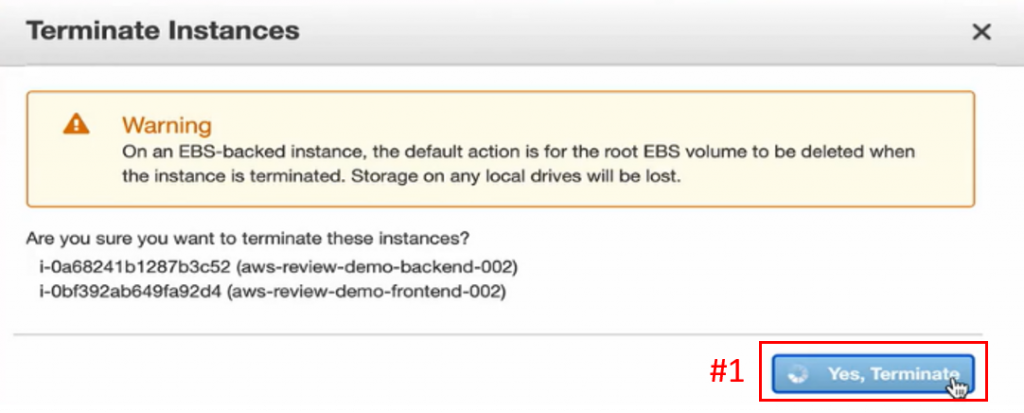
等待狀態轉為 Terminated 即成功清除 EC2 Instance (下圖#1)。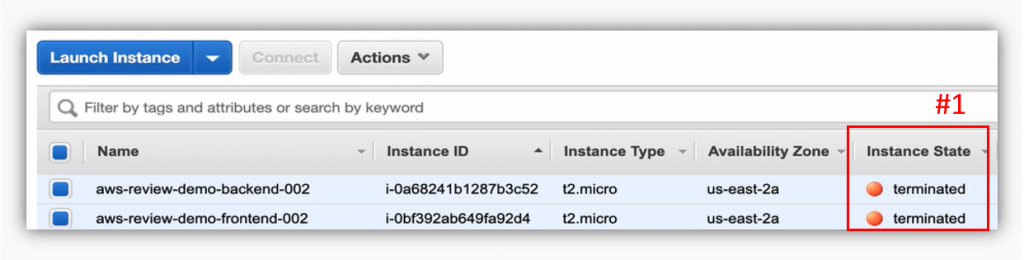
到 AMIs 頁面(下圖#1),勾選前端及後端的 AMI (下圖#2),點擊 Actions (下圖#3)的 Deregister (下圖#4)。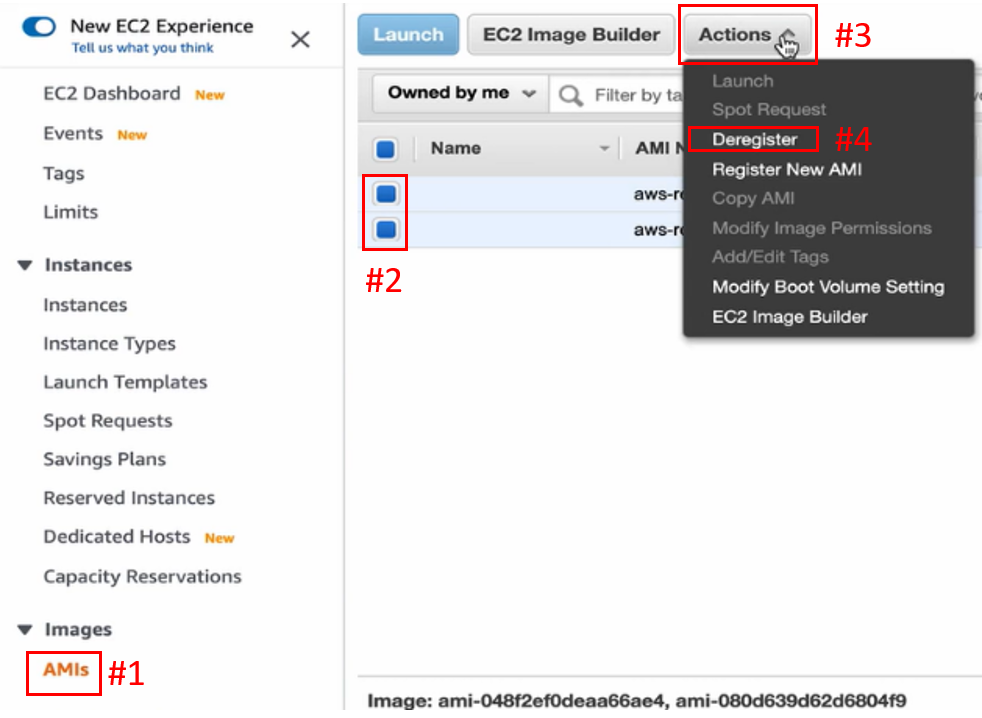
點擊 Continue 繼續(下圖#1)。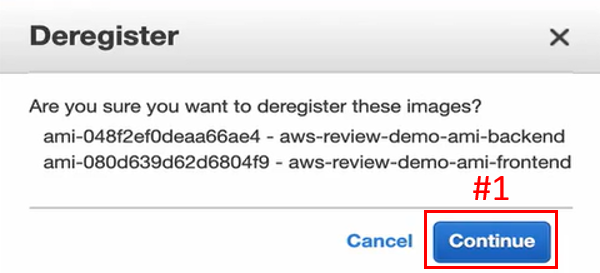
即可看到 AMIs 頁面變空的(下圖#1)。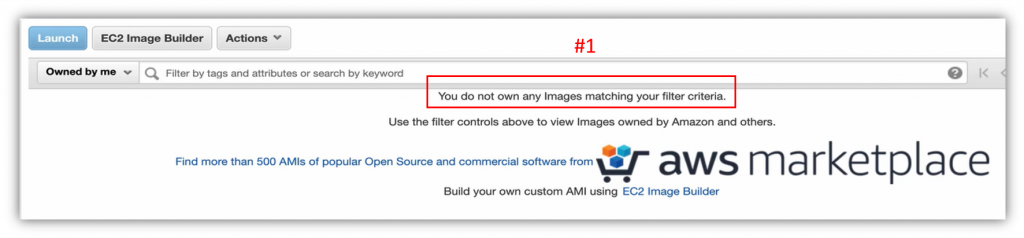
到 Snapshot 頁面(下圖#1),點選因為 AMI 而創造出來的 Snapshot (下圖#2),點擊 Actions (下圖#3)的 Delete (下圖#4)。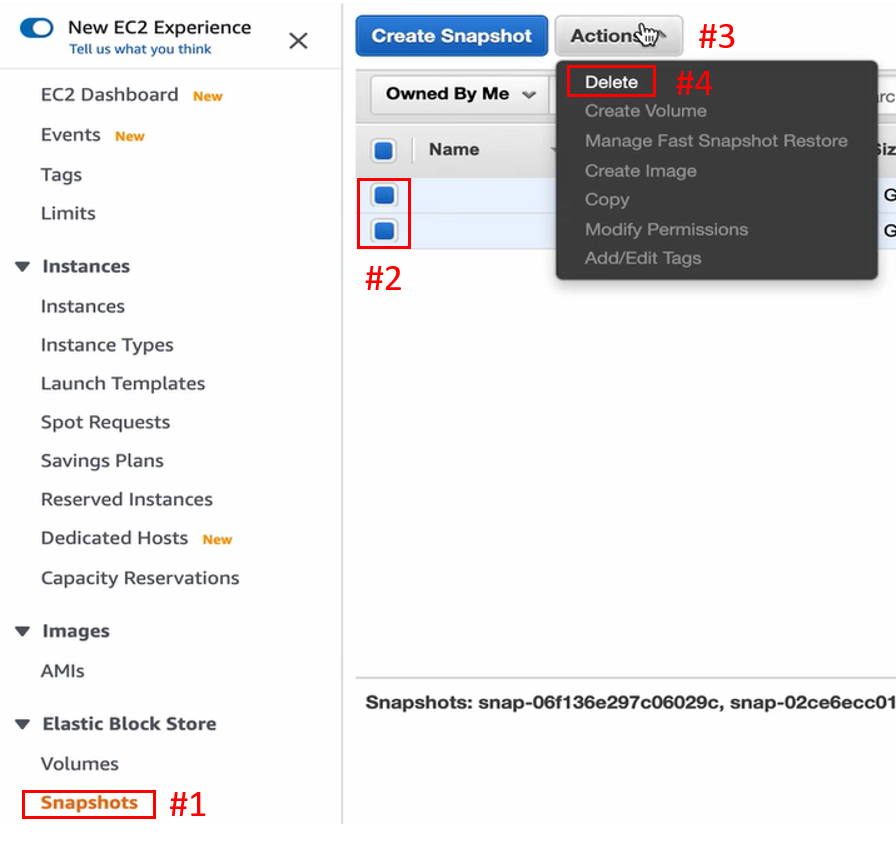
點擊 Tes, Delete 確認(下圖#1)。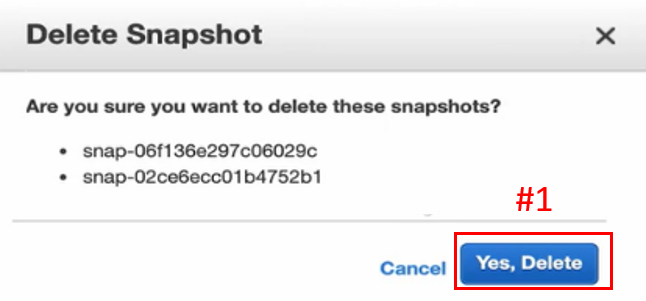
即可完成刪除 Snapshot 的動作(下圖#1)。
到此,便完成 EC2 部分的資源清理。
到 S3 介面的最上層,選擇 Bucket (下圖#1),點擊 Delete (下圖#2)。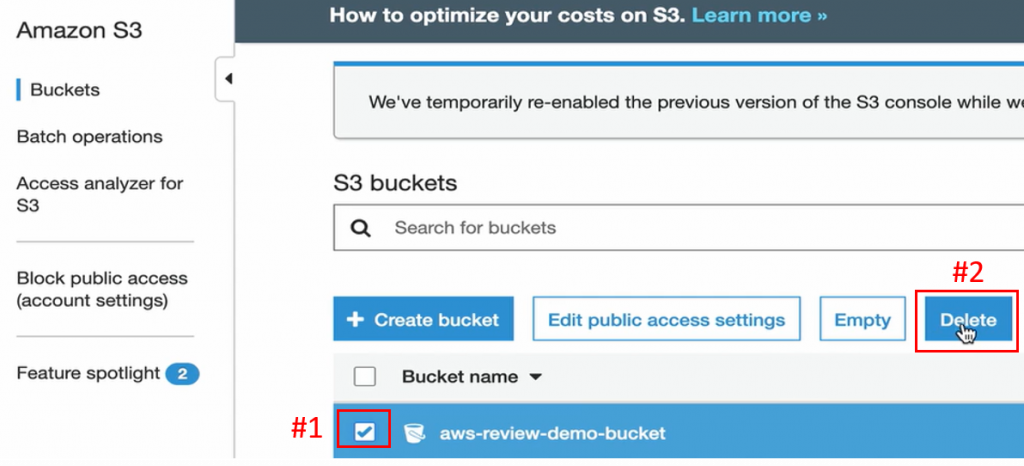
複製 Bucket Name (下圖#1),貼上 Bucket Name (下圖#2),點擊 Confirm (下圖#3)。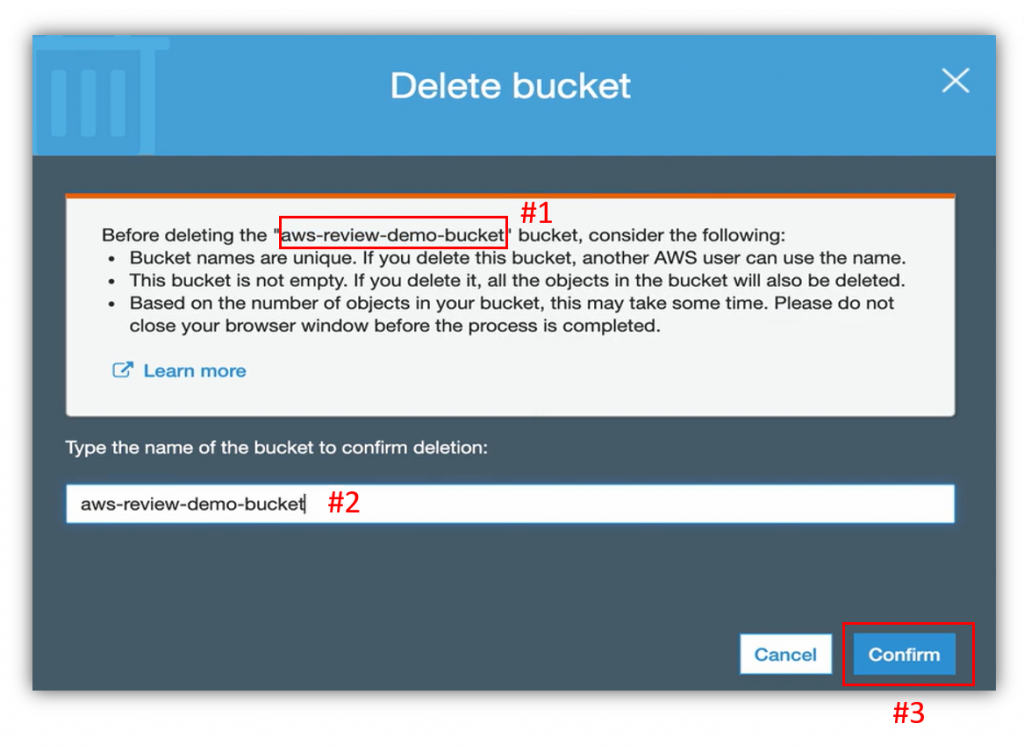
即完成刪除 Bucket 的動作(下圖#1)。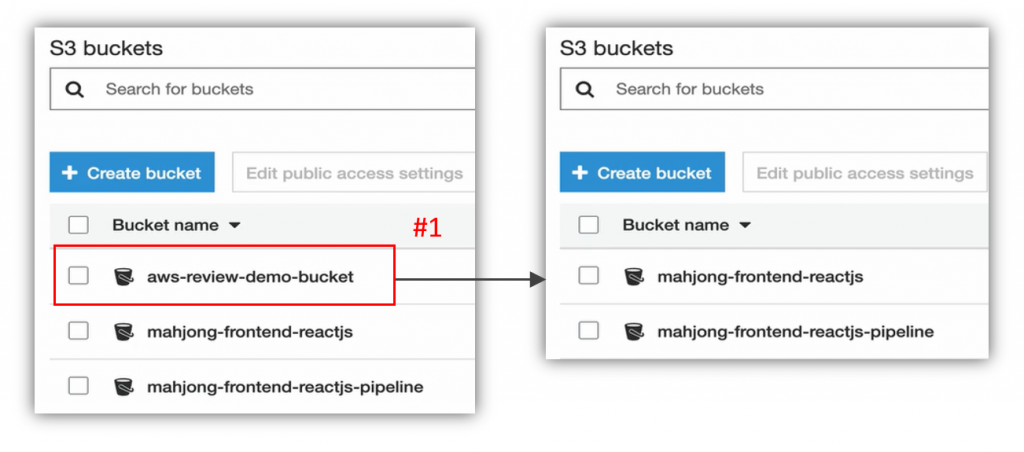
到這邊,便完成 S3 部分的資源清理。
展開頁首左方的 Service (下圖#1),搜尋 VPC (下圖#2)並新分頁開啟(下圖#3)。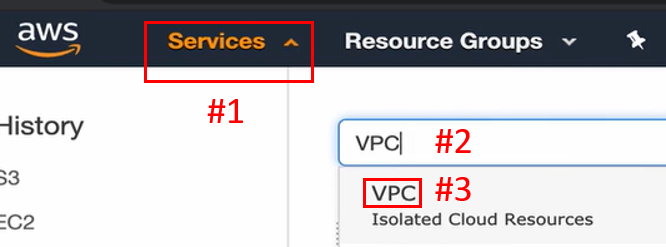
到 Your VPCs 頁面(下圖#1),勾選 VPC (下圖#2),點擊 Actions (下圖#3)的 Delete VPC (下圖#4),進行刪除 VPC 的動作。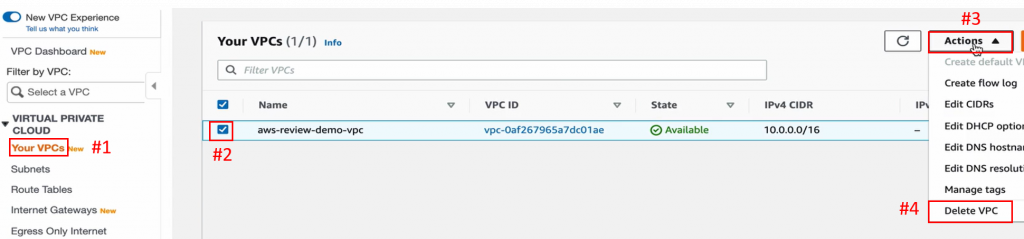
拉到最下方,輸入 delete (下圖#1),點擊 Delete (下圖#2)。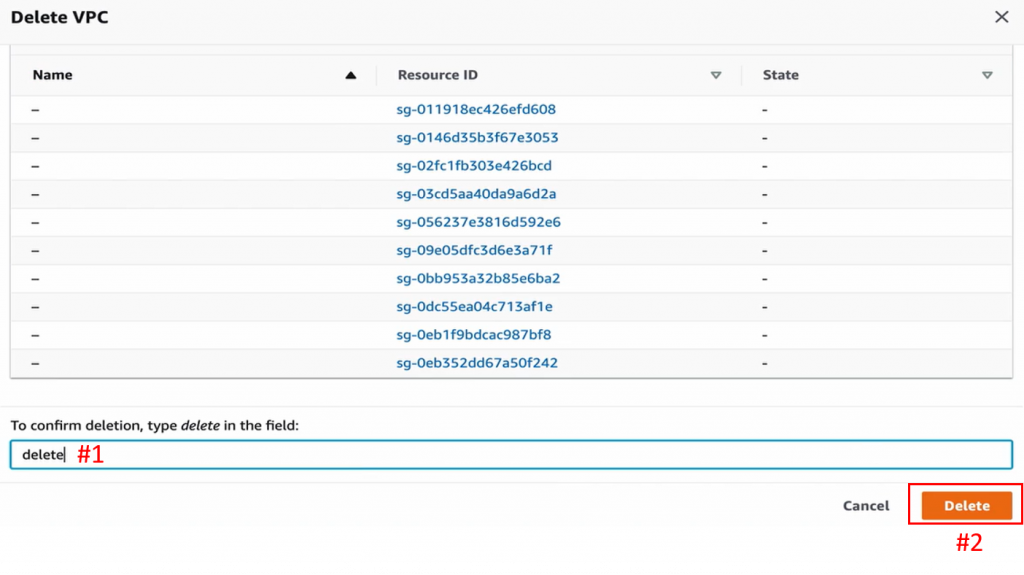
即可看到 Your VPCs 頁面為空(下圖#1)。
以上,便完成 VPC 相關的資源清理。
展開頁首左方的 Service (下圖#1),搜尋 IAM (下圖#2)並新分頁開啟(下圖#3)。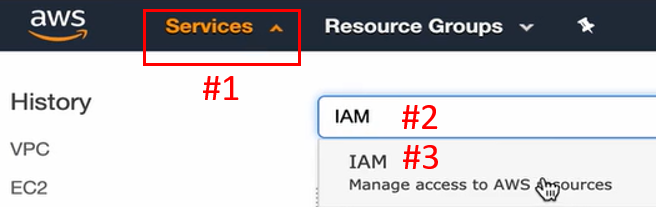
由於 sam 的 Account 沒有權限,所以目前這邊看不到 IAM 所有的東西,並且 IAM 的資源其實也都不收費,所以可以根據自己的需求,登入自己的 Root 帳號來把 IAM 清掉,這邊就不一一示範,這次 Demo 也就到這邊結束。
繼上篇 IAM 的前置設定與使用、VPC 環境建置、資料庫創建、EC2 Instance 建立、資料庫連結、資料庫初始資料的設立、Docker 應用程式的運用、前端伺服器與後端伺服器的連結、頁面內容互動與修改實作後,下篇接著透過檔案控管、RDS/EC2/S3 的節省成本、備份還原與資源清理的實作,以增加實務專案的經驗,學會根據公司的需求,判斷節省成本的事項,進而協助專案的保留或是進行。
最近每天提醒自己寫文章,比提醒自己吃飯還頻繁,實在是很特別的體驗。
30天說多不多、說少不少,最可惜的是還有許多單元沒有時間挑出來介紹,事實上每個寶石都還有著許多重要觀念與Lab值得探索,我之後有機會,再一一分享出來!感謝大家這次鐵人賽的關注與參與!


 iThome鐵人賽