第3天寫了打字特效炫起來!
今天來個姊妹篇,手寫字特效炫起來!
已經默默進入SVG幾天了...
老樣子先來看成果!

底線是我用Adobe XD拉的~按下右鍵複製SVG code~(拉到後面有點醜 ಠ_ಠ
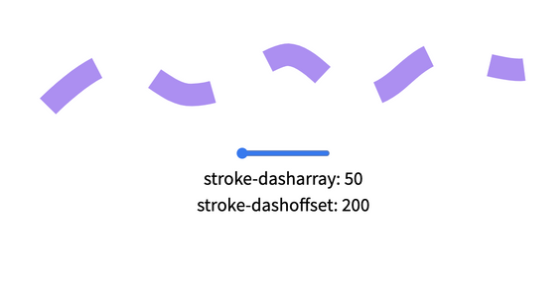
這個其實就是使用:dash-array & dash-offset的屬性去做。
stroke-dasharray: 筆畫的長度
stroke-dashoffset: 筆畫的位置
算好dash-array 為可以包覆整個物件的長度後,
(不會算的就跟我一樣手動試試長度 XD)
再調整dash-offset 移動他的位置,就會有在寫字的效果囉~
不熟悉這兩個屬性的人可以到女神的codepen玩一下:試試看dasharray試試看dashoffset
stroke-dashoffset也可以像我之前的範例一樣,
做出網頁的進度條~傳送門
上部分code!
//HTML
<div class="logo">
      <svg width="600px" height="" viewBox="0 0 600 160">
       <text
          fill="none"
          stroke="#fff"
          x="0"
          y="120"
          stroke-width="5"
          font-size="120"
          font-family="'Raleway', sans-serif"
          font-weight="800">
          Hi Regina
        </text>
        <path class="underline" data-name="Path 1"
				d="M107,318.31...省略"
				transform="translate(60 -188.421)"
				fill="none" stroke="#00BFFF" stroke-width="3"/>
     </svg>
  </div>
</div>
//SCSS
$color: #F3F3F3;
$stroke-width: 5px;

//文字的部分
text {
   stroke-width: $stroke-width;
   stroke-dasharray: 900;
   stroke-dashoffset: -900;
   animation: text 4s forwards 1;
   animation-delay: 1s;
  }

  .underline{
    stroke-dasharray: 900;
    stroke-dashoffset: 900;
    animation: underline 4s forwards 1;
    animation-delay: 5s;
  }

//文字的動態
@keyframes text {
 75% {
  fill: transparent;
  stroke-dashoffset: 0;
  stroke-width: $stroke-width;//先留著外框框
 }
 100% {
  fill: $color; //讓他上色~
  stroke-dashoffset: 0;
  stroke-width: 0;//把外框框消掉,不然會變很肥
 }
}

//下底線的動態
@keyframes underline {
 75% {
  stroke-dashoffset: 0;
 }
 100% {
  stroke-dashoffset: 0;
 }
}
今天的 code: 在這裡
今天的篇幅有點少,讓我推薦一下資源~
推薦SVG女神 Cassie 的教學資源,網站也是做的超級棒?
不過她的動畫很喜歡使用GSAP套件。
她在Google I/O大會的SVG演講影片
https://www.youtube.com/watch?v=ADXX4fmWHbo
SVG基礎一樣推薦oxxostudio:
https://www.oxxostudio.tw/articles/201410/svg-tutorial.html
有任何錯誤或是問題歡迎批評指教!?
