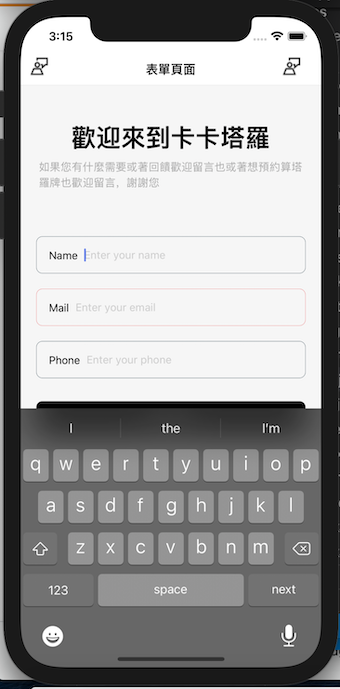
手機裝置切完版後才會發現
啊~~~ 還沒完成
今天我們來針對鍵盤擋住元件做個處理吧!!
來介紹個插件 react-native-keyboard-aware-scrollview
這個套件可以在鍵盤跑出來的時候有 scroll 的功能防止元件被擋住
npm i react-native-keyboard-aware-scroll-view --save
或著
yarn add react-native-keyboard-aware-scroll-view
import { KeyboardAwareScrollView } from 'react-native-keyboard-aware-scroll-view'
import React, {useRef} from 'react';
import {StyleSheet, View, Text} from 'react-native';
import {KeyboardAwareScrollView} from 'react-native-keyboard-aware-scrollview';
import {fonts} from '@src/constants';
import {useFormik} from 'formik';
import Input from '../components/Input';
import Button from '../components/Button';
import {object as yupObject, string as yupString, ValidationError} from 'yup';

const Formik = () => {
  const phone = useRef(null);
  const email = useRef(null);
  const phoneRegExp =
    /^((\\+[1-9]{1,4}[ \\-]*)|(\\([0-9]{2,3}\\)[ \\-]*)|([0-9]{2,4})[ \\-]*)*?[0-9]{3,4}?[ \\-]*[0-9]{3,4}?$/;

  const Schema = yupObject().shape({
    name: yupString().required('Required'),
    email: yupString().email('Invalid email').required('Required'),
    phone: yupString()
      .matches(phoneRegExp, 'Phone number is not valid')
      .required('Required'),
  });
  const {handleChange, handleSubmit, handleBlur, values, errors, touched} =
    useFormik({
      validationSchema: Schema,
      initialValues: {name: '', email: '', phone: ''},
      onSubmit: values =>
        alert(
          `Name: ${values.name},Email: ${values.email}, phone: ${values.phone}`,
        ),
    });
  return (
    // 將原本的 ScrollView 改成 KeyboardAwareScrollView
    <KeyboardAwareScrollView style={styles.container}>
      <View style={styles.textBox}>
        <Text style={[styles.text, fonts.h1]}>歡迎來到卡卡塔羅</Text>
        <Text style={(fonts.p, styles.textContent)}>
          如果您有什麼需要或著回饋歡迎留言也或著想預約算塔羅牌也歡迎留言,謝謝您
        </Text>
      </View>

      <View style={styles.formBox}>
        <Input
          onChangeText={handleChange('name')}
          label="Name"
          placeholder="Enter your name"
          autoCapitalize="none"
          autoCompleteType="email"
          keyboardType="default"
          keyboardAppearance="dark"
          onBlur={handleBlur('name')}
          error={errors.name}
          touched={touched.name}
          returnKeyType="next"
          returnKeyLabel="next"
          onSubmitEditing={() => email.current?.focus()}
        />
        <Input
          ref={email}
          onChangeText={handleChange('email')}
          label="Mail"
          placeholder="Enter your email"
          autoCapitalize="none"
          autoCompleteType="email"
          keyboardType="email-address"
          keyboardAppearance="dark"
          onBlur={handleBlur('email')}
          error={errors.email}
          touched={touched.email}
          returnKeyType="next"
          returnKeyLabel="next"
          onSubmitEditing={() => phone.current?.focus()}
        />
        <Input
          ref={phone}
          onChangeText={handleChange('phone')}
          label="Phone"
          placeholder="Enter your phone"
          autoCompleteType="phone-pad"
          autoCapitalize="none"
          keyboardAppearance="dark"
          onBlur={handleBlur('phone')}
          error={errors.phone}
          touched={touched.phone}
          returnKeyType="go"
          returnKeyLabel="go"
          onSubmitEditing={() => handleSubmit()}
        />
        <Button label="submit" color="maroon" onPress={handleSubmit} />
      </View>
    </KeyboardAwareScrollView>
  );
};

const styles = StyleSheet.create({
  container: {
    flex: 1,
    backgroundColor: 'rgb(246,246,246)',
    paddingHorizontal: 20,
  },
  textBox: {
    justifyContent: 'center',
    alignItems: 'center',
    paddingVertical: 50,
  },
  textTitle: {color: '#aaa'},
  textContent: {color: '#aaa', lineHeight: 20, marginTop: 10},
  formBox: {
    width: '100%',
    alignItems: 'center',
    justifyContent: 'center',
  },
  input: {
    width: '100%',
    textAlign: 'center',
    borderWidth: 1,
    borderColor: '#ddd',
    padding: 10,
    fontSize: 18,
    margin: 10,
  },
  errorText: {
    textAlign: 'center',
    color: 'crimson',
    marginBottom: 10,
  },
});

export default Formik;
原本擋住了按鈕!!
使用元件後~
更多參考
一个 ScrollView 组件,处理键盘外观并自动滚动到焦点文本输入。
