AWS 有個教學課程,教學課程:使用 Amazon S3 觸發條件建立縮圖影像,今天我們就以這個教程為基礎,並結合Day 32 - 透過手機呼叫 Amazon API Gateway 上傳圖片到 S3這篇文章,讓使用者可以上傳一個圖片後,就完成圖片鏡像的動作。
以上這個實驗需要的 AWS 服務有
下圖中顯示,透過具有 CORS 設定的 API Gateway 取得角色 A 的授權許可,將圖片寫入到儲存貯體 A,寫入的動作會觸發 Lambda 函數,於是 Lambda 函數就會讀取儲存貯體 A 的圖片,進行鏡像運算後,寫入儲存貯體 B,此時它是取得角色 B 的許可授權,而因為 S3 儲存貯體 B 具有對外公開的讀取權限,所以網際網路中的用戶就可以直接讀取鏡像圖片。
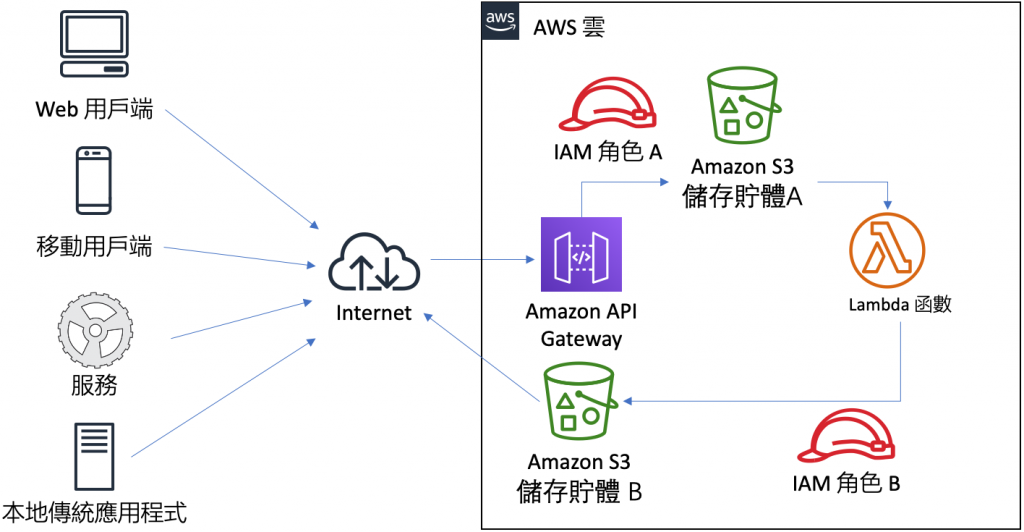
圖 1、實作 S3 驅動 Lambda 函數進行鏡像架構圖
上傳圖片的 API Gateway 已於 Day 32 - 透過手機呼叫 Amazon API Gateway 上傳圖片到 S3 這篇文章中完成實作,接著我們需要完成的就是建立一個產生鏡像圖片的 Lambda 函數,步驟如下:
建立縮圖程式
以下命令用來建立虛擬環境 pil,並激活虛擬環境,接著將安裝套件用的 pip3 更新到最新版本,並安裝所需套件 pillow。
python3 -m venv pil
. pil/bin/activate
cd pil
pip3 install --upgrade pip
pip3 install Pillow
tree -L 2
撰寫需要的程式 mirror.py,會將指定的圖片呈現鏡像,左右顛倒,需要先放一張圖片 00-frame-0054.jpg 到目錄中,文件夾結構如下圖所示。
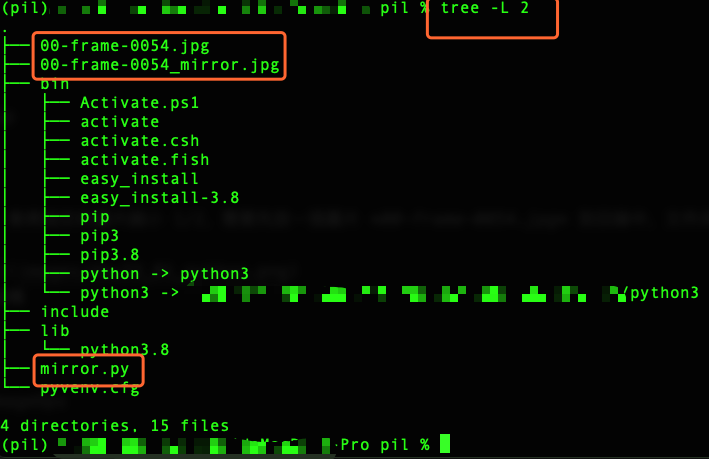
圖 2、虛擬環境 pil 的文件夾結構
_mirror.py
from PIL import Image, ImageOps
import PIL.Image

def resize_image(image_path, resized_path):
  with Image.open(image_path) as image:
      im_mirror = ImageOps.mirror(image)
      im_mirror.save(resized_path)

OriginImg = '00-frame-0054.jpg'
ResizeImg = '00-frame-0054_mirror.jpg'

resize_image(OriginImg,ResizeImg)
運行以下命令後,可以得到一張呈現鏡像,左右顛倒的圖片,如下圖所示,
python3 mirror.py

圖 3、呈現鏡像,左右顛倒的圖片
建立 IAM 角色與政策
需要建立一個角色需要由 Lambda 函數來執行,且具有讀取儲存貯體 A 與寫入儲存貯體 B 的許可授權。進入 IAM 管理控制台,選擇新增角色,接下來如下圖所示,選擇 Lambda 的使用案例後點擊 下一個:許可 按鈕。
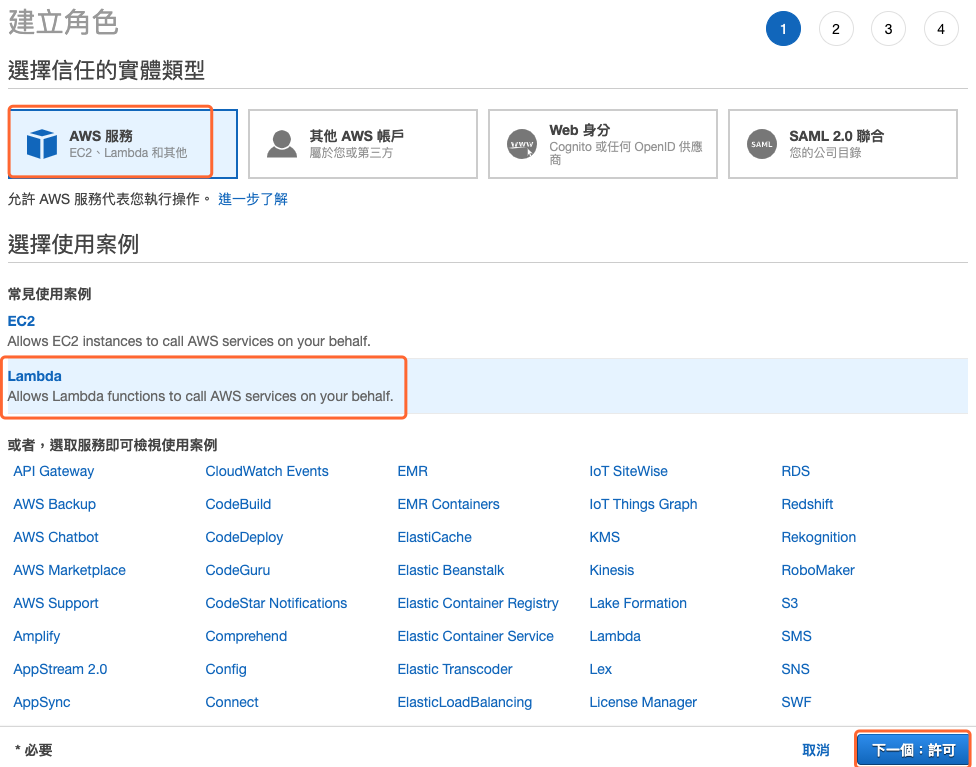
圖 4、建立一個角色選擇 Lambda 的使用案例
在搜尋文字框中輸入 basic 找到 AWSLambdaBasicExecutionRole 進行連接,這將允許這個角色有寫入 CloudWatch 記錄檔的全縣,方便程式除錯之用,如下圖所示。
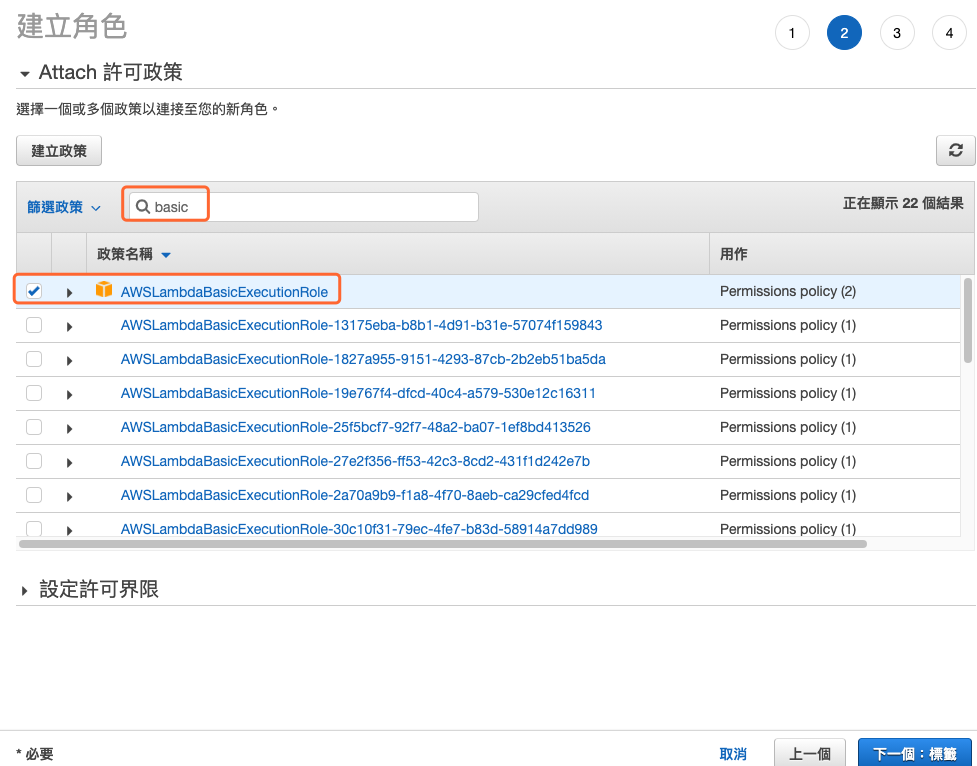
圖 5、連接基礎的 CloudWatch 除錯用的許可政策
最後確定先前的設定後並輸入角色名稱後,就可以建立角色,如下圖所示。
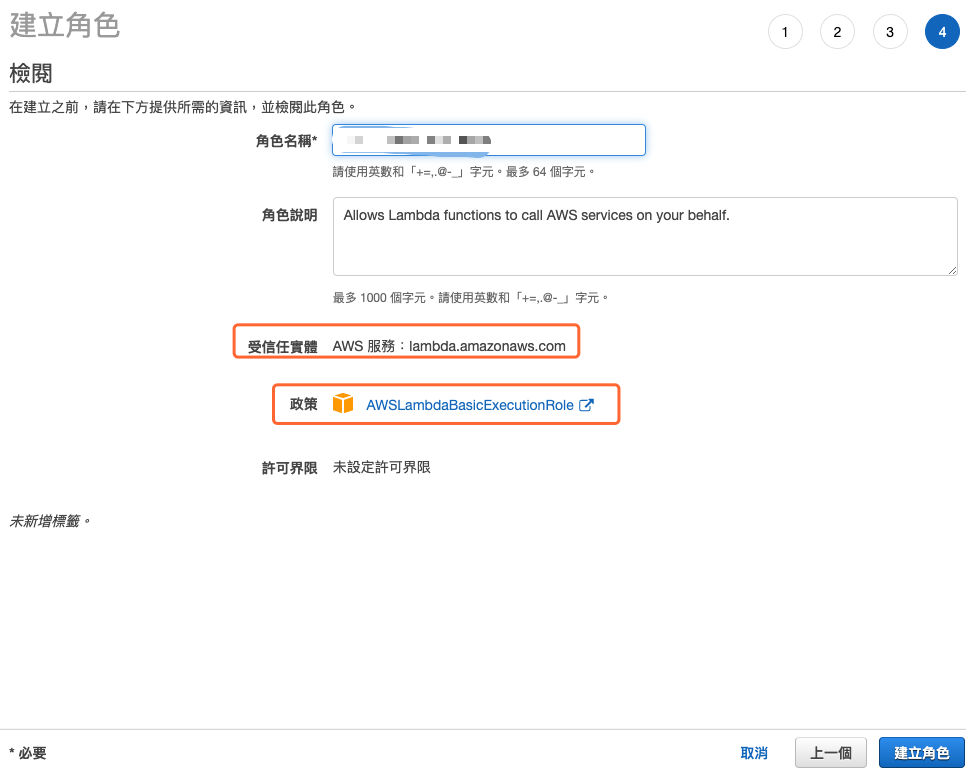
圖 6、檢閱設定並建立角色
編輯一個新的政策,內容如下圖所示,給定讀取 (GetObject) 儲存貯體 A 與寫入物件 (PutObject) 與權限 (PutObjectAcl) 到儲存貯體 B。
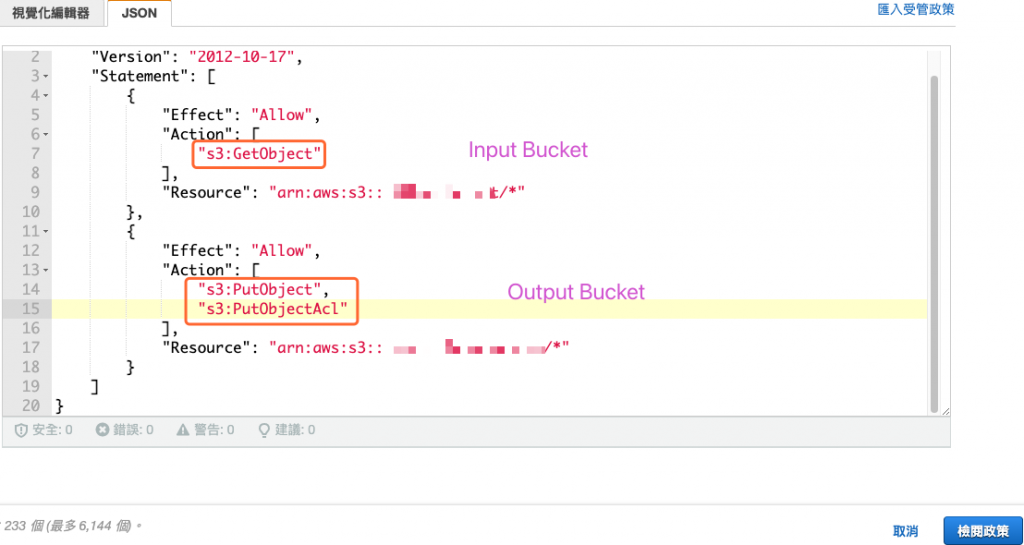
圖 7、新增政策
接著到角色設定畫面,將新建政策連接到角色上,如下圖所示。
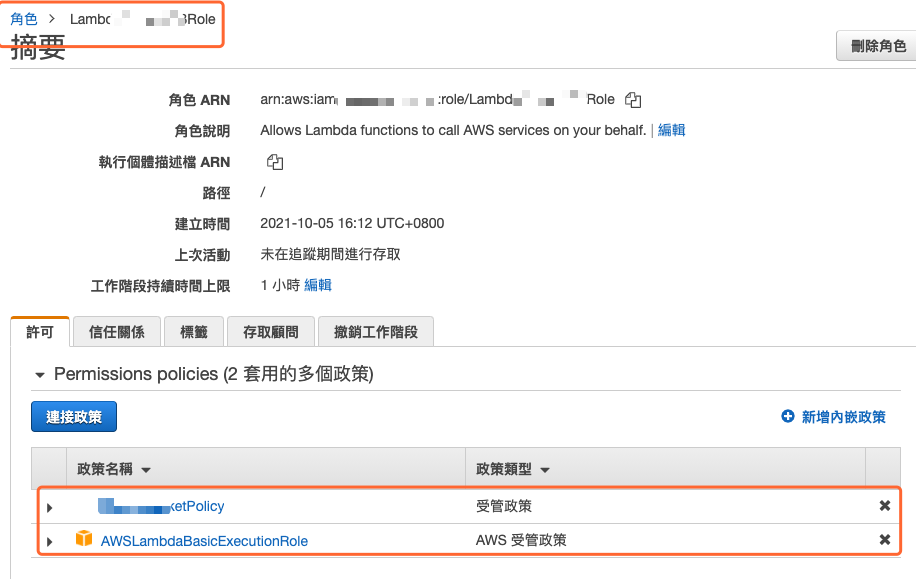
圖 8、將新增的政策連接到先前的角色
建立 Lambda layer
因為接下來的 Lambda 函數會用到 pillow 函式庫,所以必須要這個函式庫的套件一起打包到 Lambda 函式中,使用的方法有兩種,一種是跟主程式打包在一起,另一種則是以分層 (Layer) 的方式,獨立打包成一層,在 Lambda 函數中再添加需要的函式庫層,我們採用第二種方法。
根據 AWS 的官方教程 建立和共用 Lambda 層,所建立的 pillow 函式庫會出現 cannot import name '_imaging' from 'PIL' 的錯誤訊息,後來看了很多討論後,發現應該是 pillow 套件會用到已經編譯好的函式庫 (cpython) ,以致於會出現這樣的錯誤,解決方法就是直接去官方網站下載套件安裝包,如下圖所示。在 python 套件的官方網站 https://pypi.org/ 中找到 pillow 專案所在,找尋適合的安裝包。比方說,如果你的 Python 版本是 3.8,pillow 版本是 8.3.2,那就可以找 Pillow-8.3.2-cp36-cp36m-manylinux_2_5_x86_64.manylinux1_x86_64.whl 這個檔案下載,manylinux_2_5 只的是它適用於多種版本linux且核心為2.5, x86_64 則是適用的 CPU 類型,切勿以自己電腦的環境來看,因為這是被放在 lambda 的虛擬環境中的,而 lambda 的虛擬環境大多是以 linux 容器為主,當然也有 arm 架構跟 x86 架構,所以要根據建立函式庫層的設定來挑選合適的安裝包。
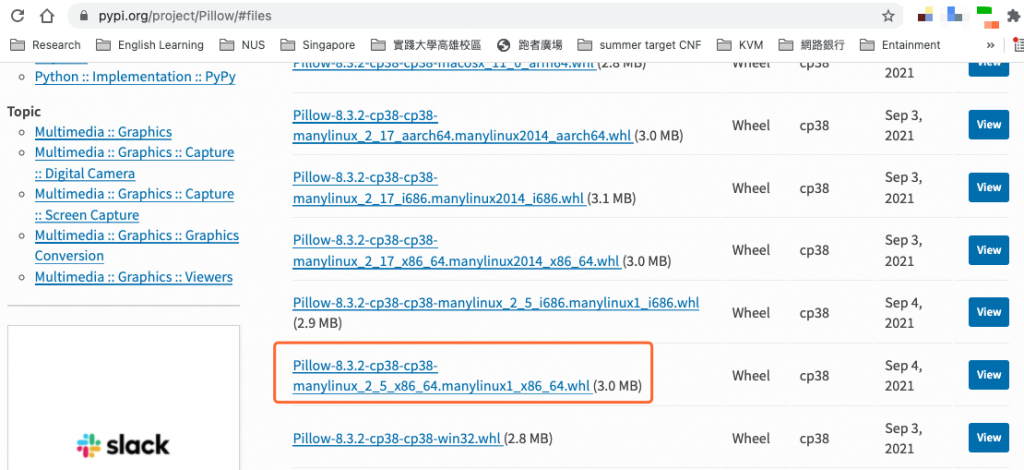
圖 9、至 Python 套件管理官方網站找尋安裝包
下載後直接用 zip 工具解壓縮,會得到 3 個文件夾,將這三個文件夾放在 python 的文件夾中,在進行壓縮即可,如下圖所示。

圖 10、壓縮至 python 文件夾中
進入 AWS Lambda 管理控制台,選擇建立 Layer,輸入 Layer 名稱,並上傳先前建立的壓縮檔,在選擇相容架構 x86_64,而相容的執行時間指的是希望可以在哪些版本的 python 中執行,確定後按下 建立 鍵即完成建立 Layer,如下圖所示。
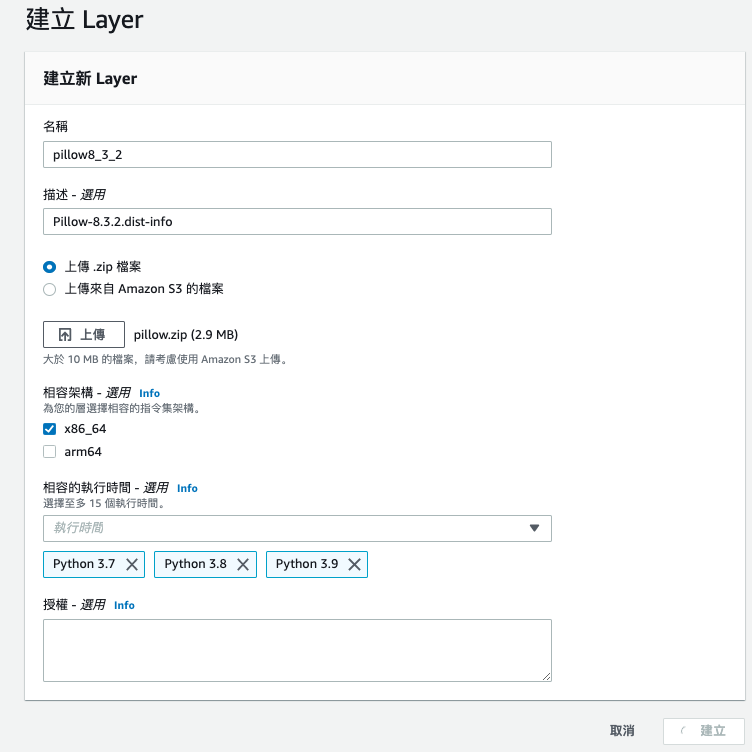
圖 11、建立 Layer 設定畫面
建立 Lambda 函數
進入 AWS Lambda 管理控制台,選擇建立 Lambda 函數,設定內容如下圖所示。
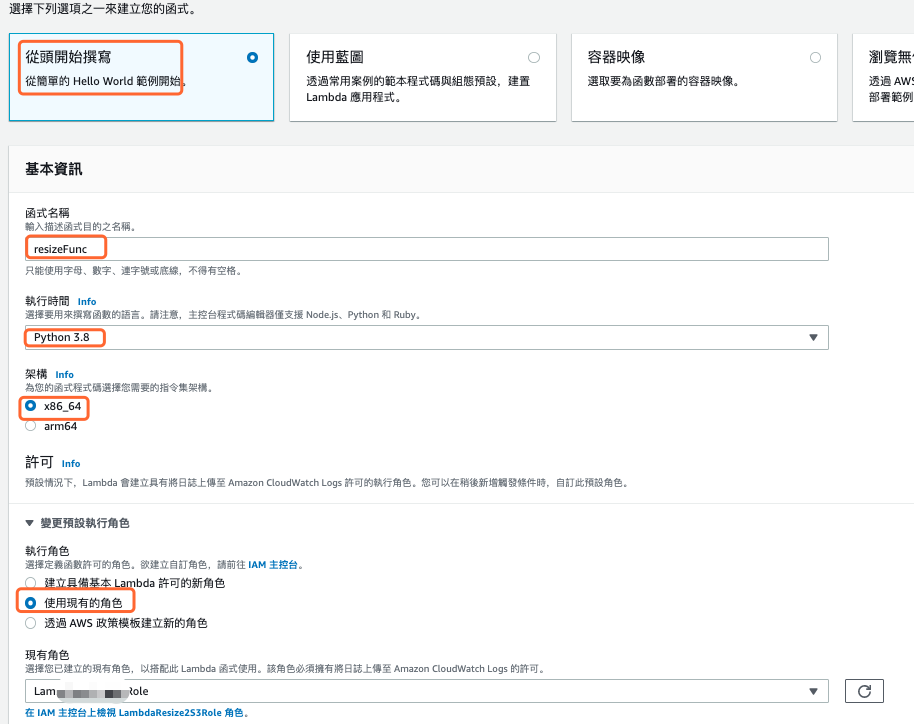
圖 12、建立 Lambda 函數設定畫面
建立 Lambda 函數後,選擇進入 resizeFunc 函數的設定畫面,在畫面的最底端,為本函數新建 Layer,如下圖所示。
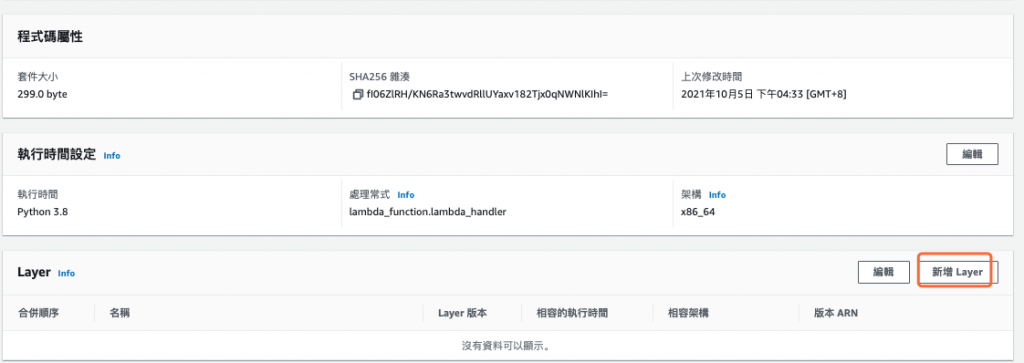
圖 13、為 Lambda 函數新增 Layer
進入新增 Layer 畫面後,選擇層來源為 自訂 Layer,接著選擇先前建立的 pillow8_3_2 函式庫層,如下圖所示。
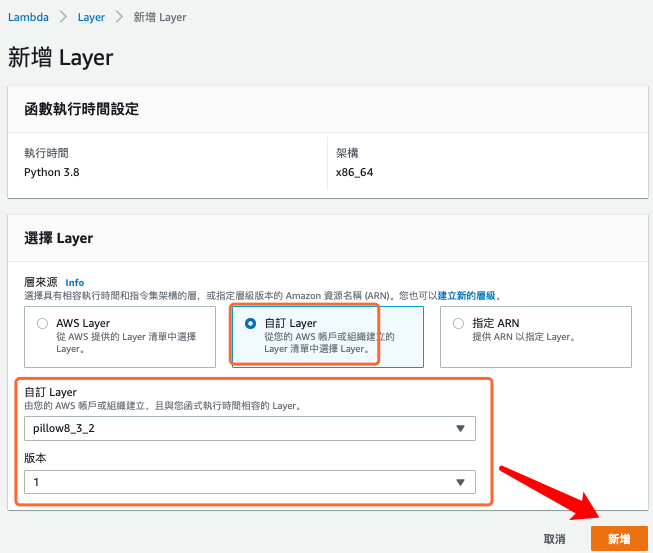
圖 14、選擇 pillow8_3_2 函式庫層
建立新測試事件,事件範本選擇 hello-world,事件名稱輸入 mirror,內容所下圖所示,這是用來模擬當 S3 觸發 Lambda 函數後所傳過來的參數內容,記得將 [INPUT_BUCKET] 改成實際的輸入儲存貯體名稱,而[INPUT_OBJECT]要確保有這個檔案。
{
  "Records": [
    {
      "s3": {
        "bucket": {
          "name": "[INPUT_BUCKET]",
          "arn": "arn:aws:s3:::[INPUT_BUCKET]"
        },
        "object": {
          "key": "[INPUT_OBJECT]"
        }
      }
    }
  ]
}
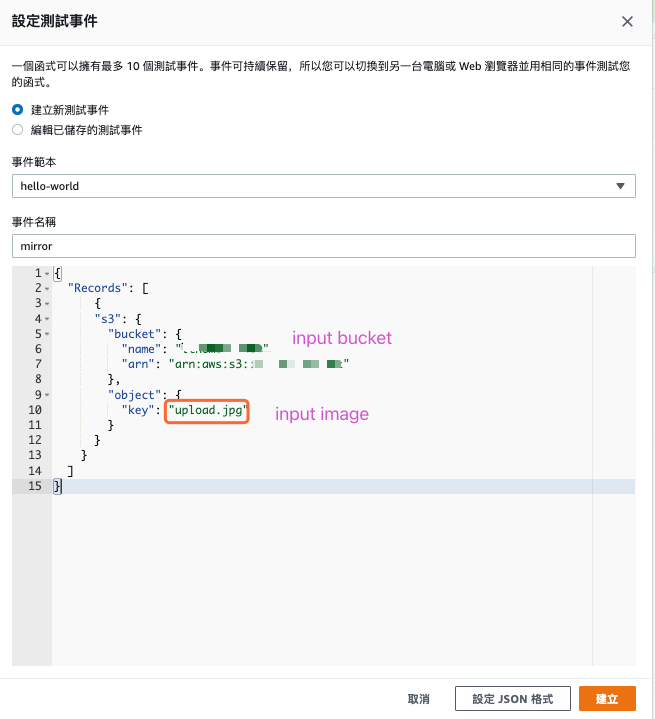
圖 15、設定 Lambda 函數測試事件
而處理完後的鏡像圖片所在的儲存貯體名稱,則是設定在 Lambda 函數組態中的環境變量,變量金鑰為 putbucket ,值是根據自己的實際設定來給定,設定畫面如下所示。

圖 16、設定 Lambda 函數組態中的環境變量
以下為 Lambda 函數的代碼部分,會根據測試事件與環境參數的參數來進行讀取。
lambda_function.py
import boto3
import os
import sys
import uuid
from urllib.parse import unquote_plus
from PIL import Image, ImageOps
import PIL.Image

s3_client = boto3.client('s3')

def mirror_image(image_path, mirror_path):
  with Image.open(image_path) as image:
    im_mirror = ImageOps.mirror(image)
    im_mirror.save(mirror_path)
    print('mirror the image {} to {}'.format(image_path, mirror_path))

def lambda_handler(event, context):
  for record in event['Records']:
	  inputbucket = record['s3']['bucket']['name']
	  outputbucket = os.environ['putbucket']
	  key = unquote_plus(record['s3']['object']['key'])
	  tmpkey = key.replace('/', '')
	  download_path = '/tmp/{}{}'.format(uuid.uuid4(), tmpkey)
	  upload_path = '/tmp/mirror-{}'.format(tmpkey)
	  s3_client.download_file(inputbucket, key, download_path)
	  mirror_image(download_path, upload_path)
	  s3_client.upload_file(upload_path, outputbucket, key,ExtraArgs={'ACL': 'public-read','ContentType':'image/jpeg'})

圖 17、Lambda 函數測試結果
建立 S3 bucket事件通知
進入 S3 管理控制台畫面,選擇儲存貯體 A (上傳時的儲存貯體),選擇 屬性 頁籤,找到 事件通知 這個屬性,點擊 建立事件通知 按鈕來進入建立事件通知畫面,完成以下配置:
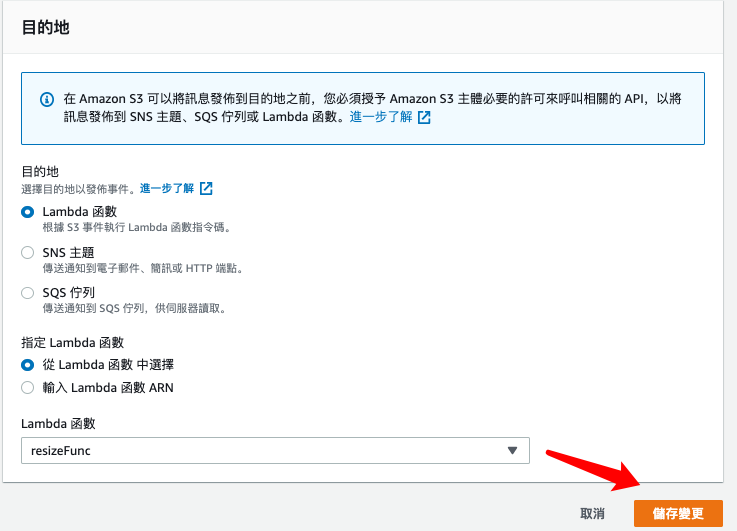
圖 18、建立事件通知設定畫面
進入儲存貯體 A 物件 頁籤畫面,手動上傳一個檔案,測試先前建立的事件通知是否正常運行,如下圖所示。
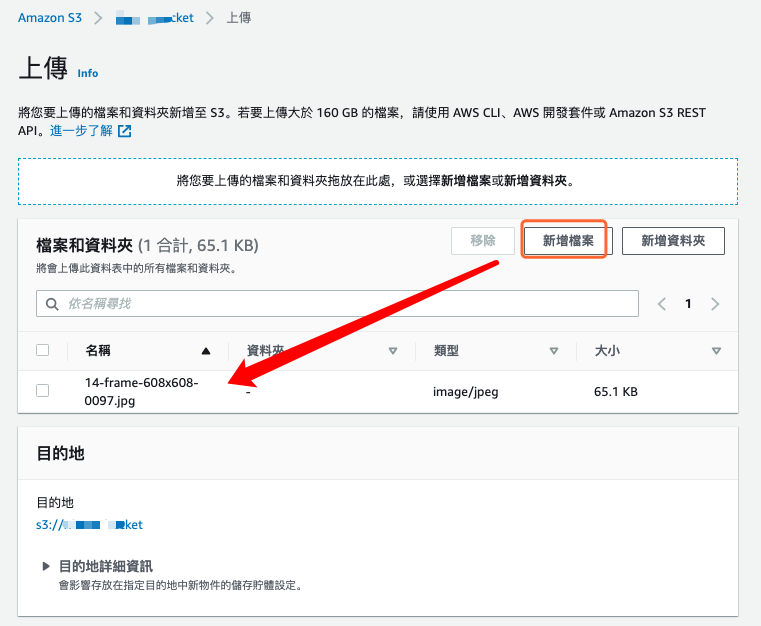
圖 19、手動上傳一個檔案
切換到儲存貯體 B 物件 頁籤畫面,確認鏡像圖片檔案是否寫入,如下圖所示。
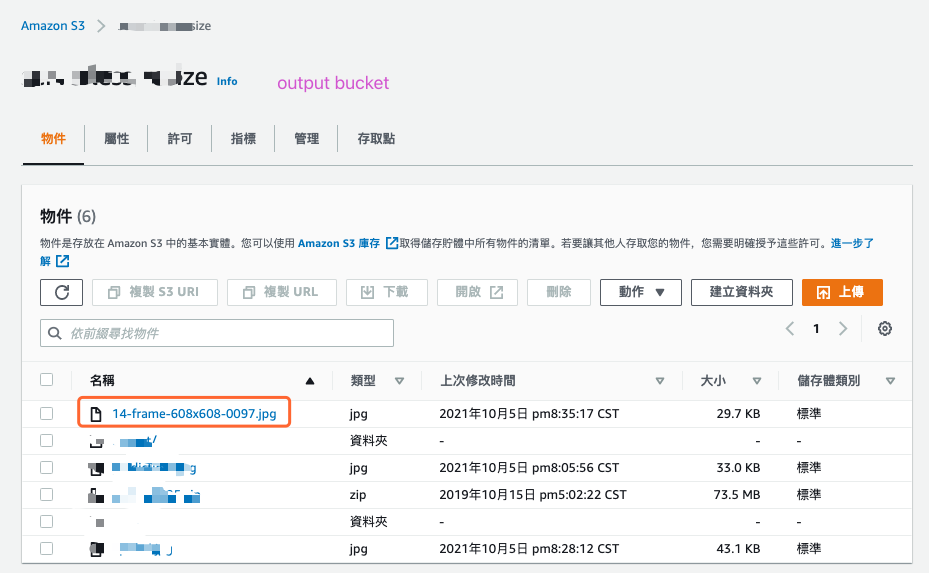
圖 20、確認鏡像圖片檔案是否寫入儲存貯體 B
打開 CloudWatch 管理控制台,找到 CloudWatch 日誌中的 Lambda 函數日誌,檢查是否有運行,結果如下圖所示。
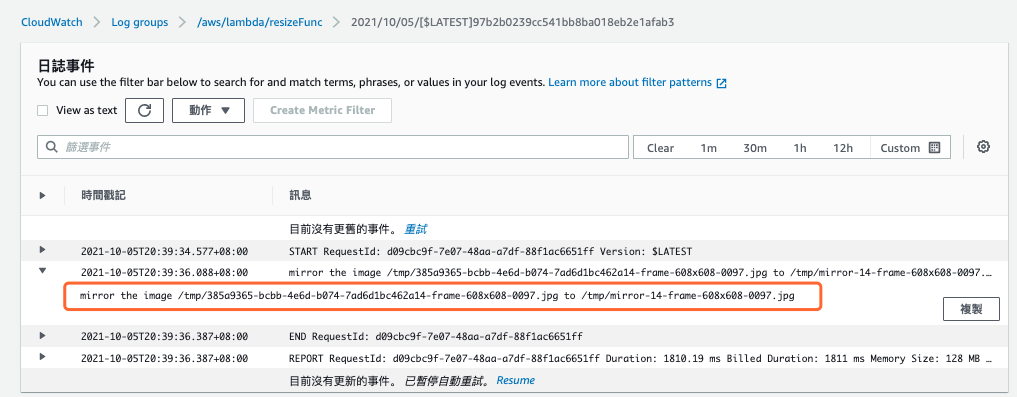
圖 21、檢查 CloudWatch 日誌中的 Lambda 函數日誌
最後就是整合 API Gateway,在本地端撰寫一個網頁,可以上傳本地檔案到儲存貯體 A ,因而觸發 Lambda 函數後,生成一個鏡像圖片,放在儲存貯體 B ,因為鏡像圖片的屬性是公開存取,所以可以直接用網頁的 <img> 標籤讀取,下圖中的下方圖片就是位於儲存貯體 B 的檔案。
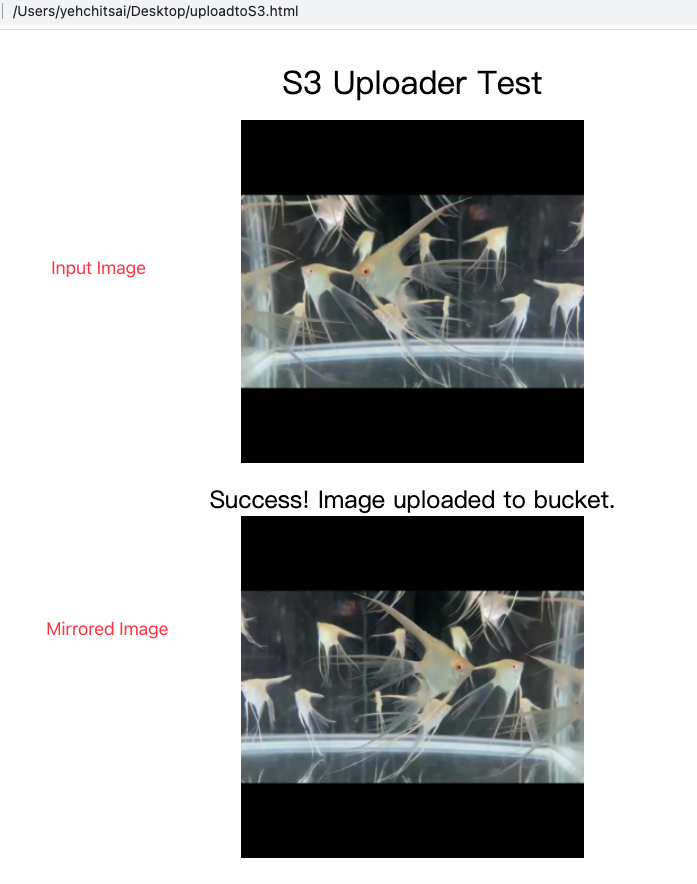
圖 22、呈現鏡像,左右顛倒的圖片
參考網頁程式如下所示。
uploadtoS3.html
<!DOCTYPE html>
<html>
  <head>
  	<meta charset="utf-8"/>
    <title>Upload file to S3</title>
    <script src="https://unpkg.com/vue"></script>
    <script src="https://unpkg.com/axios@0.2.1/dist/axios.min.js"></script>
  </head>
  <body>
    <div id="app">
      <h1>S3 Uploader Test</h1>

      <div v-if="!image">
        <h2>Select an image</h2>
        <input type="file" @change="onFileChange">
      </div>
      <div v-else>
        <img :src="image" />
        <button v-if="!uploadURL" @click="removeImage">Remove image</button>
        <button v-if="!uploadURL" @click="uploadImage">Upload image</button>
      </div>
      <h2 v-if="uploadURL">Success! Image uploaded to bucket.<br/>
      	<img :src="returnImage" />
      </h2>
    </div>

    <script>
      const MAX_IMAGE_SIZE = 10000000

      /* ENTER YOUR ENDPOINT HERE */

      const API_ENDPOINT = '[API_ENDPOINT]' // e.g. https://ab1234ab123.execute-api.us-east-1.amazonaws.com/uploads
      const RET_ENDPOINT = '[RET_ENDPOINT]' // e.g. 'https://bucketb.s3.ap-southeast-1.amazonaws.com/'

      uploadFile=''
      new Vue({
        el: "#app",
        data: {
          image: '',
          uploadURL: '',
          returnImage: ''
        },
        methods: {
          onFileChange (e) {
            let files = e.target.files || e.dataTransfer.files
            if (!files.length) return
            for( attr in files[0])
            	console.log(attr)
            console.log(files[0].name)
            uploadFile = files[0].name
            this.createImage(files[0])
          },
          createImage (file) {
            // var image = new Image()
            let reader = new FileReader()
            reader.onload = (e) => {
              console.log('length: ', e.target.result.includes('data:image/jpeg'))
              if (!e.target.result.includes('data:image/jpeg')) {
                return alert('Wrong file type - JPG only.')
              }
              if (e.target.result.length > MAX_IMAGE_SIZE) {
                return alert('Image is loo large.')
              }
              this.image = e.target.result
            }
            reader.readAsDataURL(file)
          },
          removeImage: function (e) {
            console.log('Remove clicked')
            this.image = ''
          },
          uploadImage: async function (e) {
            console.log('Upload clicked')
            console.log('Uploading: ', uploadFile)
            let binary = atob(this.image.split(',')[1])
            let array = []
            for (var i = 0; i < binary.length; i++) {
              array.push(binary.charCodeAt(i))
            }
            let blobData = new Blob([new Uint8Array(array)], {type: 'image/jpeg'})
            this.uploadURL = API_ENDPOINT + uploadFile
            console.log('Uploading to: ', this.uploadURL)
            const result = await fetch(this.uploadURL, {
              method: 'PUT',
              body: blobData
            })
            console.log('Result: ', result)
            this.returnImage = RET_ENDPOINT + uploadFile
          }
        }
      })
    </script>
    <style type="text/css">
      body {
        background: #20262E;
        padding: 20px;
        font-family: sans-serif;
      }
      #app {
        background: #fff;
        border-radius: 4px;
        padding: 20px;
        transition: all 0.2s;
        text-align: center;
      }
      #logo {
        width: 100px;
      }
      h2 {
        font-weight: bold;
        margin-bottom: 15px;
      }
      h1, h2 {
        font-weight: normal;
        margin-bottom: 15px;
      }
      a {
        color: #42b983;
      }
      img {
        width: 30%;
        margin: auto;
        display: block;
        margin-bottom: 10px;
      }
    </style>
  </body>
</html>
