今天正式進入Canvas的世界了!
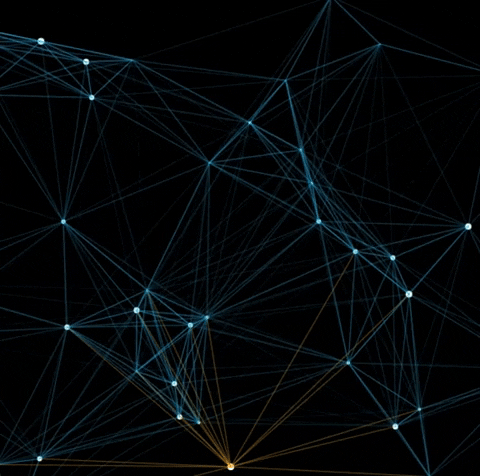
老樣子先看成品:
今天來做點科技感的畫面,橘色是滑鼠的游標,這個是滿常看到的:
但在這之前,想先談一下到底是什麼時候該用SVG,或是Canvas呢?
如果想趕快看code的,就請自行跳過下一環節~
之前在六角的直播上看到P5.js的直播,傳送門
其中講者分享了這一篇日文文章)
講述在製作動畫時, 該選擇 CSS , SVG 還是 Canvas。
我再把作者的概念整理了一下: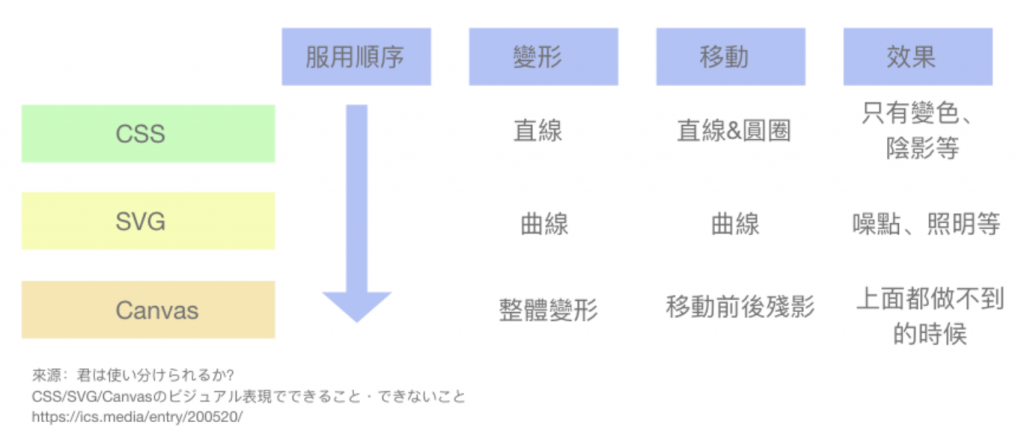
總之就是CSS&SVG都做不到的時候就用Canvas啦 XDD
不過還滿清楚的就是~
CSS就是個直來直往的單腦門傢伙,只能給他直球(直線&圈圈)
SVG是個心思細膩的抖S,所以最適合S曲線
Canvas像是個無所不能的完美情人,可以做到整體的變形~
不過Canvas有個缺點就是不能選DOM
(接受我的全部不然就拉倒)
大家之後做動畫也可以參考下~
JS主要Function和相互關係:
1.點點製造機:構造函數模型做點點!包含以下函式:
- update—>更新座標 讓球球移動,然後呼叫border & draw
- border—>判斷是不是跑超過邊緣了,超過的話讓他換個方向
- draw—>畫球球
2.畫線:讓點跟其他點連在一起!
- 2.1 取得距離
- 2.2 取得rgba 數字,再加上算好的透明度,讓距離越近,線越深
3.開始繪製 init:呼叫點點製造機,然後呼叫4.的重複繪製
4.重複繪製:一直畫點點,重複呼叫自己
- 4.1 畫點點
- 4.2 畫滑鼠的點點
- 滑鼠移動監聽器
來看code吧!
//JS
//這邊都先宣告全域變數
var w, h, loopId, id, canvas, ctx, particles, mouseParticle, color;

const options = {
  mouseColor : 'rgba(255, 165, 0)', //滑鼠的顏色,讓他不一樣
  particleColor: "rgb(255,255,255)",
  lineColor: "rgb(0,181,255)",
  particleAmount: 50, //想要多少點點
  defaultRadius: 2,
  variantRadius: 2,
  defaultSpeed: 1,
  variantSpeed: 1,
  linkRadius: 300,
};

const mouse = {
  x: null,
  y: null,
}

//5. 監聽器
window.addEventListener('mousemove', function(e){
  mouse.x = event.x;
  mouse.y = event.y;
})


//3. 開始繪製
function init(){

	//canvas起手式
  canvas = document.getElementById('canvas');
  ctx = canvas.getContext('2d');
	//讓畫布和視窗一樣寬高
  h = canvas.height = window.innerHeight;
  w = canvas.width = window.innerHeight;

	//點點製造機
  particles = [];
  for(var i = 0; i < options.particleAmount; i++){
    particles.push(new Particle());
  }
  mouseParticle = new Particle(true);
  animationLoop();
}

//4.重複繪製
function animationLoop(){
  ctx.clearRect(0,0,w,h); //要先清除畫布~才畫新的
  drawParticle();
  drawMouseParticle();
  requestAnimationFrame(animationLoop); //一直叫自己
}

//4.1 畫點點
function drawParticle(){
  for (var i = 0; i < particles.length; i++){
    particles[i].update(); //更新位置
    linkPoints(particles[i], particles); //畫線
  }
}

//4.2 畫滑鼠的點點
function drawMouseParticle(){
  mouseParticle.update(true);
  const isMouse = true;
  linkPoints(mouseParticle, particles, isMouse);
}

//2. 畫線
//point就是特定一點,hubs就是全部的點
function linkPoints(point, hubs, isMouse){
  for (var i = 0; i < hubs.length; i ++){
		//計算目前的距離
    var distance = checkDistance(point.x, point.y, hubs[i].x, hubs[i].y);

		//以我們定義好的options.linkRadius為一個評量單位,算出距離的一個介於0~1的衡量單位
		//將透明度定為衡量單位的指標
		//正數-->距離越近,opacity越大,線越明顯。負數-->就不畫線
    var opacity = 1 - distance / options.linkRadius;

    if(opacity > 0){
			//畫線寬度
      ctx.lineWidth = 0.5;

			//將評量單位當成透明度畫線
      ctx.strokeStyle = `rgba(${getRgbNumber(options.lineColor)[0]},${getRgbNumber(options.lineColor)[1]}, ${getRgbNumber(options.lineColor)[2]}, ${opacity})`;

      //如果是滑鼠那一個點的話,就用指定的顏色就好
			if(isMouse) ctx.strokeStyle = options.mouseColor;
      ctx.beginPath();
      ctx.moveTo(point.x, point.y);
      ctx.lineTo(hubs[i].x, hubs[i].y);
      ctx.closePath();
      ctx.stroke();
    }
  }
}

//2.1 判斷距離
function checkDistance(x1, y1, x2, y2){
  //就是找直角三角形的斜邊距離呀
  //pow-->乘冪,這裏做2次方, 找sqrt平方根
  return Math.sqrt(Math.pow(x2 - x1, 2)+ Math.pow(y2 - y1, 2))
}

//2.2. 取得顏色的數字
function getRgbNumber(color){
  //讓裡面的色彩變成陣列
  //正規表達式//是敘述起手式
  //\d --> 吻合數字,寫法等同於 [0-9]
  // + --> 匹配前一字元 1 至多次
  // /g -->全部搜尋回傳全部結果
  return color.match(/\d+/g);
}

// 1. 構造函數模型做點點!
Particle = function(isMouse){
  //多做一個isMouse判斷是不是滑鼠的點
  this.isMouse = isMouse ? isMouse : null;
  this.x = isMouse ? mouse.x : Math.random() * w;
  this.y = isMouse ? mouse.y : Math.random () * h;
  this.color = options.particleColor;
  this.radius = isMouse ? 4 : options.defaultRadius * Math.random() * options.variantRadius;

	//這邊是要前進的方向和速度
  this.speed = options.defaultSpeed* Math.random() * options.variantSpeed;

  //將想要的角度算成弧度才能丟到Math.cos()& Math.sin()裡面算出將要移動的距離
	this.directionAngle = Math.floor(Math.random()*360);

      this.vector = {
        //是要丟弧度進去,2*PI/360*角度
        x : Math.cos(this.directionAngle) * this.speed,
        y : Math.sin(this.directionAngle) * this.speed
      }

  this.update = function(){
    this.border();
    if(this.isMouse){
      this.x = mouse.x;
      this.y = mouse.y;
    }else{
      this.x += this.vector.x;
      this.y += this.vector.y;
    }
    this.draw();
  }

  this.border = function(){
  //超過邊界時往反方向跑
    if(this.x >= w || this.x <= 0){
      this.vector.x *= -1
    }
    if(this.y >= h || this.y <= 0){
      this.vector.y *= -1
    }
  }

  this.draw = function(){
    ctx.beginPath();
    //畫個圓點點~(起始點,結束點,半徑,起始角度,結束角度)
    ctx.arc(this.x, this.y, this.radius , 0, Math.PI * 2);
    ctx.closePath();
    ctx.fillStyle = this.color;
    ctx.fill();
  }
}

init();
要考慮的事情很多,滿複雜的 XD
如果有更簡單的寫法也請讓我知道!
今天的code在這裡
請多多指教!


 iThome鐵人賽