在過去撰寫的程式都是以單頁的形式呈現,
但實際上架的APP多不只一頁,
那要如何從A頁跳至B頁?
這問題就交由今天的主題"跳頁"來學習。
在探討如何跳頁之前,首先必須學會如何建立新頁面。
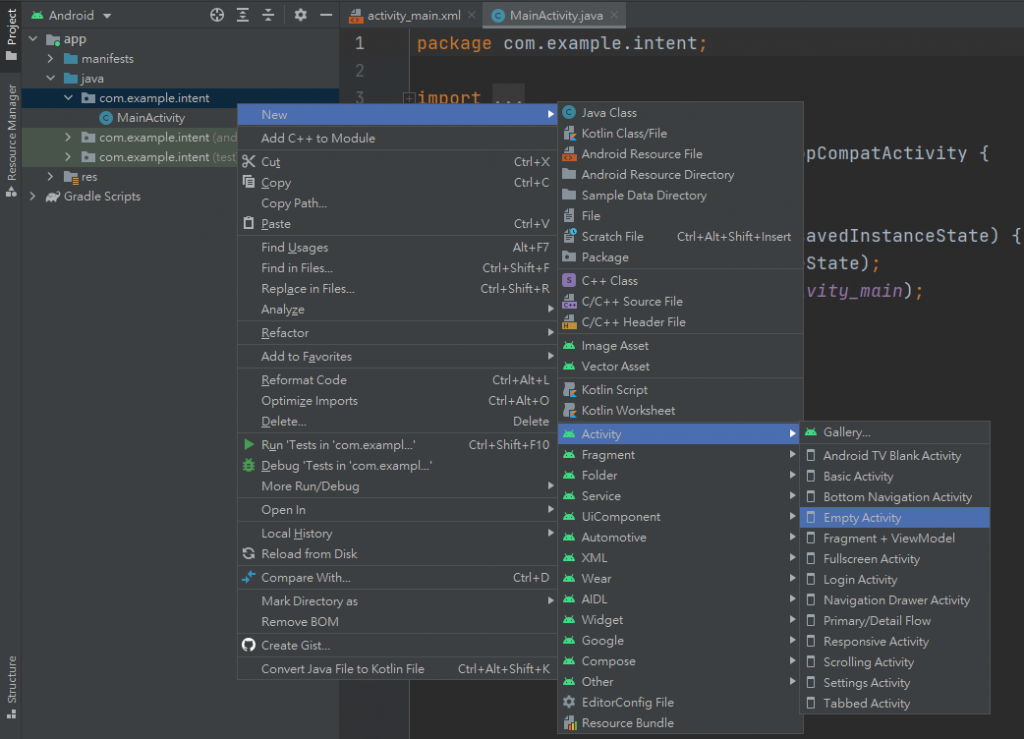
Step1 - 左側Project右鍵 ▶ New ▶ Activity ▶ Empty Activity
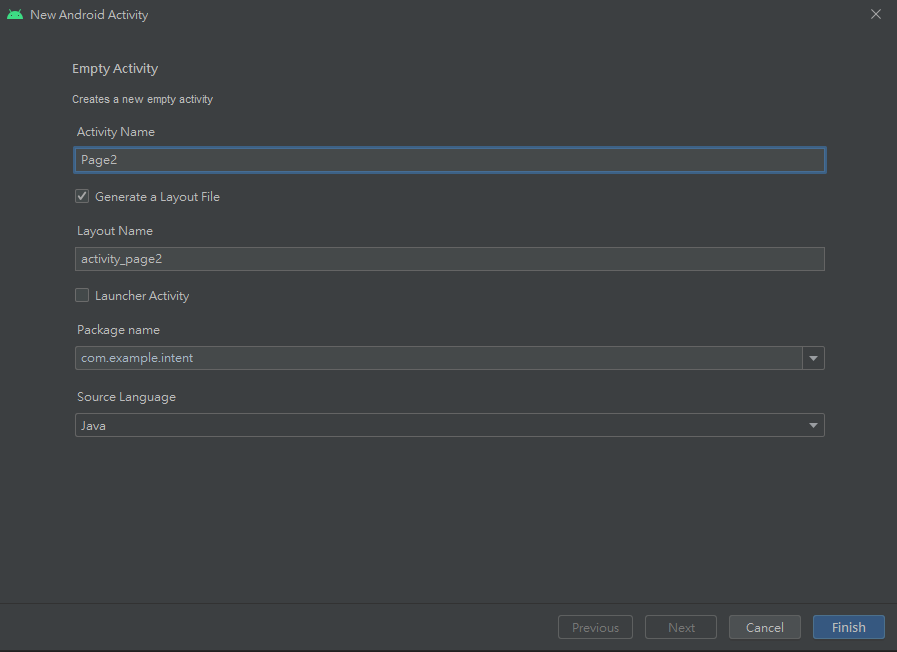
Step2 - 更改Activity Name,本範例改為Page2後按下Finish即建立完成

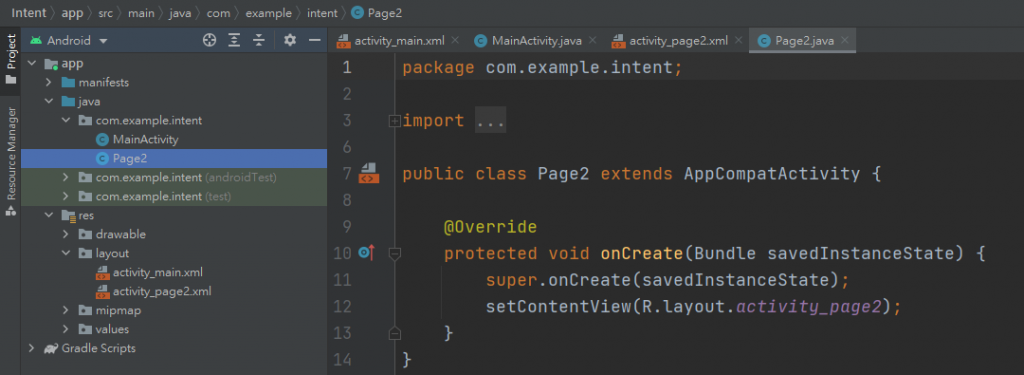
▲ New Activity完成後新增了activity_page2及Page2.java
回到activity_main.xml,我們新增一個負責跳頁的按鈕及TextView顯示Page
<?xml version="1.0" encoding="utf-8"?>
<androidx.constraintlayout.widget.ConstraintLayout xmlns:android="http://schemas.android.com/apk/res/android"
    xmlns:app="http://schemas.android.com/apk/res-auto"
    xmlns:tools="http://schemas.android.com/tools"
    android:layout_width="match_parent"
    android:layout_height="match_parent"
    tools:context=".MainActivity">

    <Button
        android:id="@+id/ToPage2"
        android:layout_width="wrap_content"
        android:layout_height="wrap_content"
        android:text="跳頁"
        android:textSize="25sp"
        app:layout_constraintBottom_toBottomOf="parent"
        app:layout_constraintEnd_toEndOf="parent"
        app:layout_constraintHorizontal_bias="0.498"
        app:layout_constraintStart_toStartOf="parent"
        app:layout_constraintTop_toTopOf="parent" />

    <TextView
        android:layout_width="wrap_content"
        android:layout_height="wrap_content"
        android:layout_marginBottom="100dp"
        android:text="Page1"
        android:textSize="25sp"
        app:layout_constraintBottom_toBottomOf="parent"
        app:layout_constraintEnd_toEndOf="parent"
        app:layout_constraintStart_toStartOf="parent" />

</androidx.constraintlayout.widget.ConstraintLayout>
在activity_page2.xml的部分,同樣新增一個Button與TextView
<?xml version="1.0" encoding="utf-8"?>
<androidx.constraintlayout.widget.ConstraintLayout xmlns:android="http://schemas.android.com/apk/res/android"
    xmlns:app="http://schemas.android.com/apk/res-auto"
    xmlns:tools="http://schemas.android.com/tools"
    android:layout_width="match_parent"
    android:layout_height="match_parent"
    tools:context=".Page2">

    <Button
        android:id="@+id/ToPage1"
        android:layout_width="wrap_content"
        android:layout_height="wrap_content"
        android:text="跳頁"
        android:textSize="25sp"
        app:layout_constraintBottom_toBottomOf="parent"
        app:layout_constraintEnd_toEndOf="parent"
        app:layout_constraintHorizontal_bias="0.498"
        app:layout_constraintStart_toStartOf="parent"
        app:layout_constraintTop_toTopOf="parent" />

    <TextView
        android:layout_width="wrap_content"
        android:layout_height="wrap_content"
        android:layout_marginBottom="100dp"
        android:text="Page2"
        android:textSize="25sp"
        app:layout_constraintBottom_toBottomOf="parent"
        app:layout_constraintEnd_toEndOf="parent"
        app:layout_constraintStart_toStartOf="parent" />

</androidx.constraintlayout.widget.ConstraintLayout>
在Java程式的部分,我們為Button建立觸發事件,
觸發事件的內容為Page1跳至Page2、Page2跳至Page1,
而跳頁的語法如下:
Intent intent = new Intent(此Activity.this, 欲跳至的Activity.class);
startActivity(intent);
加入跳頁後,
MainActivity.java完整的程式碼如下
package com.example.intent;

import androidx.appcompat.app.AppCompatActivity;

import android.content.Intent;
import android.os.Bundle;
import android.view.View;
import android.widget.Button;

public class Page2 extends AppCompatActivity {
    private Button ToPage1;

    @Override
    protected void onCreate(Bundle savedInstanceState) {
        super.onCreate(savedInstanceState);
        setContentView(R.layout.activity_page2);

       ToPage1 = findViewById(R.id.ToPage1);

       ToPage1.setOnClickListener(new View.OnClickListener() {
           @Override
           public void onClick(View v) {
               Intent intent = new Intent(Page2.this, MainActivity.class);
               startActivity(intent);
           }
       });
    }
}
Page2.java完整的程式碼如下
package com.example.intent;

        import androidx.appcompat.app.AppCompatActivity;

        import android.content.Intent;
        import android.os.Bundle;
        import android.view.View;
        import android.widget.Button;

public class Page2 extends AppCompatActivity {
    private Button ToPage1;

    @Override
    protected void onCreate(Bundle savedInstanceState) {
        super.onCreate(savedInstanceState);
        setContentView(R.layout.activity_page2);

        ToPage1 = findViewById(R.id.ToPage1);

        ToPage1.setOnClickListener(new View.OnClickListener() {
            @Override
            public void onClick(View v) {
                Intent intent = new Intent(Page2.this, MainActivity.class);
                startActivity(intent);
            }
        });
    }
}
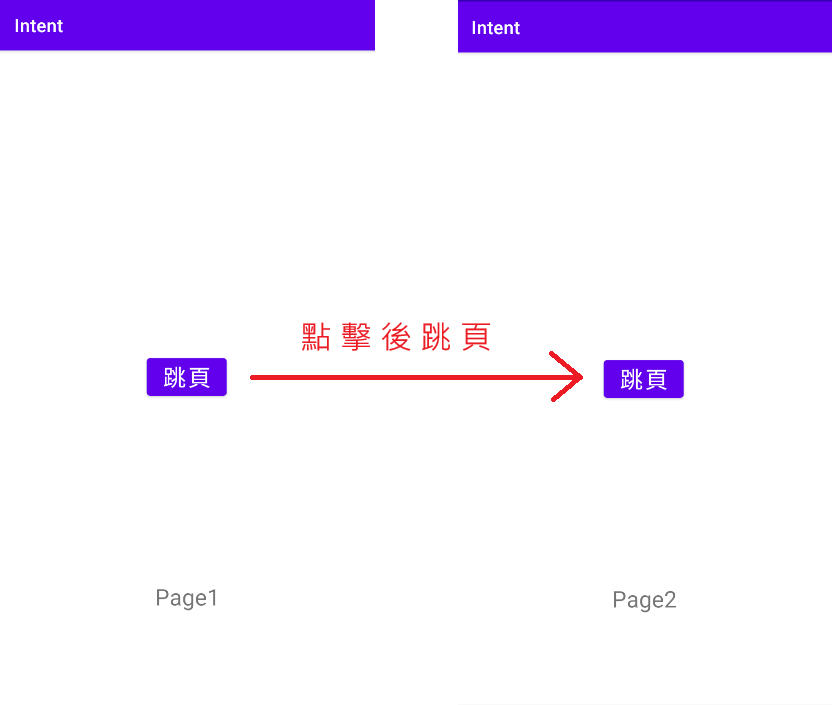
執行後點擊中央的Button,頁面將隨之轉換
