我們這次會為班次頁加上自動更新和順帶為下一篇實作錯誤 banner 做準備。
我們這頁除非顯示不能連接到互聯網這類錯誤外,都不會出現重新載入按鈕,這是因為這頁就應該自動更新。按照 API 的介紹,它是每十秒更新一次。我們先準備一個 constant 來表示這個數值:
import kotlin.time.Duration as KotlinDuration

private val AUTO_REFRESH_INTERVAL = KotlinDuration.seconds(10)
由於我們會用 Kotlin Coroutine 的 delay 來做延時的效果,它是用 Kotlin 的 Duration 作為參數,故此這裏就用 Kotlin 的 Duration。而因為之前我們用了 Java 的 Instant 來表示抵站時間,在換算站時間「X 分鐘」的數字時會用到 Java 的 Duration,為了避免混淆所以我們預先用 import alias 分開兩個 Duration。
我們做自動更新除了考慮用戶一直停留在該頁時能自動更新外,還要考慮 Android 的 lifecycle 問題。如果用戶在班次頁按 Home button 的話,我們應該暫停自動更新;而當用戶由其他 app 切換到該頁的時候就要回復自動更新。Fragment 的話就是要留意 onPause 和 onResume callback,在 onPause 時停止下次再 call API 的排程而在 onResume 重新 call API 一次。但如果用戶很快速地做 onPause 和 onResume 的話那可能會導致 call API 太密。所以我們應該在每次收到 response 時都記錄時間,然後在 onResume 檢查上次的載入的時間來決定要馬上 call API 還是要隔一會才 call API。這樣的話就做一個 data class 記錄那個時間:
private data class TimedValue<out T>(
    val value: T,
    val updatedAt: Instant,
)
然後 etaResult 就變成這樣:
private lateinit var _autoRefreshScope: CoroutineScope
private val autoRefreshScope: CoroutineScope
    get() {
        if (!::_autoRefreshScope.isInitialized || !_autoRefreshScope.isActive) {
            _autoRefreshScope =
                CoroutineScope(
                    viewModelScope.coroutineContext +
                            SupervisorJob(viewModelScope.coroutineContext.job) +
                            CoroutineName("auto-refresh")
                )
        }
        return _autoRefreshScope
    }

private val etaResult: StateFlow<TimedValue<Loadable<EtaResult>>> = combineTransform(
    language,
    line,
    station,
    sortedBy,
    triggerRefresh.receiveAsFlow(),
) { language, line, station, sortedBy, _ ->
    emit(TimedValue(value = Loadable.Loading, updatedAt = clock.instant()))
    emit(
        TimedValue(
            value = Loadable.Loaded(getEta(language, line, station, sortedBy)),
            updatedAt = clock.instant(),
        )
    )
}.onEach {
    autoRefreshScope.launch {
        delay(AUTO_REFRESH_INTERVAL)
        triggerRefresh.send(Unit)
    }
}.stateIn(
    scope = viewModelScope,
    started = SharingStarted.WhileSubscribed(STATE_FLOW_STOP_TIMEOUT_MILLIS),
    initialValue = TimedValue(value = Loadable.Loading, updatedAt = clock.instant()),
)
onEach 是會在 combineTransform 做完後觸發的,然後我們特意為了能取消之前排程好的 delay 就做了一個 CoroutineScope (autoRefreshScope)。因為將會有好幾個地方都會有 delay,如果開 variable 儲存每個 Job 會比較難搞,所以就開了一個專門的 CoroutineScope 來 launch 這些包含 delay 的 coroutine,如果要取消 CoroutineScope 的話都是跟 Job 一樣 call cancel 就可以了。以下就是除了 onEach 以外有關 autoRefreshScope 的地方:
// 當用戶改變排序方式時會令 etaResult 馬上 call 多次 API,所以要把原有的排程清除
private val sortedBy = savedStateHandle.getLiveData(SORT_BY, 0).asFlow()
    .map { GetEtaUseCase.SortBy.values()[it] }
    .onEach { autoRefreshScope.cancel() }

// 當用戶按下錯誤頁的「Try again」按鈕時
fun refresh() {
    autoRefreshScope.cancel()
    autoRefreshScope.launch {
        triggerRefresh.send(Unit)
    }
}

// Fragment.onResume 時
fun startAutoRefresh() {
    autoRefreshScope.launch {
        val delayDuration =
            JavaDuration.between(etaResult.value.currentResult.updatedAt, clock.instant())
        if (delayDuration >= AUTO_REFRESH_INTERVAL.toJavaDuration()) {
            triggerRefresh.send(Unit)
        } else {
            // schedule the next refresh base on the previous loaded time
            delay(delayDuration.toKotlinDuration())
            triggerRefresh.send(Unit)
        }
    }
}

// Fragment.onPause 時
fun stopAutoRefresh() {
    autoRefreshScope.cancel()
}
startAutoRefresh 那個 if 就是看看上次 API response 的時間是不是超過了十秒,如果是就馬上 call API,否則就多等十秒以內的時間來維持十秒間距。留意我們在 etaResult 的 combineTransform 和 startAutoRefresh 都是用 Clock 來取得當前時間。那個 Clock 是經 dependency injection 取得,以便之後可以做 unit testing。以下是對應的 Dagger module:
@Module
@InstallIn(SingletonComponent::class)
object CommonModule {
    @Provides
    fun provideClock(): Clock = Clock.systemDefaultZone()
}
另外,由於我們會在 onResume 觸發更新排程,所以原先在 init block 觸發更新的 code 都可以刪走。同時因應我們包多了一層 TimedValue,所有跟 etaResult 有關的地方都要做對應的修改:
private val loadedEtaResult = etaResult
    .map { it.value }
    .filterIsInstance<Loadable.Loaded<EtaResult>>()
    .map { it.value }
val showLoading: StateFlow<Boolean> = etaResult
    .map { it.value == Loadable.Loading }
    .stateIn(
        scope = viewModelScope,
        started = SharingStarted.WhileSubscribed(STATE_FLOW_STOP_TIMEOUT_MILLIS),
        initialValue = true,
    )
val showError = etaResult
    .map { it.value is Loadable.Loaded && it.value.value is EtaFailResult }
    .stateIn(
        scope = viewModelScope,
        started = SharingStarted.WhileSubscribed(STATE_FLOW_STOP_TIMEOUT_MILLIS),
        initialValue = false,
    )
val showEtaList = etaResult
    .map { it.value is Loadable.Loaded && it.value.value is EtaResult.Success }
    .stateIn(
        scope = viewModelScope,
        started = SharingStarted.WhileSubscribed(STATE_FLOW_STOP_TIMEOUT_MILLIS),
        initialValue = false,
    )

fun viewIncidentDetail() {
    val result = etaResult.value.value
    if (result !is Loadable.Loaded) return
    if (result.value !is EtaResult.Incident) return
    viewModelScope.launch {
        _viewIncidentDetail.send(result.value.url)
    }
}
那我們就試試效果如何。由於我們之前已經為 app 整合了 Flipper,我們就看看效果如何:
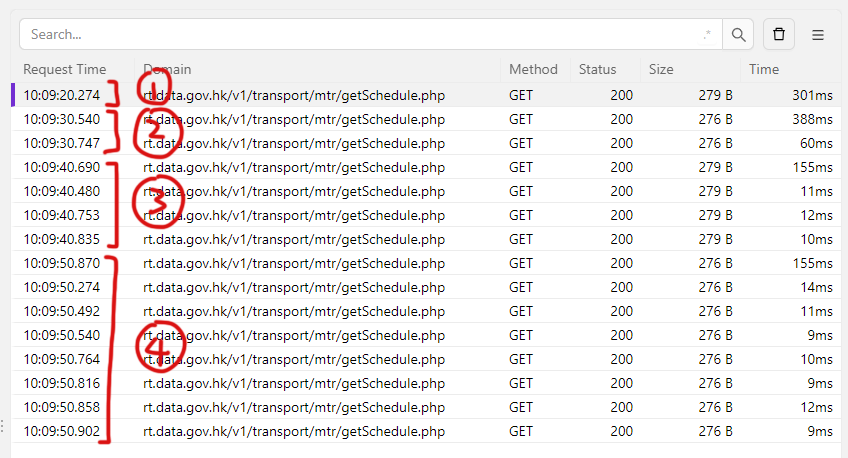
發現不似預期!在第一次 call API 後隔了十秒會變了兩個 API call,再隔十秒會變了四個 API call,再之後變十六個 API call……原來我們沒有為意到 etaResult 的 combineTransform 是先 emit 載入中然後待 API response 來到時 emit 另一個值,所以兩個值各自觸發了 delay 就變了一開二的效果。這樣的話我們要改改寫法:
private val etaResult: StateFlow<TimedValue<Loadable<EtaResult>>> = triggerRefresh
    .consumeAsFlow()
    .flatMapLatest {
        flowOf(
            flowOf(TimedValue(value = Loadable.Loading, updatedAt = clock.instant())),
            combine(
                language,
                line,
                station,
                sortedBy,
            ) { language, line, station, sortedBy ->
                TimedValue(
                    value = Loadable.Loaded(getEta(language, line, station, sortedBy)),
                    updatedAt = clock.instant(),
                )
            }.onEach {
                // schedule the next refresh after loading
                autoRefreshScope.launch {
                    delay(AUTO_REFRESH_INTERVAL)
                    triggerRefresh.send(Unit)
                }
            },
        ).flattenConcat()
    }
    .stateIn(
        scope = viewModelScope,
        started = SharingStarted.WhileSubscribed(STATE_FLOW_STOP_TIMEOUT_MILLIS),
        initialValue = TimedValue(value = Loadable.Loading, updatedAt = Instant.EPOCH),
    )
現在我們不把 triggerRefresh 放入 combineTransform/combine 內,改為以 triggerRefresh 觸發整個 combine。flatMapLatest 就是把 lambda 內的 Flow 轉交去下游。flatMapLatest 內的 Flow 是把兩個 Flow(載入中和 call API 加下次更新排程)接駁為一個 Flow(用 flattenConcat)。因為用了 flattenConcat,所以載入中那個值會比 API response 那個值來得早,正正就是我們想要的效果。
現在我們已經做了定時自動更新的功能了,亦都用了 custom scope 來停止之前的 delay,感覺有點像 RxJava 的 CompositeDisposable。另外亦經 Dagger inject Java Time 的 Clock 獲取當前時間而不是用 System.currentTimeMillis 或者 Calendar.getInstance() 獲取,這個做法是為了方便寫 unit test。至於實際如何寫 unit test 我們會待其餘功能完成後示範。下一篇會完成當成功載入班次後更新出現錯誤時會顯示的 banner,這次的 code 可以到 GitHub repo 找尋「Auto refresh」commit 就會找到。