上篇我們已經完成基本的redux-thunk的安裝,那麼今天我們就來設定一組簡單的資料呈現功能吧!
這邊為了示範常用的作法我會採用 axios 來做資料的串接,當然這部分大家選自己習慣的工具去處理即可,那麼如果和我一樣要使用 axios 的朋友記得安裝套件於你的專案當中。
npm install axios
or
yarn add axios
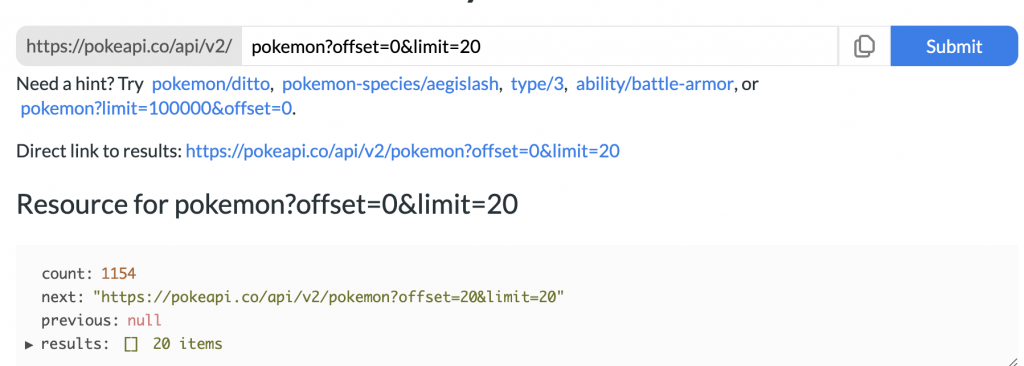
這邊為了方便示範我們就用 pokemon api 來做個簡單的練習吧!
![]()
首先我們可以先到他的網站來看看都有哪些參數可以應用。— 連結在此
試想我們簡單的處理一個列表,功能的話簡單的上下頁,每做一次 call 一次 api,我們會需要用到的參數有 limit 和 offset,分別代表了一次哪多少資料和從第幾個資料開始,那麼他的 response 回傳上一頁和下一頁的 url 與資料本身。
那麼知道他會回傳整串的 url 之後我這邊就不再拆解原本的 url 會嘗試以簡單的形式示範,那麼讓我們回到專案裡,先去定義拿 api 的時候會發生的情況,通常會有以下三種:
那我們就於 action/types.js 的檔案下先行定義這三種情況:
// action types.js
// 省略...
const POKEMON_PENDING = 'POKEMON_PENDING';
const POKEMON_SUCCESSED = 'POKEMON_SUCCESSED';
const POKEMON_FAILED = 'POKEMON_FAILED';

module.exports = {
  // 省略...
  POKEMON_PENDING,
  POKEMON_SUCCESSED,
  POKEMON_FAILED
};
那麼我們接著設定以上三種情況的 action creator,於資料夾內新增 pokemon.js 的檔案,如下:
// action/pokemon.js
const axios = require('axios');
const { POKEMON_PENDING, POKEMON_SUCCESSED, POKEMON_FAILED } = require('./types');

// 這裡為單純修改 boolean 值
const fetchPokeRequest = () => {
  return {
    type: POKEMON_PENDING
  }
}

// 這裡是成功回傳,要將資料存入 initialState
const fetchPokeSuccess = pokemons => {
  return {
    type: POKEMON_SUCCESSED,
    payload: pokemons
  }
}

// 這裡是錯誤訊息的處理
const fetchPokeFailure = error => {
  return {
    type: POKEMON_FAILED,
    payload: error
  }
}

// 這裡作法為將 url 提列出來,因為要方便上下頁使用
const fetchPokemons = (url) => {
  // 對你沒看錯,在redux-thunk安裝之後可以讓你回傳 function 並保留 dispatch 的功能
  // 可以直接在 return function 內做使用。
  return function (dispatch) {
    dispatch(fetchPokeRequest())
    axios
      .get(url)
      .then(response => {
        // 裏面包含上下頁的 url 和 pokemons data
        const pokesData = response.data
        dispatch(fetchPokeSuccess(pokesData))
      })
      .catch(error => {
        // 這裡處理錯誤訊息回傳
        dispatch(fetchPokeFailure(error.message))
      })
  }
}

module.exports = {
  fetchPokeRequest,
  fetchPokeSuccess,
  fetchPokeFailure,
  fetchPokemons
}
接著我們來處理 reducer 的部分,如以下:
// reducer/pokemonReducer
const { POKEMON_PENDING, POKEMON_SUCCESSED, POKEMON_FAILED } = require("../action/types");

const initialState = {
  loading: false,
  data: [],
  error: ''
}

const pokemonReducer = (state = initialState, action) => {
  switch (action.type) {
    case POKEMON_PENDING:
      // loading
      return {
        ...state,
        loading: true
      }
    case POKEMON_SUCCESSED:
			// success
      return {
        loading: false,
        data: action.payload,
        error: ''
      }
    case POKEMON_FAILED:
			// fail
      return {
        loading: false,
        data: [],
        error: action.payload
      }
    default:
      return state;
  }
}

module.exports = { pokemonReducer }
一樣要記得在 reducers 的地方加入剛剛寫好的 reducer:
// reducer/index.js
const { combineReducers } = require("redux");
const { assetsReducer } = require("./assetsReducer");
const { cakeReducer } = require("./cakeReducer");
const { coffeeBeanReducer } = require("./coffeeBeanReducer");
const { coffeeReducer } = require("./coffeeReducer");
const { pokemonReducer } = require("./pokemonReducer");

const reducers = combineReducers({
  coffee: coffeeReducer,
  coffeeBean: coffeeBeanReducer,
  cake: cakeReducer,
  money: assetsReducer,
  pokemon: pokemonReducer
})

module.exports = {
  reducers
}
然後我們回到 index.js 的地方來測試剛剛的 pokemon,我們把剛剛的一些指令先碼掉並加入以下:
// ./index.js
// 省略...
store.dispatch(fetchPokemons(`https://pokeapi.co/api/v2/pokemon?offset=0&limit=20`))
要記得將原本的 unsubscribe() 給碼掉,不然他會清掉動作。
測試成功的話會於終端機得到以下訊息:
initial state {
  coffee: { numOfCoffee: 20 },
  coffeeBean: { numOfCoffeeBean: 20 },
  cake: { numOfCake: 20 },
  money: { assets: 1000 },
  pokemon: { loading: false, data: [], error: '' }
}
更新 {
  coffee: { numOfCoffee: 20 },
  coffeeBean: { numOfCoffeeBean: 20 },
  cake: { numOfCake: 20 },
  money: { assets: 1000 },
  pokemon: { loading: true, data: [], error: '' }
}
更新 {
  coffee: { numOfCoffee: 20 },
  coffeeBean: { numOfCoffeeBean: 20 },
  cake: { numOfCake: 20 },
  money: { assets: 1000 },
  pokemon: {
    loading: false,
    data: {
      count: 1154,
      next: 'https://pokeapi.co/api/v2/pokemon?offset=20&limit=20',
      previous: null,
      results: [Array]
    },
    error: ''
  }
}
至此,我們已經介紹完 redux 的基礎應用了,下一篇我會和大家介紹 redux-toolkit。
這邊附上這個章節完成的範例 source code 。