安安,今天要實作的功能是讓使用者能上傳bootcamp的照片
會用到express-fileupload這個套件,要先下載呦!
一樣在bootcamps controller中,新建bootcampPhotoUpload函式
使用者送出的是DELETE請求,route則是/api/v1/bootcamps/:id/photo
如果輸入的id對應不到bootcamp & 沒有上傳檔案, return error
exports.bootcampPhotoUpload = asyncHandler(async (req, res, next) => {
const bootcamp = await Bootcamp.findById(req.params.id);

if (!bootcamp) {
  return next(new ErrorResponse(`Bootcamp not found with id of ${req.params.id}`, 404));
}

if (!req.files) {
  return next(new ErrorResponse(`Please upload a file`, 400));
}
在開始實作前,先來看看req.files是啥:
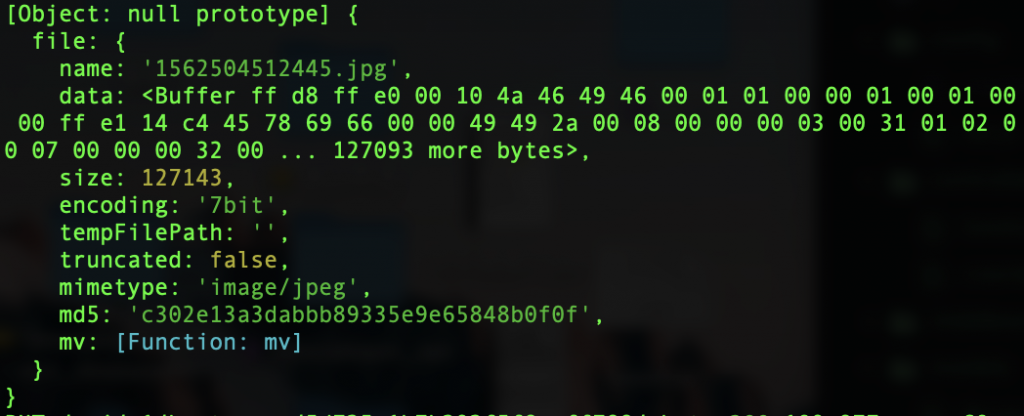
當我上傳一張.jpeg檔案後,印出的req.files為一個物件,裡面包著名為file的物件(名稱可自己定義)
可以看到file物件裡有mimetype這個property,可以用它來驗證上傳的檔案是否為image格式:
if (!file.mimetype.startsWith('image')) {
  return next(new ErrorResponse(`Please upload an image file`, 400));
}
為了避免使用者上傳檔案過大的照片,也可以在config.env中設定檔案的最大限制:
if (file.size > process.env.MAX_FILE_UPLOAD) {
  return next(new ErrorResponse(`Please upload an image less than ${process.env.MAX_FILE_UPLOAD}`, 400));
}
再來,設定file的名稱
這邊利用了path module
file.name = `photo_${bootcamp.id}${path.parse(file.name).ext}`;
最後,為了方便管理,我們要整理使用者上傳的照片至指定的資料夾
file.mv(`${process.env.FILE_UPLOAD_PATH}/${file.name}`, async err => {
  if (err) {
    console.error(err);
    return next(new ErrorResponse(`Problem with file upload`, 500));
  }
  //更新photo欄位的資料
  await Bootcamp.findByIdAndUpdate(req.params.id, { photo: file.name });

  res.status(200).json({
    success: true,
    data: file.name
  });
});
記得到route file require 函式 :)