上一篇 提到 Istio Gateway 作為 Istio 架構下負責導入外部流量的元件,除了有 Kubernetes Ingress 的功能之外,還能與 Service Mesh 的功能相結合,本篇就來實際操作看看,加深各位對 Istio Gateway 的了解。
本文參考 Istio Getting Started,這次需要在 Bookinfo 應用程式安裝 Istio Gateway,將外部流量導入到服務中,若還沒準備好應用程式,請參考 Day10 的教學,將 Istio 及 Bookinfo Application 環境準備完成,接著就可以依照以下步驟建立 Gateway。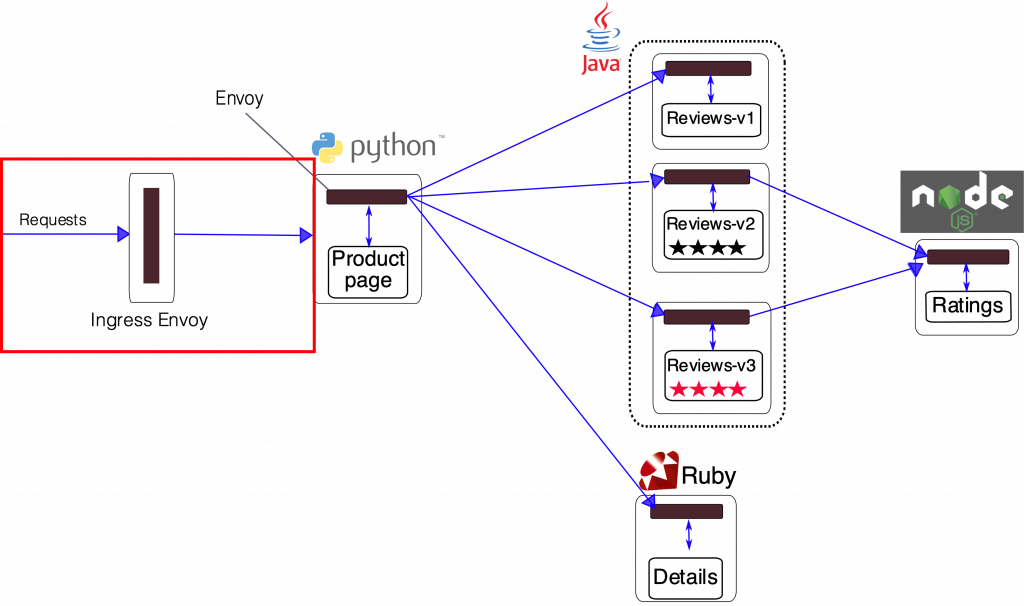
建立 Istio Gateway,將外部流量導入 Productage 微服務
apiVersion: networking.istio.io/v1alpha3
kind: Gateway
metadata:
  name: bookinfo-gateway
spec:
  selector:
    istio: ingressgateway
  servers:
  - port:
      number: 80
      name: http
      protocol: HTTP
    hosts:
    - "ironman2022.istio.com"
spec.selector.istio: ingressgateway
spec.servers.port
spec.servers.host
kubectl apply -f gateway.yaml
kubectl get gateway
(輸出結果)
NAME               AGE
bookinfo-gateway   5m
在 Gateway 設定的只有 Port 及 Domain Name 相關設定,至於要如何 Match 與如何執行 Action,就會在 VirtualService 上做設定。
apiVersion: networking.istio.io/v1alpha3
kind: VirtualService
metadata:
  name: bookinfo
spec:
  hosts:
  - "ironman2022.istio.com"
  gateways:
  - bookinfo-gateway
  http:
  - match:
    - uri:
        exact: /productpage
    - uri:
        prefix: /static
    - uri:
        exact: /login
    - uri:
        exact: /logout
    - uri:
        prefix: /api/v1/products
    route:
    - destination:
        host: productpage
        port:
          number: 9080
spec.hosts
spec.gateways
spec.http.match
spec.http.route
此 Virtual Service 會監聽 bookinfo-gateway 的流量,若進入流量符合 Match 的其中一條規定,就會將流量導入 productage service 的 9080 port
kubectl apply -f virtual-service.yaml
kubectl get virtualService
(輸出結果)
NAME       GATEWAYS               HOSTS                       AGE
bookinfo   ["bookinfo-gateway"]   ["ironman2022.istio.com"]   5m
建立完一組 Gateway 與 VirtualService ,就完成將外部流量轉入內部的準備。
至於要如何連接至服務,需要透過 istio-ingressgateway 的 EXTERNAL-IP。
kubectl -n istio-system get service istio-ingressgateway
(輸出結果)
NAME                 TYPE         CLUSTER-IP    EXTERNAL-IP ...
istio-ingressgateway LoadBalancer 10.111.31.188 <pending>   ...
External-IP 欄位為
Pending狀態,代表還沒有 IP 可以連接
因為我使用的是 Minikube,所以預設是不會分發 IP 給 istio-ingressgateway ,這時就需使用 Minikube Tunnel 讓 istio-ingressgateway 取得 External-IP
minikube tunnel
(輸出結果)
Status:
        machine: minikube
        pid: 1604696
        route: 10.96.0.0/12 -> 192.168.49.2
        minikube: Running
        services: [istio-ingressgateway]
...
需要開著 Terminal 保持 tunnel 功能開啟
kubectl -n istio-system get service istio-ingressgateway
(輸出結果)
NAME                 TYPE         CLUSTER-IP    EXTERNAL-IP    ...
istio-ingressgateway LoadBalancer 10.111.31.188 10.111.31.188  ...
External-IP 欄位有了 IP,可透過此 IP 連接至 Gateway
除了 IP 之外,另外還需要設定好 Domain Name ,讓我們能用 "ironman2022.istio.com" 連接至服務。
sudo vi /etc/hosts
(要修改的內容)
127.0.0.1 localhost
127.0.1.1 myserver
# 在這底下新增 <ingressgateway-ip domain-name>
10.111.31.188 ironman2022.istio.com

# The following lines are desirable for IPv6 capable hosts
...
筆者是在 Linux 環境操作,若是 Windows 用戶,可參考 手動設定網址與 IP 對應的 hosts
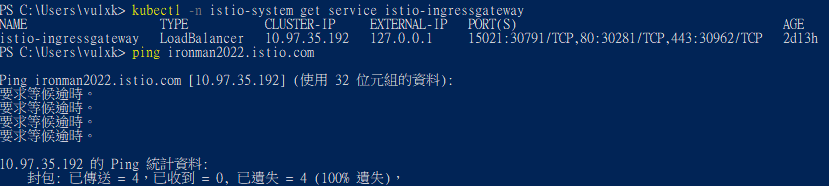
ping ironman2022.istio.com
(輸出結果)
PING ironman2022.istio.com (10.111.31.188) 56(84) bytes of data.
From 192.168.49.2 (192.168.49.2) icmp_seq=2 Redirect Host(New nexthop: 1.49.168.192 (1.49.168.192))
From 192.168.49.2 (192.168.49.2) icmp_seq=3 Redirect Host(New nexthop: 1.49.168.192 (1.49.168.192))
若有看到回應訊息代表成功
curl ironman2022.istio.com/productpage
也可以在瀏覽器輸入
ironman2022.istio.com/productpage連接至服務
(輸出結果)
<!DOCTYPE html>
<html>
  <head>
    <title>Simple Bookstore App</title>
<meta charset="utf-8">
...
...
  </body>
</html>
可以看到回傳 html 檔案,代表我們成功使用 Istio Gateway 暴露服務
看到這裡大家可能會覺得,目前設置的功能與 Ingress 大同小異,那要如何結合 Service Mesh ?其實靠的就是 Virtual Service,我們可以設置各式的路由規則,對流量進行更細緻的管理,這裡要實驗的是針對進入 Productage 外部流量,需要有特定 Header 才能進入。
apiVersion: networking.istio.io/v1alpha3
kind: VirtualService
metadata:
  name: bookinfo
spec:
  hosts:
  - "ironman2022.istio.com"
  gateways:
  - bookinfo-gateway
  http:
  - match:
    - uri:
        exact: /productpage
      headers:
        key:
          exact: ironman
    - uri:
        prefix: /static
    - uri:
        exact: /login
    - uri:
        exact: /logout
    - uri:
        prefix: /api/v1/products
    route:
    - destination:
        host: productpage
        port:
          number: 9080
productpage網站需要 Header 設置key: ironman才能進入
kubectl apply -f <file> 修改 VirtualService 設定kubectl apply -f virtual-service.yaml
kubectl get virtualService
(輸出結果)
NAME       GATEWAYS               HOSTS                       AGE
bookinfo   ["bookinfo-gateway"]   ["ironman2022.istio.com"]   36m
curl -v ironman2022.istio.com/productpage
(輸出結果)
...
* Mark bundle as not supporting multiuse
< HTTP/1.1 404 Not Found
...
沒有 Header ,無法連接至服務
-H,在 Header 中設置 "key: ironman"
curl ironman2022.istio.com/productpage -H "key: ironman"
(輸出結果)
<!DOCTYPE html>
<html>
  <head>
    <title>Simple Bookstore App</title>
<meta charset="utf-8">
...
...
  </body>
</html>
在 Header 設定 "key: ironman" 後,即可成功連線至服務。
您好,我想請教一下,如何讓EXTERNAL-IP和CLUSTER-IP為同樣一組,因為我連不上所以想請教一下.