.gif)

上一篇我們實作城市的定位,但用戶仍必須手動轉動地球。手動轉動地球體驗不是很好,而這對簡報、展示來說是一大傷害。事實上,地球並不僅只是給客戶用而已。它除了當作畫面第一個登場的物件以外,公司業務拿畫面出來賣產品時,你所設計的畫面體驗也留給了客戶第一印象。客戶可能在第一時間就評分了整個產品。
所以說,地球不僅只是好用好看而已,對於商業價值有相當的影響。
回顧原因,它可以應用在很多場景上,例如:行銷網站、企業形象網站、活動網站、全球數位戰情室、航太科技、GIS畫面等等。這些對於前端視覺特效都非常重要。
製作地球也能讓我們釐清貼圖底層的運作模式,不僅討論到底層webGL、fragmentShader、vertexShader的渲染方式,也提到很多種貼圖。
Vector3.lerp()轉動鏡頭位置normalize()、mutiplyScalar() 鎖定鏡頭與地球的高度Math.cos()、Math.pow() 控制鏡頭位移的軌道TextGeometry()建立浮動的3D文字物件%20(1).gif)
這裡也有codepen:
https://codepen.io/umas-sunavan/pen/NWMXYwZ
由於已經留下不少技術債。為了增加閱讀效率,我把部分的程式碼用函式包住:
const skydome = sreateSkydome()
const earth = createEarth()
const cloud = createCloud()
const ring = createRing()
這四個函式將一些變數留在函式作用域,並且減少全域的複雜度。
以下是整理過的程式碼,我們從這裡繼續。當然,如果沒有整理仍然可以繼續向下開發。
直接複製貼上就可以使用了。
import * as THREE from 'three';
import { OrbitControls } from 'https://unpkg.com/three@latest/examples/jsm/controls/OrbitControls.js';

const scene = new THREE.Scene();

const camera = new THREE.PerspectiveCamera(50, window.innerWidth / window.innerHeight, 0.1, 1000);
camera.position.set(0, 10, 15)

const renderer = new THREE.WebGLRenderer({ antialias: true });
renderer.setSize(window.innerWidth, window.innerHeight);
document.body.appendChild(renderer.domElement);

const sreateSkydome = () => {
	// 匯入材質
	// image source: https://www.deviantart.com/kirriaa/art/Free-star-sky-HDRI-spherical-map-719281328
	const skydomeTexture = new THREE.TextureLoader().load('https://storage.googleapis.com/umas_public_assets/michaelBay/free_star_sky_hdri_spherical_map_by_kirriaa_dbw8p0w%20(1).jpg')
	// 帶入材質,設定內外面
	const skydomeMaterial = new THREE.MeshBasicMaterial({ map: skydomeTexture, side: THREE.DoubleSide })
	const skydomeGeometry = new THREE.SphereGeometry(100, 50, 50)
	const skydome = new THREE.Mesh(skydomeGeometry, skydomeMaterial);
	scene.add(skydome);
	return skydome
}

// 新增環境光
const addAmbientLight = () => {
	const light = new THREE.AmbientLight(0xffffff, 0.5)
	scene.add(light)
}

// 新增點光
const addPointLight = () => {
	const pointLight = new THREE.PointLight(0xffffff, 1)
	scene.add(pointLight);
	pointLight.position.set(10, 10, -10)
	pointLight.castShadow = true
	// 新增Helper
	const lightHelper = new THREE.PointLightHelper(pointLight, 5, 0xffff00)
	// scene.add(lightHelper);
	// 更新Helper
	lightHelper.update();
}

// 新增平行光
const addDirectionalLight = () => {
	const directionalLight = new THREE.DirectionalLight(0xffffff, 1)
	directionalLight.position.set(0, 0, 10)
	scene.add(directionalLight);
	directionalLight.castShadow = true
	const d = 10;

	directionalLight.shadow.camera.left = - d;
	directionalLight.shadow.camera.right = d;
	directionalLight.shadow.camera.top = d;
	directionalLight.shadow.camera.bottom = - d;

	// 新增Helper
	const lightHelper = new THREE.DirectionalLightHelper(directionalLight, 5, 0xffff00)
	// scene.add(lightHelper);
	// 更新位置
	directionalLight.target.position.set(0, 0, 0);
	directionalLight.target.updateMatrixWorld();
	// 更新Helper
	lightHelper.update();
}

addPointLight()
addAmbientLight()
addDirectionalLight()

const createEarth = () => {
	const earthGeometry = new THREE.SphereGeometry(5, 600, 600)
	const earthTexture = new THREE.TextureLoader().load('https://storage.googleapis.com/umas_public_assets/michaelBay/day10/8081_earthmap2k.jpg')
	// 灰階高度貼圖
	const displacementTexture = new THREE.TextureLoader().load('https://storage.googleapis.com/umas_public_assets/michaelBay/day10/editedBump.jpg')
	const roughtnessTexture = new THREE.TextureLoader().load('https://storage.googleapis.com/umas_public_assets/michaelBay/day10/8081_earthspec2kReversedLighten.png')
	const speculatMapTexture = new THREE.TextureLoader().load('https://storage.googleapis.com/umas_public_assets/michaelBay/day10/8081_earthspec2k.jpg')
	const bumpTexture = new THREE.TextureLoader().load('https://storage.googleapis.com/umas_public_assets/michaelBay/day10/8081_earthbump2k.jpg')


	const earthMaterial = new THREE.MeshStandardMaterial({
		map: earthTexture,
		side: THREE.DoubleSide,
		roughnessMap: roughtnessTexture,
		roughness: 0.9,
		// 將貼圖貼到材質參數中
		metalnessMap: speculatMapTexture,
		metalness: 1,
		displacementMap: displacementTexture,
		displacementScale: 0.5,
		bumpMap: bumpTexture,
		bumpScale: 0.1,
	})
	const earth = new THREE.Mesh(earthGeometry, earthMaterial);
	scene.add(earth);
	return earth
}

const createCloud = () => {
	const cloudGeometry = new THREE.SphereGeometry(5.4, 60, 60)
	// 匯入材質
	// texture source: http://planetpixelemporium.com/earth8081.html
	const cloudTransparency = new THREE.TextureLoader().load('8081_earthhiresclouds4K.jpg')
	// 帶入材質,設定內外面
	const cloudMaterial = new THREE.MeshStandardMaterial({
		transparent: true,
		opacity: 1,
		alphaMap: cloudTransparency
	})
	const cloud = new THREE.Mesh(cloudGeometry, cloudMaterial);
	scene.add(cloud);
	return cloud
}

const createRing = () => {
	const geo = new THREE.RingGeometry( 0.1, 0.13, 32 );
	const mat = new THREE.MeshBasicMaterial( { color: 0xffff00, side: THREE.DoubleSide } );
	const ring = new THREE.Mesh( geo, mat );
	scene.add( ring );
	return ring
}

const control = new OrbitControls(camera, renderer.domElement);

const cities = [
	{ name: "--- select city ---", id: 0, lat: 0, lon: 0, country: "None" },
	{ name: "Mumbai", id: 1356226629, lat: 19.0758, lon: 72.8775, country: "India" },
	{ name: "Moscow", id: 1643318494, lat: 55.7558, lon: 37.6178, country: "Russia" },
	{ name: "Xiamen", id: 1156212809, lat: 24.4797, lon: 118.0819, country: "China" },
	{ name: "Phnom Penh", id: 1116260534, lat: 11.5696, lon: 104.9210, country: "Cambodia" },
	{ name: "Chicago", id: 1840000494, lat: 41.8373, lon: -87.6862, country: "United States" },
	{ name: "Bridgeport", id: 1840004836, lat: 41.1918, lon: -73.1953, country: "United States" },
	{ name: "Mexico City", id: 1484247881, lat:19.4333, lon: -99.1333 , country: "Mexico" },
	{ name: "Karachi", id: 1586129469, lat:24.8600, lon: 67.0100 , country: "Pakistan" },
	{ name: "London", id: 1826645935, lat:51.5072, lon: -0.1275 , country: "United Kingdom" },
	{ name: "Boston", id: 1840000455, lat:42.3188, lon: -71.0846 , country: "United States" },
	{ name: "Taichung", id: 1158689622, lat:24.1500, lon: 120.6667 , country: "Taiwan" },
]

let lerpTarget
let lerpPropical = new THREE.Vector3(0,0,0)
let tropical

const citySelect = document.getElementsByClassName('citySelect')[0]
citySelect.innerHTML = cities.map( city => `<option value="${city.id}">${city.name}</option>`)
citySelect.addEventListener( 'change', (event) => {
	const cityId = event.target.value
	const seletedCity = cities.find(city => city.id+'' === cityId)
	const cityEciPosition = lonLauToRadian(seletedCity.lon, seletedCity.lat, 4.4)
	ring.position.set(cityEciPosition.x, -cityEciPosition.z, -cityEciPosition.y)
	const center = new THREE.Vector3(0,0,0)
	ring.lookAt(center)
	tropical = 1
	lerpTarget = new THREE.Vector3(0,0,0).set(...ring.position.toArray()).multiplyScalar(3)
	lerpPropical.set(...camera.position.toArray())
	// camera.position.set(...ring.position.toArray()).multiplyScalar(3)
	control.update()
})

const skydome = sreateSkydome()
const earth = createEarth()
const cloud = createCloud()
const ring = createRing()

function animate() {
	requestAnimationFrame(animate);
	renderer.render(scene, camera);
	cloud.rotation.y += 0.0005
	skydome.rotation.y += 0.001
	if (lerpTarget) {
		lerpPropical.lerp(lerpTarget, 0.05).normalize().multiplyScalar(20)
		let value = Math.pow(tropical*2-1, 4.)
		camera.position.set(lerpPropical.x, lerpPropical.y*(value), lerpPropical.z).normalize().multiplyScalar(20)
		control.update()
	}
	tropical*=0.97
}
animate();

// 經緯度轉換成弧度
const lonLauToRadian = (lon, lat, rad) => llaToEcef(Math.PI * (0 - lat) / 180, Math.PI * (lon / 180), 1, rad)
// 城市弧度轉換成世界座標
const llaToEcef = (lat, lon, alt, rad) => {
	let f = 0
	let ls = Math.atan((1 - f) ** 2 * Math.tan(lat))
	let x = rad * Math.cos(ls) * Math.cos(lon) + alt * Math.cos(lat) * Math.cos(lon)
	let y = rad * Math.cos(ls) * Math.sin(lon) + alt * Math.cos(lat) * Math.sin(lon)
	let z = rad * Math.sin(ls) + alt * Math.sin(lat)
	return new THREE.Vector3(x, y, z)
}
設定鏡頭定位在城市位置正上方的外太空即可。
如何取得城市位置正上方的外太空位置?將城市position向量放大三倍即可。(透過multiplyScalar(),就在之前的必備的向量函式時都有提及)
// 用戶更新下拉選單後的回呼
citySelect.addEventListener( 'change', (event) => {
	...
	// 修改鏡頭位置,multiplyScalar可以縮放向量
	camera.position.set(...ring.position.toArray()).multiplyScalar(3)
	// 由OrbitControl幫我們更新鏡頭角度
	control.update()
})
.gif)
可以看到用戶已經可以切換位置了
在討論必備的向量函式時,有提到lerp。現在它派上用場了。如果一個向量使用它,得提供兩個參數:結果參數跟alpha參數,向量將移動alpha倍的距離向結果參數(另一個向量)移動。
所以比方說,我要讓向量(0,0,0)向結果參數(10,10,0)移動0.5倍距離(alpha參數),則結果就是(5,5,0)。再執行一次就變成(7.5, 7.5, 0),再一次就是(0.875, 0.875, 0),以此類推。
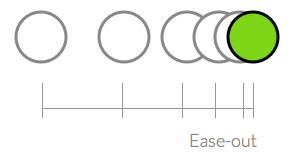
把這個函式放在animate裡面,就可以做出像是Ease-out的動畫效果,連動畫套件都不用裝,讚。
// 作為lerp移動的結果參數
let lerpTarget
citySelect.addEventListener( 'change', (event) => {
	...
	// 當用戶選城市時,更新lerp移動的結果參數
	lerpTarget = new THREE.Vector3(0,0,0)
		// 設定移動結果位置為圖釘位置
		.set(...ring.position.toArray())
		// 乘以三倍,使得位置位在城市正上方的外太空
		.multiplyScalar(3)
	// 不在此直接設定鏡頭位置了
	camera.position.set(...ring.position.toArray()).multiplyScalar(3)
	control.update()
})
接著,我們在animate()加上函式,使得鏡頭不斷的位移,實現動畫:
function animate() {
	...
	// 用戶有選取城市才會執行下面
	if (lerpTarget) {
		// 鏡頭位置向城市上方的外太空移動
		camera.position.lerp(lerpTarget, 0.05)
		// 使得OrbitControl不斷幫我們更新鏡頭
		control.update()
	}
}
接著就能做出效果:
.gif)
畫面看起來非常好,但事情還沒有結束。
你玩一玩會發現,怎麼怪怪的?
.gif)
你會發現,鏡頭移動的路徑是直線的。
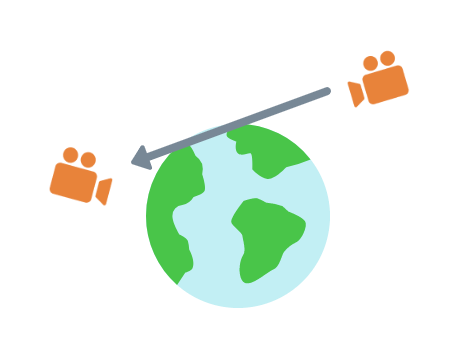
我們需要把路徑改成曲線。
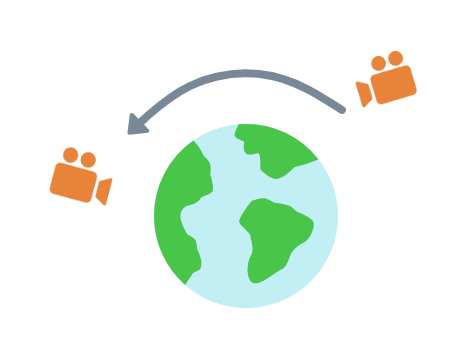
為什麼會產生這個問題?
鏡頭在位移時,其位置距離地球的遠近不一樣。當鏡頭在起點跟終點時,鏡頭距離地球的距離一致,然而在位移的過程中,其距離地球過近。
而解決方法,就是在鏡頭移動的過程中,持續固定鏡頭對地球的距離。固定距離的方法有很多種,而我的作法有三個步驟:
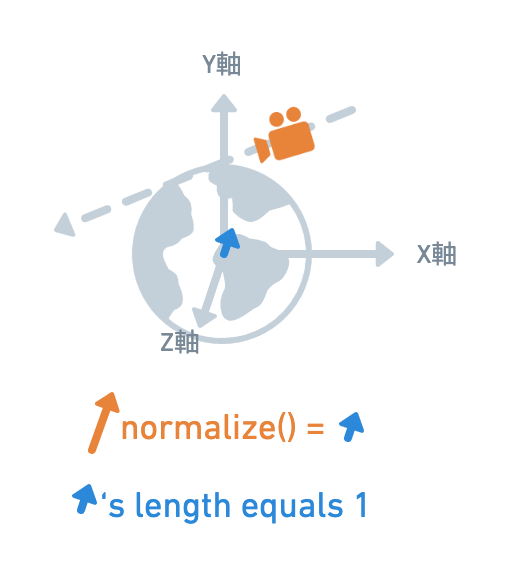
我們看圖理解:
步驟一:一開始離世界中心距離假設為20。(世界中心也是地球中心)
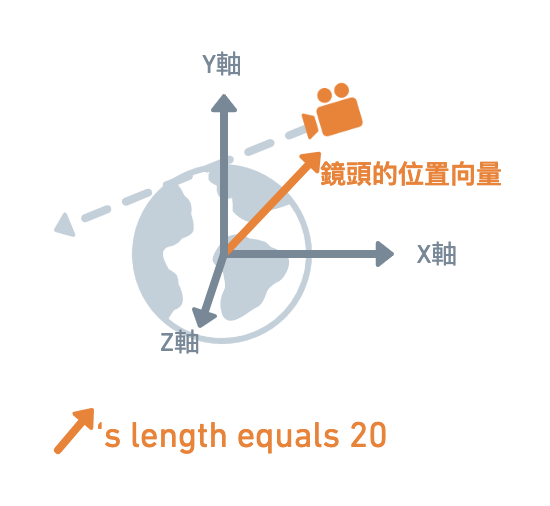
步驟二:現在將該向量縮小到長度為1,但方向不變。這個可以透過Vector3.normalize()完成
步驟三:一開始我們知道長度為20,所以只要再乘上20即可。
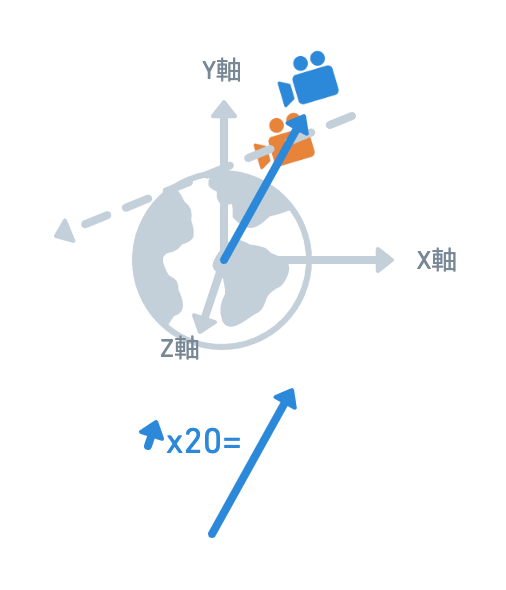
如果每一幀鏡頭移動時都做同樣的事情,那麼就可以形成一個完美的弧度

Vector3.normalize()可以把向量轉成單位向量,以此固定距離成一單位;Vector3.multiplyScalar()則能夠縮放向量到正確的距離。有這兩個函式,就可以開始把邏輯寫在程式了。
這兩個都在我們介紹必備的向量函式時都有提及,可以參考:Day7: three.js的一方通行:矢量操作——全面釐清向量與底層特性
套用在我們專案,就是:
- camera.position.lerp(lerpTarget, 0.1)
+ // 固定長度為一單位,然後放大長度
+ camera.position.lerp(lerpTarget, 0.1).normalize().multiplyScalar(15)
結果就自然多了:
.gif)
OrbitControl自動轉正的特性以及解法當鏡頭靠近北極時,會有奇怪的旋轉。
.gif)
為什麼會有奇怪的旋轉?
這跟OrbitControl的特性有關。OrbitControl 一個很大的特性在Day6: three.js 圓弧的藝術家!弧線的教授!——軌道控制器有提到:當用戶把鏡頭繞過最頂端之後,OrbitControls會自動校正頭頂方向。
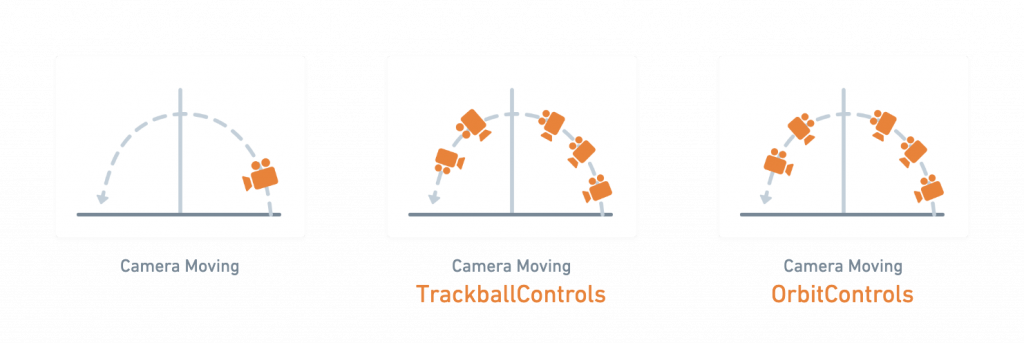
也是因為這個特性,讓鏡頭在繞過北極的時候,有不自然的旋轉。
為了解決這個方法,我加上了一個函式,來讓鏡頭沿著赤道旋轉,避免這個問題。
因為鏡頭往北極時都要轉正,為了避免這個問題,我改從赤道旋轉鏡頭。但要如何開發呢?
目前為止,我們有lerpTarget,它每一幀都移動一個距離,並讓鏡頭綁定給它lerpTarget 。

現在,我們多出一個變數,先頂替camera的路徑移動,我們稱這個變數作moveAlongTropical好了。我們接著修改moveAlongTropical 的數值,使得它沿著赤道移動,再綁定移動軌跡給鏡頭。

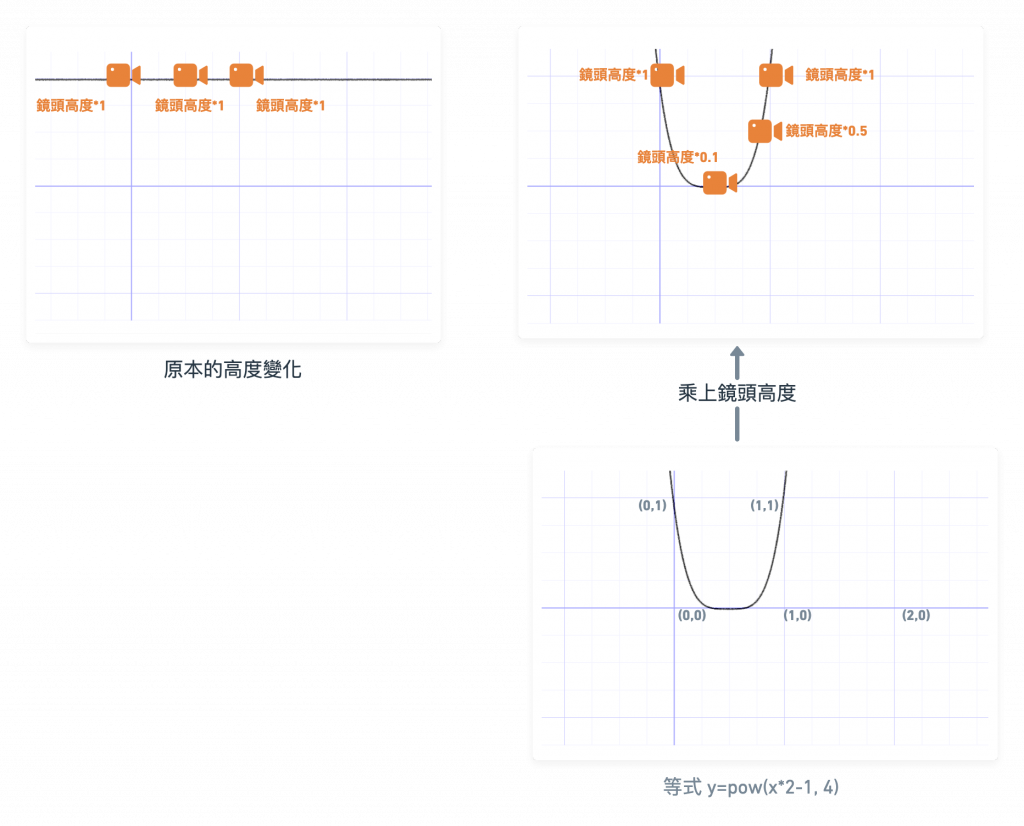
要如何修改moveAlongTropical 的數值來讓鏡頭沿著赤道移動?從下圖可見紅字,假設紅字代表是一個變數,它將lerpTargt的Y軸數值乘成比較小的數值,就可以改變鏡頭的位置了。

如圖中紅字那樣,只要lerpTarget座標中的高度Y乘上一個變數,即可將鏡頭偏向赤道移動。我將該變數命名為moveVolume,待會解釋。
在程式碼實作是這樣:
let lerpTarget
// 加上兩個變數
let moveAlongTropical = new THREE.Vector3(0,0,0)
// moveAlongTropical的移動進度
let moveProgress
在此我們宣告兩個變數。當用戶點選新的城市,設moveProgress為1,將由1走到0,做為moveAlongTropical移動的進度。
citySelect.addEventListener( 'change', (event) => {
	...
	// 給定moveAlongTropical於移動的起點
	moveAlongTropical.set(...camera.position.toArray())
	// pregress將由1走到0,控制稍候的變數「moveVolume」以做變化
	moveProgress = 1
})
每一幀,moveAlongTropical都會頂替鏡頭原先的位置。moveVolume使得鏡頭的Y座標保持在赤道。
moveVolume為什麼能使鏡頭在赤道?因為moveVolume範圍是1~0,它乘給了Y,導致Y值減少了,也因此使得鏡頭靠近赤道。
function animate() {
	...
	// 建立一個函式,使得鏡頭的航向可以往赤道移動
	let moveVolume = Math.pow(moveProgress*2-1, 4.)
	// 用戶有選取城市才會執行下面
	if (lerpTarget) {
		// 綁定數值給moveAlongTropical
		moveAlongTropical.lerp(lerpTarget, 0.05).normalize().multiplyScalar(15)
		// 現在,將camera位置綁定到moveAlongTropical上。其中由於moveVolume範圍是1~0,其減少了Y值的輸出
		camera.position.set(moveAlongTropical.x, moveAlongTropical.y*moveVolume, moveAlongTropical.z).normalize().multiplyScalar(20)
		// 使得OrbitControl不斷幫我們更新鏡頭
		control.update()
	}
	// 不斷更新progress,使得moveVolume不斷更新數值
	moveProgress*=0.97
}
如此一來,地球就可以沿著赤道移動,解決鏡頭繞過北極時的問題了。
.gif)
有兩種開發方式,一種是將文字當作一個Mesh,一種是將文字當作是一個html DOM,這兩種都可以。前者提供多元的文字渲染,後者提供用戶複製文字並作後續操作。我介紹前者為主。
首先加上一個函式以新增文字Mesh。身為一個Mesh,它就跟前幾篇介紹的物件一樣,需要形狀(geometry)跟材質(material),文字可用TextGeometry。只是textGeometry的參數較多。儘管如此,這些參數仍然很好理解。
const addText = text => {
	const textGeometry = new TextGeometry( text, {
		font: font,
		size: 0.2,
		height: 0.01,
		curveSegments: 2,
		bevelEnabled: false,
		bevelThickness: 10,
		bevelSize: 0,
		bevelOffset: 0,
		bevelSegments: 1
	} );
	const textMaterial = new THREE.MeshBasicMaterial({color: 0xffff00})
	const textMesh = new THREE.Mesh(textGeometry, textMaterial)
	scene.add(textMesh)
	return textMesh
}
// 初始化物件
let text = addText('')
接著,每當用戶選擇城市時,就更新文字Mesh,如下:
citySelect.addEventListener( 'change', (event) => {
	// 移除上一個城市的文字mesh
	text.removeFromParent()
	// 新增文字mesh
	text = addText(seletedCity.name)
	// 設定文字位置於圖釘上
	text.position.set(ring.position.toArray())
})
你會看到文字的方向怪怪的,這是因為它面向的方向並不是鏡頭。
.gif)
我們只要文字面向鏡頭即可。
function animate() {
	...
	text.lookAt(...camera.position.toArray())
}
修完之後,我們由圖可見文字擋到圖釘了。
.gif)
這個時候只要應用我們在Day3: Three.js空間座標!讓世界繞著我旋轉!討論到的translate()即可。我更新了文字的位置,使得文字不會遮住圖釘:
// 0.2是我們在建立TextGeometry時的文字寬度
textMesh.geometry.translate(text.length*-0.2,0.2,0)
.gif)
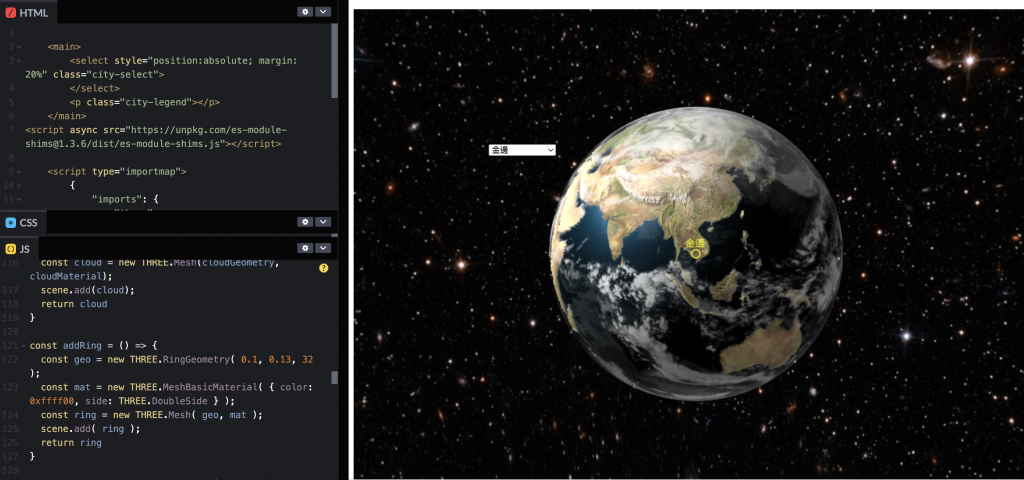
https://codepen.io/umas-sunavan/pen/RwyQGZm
以上就是透過3D地球特效開發所做的成果。歷經三篇實戰跟一篇原理,我們已經吸收了非常非常多東西,而且多數的技術,都從過去文章介紹的原理疊加而來。
經過這四篇,我們學到的東西包含:
事實上,我們只做到冰山一角,地球能做的功能真的太多了,沒辦法在預計的篇幅中介紹完。地球能做到的包含:
Vector3.project/ Vector3.unproject)CylinderGeometry)Vector3.Lerp, Curve)諸如此類,這些都能由你發揮。如果有興趣,都可以複製我Codepen的程式碼來玩!
接下來我將以3D圓餅圖為示例,從中介紹線段、曲線、轉成Mesh、製作3D,其過程也將相當有趣。
