延續上一篇文章,當CI pipeline執行結束後,模型會被下載到【pipeline published artifact區域】。接下來,就把【pipeline published artifact區域】產生新的模型檔案,做為「觸發CD pipeline的條件」。本次練習CD pipeline的目的是在將機器學習模型部署成endpoint。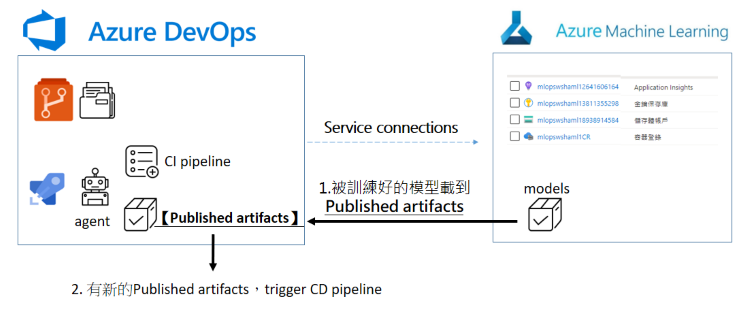
本篇文章結構:
1.概念說明
2.建立agent的任務
3.設定觸發條件
4.試跑第一部分CD pipeline
CI pipeline文章:
【Azure MLOps - 1】使用Azure DevOps建立AML pipelines
【Azure MLOps - 2】使用Azure DevOps建立專案與連線設定
【Azure MLOps - 3】使用Azure DevOps建立訓練模型的CI pipeline(上)
【Azure MLOps - 4】使用Azure DevOps建立訓練模型的CI pipeline(下)
【Azure MLOps - 5】執行Azure DevOps CI pipeline
先來思考一下資料科學家使用Azure Machine Learning部署模型時(示意圖如下),會點選deploy,透過一些必要的設定,把模型部署成web service。部署後,提供模型的使用者api「輸入特徵值」,產出模型預測結果,例如預測機率值。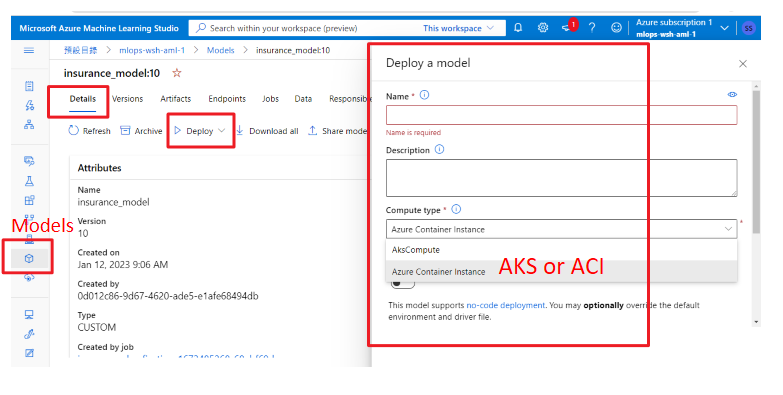
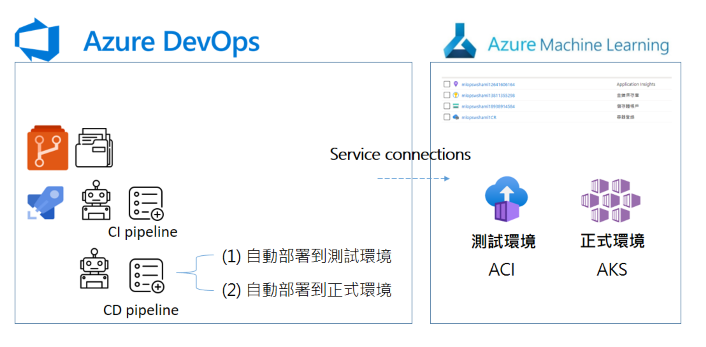
在這次的練習情境中,在模型部署時,會分成測試環境(staging area)與正式環境(production area),把模型部署成real-time endpoint,也可以依照你的需求部署成batch endpoint。只有當測試環境(staging area)模型部署結束,才會考慮是否要把模型部署到正式環境(production area)。
考慮的面向很多,很可能是開發團隊想要觀察模型表現一陣子,確認新模型的預測結果是否比舊版模型好(每個模型的允許放行的條件不同)。
所以在CD pipeline中,會有兩個部分:
(1)模型自動部署到測試環境(staging area)
(2)模型自動部署到正式環境(production area)
而這兩個部分中間,並不會直接觸發,中間會卡一個核准的關卡。
如果是在測試環境(staging area)模型吃的運算資源,設定為Azure compute instance(ACI);如果是正式環境(production area),模型服務最好是部署到AzureAKS。可參考在 Azure Machine Learning 上建立運算資源
因為要產生一條新的CD pipeline,到Azure DevOps點選pipeline下的release,點選new pipeline: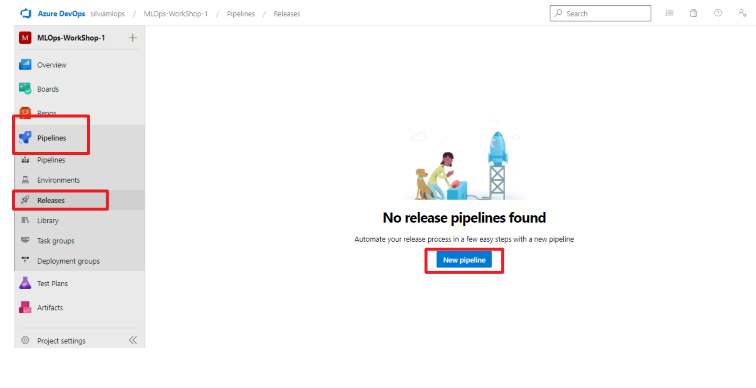
選擇empty job: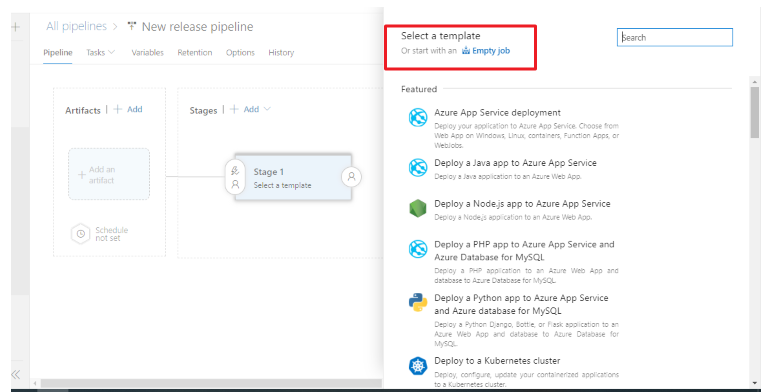
點選「1 job,0 task」:
接下來就會到熟悉的畫面,把這個部分稱作Deploy to staging: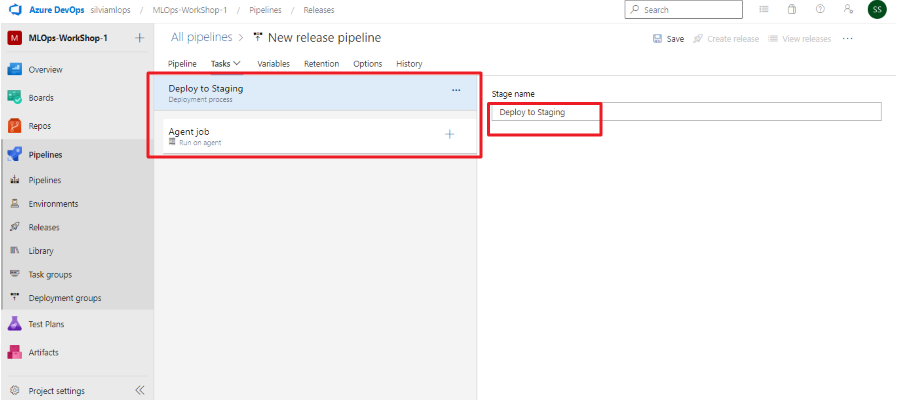
和CI pipeline一樣,選擇agent的系統和版本,我這裡還是選擇ubuntu-18.04: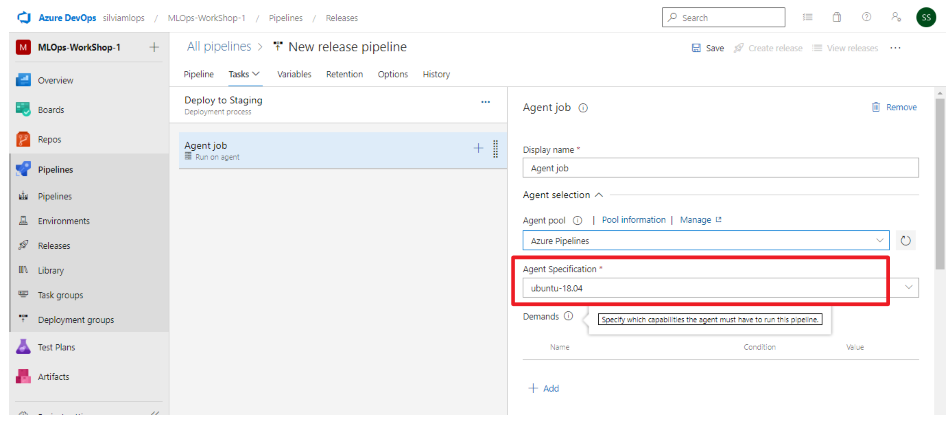
備註:因為在建立CI pipeline的時候已經解說過很多概念,所以CD pipeline會很快速的帶過。如果還不知道agent是什麼,也不知道什麼是Azure Machine Learning CLI extension (機器學習延伸模組),建議回頭從頭複習一下。
由於後續會在agent裡面測試部署的api是否可以呼叫並預測,而測試使用的程式碼是staging_test.py (位在【pipeline published artifact區域】)如下圖,所以我們需要指定agent python版本。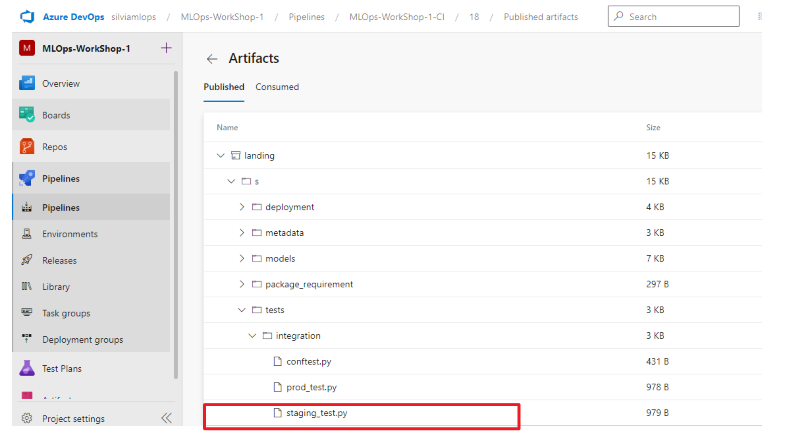
點擊agent旁邊的+,搜尋python,加入use python任務,指定python版本: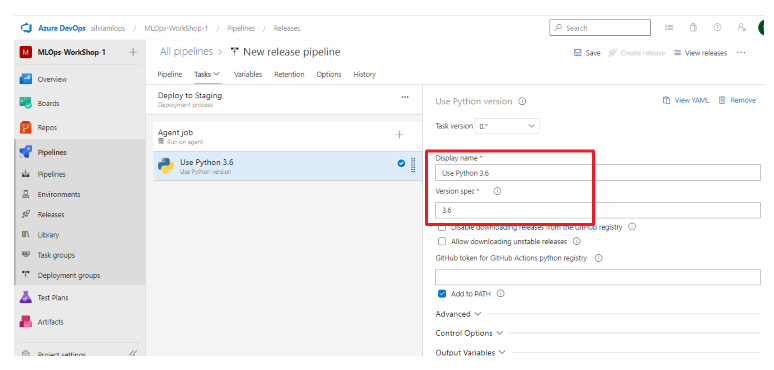
與CI pipeline相同,需要再agent安裝az ml extension,才有辦法使用指令對Azure Machine Learning各種操作。所以點擊agent旁邊的+,搜尋Azure CLI,加入任務: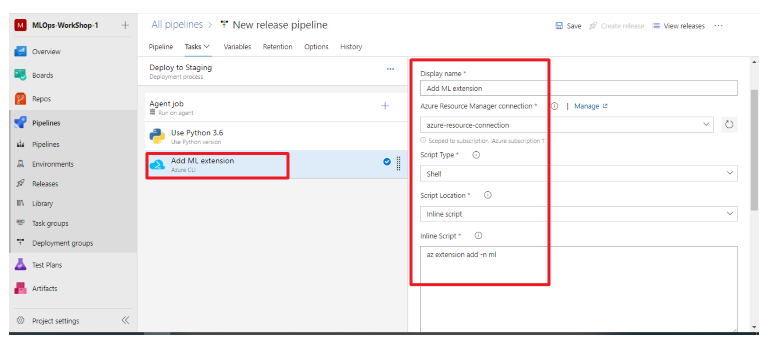
在inline script當中寫入指令:
az extension add -n azure-cli-ml
接下來我們希望模型部署到container上,下一個任務 Deploy to Azure contrainer instance (ACI)。
因為要使用az ml cli指令部署模型,點擊agent旁邊的+,搜尋Azure CLI,加入任務,命名為Deploy to ACI: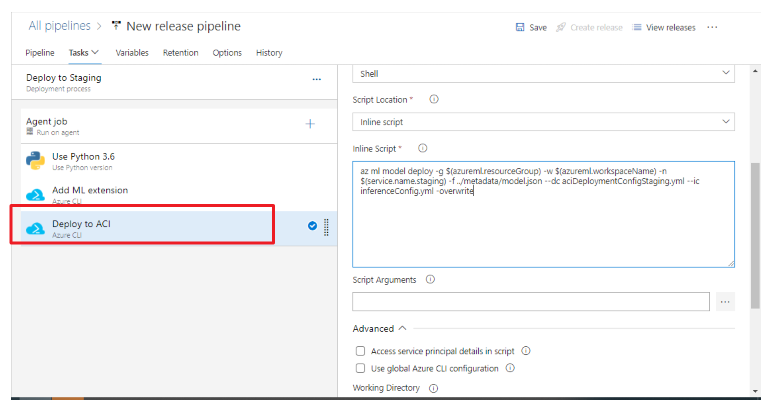
使用指令:az ml model deploy進行部署,指令的詳細參數可參閱官方說明:
az ml model deploy -g $(azureml.resourceGroup) -w $(azureml.workspaceName) -n $(service.name.staging) -f ../metadata/model.json --dc aciDeploymentConfigStaging.yml --ic inferenceConfig.yml --overwrite
提醒大家使用Azure Machine Learning部署,需要以下兩個要素,
(1)model
(2)Inferencing and deployment configuration (Compute target+Environment+Scoring scripts)
model很簡單理解,就是model.pkl(如示意圖),我們也已經複製到【pipeline published artifact區域】。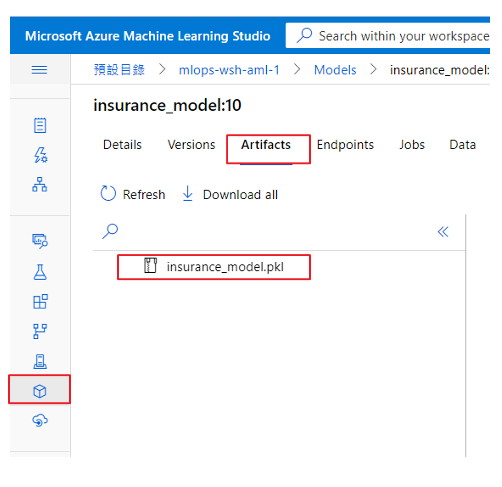
而另外一個要素,「Inferencing and deployment configuration」又由3個元素組成:
(1)Compute target
(2)Environment
(3)Scoring scripts
也就是模型在部署和推斷(預測)的時候需要的configuration,稍微說明:
(1)compute target就是模型吃的運算資源,所以staging area就會是ACI,production area就會是AKS,所以用Azure CLI指令進行模型部署的時候,會需要進行aci configuration。也就是上面指令的參數--dc所指定的檔案: aciDeploymentConfigStaging.yml
(2)Environment則是機器學習模型「在預測的時候」會需要什麼環境,例如模型需要sklean,python3.7。也就是上面指令的--ic參數:inferenceConfig.yml
(3)scoring.py就是產出預測結果的程式,裡面有兩個功能,一個是把model load 到ACI的功能init function,另一個是進行預測的run function: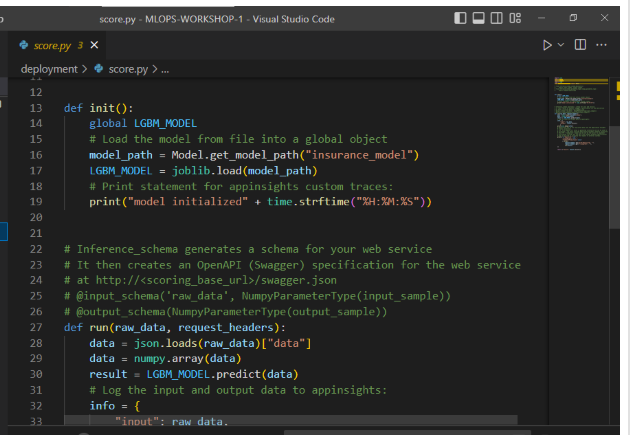
所以可以看到az ml model deploy指令所加入的參數有點複雜:
--ic參數 指定inference configuration file,檔案位在【pipeline published artifact區域】的inferenceConfig.yml (如下圖),這個檔案當中,指定模型部署的environment ymal檔案為「scoringConfig.yml」,而Scoring scripts則是「score.py」。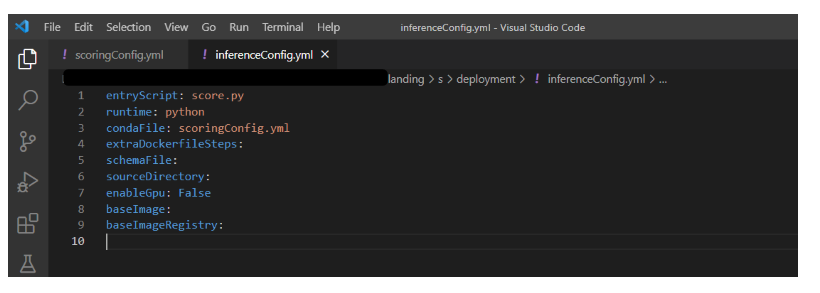
以上這些檔案,都位在【pipeline published artifact區域】中,如下圖,所以這就是為什麼會在CI pipeline中,最後的copy file任務時,把這些檔案一併複製: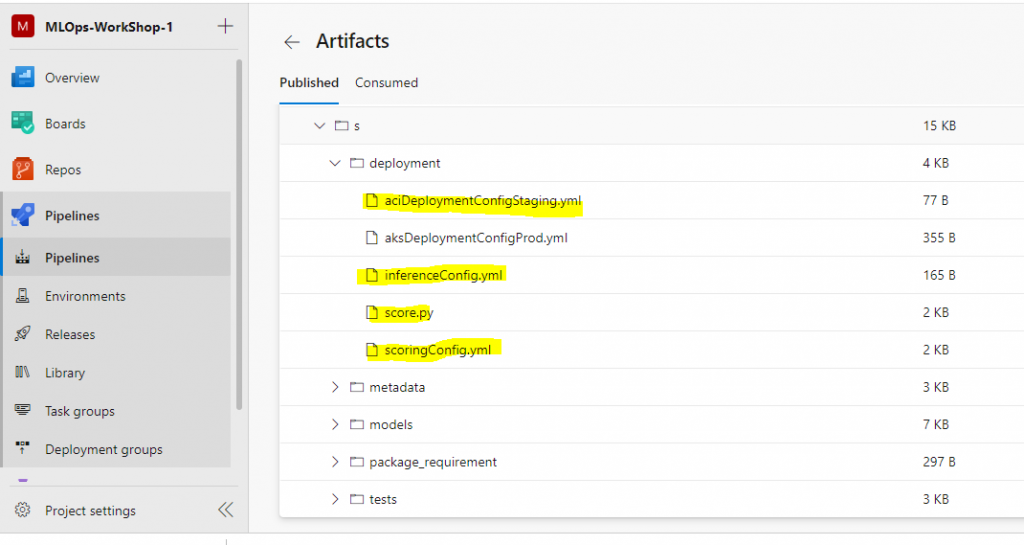
其實在AML部署模型有點複雜,所以就多說明了一些,對剛接觸的人會較難理解沒錯,本系列文章先繼續專注在MLOPS流程建立。
因為az ml model deploy指令中,所需的檔案都在【pipeline published artifact區域】,所以需要指定工作目錄,下拉選單/_MLOps-WorkShop-1-CI/landing/s/deployment: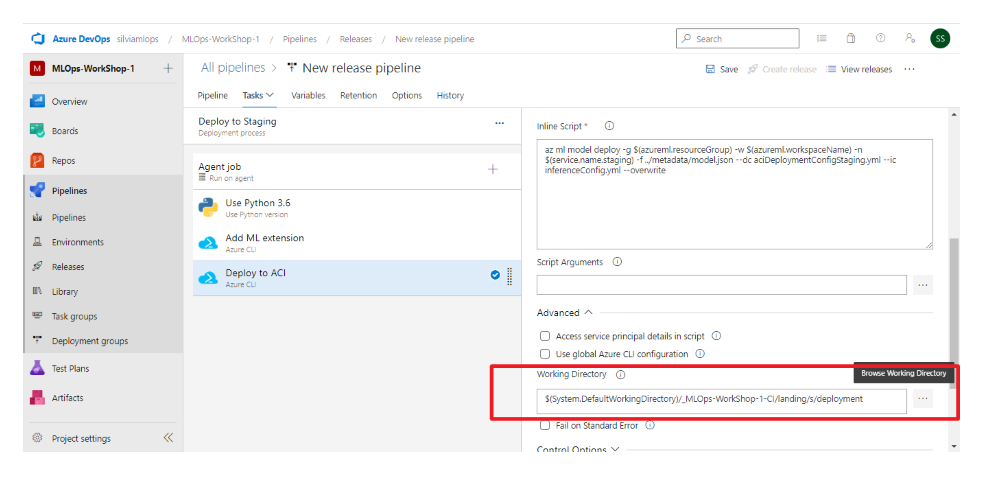
最後指定$()內的名稱變數: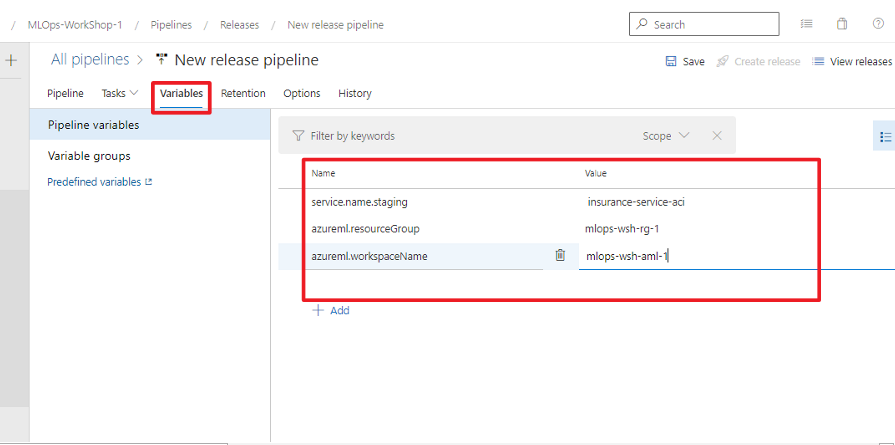
azureml.resourceGroup mlops-wsh-rg-1
azureml.workspaceName mlops-wsh-aml-1
service.name.staging insurance-service-aci (web service名稱)
如果執行CD pipeline,當agent執行到2-3時,一個名叫做insurance-service-aci的web service會被部署完成。所以在azure machine learning workspace的endpoint會出現insurance-service-aci (如下圖示意圖):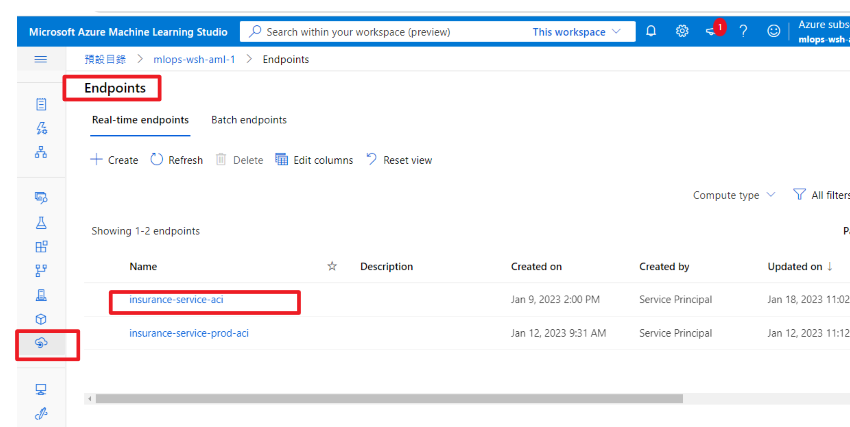
並且有這個service專屬的endpoint url(如下圖)。
建立pipeline的目的就是希望能夠自動化,由agent自動測試這個endpoint url「是否能可以呼叫,輸入特徵值,且回傳預測結果」,所以接下來新增的任務是「測試endpoint url」。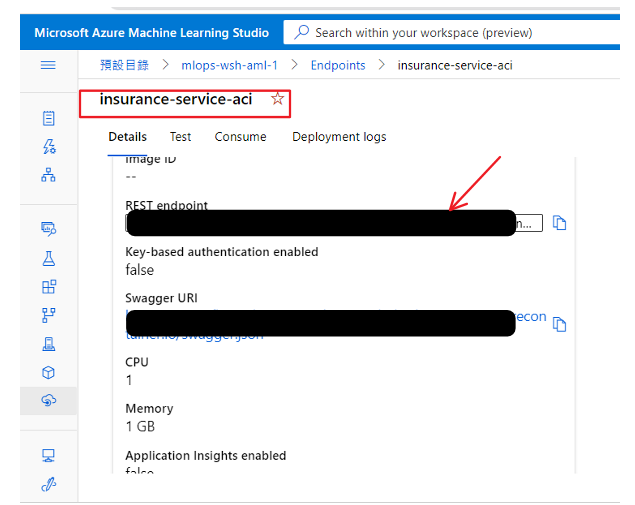
測試endpoit的程式碼: staging_test.py 一樣位在【pipeline published artifact區域】,測試程式檔中,會執行「傳入特徵值(json格式)給endpoint」,和資料科學家在AML workshop使用UI測試是一樣的流程: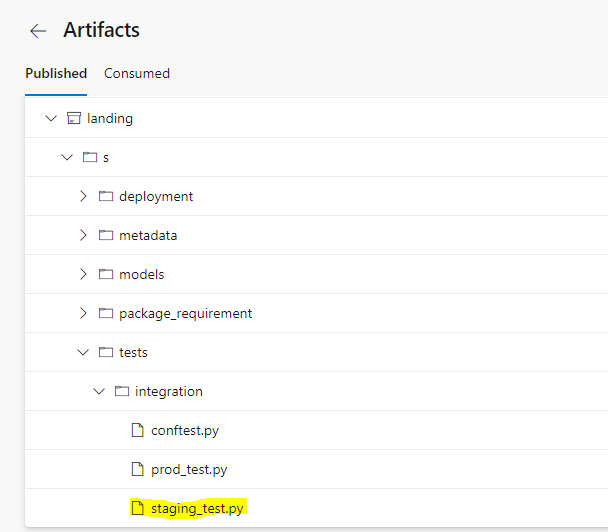
要在agent當中執行staging_test.py,就需要先把程式當中需要的套件安裝好,所以一樣會需要在agent執行安裝指令(與CI pipeline一樣,可以回去複習)。增加一個bash task,執行install_requirements.sh:
(install_requirements.sh在_MLOps-WorkShop-1-CI/landing/s/package_requirement/)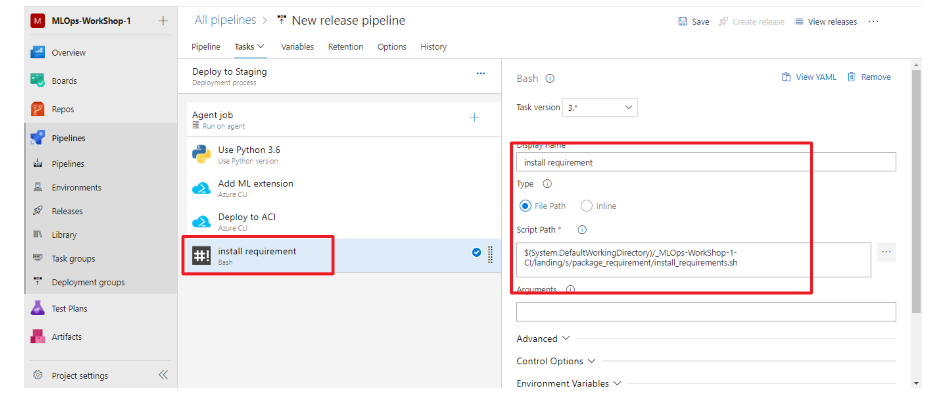
接下來新增一個Azure CLI任務,取名為「Staging test」,執行pytest,pytest解釋詳見之前位於CI pipeline文章的解說: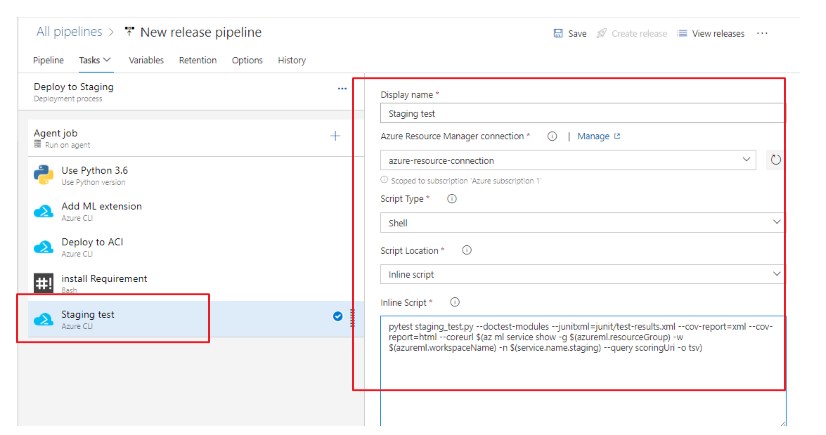
在inline script當中輸入:
pytest staging_test.py --doctest-modules --junitxml=junit/test-results.xml --cov-report=xml --cov-report=html --scoreurl $(az ml service show -g $(azureml.resourceGroup) -w $(azureml.workspaceName) -n $(service.name.staging) --query scoringUri -o tsv)
這邊特別說明一下,agent要測試的endpoint url需要由--scoreurl參數帶入,az ml service show指令可以吐出部署的service detail,但我們只需要url資訊,所以az ml service show後面會有--query scoringUri參數。
其他細節請查閱官方文件。
staging_test.py檔案位在【pipeline published artifact區域】/_MLOps-WorkShop-1-CI/landing/s/tests/integration,所以往下捲動,設定工作目錄: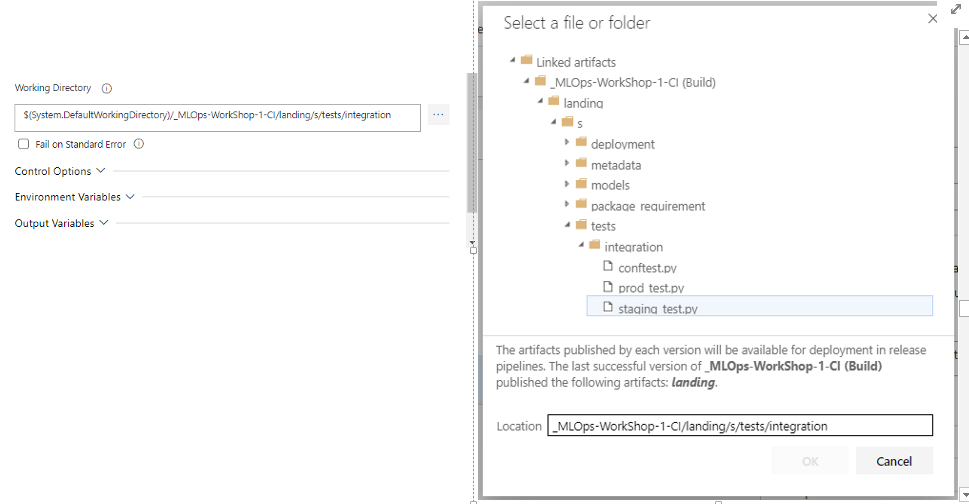
前一步驟使用pytest測試,並產出report,新增一個任務把這些報告發布到Azure DevOps中。搜尋publish result,add後修改名稱Publish Staging Test Results。前一個步驟有設定pytest報告的檔名都叫做test-,所以Test results files填入:**/test-*.xml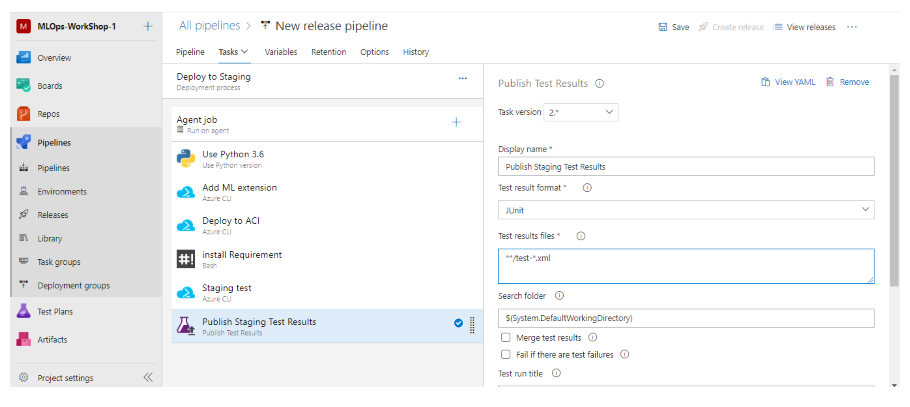
CD pipeline的第一部分:模型自動部署到測試環境(staging area),到這裡就設定完成了!記得按儲存!
CD pipeline artifact來源是CI pipeline產生的artifact,一旦有新artifact就觸發CD pipeline。
所以接下來要設定:
(1)CD pipeline artifact來源
(2)觸發條件
回到這條release pipeline的首頁,點選artifact,Source (build pipeline)處填寫:CI pipeline,選擇最新latest:
設定Continuous deployment trigger,點擊閃電處: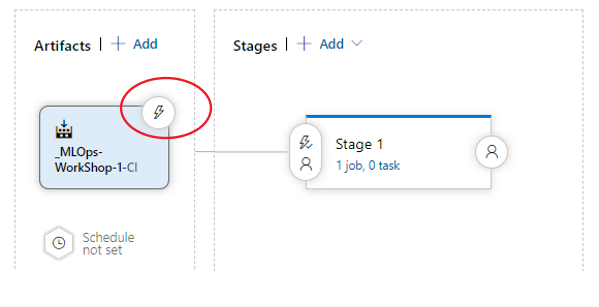
打開Continuous deployment trigger: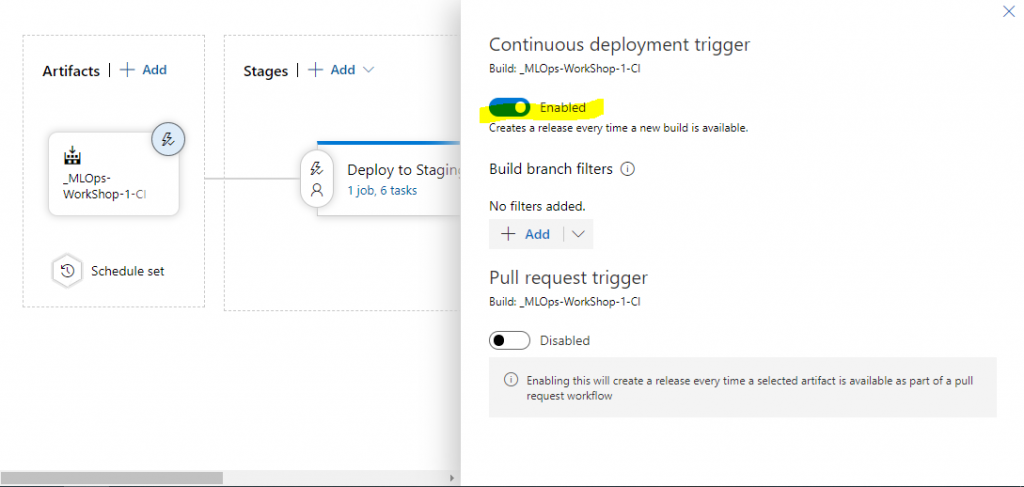
雖然我們設定好觸發條件,不過在真的讓他自動觸發前,還是先執行一次這個pipeline看看,點選頁面右上方的create release:
然後點選Create: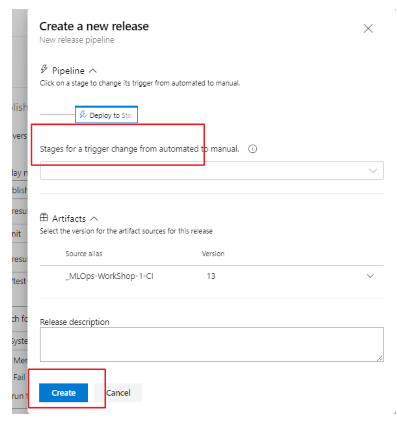
和CI pipeline一樣,每次執行會有一個編號(run ID),下圖顯示這次release pipline正在運行: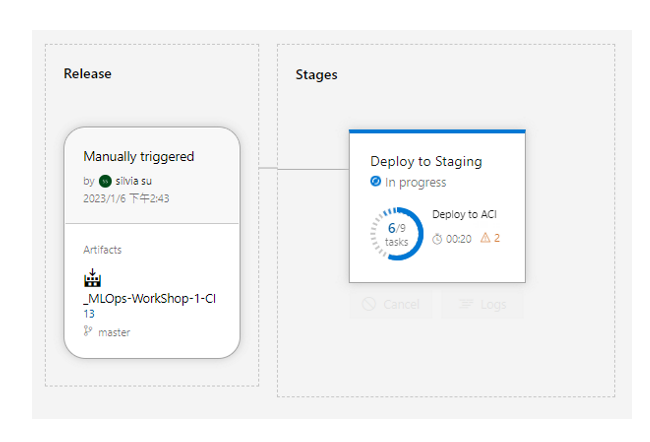

運行執行成功後,可以檢視一下發布的測試報告:
如果運行執行成功,可以在Azure Machine Learning當中,看到我們部署的service: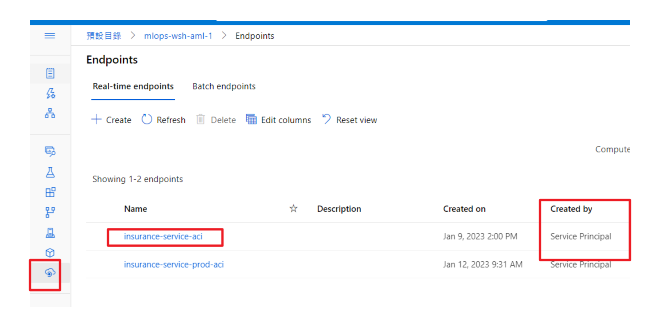
下一篇【Azure MLOps - 7】建立CD pipeline:把機器學習模型部署到production area
 silviasu
