前一篇第 14 天是提到「Scroll View」,雖然本系列文章基本上沒有前後關聯,如果你是還沒讀過前一篇的讀者,也推薦你去讀讀。
在 UIKit 中,說 UITabViewController 幾乎是每一個 app 必備的元件也不為過,我們今天就來看看怎麼在 SwiftUI 中做出一樣的東西。
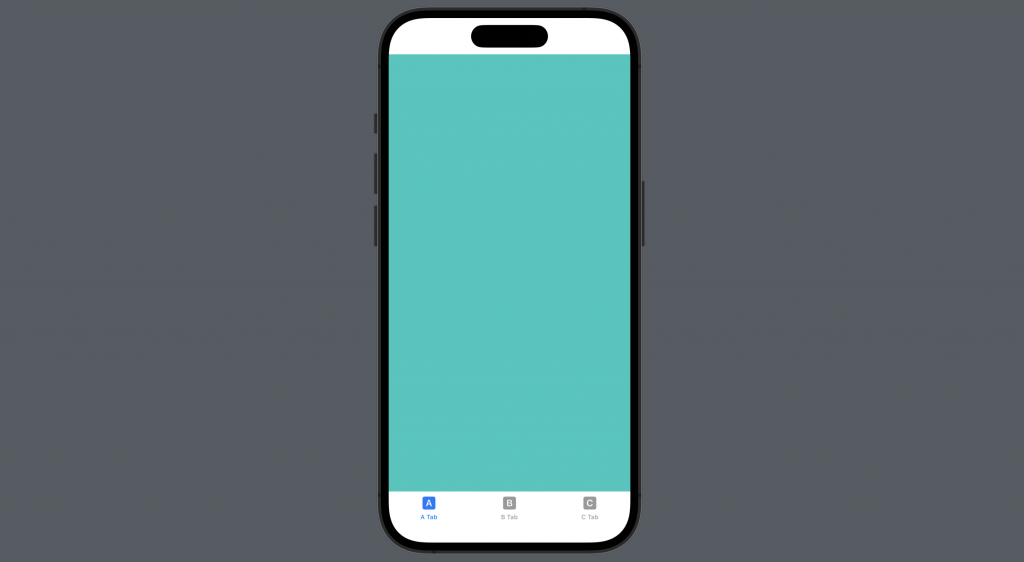
先用 TabView 當外框,每一個根層級的 UI 元件就會是一個 tab ,透過 tabItem 設定 icon 和文字即可:
struct ContentView: View {
    var body: some View {
        TabView {
            Color.mint
                .tabItem { Label("A Tab", systemImage: "a.square.fill") }
            Color.indigo
                .tabItem { Label("B Tab", systemImage: "b.square.fill") }
            Color.cyan
                .tabItem { Label("C Tab", systemImage: "c.square.fill") }
        }
    }
}

TabView 能加入一個 selectable 來偵測正在選中的 tab item 是哪一個,這時候需要透過指定 .tag() 來標記:
struct ContentView: View {
    @State private var selection = "a"

    var body: some View {
        TabView(selection: $selection) {
            Color.mint
                .tabItem { Label("A Tab", systemImage: "a.square.fill") }
                .tag("a")
            Color.indigo
                .tabItem { Label("B Tab", systemImage: "b.square.fill") }
                .tag("b")
            Color.cyan
                .tabItem { Label("C Tab", systemImage: "c.square.fill") }
                .tag("c")
        }
        .overlay {
            VStack {
                Text("目前選中")
                Text(selection)
                    .font(.system(size: 100, weight: .black))
            }
        }
    }
}

這時候只要在 systemImage 的地方透過 selection 判斷即可。
注意事項: 為了方便呈現,這邊沒有進行任何封裝而平鋪直述的寫出來。實務上請依據需求進行適度的封裝。
struct ContentView: View {
    @State private var selection = "a"

    var body: some View {
        TabView(selection: $selection) {
            Color.mint
                .tabItem {
                    Label(
                        "A Tab",
                        // 加入 selection 的判斷式
                        systemImage: selection == "a" ? "a.square" : "a.circle"
                    )
                }
                .tag("a")
            Color.indigo
                .tabItem {
                    Label(
                        "B Tab",
                        // 加入 selection 的判斷式
                        systemImage: selection == "b" ? "b.square" : "b.circle"
                    )
                }
                .tag("b")
            Color.cyan
                .tabItem {
                    Label(
                        "C Tab",
                        // 加入 selection 的判斷式
                        systemImage: selection == "c" ? "c.square" : "c.circle"
                    )
                }
                .tag("c")
        }
        .overlay {
            VStack {
                Text("目前選中")
                Text(selection)
                    .font(.system(size: 100, weight: .black))
            }
        }
    }
}

在一些商業需求上,我們會限制使用者不能使用某一個 tab ,例如只有登入才能切換到我的帳號
struct ContentView: View {
    @State private var selection = "a"

    var body: some View {
        TabView(selection: $selection) {
            /* 省略 */
            Color.brown
                .tabItem {
                    Label(
                        "我的帳號",
                        systemImage: "person"
                    )
                }
                .tag("d")
        }
        .overlay {
            /* 省略 */
        }
        .onChange(of: selection) { old, new in
            if new == "d" {
                selection = old
            }
        }
    }
}
透過使用 onChange 監聽 selection ,當使用者選到 "d" 的話,就把 selection 切換回去舊的數值:
.onChange(of: selection) { old, new in
    if new == "d" {
        selection = old
    }
}

到這裡就是在 SwiftUI 中如何使用 TabView 做出 UITabView 的畫面 。
關於 TabView 的其他功能,接下來再另外寫一篇分享。
那今天的 SwiftUI 的大大小小就到這邊,以上,明天見!
本篇使用到的 UI 元件和 modifiers 基本上沒有受到版本更新影響
因此 Xcode 14 等環境下使用也是沒問題的。
