本篇要實現
「你滑掉我的APP,再點一次還是能進入首頁」
那麼如何做到的呢
讓我們開始一步步操作吧
※本篇教學文稍長,稍微整理一下大綱
請先在專案新增以下資料夾及空白js檔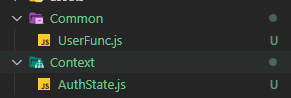
在UserFunc.js引入AsyncStorageimport AsyncStorage from "@react-native-async-storage/async-storage";
接著製作以下四種Function
使用名為userData的鍵值名稱做為使用者資訊存取
async function StoreUserInfo(user) {
  try {
    await AsyncStorage.setItem("userData", JSON.stringify(user));
  } catch (error) {
    console.log("Something went wrong", error);
  }
}
try...catch為JavaScript對於程式例外時需捕捉的語法
可參考try...catch介紹
取出名為userData的鍵值名稱做為使用者資訊帶出
回傳使用者資訊userResult
async function GetUserInfo() {
  try {
    let userData = await AsyncStorage.getItem("userData");
    const userResult = JSON.parse(userData);
    return userResult;
  } catch (error) {
    console.log("GetUserDataError", error);
  }
}
async function CheckAlReadyLogin() {
  let checkResult = false;
  await AsyncStorage.getItem("userData").then((res) => {
    if (res !== undefined && res !== null) checkResult = true;
  });
  return checkResult;
}
非同步函式會回傳一種叫做Promise的承諾型物件
Promise 物件代表一個即將完成、或失敗的非同步操作,以及它所產生的值。
而then就是向Promise取得它承諾要回傳的資訊(使用者資訊)
只要成功拿到使用者資訊
代表使用者已登入,設定checkResult=true
反之,取不到使用者資訊就必須重新登入
function ClearUserInfo() {
  AsyncStorage.clear();
}
export { StoreUserInfo, CheckAlReadyLogin, GetUserInfo, ClearUserInfo };
在AuthState.js引入React Hook、UserFunc登入登出相關Function
import React, { useEffect, useState, createContext } from "react";
import {
  StoreUserInfo,
  ClearUserInfo,
  CheckAlReadyLogin,
  GetUserInfo,
} from "../../Common/UserFunc";
除了AuthContext,其餘功能皆要放入AuthState裡
const AuthContext = createContext();
const AuthState = (props) => {

}
這邊同時存放使用者資訊
讓其他Component能直接使用
const [isLogin, setIslogin] = useState(false);
const [userInfo, setuserInfo] = useState({});
這段Effect是整個APP判斷登入的核心效果
只要你APP一打開,就會執行此函式
可透過setIslogin調整登入判斷
useEffect(() => {
  CheckAlReadyLogin().then((res) => {
    if (res) {
      GetUserInfo().then((loginInfo) => {
        setuserInfo(loginInfo); //重開APP時從AsyncStorage將使用者資訊帶回去
        //如果你一開始記住登入資訊是取消的,下次登入進來要回登入畫面重打
        setIslogin(loginInfo.IsRemberMe);
      });
    } else {
      setIslogin(false);
    }
  });
}, []);
※ 這邊有個判斷要注意
「記住登入資訊」如果不勾選就登入
可以將使用者踢回登入畫面
有些使用者為確保帳號安全性
不會希望一直長久登入
const onAuthentication = async (loginInfo) => {
  StoreUserInfo(loginInfo);
  setuserInfo(loginInfo); //存一份登入資訊放在userInfo上下文裡
  setIslogin(true);
};
loginInfo為登入時所要帶入的資訊(帳號)
const onLogOut = () => {
    ClearUserInfo();
    setIslogin(false);
    setuserInfo({});
};
return (
  <AuthContext.Provider
    value={{
      onAuthentication,
      isLogin,
      onLogOut,
      userInfo,
    }}
  >
    {props.children}
  </AuthContext.Provider>
);
匯出Context & Component
export { AuthContext };
export default AuthState;
有關naming export、default export寫法可參考這篇英文文章
可參考前篇的程式碼作為對照
修改App.js
將AuditState包裝在AppNavigator父層
import { StatusBar } from "expo-status-bar";
import { StyleSheet, Text, View, SafeAreaView } from "react-native";
import AuditState from "./Context/AuthState";
import AppNavigator from "./Navigation/AppNavigator";

export default function App() {
  return (
    <SafeAreaView className="flex-1">
      <StatusBar style="auto" />
      <AuditState>
        <AppNavigator />
      </AuditState>
    </SafeAreaView>
  );
}
※這樣包裝的好處是
在進入APP前,一定得先穿越AuditState
就會先執行上方「監控使用者是否登入Effect」
在還沒進入Navigator前,就能知道是否有登入過
修改AppNavigator.js
將isLogin從AuthContext引用進來
登入、首頁只選一種畫面來顯示
import React, { useContext } from "react";
import { AuthContext } from "../Context/AuthState";
import LoginScreen from "../src/Home/LoginScreen";
import IndexScreen from "../src/Home/IndexScreen";
import { NavigationContainer } from "@react-navigation/native";
import { createStackNavigator } from "@react-navigation/stack";

export default function AppNavigator() {
  const RootStack = createStackNavigator();
  const { isLogin } = useContext(AuthContext);
  return (
    <NavigationContainer>
      <RootStack.Navigator initialRouteName="Login">
        {isLogin ? (
          <RootStack.Screen
            name="Index"
            component={IndexScreen}
            options={{ title: "首頁" }}
          />
        ) : (
          <RootStack.Screen
            name="Login"
            component={LoginScreen}
            options={{ title: "登入" }}
          />
        )}
      </RootStack.Navigator>
    </NavigationContainer>
  );
}
※useContext的好處
就是能將外部元件的狀態isLogin放進其他元件做判斷
然而JSX是可以直接使用三元運算子(?:)做為登入登出Screen判定
可參考前篇的程式碼作為對照
LoginScreen.js
import { AuthContext } from "../Context/AuthState";
const { onAuthentication } = useContext(AuthContext);
function onLogin() {
    if (loginInfo.Account === "" || loginInfo.Password === "") {
      Alert.alert("失敗","請輸入使用者資訊");
      return false;
    } else{
      loginInfo.Password = "";
      onAuthentication(loginInfo).then(() =>
      {
        Alert.alert("訊息", "登入成功!");
        navigation.navigate("Index");
      })
    }
}
※在儲存登入資訊前,先將密碼清除
密碼為機敏資訊,故不存取
IndexScreen.js 畫面
import { AuthContext } from "../../Context/AuthState";
const { onLogOut, userInfo } = useContext(AuthContext);
  return (
    <View className="flex-1 items-center justify-center">
      <Text>{userInfo.Account}你好</Text>
      <TouchableOpacity
        className="bg-red-600 rounded-lg w-10/12 m-3"
        onPress={CheckLogout}
      >
        <Text className="text-white text-xl m-3 text-center">登出</Text>
      </TouchableOpacity>
    </View>
  );
登出 Function
function CheckLogout() {
    Alert.alert("訊息", "確定要登出嗎?", [
      {
        text: "取消",
        onPress: () => {
          return false;
        },
      },
      { text: "確認", onPress: () => onLogOut() },
    ]);
  }
※這裡先使用Alert警示使用者確定要登出
使用者確認後,在執行登出
功能實作結束
本篇Snack完整程式碼附上:https://snack.expo.dev/@peter_lu/loginandlogout
測試時請使用實體手機試玩
NativeWind無法在Snack使用,樣式部分敬請見諒
結語:
整個登入登出系列文到這邊就告一段落了
現在,你的APP登入能儲存資訊
登出時能清除資訊
以往開發ASP.NET時
都是直接使用Session、Cookie去存取
首次接觸前端AsyncStorage結合Context製作登入登出機制
真的花了不少功夫去鑽研技術
開發時,還是要以實際需求為例
範例只能輔助你開發
因為客戶提出的功能永遠都天馬行空🤑
下一篇
會開始以「登入後」功能為主
介紹開發過程中所安裝、接觸到的套件
會先從「切換式分頁」- TabNavigator 開始講起。