在本篇文章中,我們將透過前幾天所提到的指令來實現表單輸入元素的綁定和驗證,內容也包括了自定義驗證規則和錯誤處理。
首先,讓我們討論如何使用Vue的表單元件來收集用戶輸入。Vue提供了一種方便的方式來實現數據雙向綁定,這使得在表單元素和Vue實例之間同步數據變得輕鬆。
先規劃一個資料表
<template>
  <div>
    <table>
      <thead>
        <tr>
          <th class="tableCol">姓名</th>
          <th class="tableCol">備註</th>
          <th class="tableCol">性別</th>
          <th class="tableCol">需要之證照</th>
          <th></th>
        </tr>
      </thead>
      <tbody>
        <tr v-for="(item, index) in tableData" :key="index">
          <td>{{ item.name }}</td>
          <td>{{ item.remark }}</td>
          <td>{{ item.sex }}</td>
          <td>{{ item.license.join(", ") }}</td>
          <td>
            <button @click="deleteRow(index)">刪除</button>
          </td>
        </tr>
      </tbody>
    </table>
    <button @click="addItem">新增項目</button>
	</div>
<template>

<script>
export default {
  data() {
    return {
			//tableData放入table的預設內容
      tableData: [
        {
          name: "A",
          remark: "none",
          sex: "Male",
          license: ["A", "B"],
        },
        {
          name: "B",
          remark: "none",
          sex: "Female",
          license: ["C"],
        },
      ],
    };
  },
};
</script>
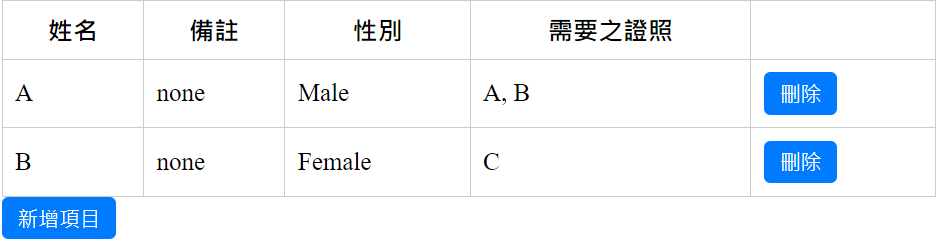
使用v-for的方式,將tableData中的內內容渲染到畫面中。
初步的畫面就產生了!
接著設置表單樣式
<div v-if="dialogVisible">
<h2>新增</h2>
<form @submit.prevent="submitForm">
<div>
<label>姓名:</label>
<input type="text" v-model="form.name" />
</div>
<div>
<label>備註:</label>
<input type="textarea" v-model="form.remark" />
</div>
<div>
<label>性別:</label>
<select v-model="form.sex">
<option value="Male">Male</option>
<option value="Female">Female</option>
</select>
</div>
<div>
<label>需要證照:</label>
<select v-model="form.license" multiple size="3">
<option value="A">A</option>
<option value="B">B</option>
<option value="C">C</option>
</select>
</div>
<div>
<button type="submit">建立</button>
<button @click="cancelForm">取消</button>
</div>
</form>
</div>
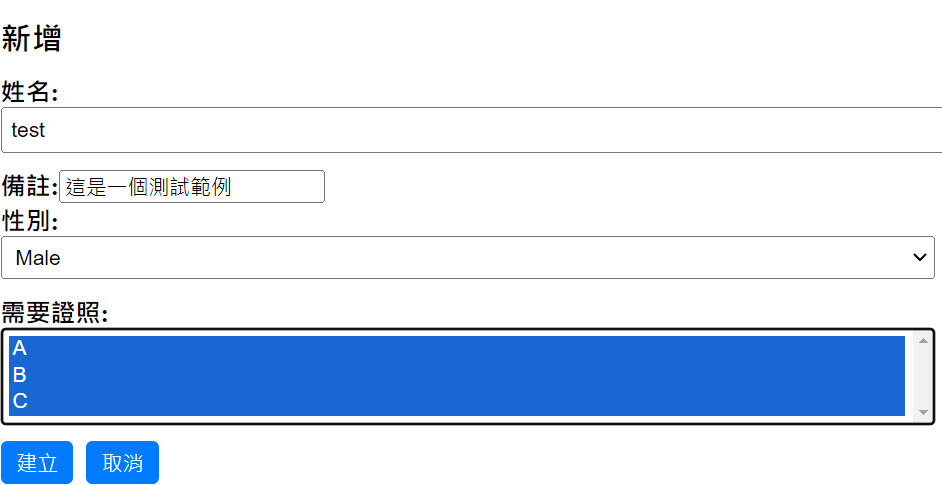
設定表單的初始值,以及會使用到的方法
<script>
  export default {
    data() {
      return {
        tableData: [
          {
            name: "A",
            remark: "none",
            sex: "Male",
            license: ["A",'B'],
          },
          {
            name: "B",
            remark: "none",
            sex: "Female",
            license: ["C"],
          },
        ],
        dialogVisible: false,
				//表單初始值
        form: {
          name: "",
          remark: "",
          sex: "",
          license: [],
        },
      };
    },
    methods: {
			//點擊新增時,表單顯示
      addItem() {
        this.dialogVisible = true;
      },
			//表單填寫完成送出
      submitForm() {
        this.tableData.push({
          name: this.form.name,
          remark: this.form.remark,
          sex: this.form.sex,
          license: this.form.license,
        });
        this.cancelForm();
      },
			//點擊取消時,表單隱藏
      cancelForm() {
        this.dialogVisible = false;
        this.resetForm();
      },
			//刪除
			deleteRow(index) {
	      const confirmed = window.confirm("確定要刪除這個項目嗎?");
	      if (confirmed) {
	        this.tableData.splice(index, 1);
	      }
	    },
			//重置表單,將表格內容清空
      resetForm() {
      this.form.name = "";
      this.form.remark = "";
      this.form.sex = "";
      this.form.license = [];
    }
    },
  };
  </script>
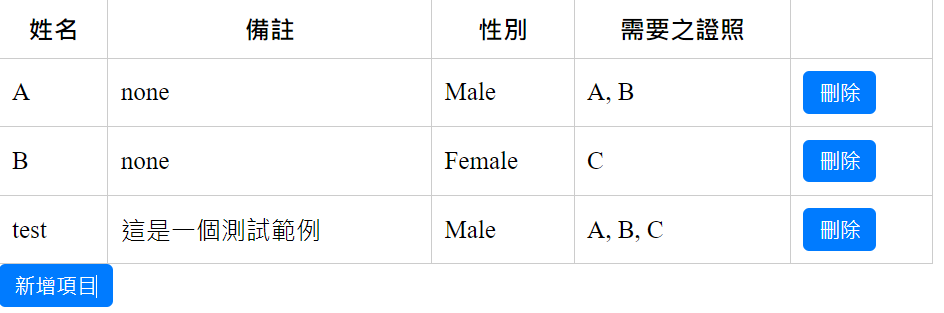
成功新增!
上面的代碼中,我們使用了v-if指令來控制表單的顯示與否。接著使用
v-model指令將數據綁定到輸入框元素,這意味著當用戶輸入內容時,數據將自動更新。
實例中我們必須先在data裡初始化我們會用到的值,這些初始值則是對應到表單裡的value,因此,如果我們希望預設的性別是 Female,可以設置如下:
form: {
  name: "",
  remark: "",
  sex: "Female",
  license: [],
}
可以發現在form的宣告中,只有license是使用[ ],原因是因為我們將license設置為複選,需要設置為陣列格式才能複選。
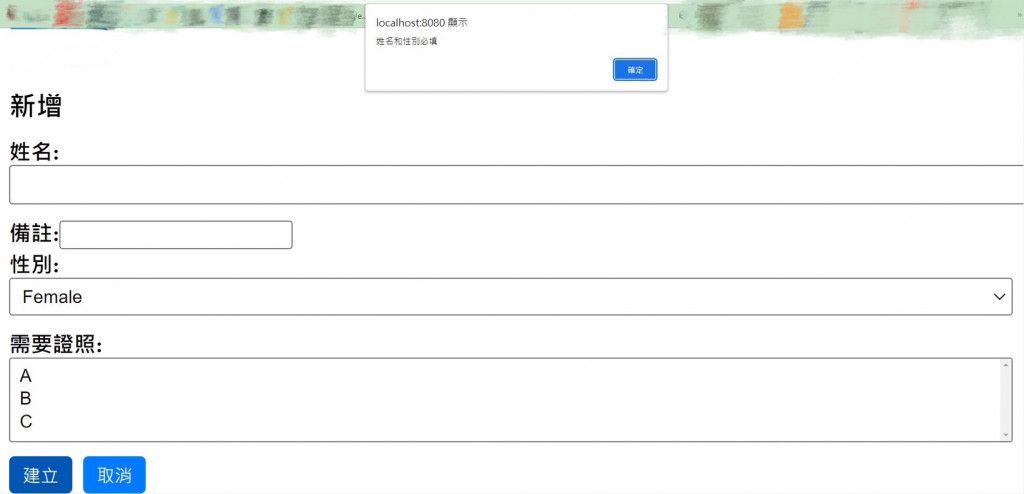
現在功能已經大致完成,可以加入表單驗證和錯誤處理,使操作更完整。
假設我們將姓名設置為必填
方法1: 加入if做判斷
submitForm() {
  if (!this.form.name ) {
    alert("姓名必填");
    return;
  }
  this.tableData.push({
    name: this.form.name,
    remark: this.form.remark,
    sex: this.form.sex,
    license: this.form.license,
  });
  this.cancelForm();
}
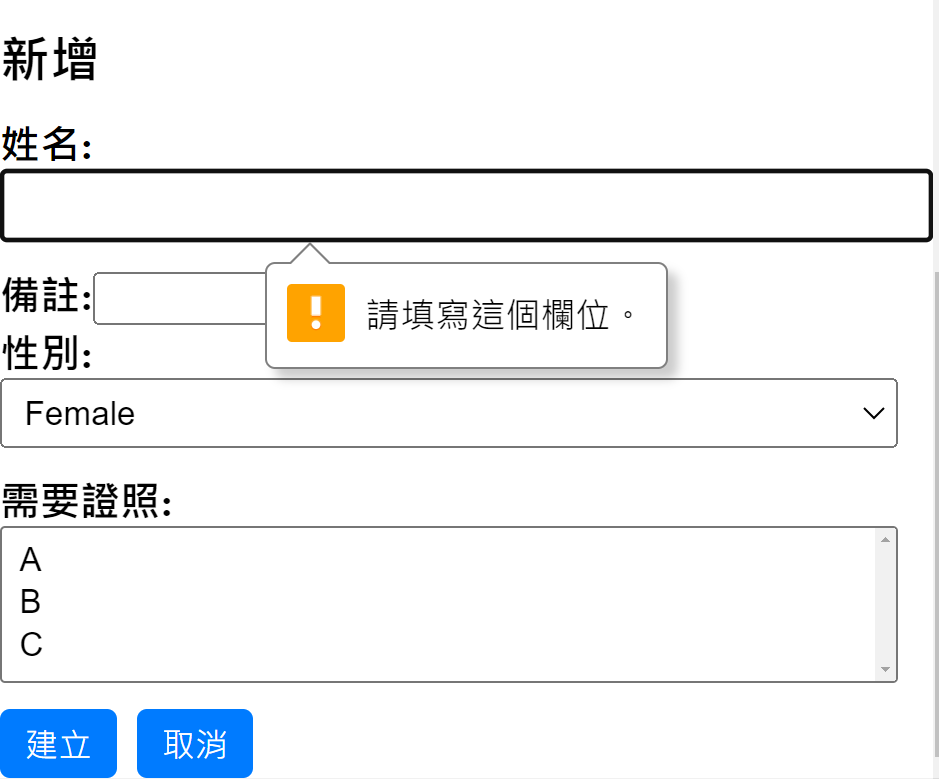
方法2: 設置required
<div>
    <label>姓名:</label>
    <input type="text"  v-model="form.name" required />
  </div>
表單處理是前端開發的重要部分,它使我們能夠收集和處理用戶的數據。Vue.js提供了強大的工具和指令,使表單的創建和管理變得輕鬆而高效。同時,通過自定義驗證規則和更好的錯誤處理策略,我們能夠提供更好的用戶體驗。