前面部署 App 時有用到 Secret 來儲存資料庫的敏感資料,例如登入帳號、密碼等等。ConfigMap 也是類似的用途,可以拿來存放設定檔。今天就來介紹這兩種 object。
建立 ConfigMap 的 yaml 範例如下:
apiVersion: v1
kind: ConfigMap
metadata:
	name: app-config
data:
	APP_COLOR: blue
	APP_MODE: prod
想要用指令建立則使用 kubectl create configmap ...
# kubectl create configmap <config-name> --from-literal=<key>=<value>
kubectl create configmap \
	app-config --from-literal=APP_COLOR=blue --from-literal=APP_MOD=prod
如果想要從檔案建立也行
kubectl create configmap my-config --from-file=key1=/path/to/bar/file1.txt \
	--from-file=key2=/path/to/bar/file2.txt
kubectl create configmap my-config --from-file=path/to/bar
詳細的 options / flags → https://kubernetes.io/docs/reference/generated/kubectl/kubectl-commands#-em-configmap-em-
要怎麼在 Pod 中引用呢?有三種方式:
利用 envFrom
apiVersion: v1
kind: Pod
metadata:
  name: demo-1
spec:
  containers:
    - name: nginx
      image: nginx:1.24.0-alpine3.17
      ports:
        - containerPort: 80
      envFrom:
        - configMapRef:
            name: app-config #app-config - 前面先建好的 configmap name
用 envFrom 的方式可以直接 reference 整個 configMap。用 printenv 來看看是不是真的設定好了我們定義的 key-value pair
利用 env
apiVersion: v1
kind: Pod
metadata:
  name: demo-2
spec:
  containers:
    - name: nginx
      image: nginx:1.24.0-alpine3.17
      ports:
        - containerPort: 80
      env:
        - name: APP_COLOR_NEW
          valueFrom:
            configMapKeyRef:
              name: app-config #configMap name
              key: APP_COLOR #這邊的 key 要是 ConfigMap 裡面使用的 key name
env 則是可以分別定義單一個環境變數,注意這邊 env name 與 configMap 定義的名字不同。
利用 volume
apiVersion: v1
kind: Pod
metadata:
  name: demo-3
spec:
  containers:
    - name: nginx
      image: nginx:1.24.0-alpine3.17
      ports:
        - containerPort: 80
      volumeMounts:
        - name: app-config-volume #volume's name, defined below
          mountPath: "/config"
          readOnly: true
  volumes:
    - name: app-config-volume
      configMap:
        name: app-config #app-config - 前面先建好的 configmap name
使用 Volume 則是讓所有在 Pod 中的 container 都能使用,這個方式會將 configMap 定義的 key 轉成一個一個檔案。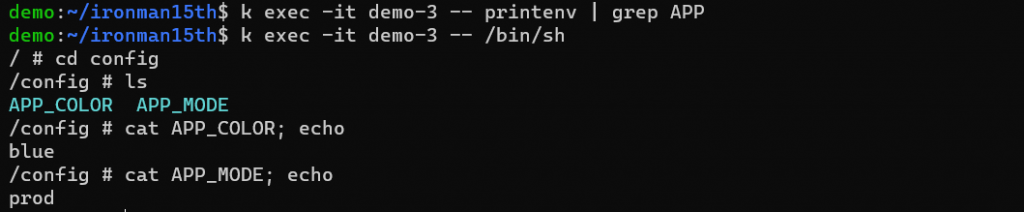
ConfigMap 除了 key-value 的形式外,也有另一種方式來做設置檔。有比較多、比較複雜的配置的時候可以使用。
apiVersion: v1
kind: ConfigMap
metadata:
  name: game-demo
data:
  # property-like keys; each key maps to a simple value
  player_initial_lives: "3"
  ui_properties_file_name: "user-interface.properties"

  # file-like keys
  game.properties: |
    enemy.types=aliens,monsters
    player.maximum-lives=5
  user-interface.properties: |
    color.good=purple
    color.bad=yellow
    allow.textmode=true
使用 file-like keys 的時候,用 envFrom 的方式最後得到的變數會不如預期。這時使用 volumes 的方式去掛 configMap 才能讀到正確的內容。demo 如下:
apiVersion: v1
kind: Pod
metadata:
  name: test-1
spec:
  containers:
    - name: nginx
      image: nginx:1.24.0-alpine3.17
      ports:
        - containerPort: 80
      envFrom:
        - configMapRef:
            name: game-demo
---
apiVersion: v1
kind: Pod
metadata:
  name: test-2
spec:
  containers:
    - name: nginx
      image: nginx:1.24.0-alpine3.17
      ports:
        - containerPort: 80
      volumeMounts:
        - name: config
          mountPath: "/config"
          readOnly: true
  volumes:
    - name: config
      configMap:
        name: game-demo
        # An array of keys from the ConfigMap to create as files
        items:
          - key: "game.properties"
            path: "game.properties"
          - key: "user-interface.properties"
            path: "user-interface.properties"
apply pod 後進去容器中看看
test-1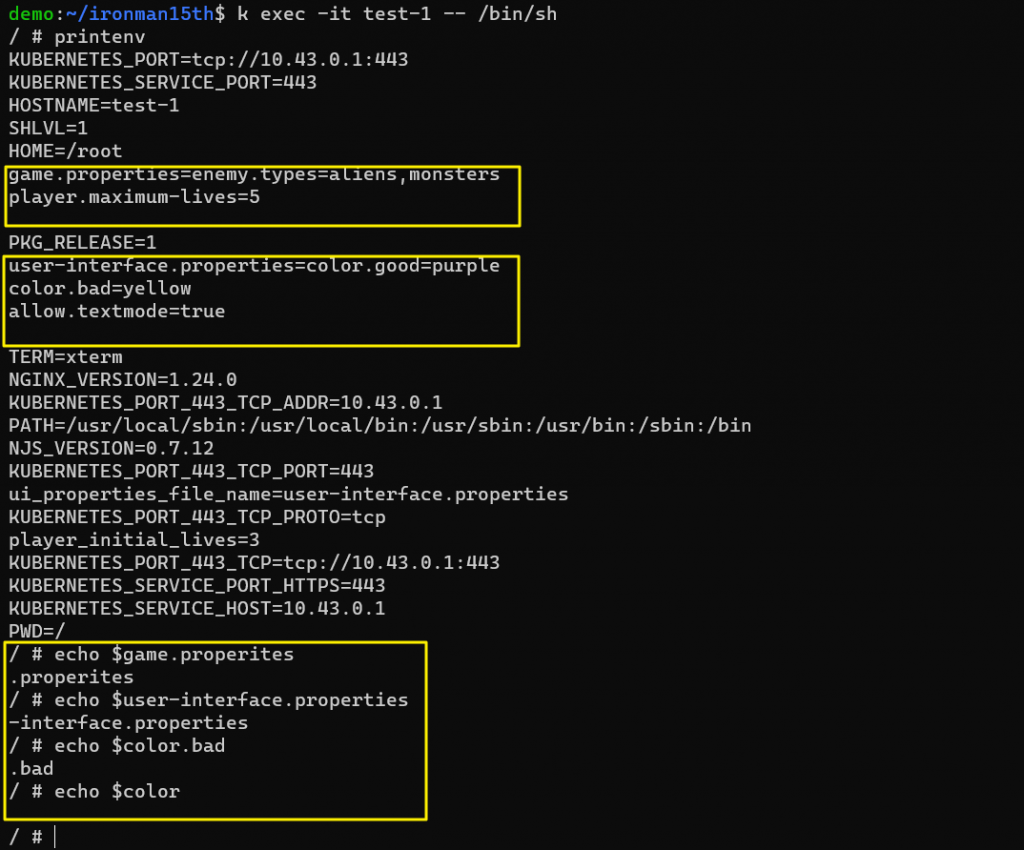
印出了一些…不是我們想要的東西,使用上變得比較麻煩
test-2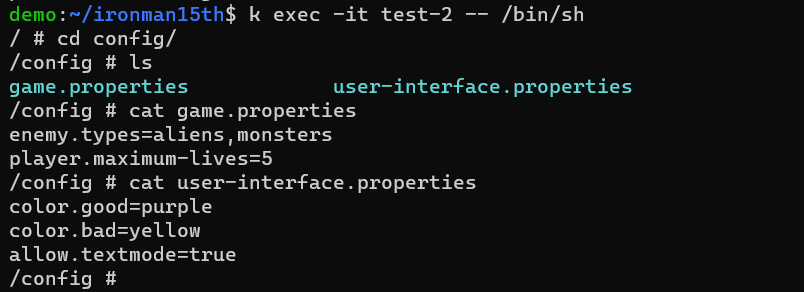
如果是用 volume 掛載的方式,則會產生檔案,檔案中會完整保留 configMap 設置的值。因 items 的部分設置了兩個 key,所以這邊產生了兩個檔案。如果 items 的部分不填,就會看原本 configMap 中定義多少 key,全部都會轉成檔案。以這邊的例子來說 game-demo 這個 configMap 則會產生四個檔案。
也是有 Imperative way & Declarative way 來建立。
kubectl create secret generic my-secret --from-literal=key1=supersecret --from-literal=key2=topsecret
kubectl create secret generic my-secret --from-file=ssh-privatekey=path/to/id_rsa --from-file=ssh-publickey=path/to/id_rsa.pub
apiVersion: v1
kind: Secret
metadata:
  name: secret-basic-auth
type: kubernetes.io/basic-auth
stringData:
  username: admin # required field for kubernetes.io/basic-auth
  password: t0p-Secret # required field for kubernetes.io/basic-auth
Secret type 可參考官方文件 → https://kubernetes.io/docs/concepts/configuration/secret/#secret-types
一般使用比較熟悉的是 Opaque ,如果不指定 type 預設也會是這個種類。之前部署時底下內容是用 data field,必須是 base64-encoded 字串。這邊用 stringData 就會是明文啦。
Pod 使用 Secret 的方式與 ConfigMap 相同,可以用三種方式引用:
利用 envFrom
apiVersion: v1
kind: Pod
metadata:
  name: demo-1
spec:
  containers:
    - name: nginx
      image: nginx:1.24.0-alpine3.17
      ports:
        - containerPort: 80
      envFrom:
        - secretRef:
            name: app-secret
利用 env
apiVersion: v1
kind: Pod
metadata:
  name: demo-2
spec:
  containers:
    - name: nginx
      image: nginx:1.24.0-alpine3.17
      ports:
        - containerPort: 80
      env:
        - name: DB_PWD
          valueFrom:
            secretKeyRef:
              name: app-secret
              key: DB_PASSWORD
利用 volumes
apiVersion: v1
kind: Secret
metadata:
  name: dotfile-secret
data:
  .secret-file: dmFsdWUtMg0KDQo= # -> it will become decoded string inside the container
---
apiVersion: v1
kind: Pod
metadata:
  name: secret-dotfiles-pod
spec:
  containers:
    - name: dotfile-test-container
      image: nginx
      volumeMounts:
        - name: secret-volume
          readOnly: true
          mountPath: "/etc/secret-volume"
	volumes:
    - name: secret-volume
      secret:
        secretName: dotfile-secret

可以執行看看 echo -n "dmFsdWUtMg0KDQo=" | base64 --decode 出來的結果是不是跟上圖相同
過去在開發程式的時候都是使用 .env 的檔案來做環境配置或儲存 API key 等這類機密資料,轉換到 kubernetes 還是不太能掌握實際生產環境會怎麼去做這個設置。曾看到有一個做法是在部署的時候去讀取本機 .env 檔案內的資料,再用 kubectl create secret generic ... 的方式建立 Secret 。現在還有別種方式來管理這些機密資料,例如 Helm Secrets, HashiCorp Vault。
Reference
https://kubernetes.io/docs/concepts/configuration/configmap/
https://kubernetes.io/docs/concepts/configuration/secret/


 iThome鐵人賽