
今天來看 Scheduler 分配 Pods 到 Node 的一些依據。在這之前先講講 Label 的用法。
Labels & Annotations 可以加在 kubernetes objects 上。前面部署登入註冊 web 時也有用 label 來辨識目標 pod。
Labels 放的是以識別為目的的資訊。為 key-value pair,一個 object 可以加上多組標籤。因要管理的對象一多,分類就會是必須的。在實際工作上,可能就需要幫 pods 加上部門的標籤。而 object 之間的連接 (selector) 也是透過 label 來識別。對該 object 來說,label 的每個 key 必須是唯一的。
Annotations 則是放非以識別為目的的資訊,可以是讓人類比較好辨識的標示,或是有些工具可以根據 annotations 去執行特定的操作,例如後面講到的 Ingress Controller 就有這樣的應用。
寫法就是在 metadata section 下好要加的 labels & annotations 即可。
apiVersion: v1
kind: Pod
metadata:
  name: label-demo
  labels:
    environment: production
    app: nginx
	annotations:
		imageregistry: "https://hub.docker.com/"
spec:
  containers:
  - name: nginx
    image: nginx:1.14.2
    ports:
    - containerPort: 80
建立好 pod 後,用 kubectl describe <object type> <object name> <-n namespace> 來看詳細的訊息,包含 configuration 以及建立有沒有錯誤等資訊。
kubectl describe pod label-demo
可以看到我們指定的 Labels & Annotations。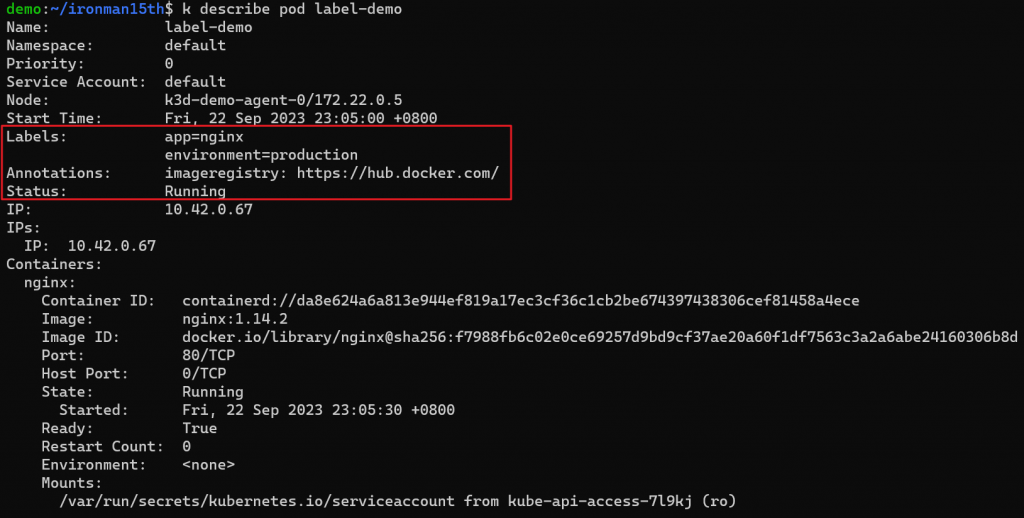
再來透過指令可以篩選出有特定 label 的 pod。
kubectl get pods -l environment=production,app=nginx
觀察一下 output,可以發現 filter label 中如果指定多個 key,它們會是 AND 的關係,要符合所有 key-value pair 才符合篩選的條件。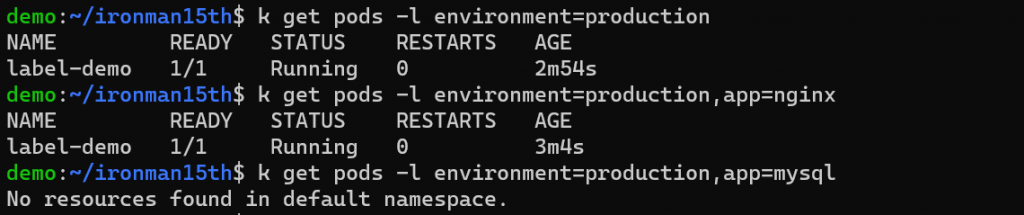
如果 pod 運行後想要更新 label,也可以透過指令更改。這邊是使用 kubectl label
kubectl label pod -l app=nginx tier=fe
# --overwrite option: 重新給值
這邊會先篩選出 label app=nginx 的 pod,加上 tier=fe label
Annotations 的更新類似 Labels,指令是 kubectl annotate KEY1=VAL1 ... (kubectl commands reference: https://kubernetes.io/docs/reference/generated/kubectl/kubectl-commands#annotate)
前面有提到 control plane 的 scheduler 會負責將 Pod 安排到合適的 Node 上。Scheduler 考量的點有以下幾個:
這邊來提下 Node Selectors。
定義很直覺,在 Pod definition file 中加上對應的設定即可。
apiVersion: v1
kind: Pod
metadata:
  name: node-selector-demo
spec:
  containers:
    - name: nginx
      image: nginx
      ports:
        - containerPort: 80
  nodeSelector:
    role: "agent"
nodeSelector 這邊定義了 key-value pair,那哪邊有這樣子的 node ?
這裡的 key-value 會是 node 身上的 label。因此必須要有一個 node 擁有 role 這個標籤並且值等於 agent,這個 Pod 才會被分配到該 node 上。
幫 node 下 label 的方式如下:
kubectl label nodes <node-name> <label-key>=<label-value>
kubectl label nodes k3d-demo-agent-0 role=agent
要看 node 有哪些標籤可以跑這個指令:
kubectl get nodes --show-labels

不過使用 node selector,我們只能指定單一個條件,如果我們希望更彈性的去安排這些 pods 呢?
有另一種方式 - Node Affinity。
Affinity 的設定支援更多種規則,也有提供一些彈性。例如我偏好把 pod 安排到某一個 node,但如果真的沒辦法,也可以接受被安排到別的 node。
Node Affinity 有兩種:
requiredDuringSchedulingIgnoredDuringExecution
preferredDuringSchedulingIgnoredDuringExecution
從字面上就看得出來什麼意思。這兩種規則都只管 schedule 的狀態,如果 execution 的時候 node label 改變,也不會影響 Pod。而一個是必須滿足的條件,另一個則是傾向的條件。
一樣定義在 Pod spec 中:
apiVersion: v1
kind: Pod
metadata:
  name: with-node-affinity
spec:
  affinity:
    nodeAffinity:
      requiredDuringSchedulingIgnoredDuringExecution:
        nodeSelectorTerms:
        - matchExpressions:
          - key: topology.kubernetes.io/zone
            operator: In
            values:
            - antarctica-east1
            - antarctica-west1
      preferredDuringSchedulingIgnoredDuringExecution:
      - weight: 1
        preference:
          matchExpressions:
          - key: another-node-label-key
            operator: In
            values:
            - another-node-label-value
  containers:
  - name: with-node-affinity
    image: registry.k8s.io/pause:2.0
上面的例子表示,node 必須要有 key topology.kubernetes.io/zone = antarctica-east1 OR antarctica-west1 ,Pod 才會被安排上去。另外這個 Pod 對具有 label another-node-label-key = another-node-label-value 的 node 傾向較高。
operator 這邊支援 In, NotIn, Exists, DoesNotExist, Gt & Lt。使用 Exists 以及 DoesNotExist 是判斷這個 key 的 label 存不存在,這邊就不用再指定 values 了。
preferredDuringSchedulingIgnoredDuringExecution 的部分還能夠設定 weight 要多少,可設定 1-100之間。這個 weight 會被 scheduler 拿來計算分數,當 Pod 要被分配時會優先放到分數最高的 Node。
除了 Node Affinity 以外,還有別的方式來安排 Pods。
前面設定了 Node Affinity,可以指定說 Pod 只能被安排到具有某個或某些 Label 的 Node,但這不代表 Pod 一定會被安排到這個 Node。這邊來介紹 Taints & Tolerations 的用法。
對 Node 加 taints → pods 不會被安排到有 taints 的 node
對 Pod 加上 tolerations - 這些 pods 可以放到有 taints 的 node
加 taints 的方式可以執行以下指令
kubectl taint nodes <node-name> <key>=<val>:<taint-effect>
kubectl taint nodes node1 app=blue:NoSchedule
Taint effect 有三種
如果想要移除 taints 則是執行
kubectl taint nodes node1 key1=value1:NoSchedule-
很明顯這些規則是要搭配 Pod 設定來使用。再來看 Tolerations 在 Pod 中怎麼定義:
apiVersion: v1
kind: Pod
metadata:
  name: nginx
  labels:
    env: test
spec:
  containers:
  - name: nginx
    image: nginx
  tolerations:
  - key: "example-key"
    operator: "Exists" # default is "Equal"; no value should be specified if operator = "Exists"
    effect: "NoSchedule"
	# tolerations:
	# - key: "key1"
	  # operator: "Equal"
	  # value: "value1"
	  # effect: "NoSchedule"
要將 tolerations 跟 taints 對應,**key & effect 都要對應上才有效**。
以上面的例子來說,這個 Pod 可以被放到具有 taint key = example-key 並且 effect = NoSchedule 的 node 上。
假設現在有:
Pod - red
Pod - blue
Pod - grey
Node - 1
Node - 2
Node - 3
如果我希望 Red Pod 可以被安排到 Node 1、Blue Pod 可以被安排到 Node 2;但是不希望 Grey Pod 被安排到 Node 1 & 2、不希望 Red Pod & Blue Pod 被安排到 Node 3
我們可以做以下的設定:
requiredDuringSchedulingIgnoredDuringExecution to label on Node 1requiredDuringSchedulingIgnoredDuringExecution to label on Node 2group=red:NoSchedule
group=blue:NoSchedule
group=grey:NoSchedule
group=red:NoSchedule
group=blue:NoSchedule
再回來看敘述:
Red Pod 可以被安排到 Node 1、Blue Pod 可以被安排到 Node 2
→ 指定 requiredDuringSchedulingIgnoredDuringExecution ( 1 & 2 )
不希望 Grey Pod 被安排到 Node 1 & 2
→ 幫 Node 1 & Node 2 加 taints ( 3 & 4 ),但為了讓 Red Pod & Blue Pod 能夠被安排上去,要幫他們加 tolerations ( 6 & 7 )
不希望 Red Pod & Blue Pod 被安排到 Node 3
→ 幫 Node 3 加 taints ( 5 )
😵😵😵😵😵😵😵😵😵😵😵😵😵😵😵😵😵😵😵😵😵😵😵😵😵😵
Reference
https://kubernetes.io/docs/concepts/overview/working-with-objects/labels/
https://kubernetes.io/docs/concepts/overview/working-with-objects/annotations/
https://kubernetes.io/docs/concepts/scheduling-eviction/assign-pod-node/
https://kubernetes.io/docs/concepts/scheduling-eviction/taint-and-toleration/

 iThome鐵人賽