今明兩天會寫 GitLab CI/CD 的主題,算是 Kubernetes 的應用。是很基本的文章但還是紀錄一下小白如我怎麼理解的。
這篇會稍微介紹 GitLab 是什麼、CI/CD Pipeline 是什麼、git push 後自動化部署程式到 GKE 要怎麼做。
類似 GitHub,GitLab 也是一個遠端的 Git Repository 管理系統,另外還提供了滿多附加功能協助軟體開發。GitLab 有官方版本的,若是公司或團隊使用會有相對應的費用。不過 GitLab 也有提供社群(GitLab Community Edition, CE) 及企業 (GitLab Enterprise Edition, EE) 版的軟體給企業自己架設 GitLab Server。
GitLab CI/CD Pipeline 是一套自動化整合及部署的工具,讓軟體開發能夠 Continuous Integration, Continous Delivery (or Deployment)。例如 commit code 並 push 上 repo 後,自動跑測試、自動 build image、自動 deploy 到 UAT/Production 環境等等。在使用 CI/CD 工具之前,開發者需要自己手動下指令來測試、Build Image、部署到目標環境,但透過 CI/CD 工具就能自動化原本需要人工的動作,確保要執行的步驟每一次都會相同 (標準化) 並節省手動的時間。
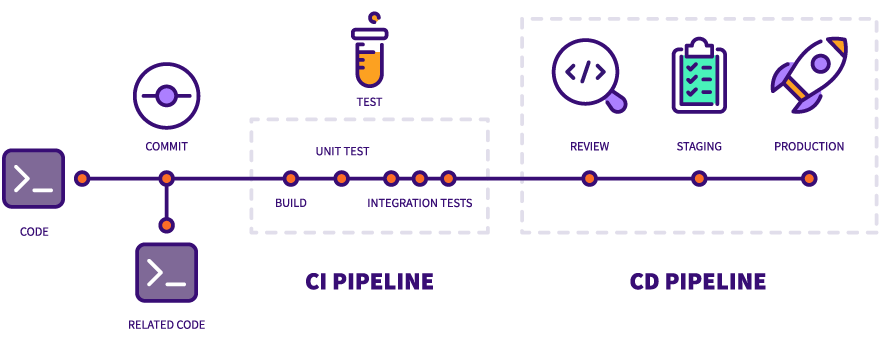
流程長這樣 -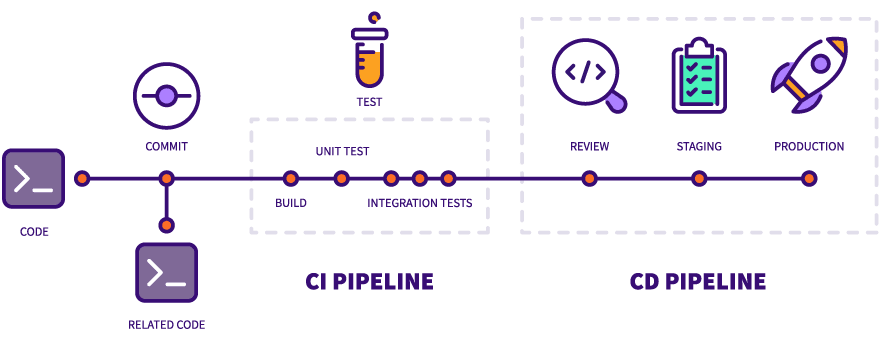
Source: https://about.gitlab.com/images/blogimages/cicd_pipeline_infograph.png
上圖的 BUILD、UNIT TEST etc 可以想成是一個一個的 Job,Job 可能會是多條指令的集合。手動時是人來執行這些指令,自動的話則是由機器幫我們執行。
GitLab CI/CD Pipeline 要做什麼事是定義在 Repository 中的 .gitlab-ci.yml,其中會定義 Job,對應到上圖的編譯、跑測試、部署。Job 通常會包含多條指令,手動的時候是人來執行,自動化則是由機器幫我們執行這些 Job。 因此 Pipeline 還有個 Runner 的角色,當 CI/CD Pipeline 啟動後,這些 Job 就會分給 Gitlab Runner 去執行。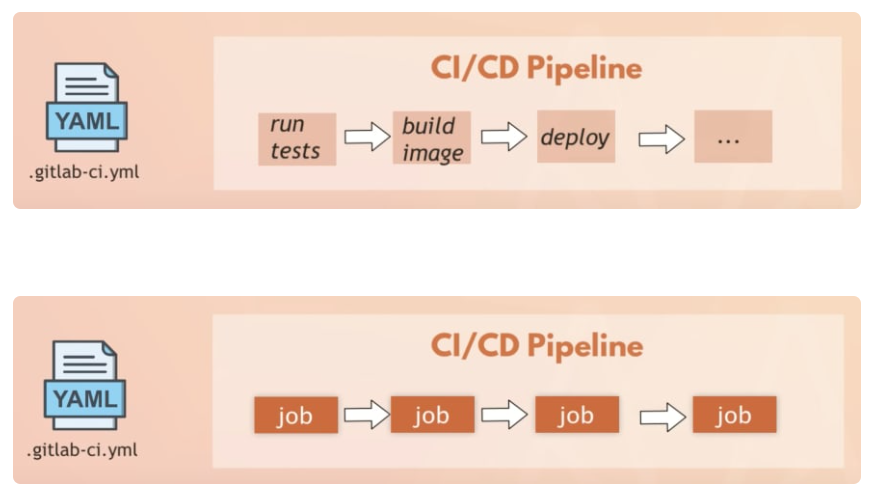
Source: https://dev.to/techworld_with_nana/gitlab-cicd-for-beginners-free-course-2mee
GitLab Server 上可以註冊多個 Runner,每個 Runner 會是另一台主機 (or Instance)。Pipeline 中的 Job 可以指定 tag,tag 會對應到 Runner。Runner 會定時去跟 GitLab Server 確認有沒有符合它的 Job 要執行,有就會分配給它。這邊的 GitLab Server 可以是官方的 gitlab.com,或是自己架的 Gitlab Server。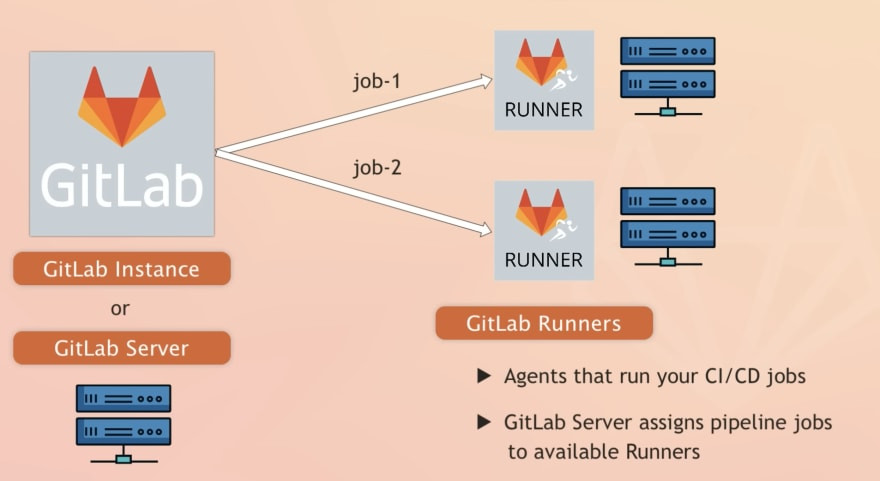
Source: https://dev.to/techworld_with_nana/gitlab-cicd-for-beginners-free-course-2mee
學 .gitlab-ci.yml 的部分直接推薦教學影片 - https://www.youtube.com/watch?v=qP8kir2GUgo。
可以跟著寫 YAML file 然後將程式部署到某台主機上。不過影片中使用的是 Docker Hub、部署環境到雲端主機,這邊示範的則是將 Image 推到 Google Artifact Registry 以及使用這個 Image 部署到 GKE 中。
示範的 Repository 在這:https://gitlab.com/devops8995537/gitlab-cicd-python-web ,改寫 Nana 的 .gitlab-ci.yml ,跑的應用程式一樣是影片中的 python app。
檔案請看 https://gitlab.com/devops8995537/gitlab-cicd-python-web/-/blob/main/.gitlab-ci-ironman_day28.yml
# .gitlab-ci.yml
workflow:
  rules:
    - if: $CI_COMMIT_MESSAGE =~ /run-pipeline/

stages:
  - test
  - build
  - deploy

variables:
  REGISTRY: asia-east1-docker.pkg.dev
  GCP_PROJECT: ironman-401814
  REPO_NAME: demo
  IMAGE_NAME: $REGISTRY/$GCP_PROJECT/$REPO_NAME/$CI_PROJECT_NAME
  IMAGE_TAG: $CI_COMMIT_SHORT_SHA
  GKE_CLUSTER_NAME: cluster-demo
  GKE_CLUSTER_ZONE: asia-east1-b

run_tests:
  stage: test
  image: python:3.9-slim-buster
  before_script:
    - apt-get update && apt-get install make
  script:
    - make test

build:
  stage: build
  image: google/cloud-sdk:447.0.0-alpine
  services:
    - docker:24.0.6-dind-alpine3.18
  variables:
    DOCKER_HOST: tcp://docker:2376
    DOCKER_TLS_CERTDIR: '/certs'
    DOCKER_TLS_VERIFY: 1
    DOCKER_CERT_PATH: '$DOCKER_TLS_CERTDIR/client'
  script:
    # Allow gcloud & other tools to use service account credentials to make requests
    - gcloud auth activate-service-account --key-file $GCP_SERVICE_ACCOUNT_KEY
    # Let Docker client to authenticate by GCP service account, to access the artifact registry
    - gcloud auth configure-docker $REGISTRY -q
    # Build & Push Image
    - docker build -t $IMAGE_NAME:$IMAGE_TAG -t $IMAGE_NAME:latest .
    - docker push $IMAGE_NAME --all-tags
    # List Images
    - gcloud container images list-tags $IMAGE_NAME --limit=10

deploy:
  stage: deploy
  image: google/cloud-sdk:447.0.0-alpine
  before_script:
    # No kubectl in google/cloud-sdk, need to install it
    - gcloud components install kubectl
    - gcloud auth activate-service-account --key-file $GCP_SERVICE_ACCOUNT_KEY
    - gcloud container clusters get-credentials $GKE_CLUSTER_NAME --zone $GKE_CLUSTER_ZONE --project $GCP_PROJECT
	script:
    # Pass the image name & tag name into yaml file
    - sed -i "s|<IMAGE_NAME>|$IMAGE_NAME|g" deploy/gke/deploy.yaml
    - sed -i "s|<IMAGE_TAG>|$IMAGE_TAG|g" deploy/gke/deploy.yaml
    - kubectl apply -f deploy/gke/deploy.yaml
DIND (docker in docker,build job 使用 docker:24.0.6-dind-alpine3.18 當作 service) 的使用可參考官網文件: https://docs.gitlab.com/ee/ci/docker/using_docker_build.html#use-the-kubernetes-executor-with-docker-in-docker
$CI_PROJECT_NAME、$CI_COMMIT_SHORT_SHA 是 Predefined CI/CD vairiables: https://docs.gitlab.com/ee/ci/variables/predefined_variables.html
需要做的事有 -
Artifact Registry 的圖先跳過,Cluster 的部分可參考前一天的文章。
接下來要建立 Service Account,讓 Gitlab Runner 執行 Job 的時候可以拿這個身份對 Google Cloud 做操作。左側選單選擇 [IAM] → [Service Account]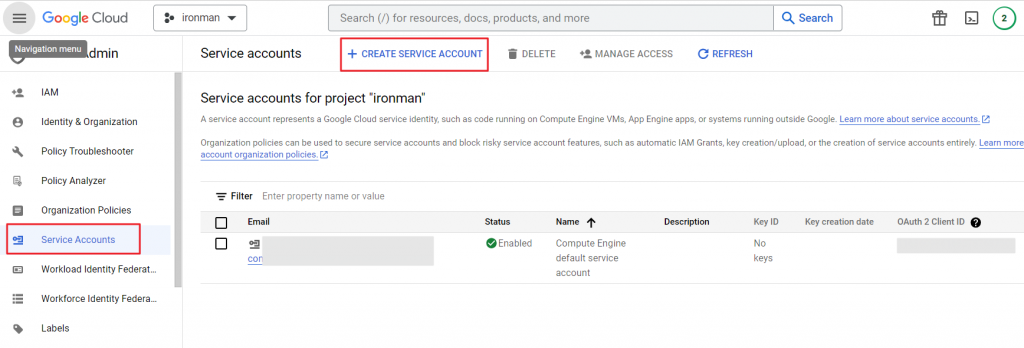
點選 [CREATE SERVICE ACCOUNT] 後,輸入 account name,接下來選擇要給這個 account 什麼 role。我們要
所以給 Artifact Registry Writer、Artifact Registry Reader、Kubernetes Engine Developer 這三個 Role。(GCP IAM 是不是能夠再限縮權限到特定 Repo 或特定資源待研究)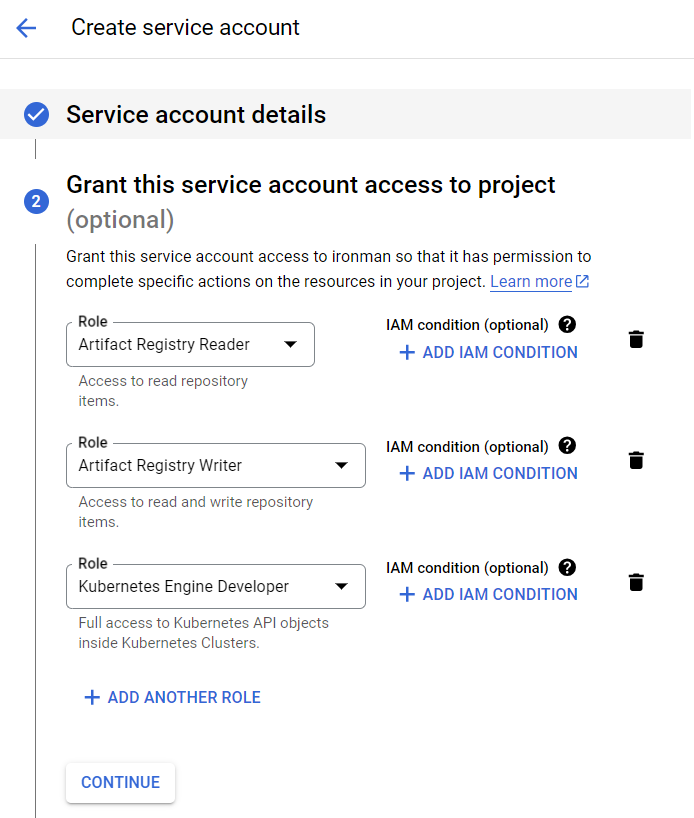
接下來按 [Done] 就設定好了。
回到 Service Accounts 的頁面,可以看到多了剛才設定的 Account。接下來直接點選這個 Email,進去新增 Key。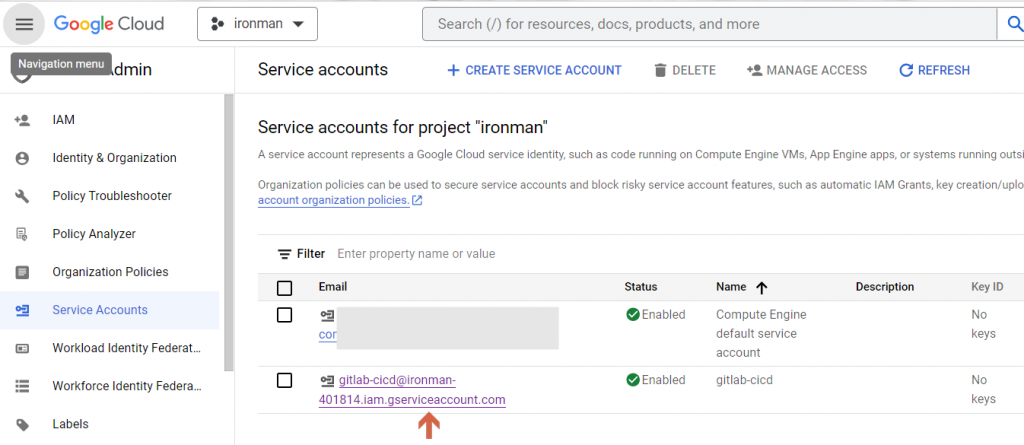
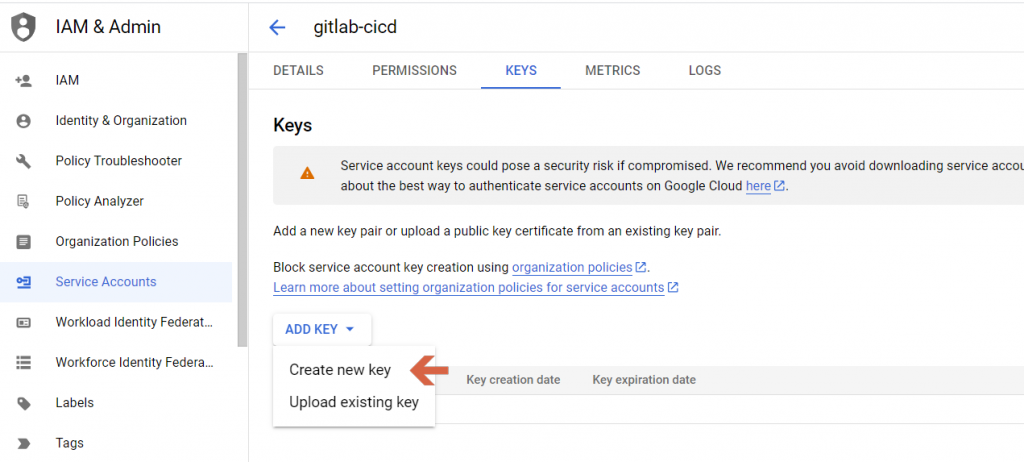
點選後會跳出視窗,建議選擇 JSON 格式的 KEY,確定後會再跳出下載的視窗讓你存 KEY。透過這個 KEY 就能對 Service Account 做認證,執行這個 Account 可以做的事。
回到 IAM 的介面,可以看到各 Account 有什麼 Role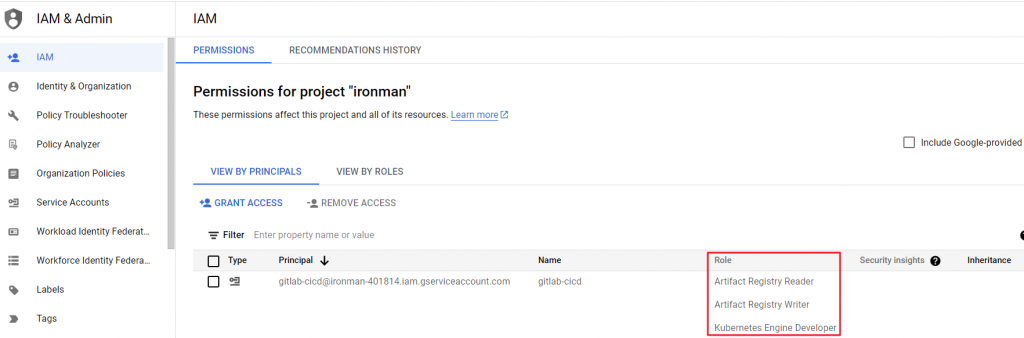
有些機密的資料不該明文寫在程式碼中,但我們使用 GitLab Pipeline 又需要剛才 Service Account 的 KEY。這時需到 GitLab Repo 左側選單,[Settings] → [CI/CD] → [Variables] 設定變數。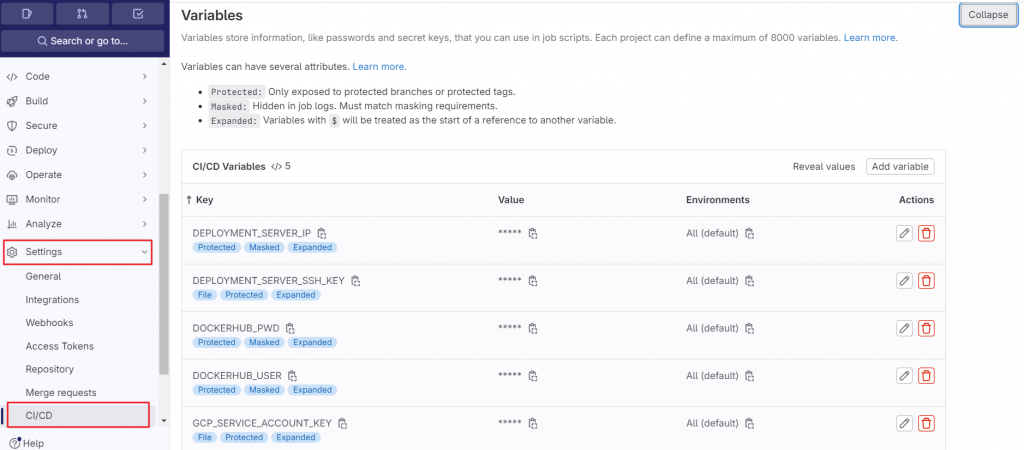
點選 [Add variable],可以新增變數,到時就能在 .gitlab-ci.yml 中透過 $ 使用。
這邊可以將變數存成 File 或是一般變數,這邊直接存成 File,在下 gcloud auth activate-service-account [ACCOUNT] [--key-file]=KEY_FILE 指令時就能直接用。
一切都準備好後就可以 commit & push。因我在 pipeline file 中有設 rules: if: $CI_COMMIT_MESSAGE =~ /run-pipeline/ ,所以只有 Commit Message 包含 run-pipeline 的字眼時才會啟動 CI/CD pipeline。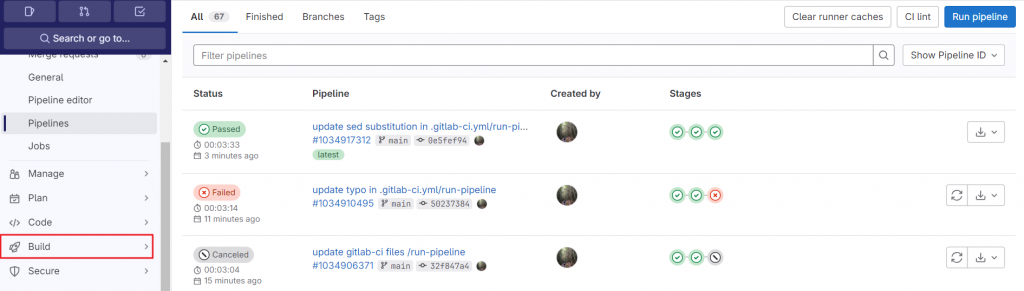
跑了幾個錯誤後終於成功!點進去看可看每個 Job 輸出的 log。
例如 deploy job 的輸出 -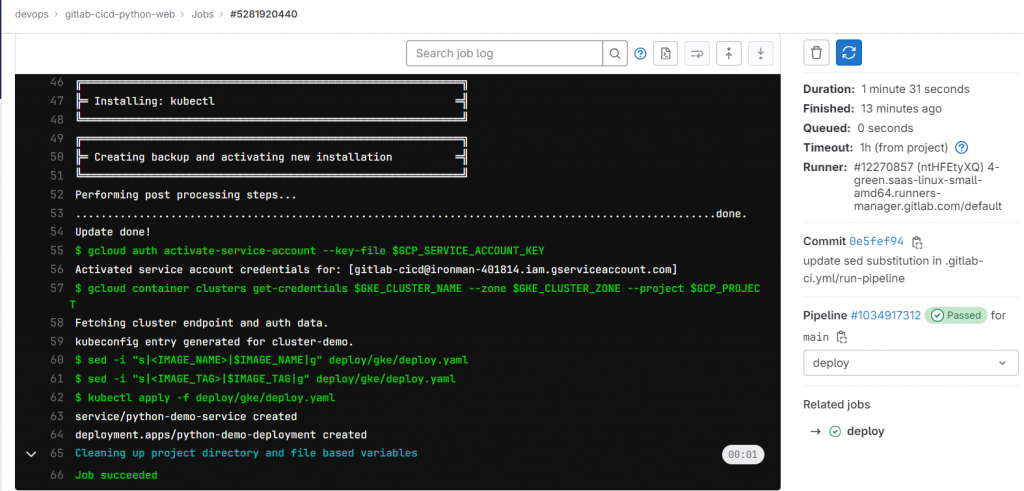
因部署上去的只有 Deployment & Service,可以透過 Cloud Shell 的功能來預覽一下。要使用 Cloud Shell 操作 Cluster 需要先下載 kubectl & grant access to the cluster。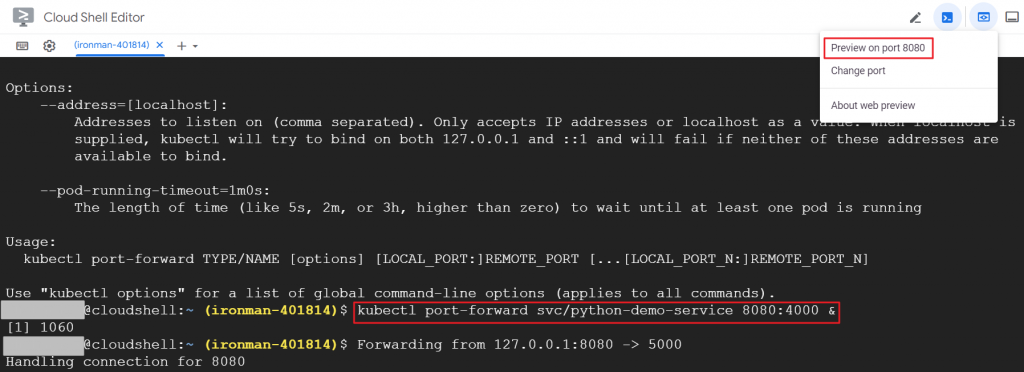
然後 port-forward 到主機的 8080 port,就能從右上角點選 [Preview on port 8080] 預覽 App。
Day 28 !!!!
Cluster 記得刪除
Nana 的頻道很棒 (https://www.youtube.com/@TechWorldwithNana)

