昨天使用了 GitLab CI/CD Pipeline 部署程式到 GKE,今天來介紹一下 GitLab Runner & 在 Kubernetes Cluster 中建 Runner。
兩句話描述一下什麼是 Runner executor。Executor 可以理解成 Runner 要用什麼樣的環境 & 方式來執行 Job。Executor 有幾種:Shell executor、Docker executor、Kubernetes executor ……。詳細介紹在這邊: https://docs.gitlab.com/runner/executors/ 。使用 Shell executor 會在 Runner 這台主機執行 Job、Docker executor 則是建 Container,在 Container 中執行 Job。下圖的 Runner 則是使用 Kubernetes executor。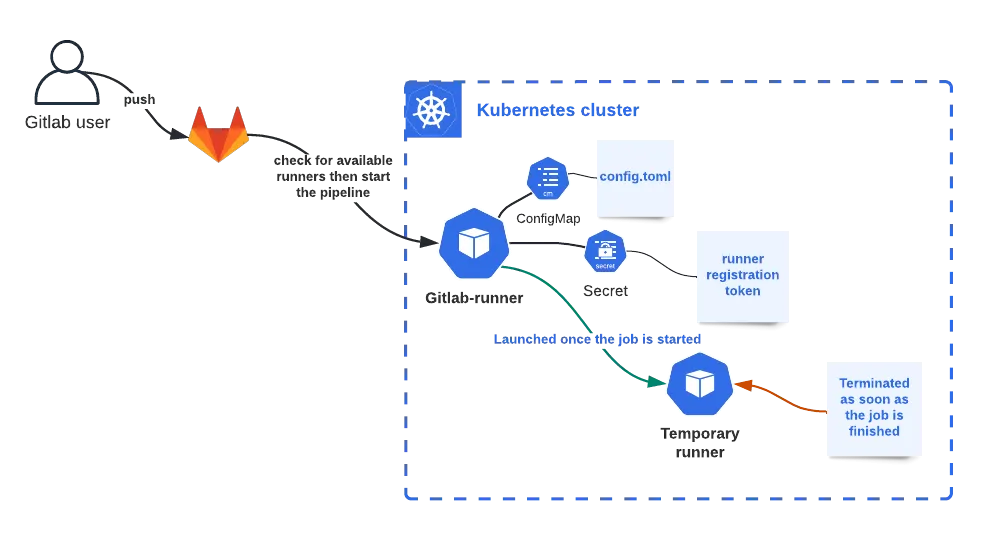
Source: https://blog.devops.dev/gitlab-ci-runner-on-kubernetes-cluster-530885ad510f
中間那個狐狸是 GitLab Server,而這裡的 GitLab Runner 是 Kubernetes Cluster 中的一個 Pod,當有 Job 分配給這個 Runner 執行,它會建立一個暫時的 Pod 來執行 Job。
當我們使用 gitlab.com 的服務時,官方有提供共用的 Runner,它們也有自己的 tag,如果沒加 tag 預設會是 Linux 環境、Docker Machine executor、規格是 small 的機器。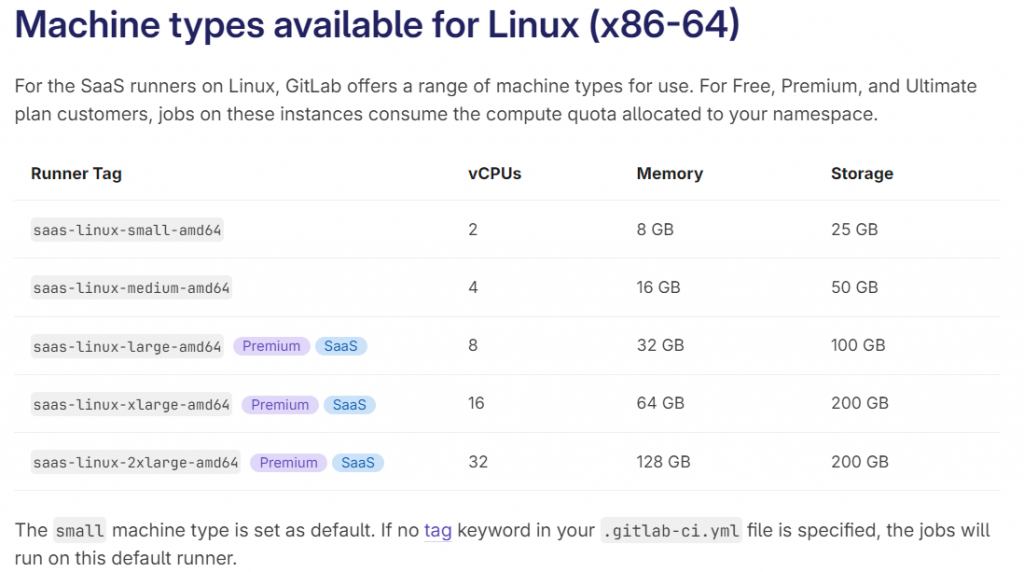
詳細可看: https://docs.gitlab.com/ee/ci/runners/saas/linux_saas_runner.html
除了 Linux 環境外也有 macOS & Windows Runner。
這個小標有點怪但就先這樣理解好了。Runners 可以分成 Shared runners、Group runners、Project runners。顧名思義,Shared runners 是整個 GitLab 上的 groups & projects 都能使用、Group runners 是 Group level、Project runners 是 Project level。
如果是自架的 GitLab Server,Admin 有權限設 Shared runner。
Group runners & Project runners 則是讓 Owner 可以自己註冊這個 Group / Project 使用的 runners。
進到註冊及安裝 Runner 的階段。接下來會在本地的 Cluster 中裝 Runner 然後註冊 Runner 到 gitlab.com 上 (目前版本是 16.5),給特定 Project 使用。如果要註冊 Group runner 步驟是一樣的,只是要去 Group 的頁面找 runner authentication token。
左側選單選 Settings → CI/CD,可以看到 Runners 的區塊。左側就是 Project runners。下面會列 Available runners,目前 QwKXvgj_n 這個 Runner 是我在別的 Project 中註冊的,如果沒有鎖住那這個 Runner 也可以被拿來給別的 Project 使用。
新增新 Runner 就點選 [New project runner]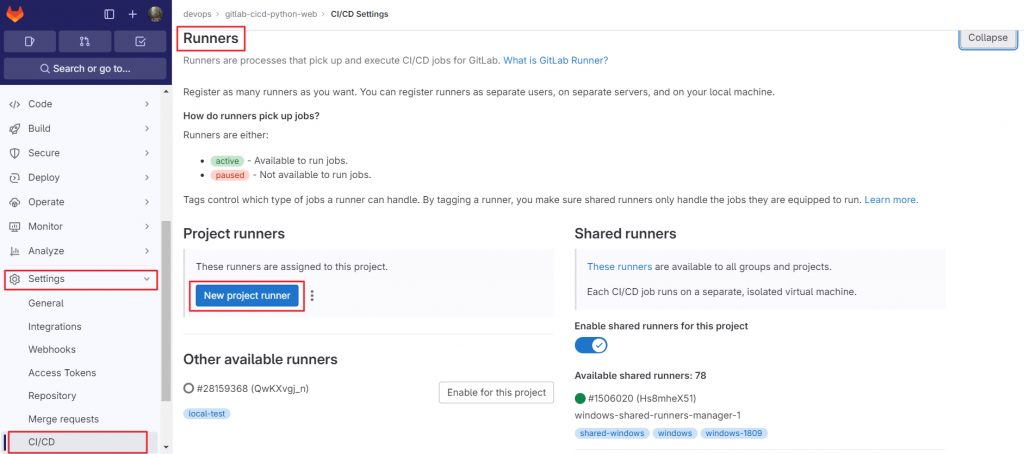
接下來進到設定的頁面,可設定 tags、是否要跑 untagged jobs、Job 跑多久算 timeout。點選 Create Runner 後,會顯示 Runner Token -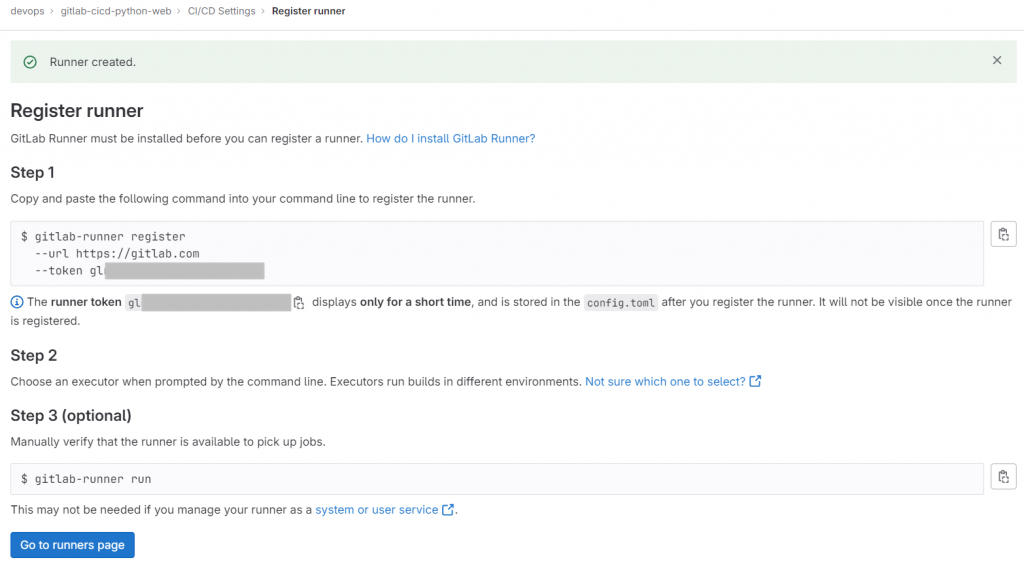
把 runner token 記下來,後面安裝時會用到。
接下來用 Helm 安裝 Runner。參考官方的頁面: https://docs.gitlab.com/runner/install/kubernetes.html
一樣要先加 repo,然後在安裝時要注意 GitLab Runner 版本跟 GitLab Server 的相容性。如果是自架的 GitLab Server,安裝時可使用 --version 來指定 chart version。
helm repo add gitlab https://charts.gitlab.io
helm repo update gitlab
# view versions
helm search repo -l gitlab/gitlab-runner
接下來則是最重要的 Configuration。一樣下載 Values.yaml 來改設定,或是想要整個 chart 載下來也行。
# get values.yaml
helm show values gitlab/gitlab-runner > values_gitlab-runner.yaml

# pull whole chart
# helm pull repo/chartname [flags]
# --untar: untar the chart after downloading it
helm pull gitlab/gitlab-runner --untar
其中 Values.yaml 有幾個參數可以了解一下 -
跑 GitLab Runner 的 Pod 使用的 image
image:
  registry: registry.gitlab.com
  image: gitlab-org/gitlab-runner
要設定 GitLab URL,如果是自架的 GitLab 這邊就填自架的 Server 位置
gitlabUrl: https://gitlab.com
前面在 gitlab.com 註冊 Runner 時拿到的 token,填在 runnerToken 的地方。因過去的版本是使用 runnerRegistrationToken 所以這邊也列出來,但未來應該會改成用 runnerToken。
## DEPRECATED: The Registration Token for adding new Runners to the GitLab Server.
##
## ref: https://docs.gitlab.com/ee/ci/runners/new_creation_workflow.html
##
# runnerRegistrationToken: ""

## The Runner Token for adding new Runners to the GitLab Server. This must
## be retrieved from your GitLab Instance. It is token of already registered runner.
## ref: (we don't yet have docs for that, but we want to use existing token)
##
runnerToken: "YOUR RUNNER TOKEN"
設定同時跑多少個 jobs & 多久去跟 GitLab 確認有沒有 job 要跑
## Configure the maximum number of concurrent jobs
concurrent: 10
## Defines in seconds how often to check GitLab for a new builds
checkInterval: 30
RBAC - 如果已經有建好的 service account 這邊維持 false,下面的 serviceAccountName 則指定要用的 service account;但這邊我們設成 true 直接建一組
## For RBAC support:
rbac:
  create: true
	rules:
    - resources:
        [
          "configmaps",
          "events",
          "pods",
          "pods/attach",
          "pods/exec",
          "secrets",
          "services",
        ]
      verbs: ["get", "list", "watch", "create", "patch", "update", "delete"]
    - apiGroups: [""]
      resources: ["pods/exec"]
      verbs: ["create", "patch", "delete"]

## Use the following Kubernetes Service Account name if RBAC is disabled in this Helm chart (see rbac.create)
# serviceAccountName: default
再來是 Runners 的設置。這邊可以參考 -
當使用 Runner 跑 Job 的時候,會起一個暫時的 Pod,Pod 裡面會有三種 containers -
可以設置每個 Container 能夠用的 CPU & Memory 各是多少、預設的 build container image 是哪個 (官方的就是 ruby)、有沒有要 mount 的 volume 等等。
這邊假設我們要建立專門 build image 用的 Runner,可以指定好用 google cloud sdk image、service 使用 dind image。為了要跑 Docker in Docker,Containers 必須用 privileged 模式運行 (會有更高的權限,例如訪問 host 的設定),並設定如果使用 TLS connection 的話 certification 要放哪。
runners:
	config: |
    [[runners]]
      [runners.kubernetes]
        namespace = "{{.Release.Namespace}}"
        image = "google/cloud-sdk:447.0.0-alpine"
        privileged = true
      [[runners.kubernetes.services]]
        name = "docker:24.0.6-dind-alpine3.18"
      [[runners.kubernetes.volumes.empty_dir]]
        name = "docker-certs"
        mount_path = "/certs/client"
        medium = "Memory"
先設定到這邊。接下來執行
helm install --namespace gitlab-runner --create-namespace gitlab-runner gitlab/gitlab-runner -f values.yaml
成功後會看到
也可觀察 gitlab-runner 這個 namespace 中的 pod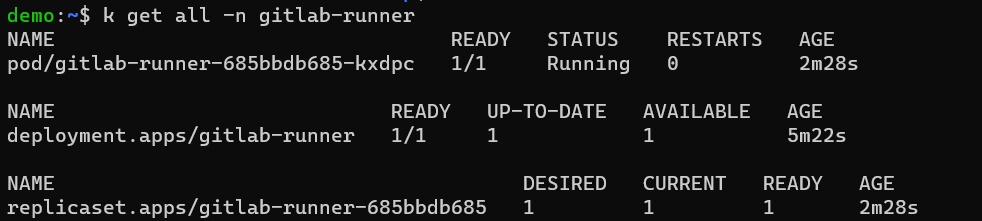
還可以看 helm 一鍵安裝了什麼 objects
kubectl get sa,roles,rolebindings -n gitlab-runner
kubectl get configmaps,secret -n gitlab-runner
進到 gitlab.com 會看到剛才註冊的 Runner 變綠色。點筆的圖示可以做 tag 的修改,這邊我幫它加了 build-image 的 tag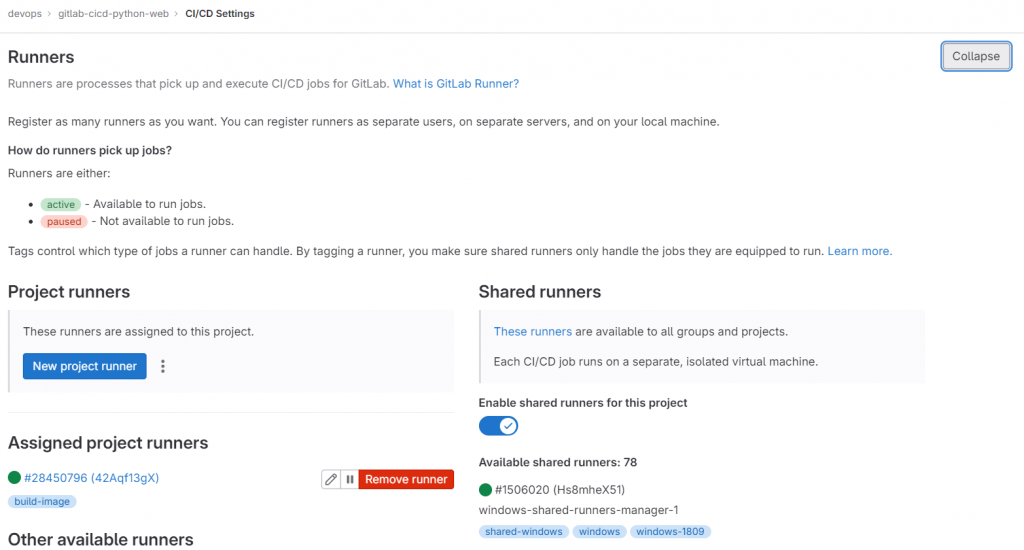
然後就能用我們建的 Runner 跑 pipeline 了,示範 .gitlab-ci.yml 如下:
workflow:
  rules:
    - if: $CI_COMMIT_MESSAGE =~ /run-pipeline/

stages:
  - test
  - build
  - deploy

variables:
  REGISTRY: asia-east1-docker.pkg.dev
  GCP_PROJECT: ironman-401814
  REPO_NAME: demo
  IMAGE_NAME: $REGISTRY/$GCP_PROJECT/$REPO_NAME/$CI_PROJECT_NAME
  IMAGE_TAG: $CI_COMMIT_SHORT_SHA
  GKE_CLUSTER_NAME: cluster-demo
  GKE_CLUSTER_ZONE: asia-east1-b

run_tests:
  tags:
    - build-image
  stage: test
  image: python:3.9-slim-buster
  before_script:
    - apt-get update && apt-get install make
  script:
    - make test

build:
  tags:
    - build-image
  stage: build
  # image: google/cloud-sdk:447.0.0-alpine
  # services:
  #   - docker:24.0.6-dind-alpine3.18
  variables:
    DOCKER_HOST: tcp://docker:2376
    DOCKER_TLS_CERTDIR: '/certs'
    DOCKER_TLS_VERIFY: 1
    DOCKER_CERT_PATH: '$DOCKER_TLS_CERTDIR/client'
  script:
    # Allow gcloud & other tools to use service account credentials to make requests
    - gcloud auth activate-service-account --key-file $GCP_SERVICE_ACCOUNT_KEY
    # Let Docker client to authenticate by GCP service account, to access the artifact registry
    - gcloud auth configure-docker $REGISTRY -q
    # Build & Push Image
    - docker build -t $IMAGE_NAME:$IMAGE_TAG -t $IMAGE_NAME:latest .
    - docker push $IMAGE_NAME --all-tags
    # List Images
    - gcloud container images list-tags $IMAGE_NAME --limit=10
GitLab repo: https://gitlab.com/devops8995537/gitlab-cicd-python-web
示範檔案請看 https://gitlab.com/devops8995537/gitlab-cicd-python-web/-/blob/main/.gitlab-ci-ironman_day29.yml
這邊只執行兩個 Jobs。tags 指定自己建立的 Runner (=build-image)。第二個 Job 不指定 image & services,會直接套用 runner 設定。
跑的時候可以用 kubectl get pods -n gitlab-runner -w 觀察 pod 的變化。可以看到照順序有兩個 runner-xxx Pods 被建立。其中一個是跑 run_tests job、一個是跑 build job。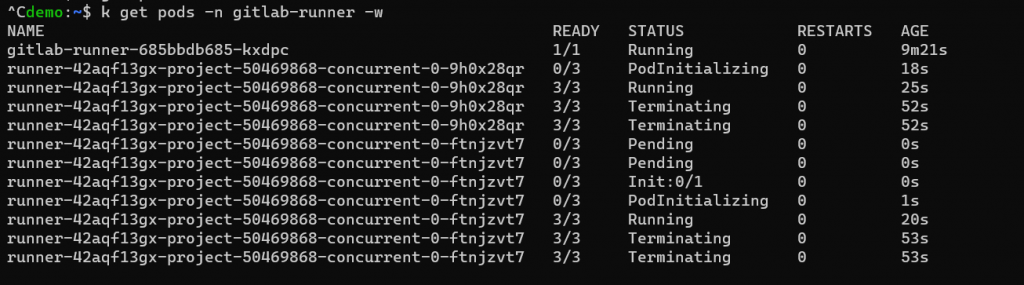
到 gitlab 的 Pipelines 界面也可以看到相對應的資訊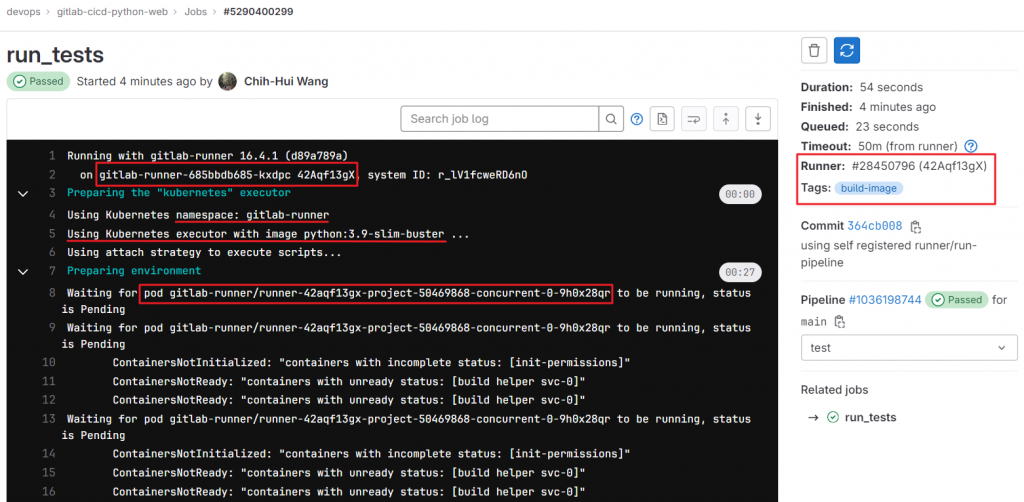
會寫 gitlab runner 本身 Pod 的名字、運行在哪個 namespace、執行這個 job 的 Pod 的名字、用什麼 Image 等等。右方則是使用的 Runner & Tags。
最後提一下 config.tml ,GitLab Runner 的設定檔其實是來自這個檔案。用 Helm 安裝它會自動生成這個文件讓 GitLab Runner 使用。可以透過 kubectl describe -n gitlab-runner configmaps gitlab-runner 看內容。
而這個 configmap 會被掛到 runner pod 中。Describe GitLab Runner Pod 可看到 configmap 會被掛到 /configmaps 中,進去 Pod 裡面看看,可以看到被建立的檔案以及前面在 values.yaml 中的設定。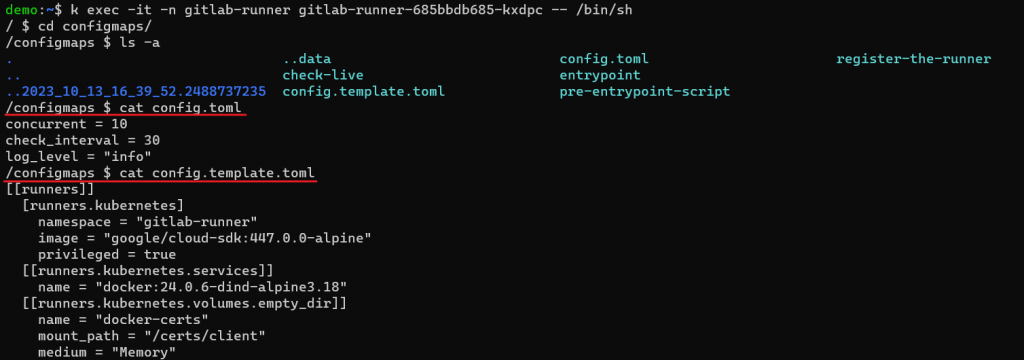
官方文件算是有寫詳細但總覺得結構有點亂,很多資訊很難想到要去哪個 section 找。
剩下一天!
Reference
https://chengweichen.com/2021/03/gitlab-ci-executor.html
https://docs.gitlab.com/runner/
https://docs.gitlab.com/runner/#gitlab-runner-versions
https://docs.gitlab.com/runner/executors/
https://docs.gitlab.com/runner/install/kubernetes.html
https://docs.gitlab.com/runner/configuration/advanced-configuration.html
https://docs.gitlab.com/runner/configuration/advanced-configuration.html#helper-image
https://docs.gitlab.com/ee/ci/docker/using_docker_build.html#use-docker-in-docker
https://hklifenote.blogspot.com/2022/02/gitlab-cicd-gitlab-runner.html