昨天跟各位分享了Denoising Autoencoder的相關理論,而今天將會分享如何用DAE實現MNIST數據集圖像去噪,那我們廢話不多說,正文開始!
MNIST是Tensorflow內建的手寫數字數據集,因此不需要從網路上下載!
先載入所需的套件
import numpy as np
import tensorflow as tf
from tensorflow.keras.layers import Input, Dense
from tensorflow.keras.models import Model
from tensorflow.keras.datasets import mnist
import matplotlib.pyplot as plt
然後我們需要載入MNIST數據集,然後再進行前處理
(x_train, _), (x_test, _) = mnist.load_data()

x_train = x_train.astype('float32') / 255.
x_test = x_test.astype('float32') / 255.
x_train = x_train.reshape((len(x_train), np.prod(x_train.shape[1:])))
x_test = x_test.reshape((len(x_test), np.prod(x_test.shape[1:])))
MNIST數據集的圖片為黑白圖,因此顏色深度為0到255,
我們將測試集和訓練集的數據轉為浮點數,並且將像素值縮到0到1的範圍內,然後將兩個數據集從28*28重塑成784
接下來我們要在訓練集跟測試集動點手腳
noise_factor = 0.5
x_train_noisy = x_train + noise_factor * np.random.normal(loc=0.0, scale=1.0, size=x_train.shape)
x_test_noisy = x_test + noise_factor * np.random.normal(loc=0.0, scale=1.0, size=x_test.shape)
x_train_noisy = np.clip(x_train_noisy, 0., 1.)
x_test_noisy = np.clip(x_test_noisy, 0., 1.)
這裡我們添加高斯噪音到訓練集和測試集,並且確保像素質在0~1之間,這樣我們資料集的處理就完成了~
接下來就是構件模型了~
def create_denoising_autoencoder(input_dim, encoding_dim):
    input_layer = Input(shape=(input_dim,))
    noisy_layer = GaussianNoise(0.5)(input_layer)

    encoder = Dense(encoding_dim, activation='relu')(noisy_layer)
    decoder = Dense(input_dim, activation='sigmoid')(encoder)

    autoencoder = Model(input_layer, decoder)
    return autoencoder
其實模型十分簡單,我們先定義了DAE的模型,裡面包含了輸入層、高斯噪音層、編碼器以及解碼器
接下是定義模型參數
input_dim = 784
encoding_dim = 32
第一個是輸入大小,也就是圖片大小28*28=784,第二個則是要求壓縮後的維度為32
最後編譯、訓練模型
denoising_autoencoder = create_denoising_autoencoder(input_dim, encoding_dim)
denoising_autoencoder.compile(optimizer='adam', loss='mse')

denoising_autoencoder.fit(x_train_noisy, x_train, epochs=10, batch_size=128, shuffle=True,validation_data=(x_test_noisy, x_test))
decoded_imgs = denoising_autoencoder.predict(x_test_noisy)
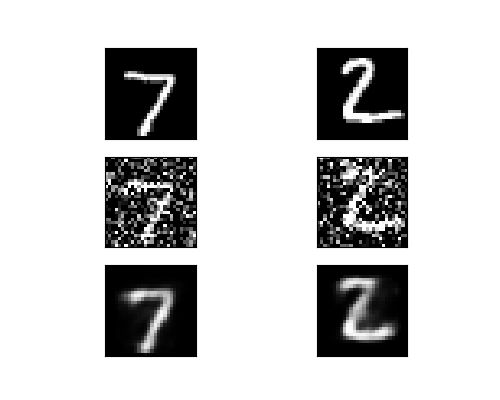
這樣就訓練的部分就完結了!接下來我們讓原圖與去躁的圖片作比較
n = 2
plt.figure(figsize=(5, 4))
for i in range(n):
    ax = plt.subplot(3, n, i + 1)
    plt.imshow(x_test[i].reshape(28, 28))
    plt.gray()
    ax.get_xaxis().set_visible(False)
    ax.get_yaxis().set_visible(False)

    ax = plt.subplot(3, n, i + 1 + n)
    plt.imshow(x_test_noisy[i].reshape(28, 28))
    plt.gray()
    ax.get_xaxis().set_visible(False)
    ax.get_yaxis().set_visible(False)

    ax = plt.subplot(3, n, i + 1 + 2 * n)
    plt.imshow(decoded_imgs[i].reshape(28, 28))
    plt.gray()
    ax.get_xaxis().set_visible(False)
    ax.get_yaxis().set_visible(False)
plt.show()

上面是原圖,中間是加入噪音,下面則是重建後的圖片,可以發現他已經將去躁的部分刪除掉了,但因為模型比較簡單,所以圖片看起來還是有點模糊
參考網站:The Keras Blog
以上就是小弟我今天分享有關於用DAE實現MNIST數據集圖像去噪,明天跟各位介紹Variational Autoencoder(VAE),那我們明天見!
