
還記不記得以前瘋迷全世界的電子雞(Tamagotchi),這個由萬代(BANDAI)公司於1996年推出的掌上型電子寵物。在最近這個缺蛋的時期,2023/07/15該公司又推出了新產品「Tamagotchi Uni」,內建 WiFi 功能,除了基礎的手表功能外,也能餵養電子寵物(原始功能),還能聯網跟世界的玩家一起遊玩、交換道具。另外萬代公司使用 AWS 的雲端的 IoT服務,建構了一個專用的「Tamaverse」環境,這個蛋蛋宇宙有入口處可遇見來自世界的遊戲玩家,Tama廣場有派對場地、旅遊景點與服裝店,而競技場則可讓玩家進行合作解任務或是對戰。

身為中年大叔,去買一顆色彩鮮艷的Tamagotchi Uni戴在手上似乎有點奇怪。不過自己動手做一個概念產品,就很值得一試。在這個資訊的年代,要找相關的教學影片與專案,我們就會想到程式設計師的三寶:
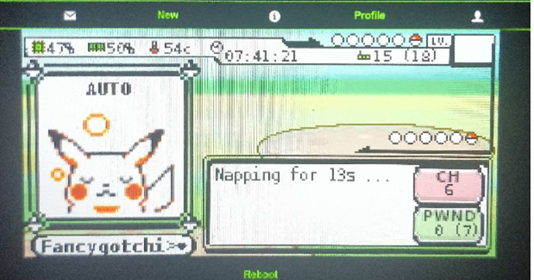
沒想到就讓我找到了一個很有趣的 MicroPython 專案「picotamachibi」,這是由 Kevin McAleer 先生所製作的Raspberry Pico版的虛擬電子寵物。Kevin McAleer 的頻道常會教您做各式各樣的小玩具,很值得訂閱與學習。有興趣的讀者可以參考底下的連結,做進一步的學習:

不過先前網路上也有類似的創意專案。就有人想過是否可以用無線網路訊號來問養虛擬寵物?還真的有人實作出這樣的專案。但要提醒各位讀者,因為這專案裡面有牽涉破解無線網路密碼的技術,這屬於違法的行為,請各位讀者要特別注意,千萬別違法。知道原理,才能避免自己受害。趕快注意你家的無線基地台密碼是不是太簡單?
在2019年10月16日的 hackaday 網站貼出過一篇文章「A TAMAGOTCHI FOR WIFI CRACKING」。

專案是這樣說的
如果您想瞭解WPA標準中的安全性和弱點,沒有比使用模仿Tamagotchi行為的工具更好的方法了。
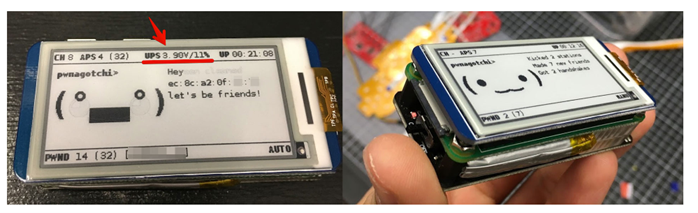
這個人工智慧包被稱為pwnagotchi,在本地WiFi數據包中尋找可用於破解WPA加密的資訊。它能夠自我修改,以便最大限度地利用它能夠從你碰巧放置它的任何環境中獲得的有用資訊量。作為一個有趣的設計選擇,pwnagotchi的行為就像一隻古老的Tamagotchi寵物一樣,當它得到所需的輸入時,它表現得很開心。
您可以到這個網頁來了解製作一台 「pwnagotchi」所需的材料,請參考 installation 說明。
因為破解無線網路的 WPA 加密需要比較強的運算能力,因此此專案用了一台樹梅派 Raspberry Pi Zero W 。
Github 專案連結: https://github.com/evilsocket/pwnagotchi
我們使用的玩學機雖然 CPU 沒有這麼快,但機器上有WiFi 模組,依然可以用前面課程學到的無線網路連線程式,進行部分程式修改,做一個基礎的 SSID 搜集器,記錄到資料庫中,這也是觀察生活週遭是否有惡意無線網路站台的好辦法。
這次我們參考 https://github.com/tipodice/ESP8266-Network-Scanner 這個專案來進行修改。
ESP8266-Network-Scanner 會持續掃描設周圍的 WiFi網路,蒐集 SSID、RSSI、加密類型與頻道的數據,將資料存到 JSON格式的資料庫。使用 MicroPython 程式語言開發,很容易移植到支援執行MicroPython 系統的其他微處理器平台。
使用這個函式庫要注意的事情是:
dp.py 程式碼如下:
# Import necessary modules
import time
import network
import db  # Import the custom database module

# Create an instance of the Database class to manage network data
my_db = db.Database('networks.json')

# Activate the Wi-Fi interface for scanning
sta_if = network.WLAN(network.STA_IF)
sta_if.active(True)

# List of authentication modes for Wi-Fi networks
authmodes = ['Open', 'WEP', 'WPA-PSK', 'WPA2-PSK4', 'WPA/WPA2-PSK']

# Infinite loop to continuously scan for nearby APs
while True:
    # Iterate through the scanned Wi-Fi networks
    for (ssid, bssid, channel, RSSI, authmode, hidden) in sta_if.scan():
        try:
            try:
                # Format the BSSID (MAC address) as a string
                bssid = "{:02x}:{:02x}:{:02x}:{:02x}:{:02x}:{:02x}".format(*bssid)
            except:
                bssid = str(bssid)

            # Create a formatted authentication mode string
            auth = f"{authmodes[authmode]} (hidden)" if hidden else f"{authmodes[authmode]}"

            # Check if the BSSID is not already in the database
            record_value = my_db.get_record_by_bssid(bssid)
            if not record_value:
                # Create a new record for the scanned network
                found = {
                    "ssid": "{:s}".format(ssid),
                    "auth": auth,
                    "channel": "{}".format(channel),
                    "rssi": "{}".format(RSSI),
                    "bssid": bssid
                }
                # Get the key for the new record (incremental)
                last_record_key = my_db.get_last_record_key()
                if last_record_key:
                    record_key = str(int(last_record_key) + 1)
                else:
                    record_key = "1"
                # Add the new record to the database
                my_db.add_record(record_key, found)
        except:
            pass
    # Sleep for 1 second before scanning again
    time.sleep(1)
main.py 程式碼如下:
# Import necessary modules
import time
import network
import db  # Import the custom database module

# Create an instance of the Database class to manage network data
my_db = db.Database('networks.json')

# Activate the Wi-Fi interface for scanning
sta_if = network.WLAN(network.STA_IF)
sta_if.active(True)

# List of authentication modes for Wi-Fi networks
authmodes = ['Open', 'WEP', 'WPA-PSK', 'WPA2-PSK4', 'WPA/WPA2-PSK']

# Infinite loop to continuously scan for nearby APs
while True:
    # Iterate through the scanned Wi-Fi networks
    for (ssid, bssid, channel, RSSI, authmode, hidden) in sta_if.scan():
        try:
            try:
                # Format the BSSID (MAC address) as a string
                bssid = "{:02x}:{:02x}:{:02x}:{:02x}:{:02x}:{:02x}".format(*bssid)
            except:
                bssid = str(bssid)

            # Create a formatted authentication mode string
            auth = f"{authmodes[authmode]} (hidden)" if hidden else f"{authmodes[authmode]}"
            # Check if the BSSID is not already in the database
            record_value = my_db.get_record_by_bssid(bssid)
            if not record_value:
                # Create a new record for the scanned network
                found = {
                    "ssid": "{:s}".format(ssid),
                    "auth": auth,
                    "channel": "{}".format(channel),
                    "rssi": "{}".format(RSSI),
                    "bssid": bssid
                }
                # Get the key for the new record (incremental)
                last_record_key = my_db.get_last_record_key()
                if last_record_key:
                    record_key = str(int(last_record_key) + 1)
                else:
                    record_key = "1"
                # Add the new record to the database
                my_db.add_record(record_key, found)
        except:
            pass
    # Sleep for 1 second before scanning again
    time.sleep(1)
各位讀者可以運用先前學到的一些技能,為自己的玩學機增添提示畫面訊息、加入圖片素材與綁定按鈕顯示不同的資訊等功能,將「無線網路訊號電子雞」的功能逐步加強。讓自己的小專案可以變得更實用、更有趣!


 iThome鐵人賽