今天要稍微談一下 Leptos 的基本概念與做一些美化,所以是藝術家 Ferris:
*Ferris from strager - Faster than Rust and C++: the PERFECT hash table
昨天建立了專案的 Hellow world,目前的資料夾結構應該是這樣的:
.
├── Cargo.toml
├── LICENSE
├── README.md
├── assets
│   └── favicon.ico
├── end2end
│   ├── ...
│   ...
│   └── ...
├── rust-toolchain.toml
├── src
│   ├── app.rs
│   ├── lib.rs
│   └── main.rs
└── style
    └── main.scss
其中前、後端的程式碼都放在 src/ 資料夾中:
src/app.rs 負責前端,由於 Leptos 主要受 Solid(JavaScript) 與 Sycamore(Rust) 啟發,另外也有一些 React(JavaScript)、Yew(Rust) 等框架的影子,所以也是以 Components 作為網頁基本的元素,這部份稍後會再詳細說明。src/main.rs 則負責後端,使用的是 Actix,詳細使用可以參考 官方教學。稍微掃視過這些檔案,可以發現兩件事:
src/main.rs 裡面每個函式都有 #[cfg(feature = ...)] 巨集。feature 有 ssr 與 csr 兩種選項,前者代表 Server-Side Rendering,意思是標有此 feature 的函式只有後端被建立時才會建立。Cargo.toml 中看到 ssr 的部分就有 actix (附上截圖)cx。
cx) 是為了在不同組件間共享數據、管理應用狀態、以及促進模組化的開發和協同工作,但到處都要寫也是很麻煩,所以 Leptos 團隊在未來會將它移除,現在就連 官方教學 都已經採用新版本的寫法了。cargo leptos new 預設使用的 0.4 版升級為即將正式發佈的 0.5 版。Scope
這裡使用的是當前最新的 v0.5.0-rc3 (使用 0.5.0 即可),而升級的方法也很簡單,改 Cargo.toml 就好,這裡會更改兩個地方:
name 跟 output-name,從預設的 leptos_start 改成專案名稱 iron_llama。iron-llama,這是因為對 Rust 的 identifier 來說 - 並非有效的字符,但偏偏 cargo leptos new 的專案名稱只能用 - 分隔,所以這裡要手動轉成 _。leptos_start 的地方也要一起改掉,幸好要改的地方不多:
app.rs 的 <Stylesheet id="leptos" href="/pkg/leptos_start.css"/>
main.rs 的 use leptos_start::app::*;
[dependencies] 區塊中涉及 leptos 的地方版本改掉:
leptos = { version = "0.5.0", features = ["nightly"] }
leptos_meta = { version = "0.5.0", features = ["nightly"] }
leptos_actix = { version = "0.5.0", optional = true }
leptos_router = { version = "0.5.0", features = ["nightly"] }
升級好之後,就能把所有出現 cx 的地方都拿掉,此時三個檔案會分別如下圖右邊的版本,這裡把前後比較詳列如下:
main.rs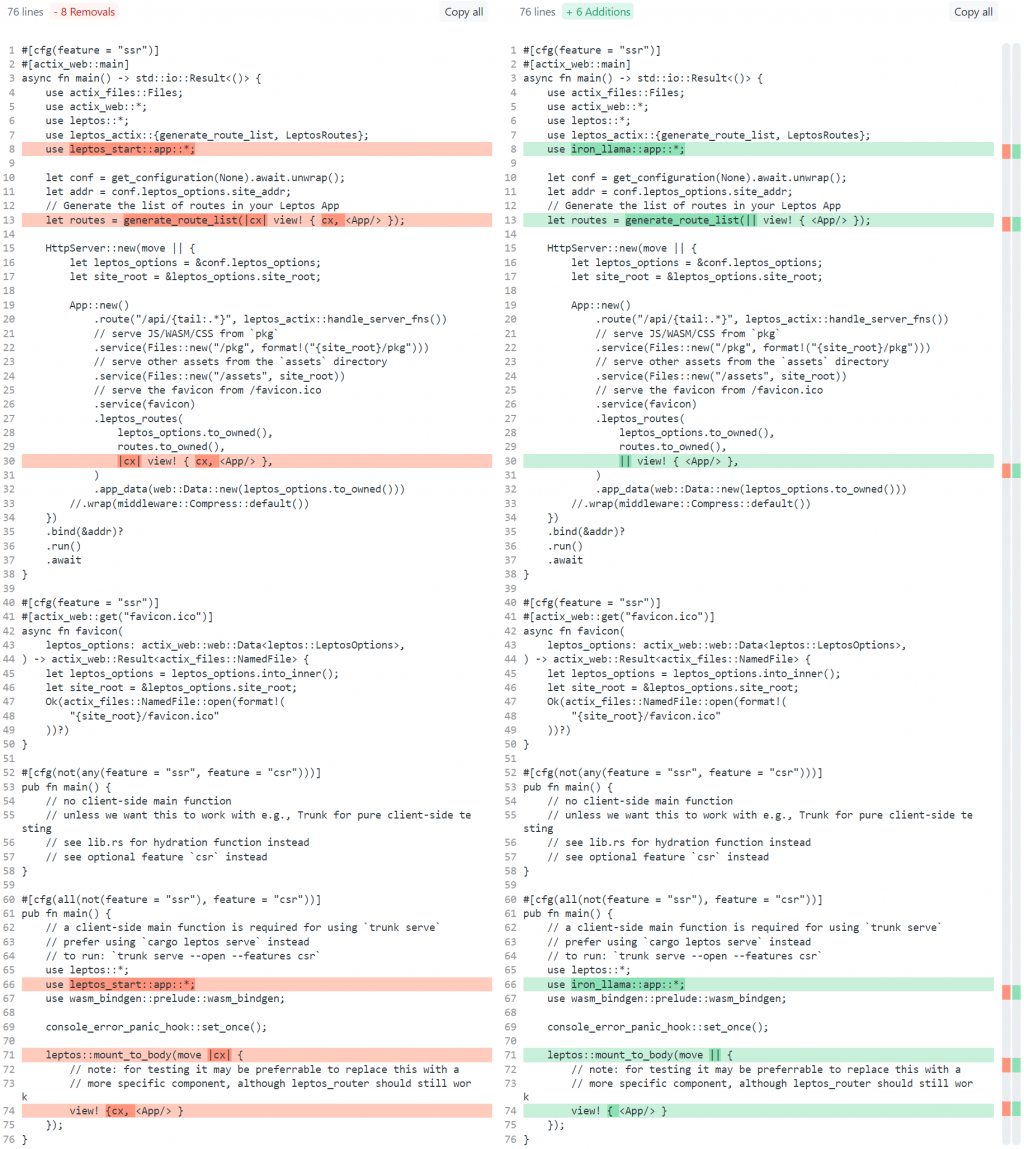
lib.rs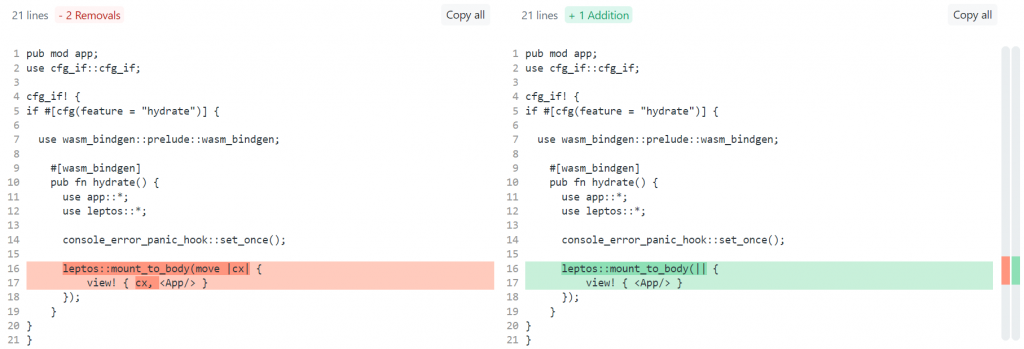
app.rs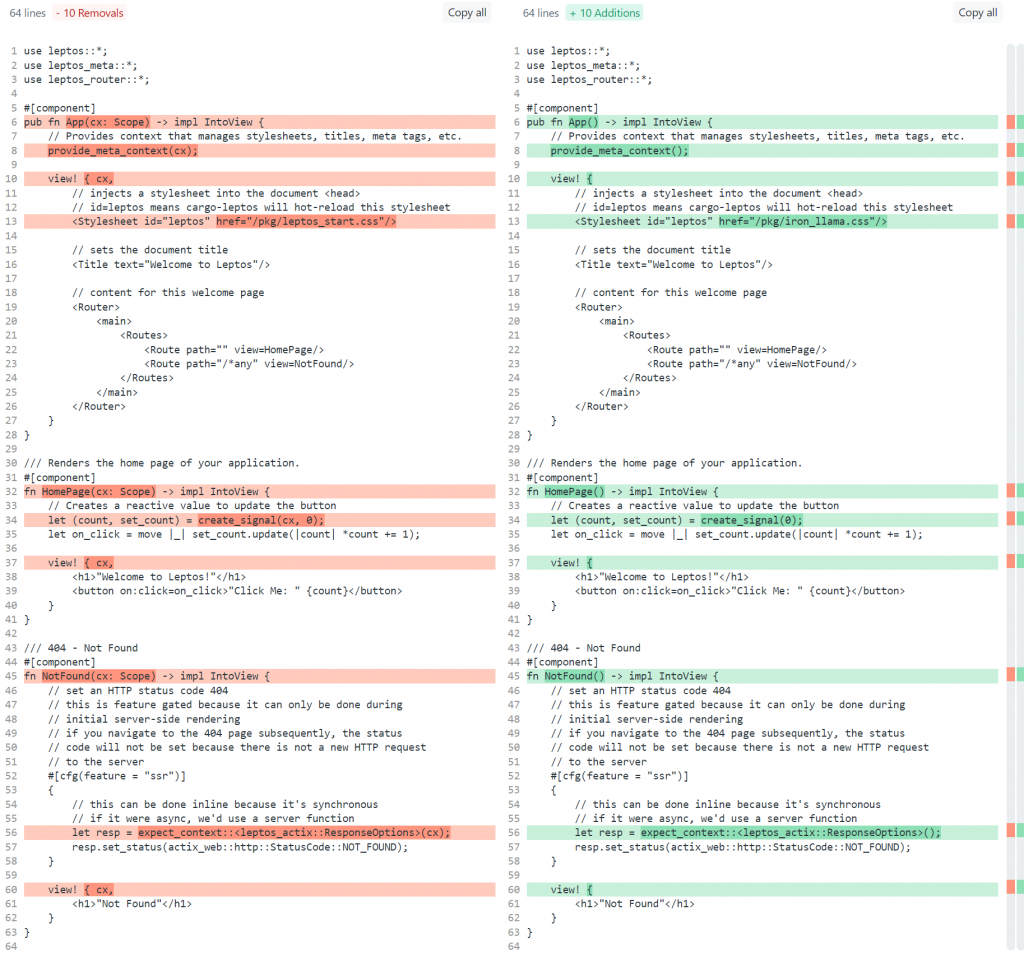
概念上,Component 就像是 HTML 元素,它是一個具有獨立、自定義行為 DOM 區塊。
而其命名使用 PascalCase,這裡以一個簡單的 <App/> component 為例進行說明:
#[component]
fn App() -> impl IntoView {
    let (count, set_count) = create_signal(0);

    view! {
        <button
            on:click=move |_| {
                set_count(3);
            }
        >
            "Click me: "
            {move || count.get()}
        </button>
    }
以下將各部分拆解並詳細說明:
就像大部份的 Component 定義一樣,這裡也使用 #[component] 巨集開頭,使函式變成 Leptos 應用程式中的 Component。
而函式簽名必須具有以下形式:
fn App() -> impl IntoView
這使得每個 Component 都是具有以下特徵的函式:
impl IntoView,它是任何能由 Leptos view 回傳的不透明數據類型。Component 函式的主體為只會執行一次的 set-up 函式,而非會多次回傳的 render 函式。
因此一般會用來:
let (count, set_count) = create_signal(0);
create_signal 建立了一個信號,信號是 Leptos 中反映變化與管理狀態最基本的部件。
它會回傳 (getter, setter) tuple,要取得現在的數值可以使用 count.get() (在 Rust 每夜版可以簡寫為 count()),要設定數值則可以使用 set_count.set(...) (或 set_count(...))
Leptos 透過 view 巨集以類似 JSX 的格式來定義使用者介面:
view! {
    <button
        // define an event listener with on:
        on:click=move |_| {
            // on stable, this is set_count.set(3);
            set_count(3);
        }
    >
        // text nodes are wrapped in quotation marks
        "Click me: "
        // blocks can include Rust code
        {move || count.get()}
    </button>
}
其實看起來就像一般的 HTML 加上 on:click 來定義點擊 event listener,中間則是跟 Rust string 一樣的文字區塊。
唯一值得注意的是 {move || count.get()},這裡用到的是 Rust 的 閉包 (Closure),而把函式傳入 view 的意義在於告訴框架『嘿!這個會改變!』。
如此一來,當我們點選按鈕呼叫了 set_count 之後,就會使得 count 信號被更新。
而數值由 count 所決定的閉包 move || count.get() 也隨之被重新執行,最後框架會單獨針對這個文字節點進行更新,完全獨立於應用程式的其它部分,這也是為什麼這種做法可以極度高效的更新 DOM。
這時候聰明的小朋友 (或 Clippy) 會發現其實這個閉包是多餘的,因為信號本身就是函數了,所以不需要再另外用閉包,所以上面的 view 可以改寫為:
view! {
    <button /* ... */>
        "Click me: "
        // identical to {move || count.get()}
        {count}
    </button>
}
🚨 注意,只有函式是 reactive 的,這代表
{count}和{count()}在 view 中的行為會截然不同。
前者會告訴框架在每次count改變時更新 view,而後者只是單次取得count的值,並將得到的 i32 數字傳給 view。
在這個專案中,我們會用到 TailwindCSS 來讓頁面漂釀一點,但為了著重在 Rust 的部分,就不會詳細說明。
簡單來說,它是很受歡迎的 utility-first CSS library,允許我們使用內嵌的實用類別來設計應用程式,而其 CLI 工具則能掃描檔案以查找 Tailwind 的類別名稱與打包所需的 CSS。
但這裡就不安裝 Tailwind 的 CLI,我們使用 cargo-leptos 的內建支援,你說要怎麼用?
改 Cargo.toml!!
往下滑到 [package.metadata.leptos] 區塊,找到 style-file 後,在它的下面貼上以下程式碼就好:
# The tailwind input file.
#
# Optional, Activates the tailwind build
tailwind-input-file = "style/tailwind.css"

# The tailwind config file.
#
# Optional, defaults to "tailwind.config.js" which if is not present
# is generated for you
tailwind-config-file = "tailwind.config.js"
而其中提到的兩個檔案需要我們手動新增,首先是在專案 root 新增 tailwind.config.js:
/** @type {import('tailwindcss').Config} */
module.exports = {
    content: {
      files: ["*.html", "./src/**/*.rs"],
    },
    theme: {
      extend: {},
    },
    plugins: [],
  }
然後再到 style 資料夾中新增 tailwind.css 即可:
@tailwind base;
@tailwind components;
@tailwind utilities;
把這兩個檔案新增好後,執行 cargo leptos watch 就會看到 Tailwind 的配置被執行:
而為了確認是否真的可以用,我們把 app.rs 中的 HomePage component 加上一些內嵌類別:
fn HomePage() -> impl IntoView {
    // Creates a reactive value to update the button
    let (count, set_count) = create_signal(0);
    let on_click = move |_| set_count.update(|count| *count += 1);

    view! {
        <body class="bg-gradient-to-r from-purple-500 to-pink-500">
            <h1 class="mt-20 mb-4 text-4xl font-extrabold leading-none tracking-tight text-gray-900 md:text-5xl lg:text-6xl dark:text-white">"Welcome to Leptos!"</h1>
            <button on:click=on_click class="inline-flex items-center justify-center px-5 py-3 text-base font-medium text-center text-white bg-blue-700 rounded-lg hover:bg-blue-800 focus:ring-4 focus:ring-blue-300 dark:focus:ring-blue-900">"Click Me: " {count}</button>
        </body>
    }
}
可以看到昨天醜醜的初始頁面變成下面這個勉強漂釀的樣子: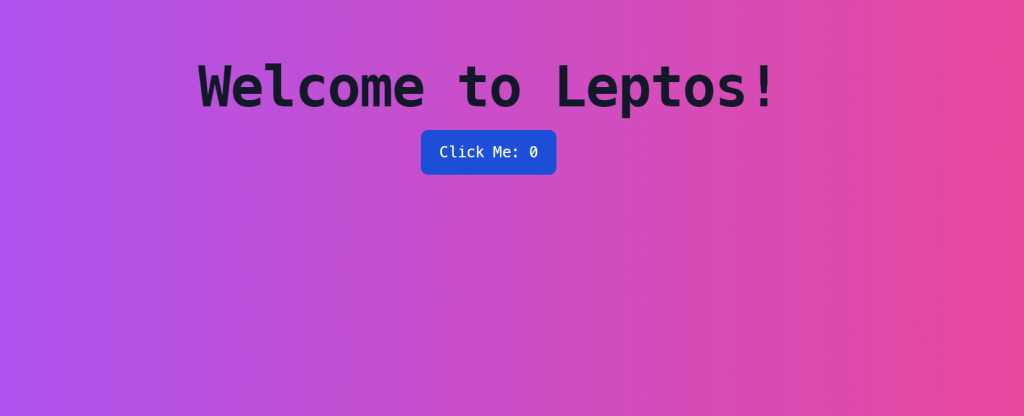
<Title/> 標籤設定,這裡設定成 <Title text="Iron LLaMa"/>。
今天的內容就到這,明天見啦~