設定 Celebrate final task in Epic completing
前言
Keywords
設定 Celebrate final task in Epic completing
樸實無華的開單日常 - 如何關掉 Automation rule
各位觀眾,我們終於來到文章路程的一半 15 天惹!

不求得獎只求每天完成文章,是我首次參賽的唯一要求!而賽程來到一半,是很重要的里程碑啊!因為進也很累,退又不甘心!
我們是不是應該要應景一下來做個 Celebrate milestones 呢?
賀!問就是要,今日的 Slack 設定就要來做 Celebrate final task in Epic completing
Whenever the last task is completed in Jira, send a celebratory message to the Slack room.
在進入今天練習主題前,先來了解今天需要用到的 Keywords
Transitions must follow workflows
這個很重要,而今天的 Automation rule ,其 main rule 會持續進行,但其中有另一項子項 rule 會被觸發,也就是 branches,因此,設定今天的練習前,我們先來了解 branches 係啥,有什麼分類,這樣會比較了解 Celebrate final task in Epic completing 時,為什麼會這樣設定惹!(^_^)/
Jira automation branches
When configuring automation rules, it's possible to create a separate section of the rule and perform actions on related issues - this is referred to as branching
在設置自動化規則時,可以開啟規則的獨立分支並對相關的問題執行操作,這稱為分支。以下列出 Types of Jira automation branches自動化的分支類型
Related issues
此 branche 可以對與觸發規則的 issue 相關的問題執行操作。例如,可以設置一個規則,當一個 issue 移動到 [DONE]時,對此 Issue 的sub-task 添加 comment 評論。
Rule 可以使用 create issue 和 Clone issue 來產生 issue。在同一個 rule 中對新創建的問題執行進一步的操作,如 Add comment 或 Create sub-task,需要使用 Related issues。
主要的原因為 Rule 的 main branch 適用在 trigger issue而非 created issue。例如,在 created issue 後自動增加一個 comment issue,把 comment 加在被 trigger issue,而不是 created issue。
您可以為所有的 created issue,開啟一個 branche,以來開通對新的 Create issue 執行操作。如果只需要對單個 issue 執行操作,您可以使用 Related issues condition。
對多個問題(ex:4個sub-task)的 branch 可同時運作,但不保證每個 branch 可完成於下一個 branch 開始前。如此一來,多個 issue 的 branch 成為新的工作流運作,其 main branch 持續執行。
Advanced branching
指可輸入 smart value,進行你所期望的結果做自動化。
僅可用於 Jira Service Management。在AQL上的 branching 讓你可選擇一個欄位並輸入 AQL 語法做搜尋,對符合條件的 issue 或 更細節的項目(最多50個)執行操作。
資料來源 Atlassian Jira automation branches
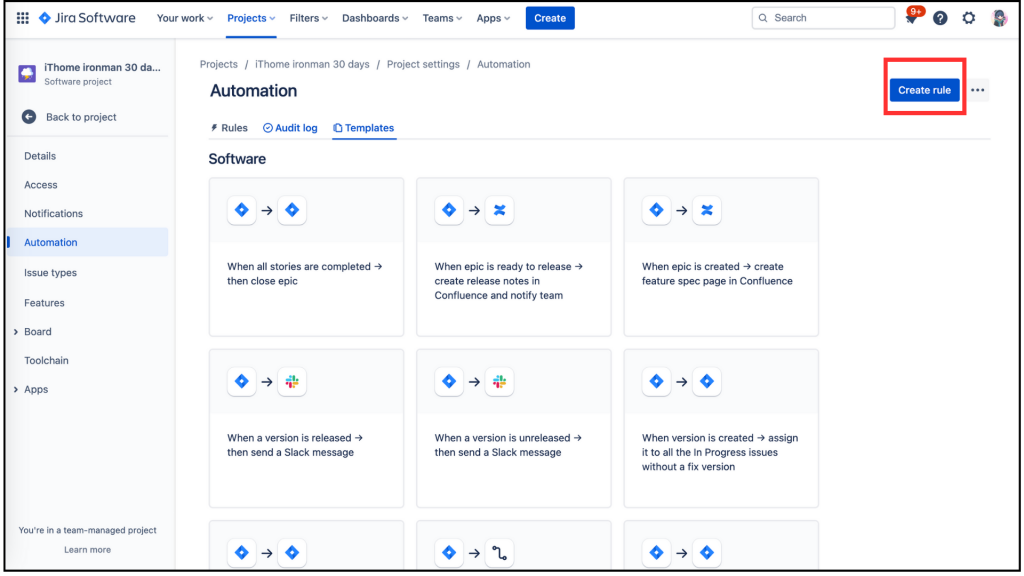
進到 When:Create a trigger,,我們把頁面向下拉。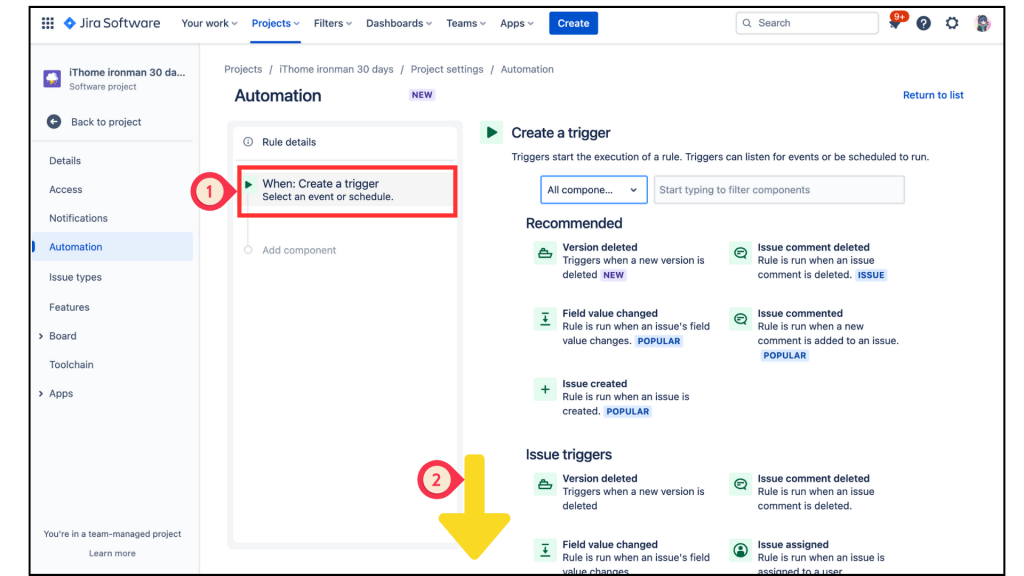
在 Issue triggers 分類中找到 Issue Transitioned 點擊進入。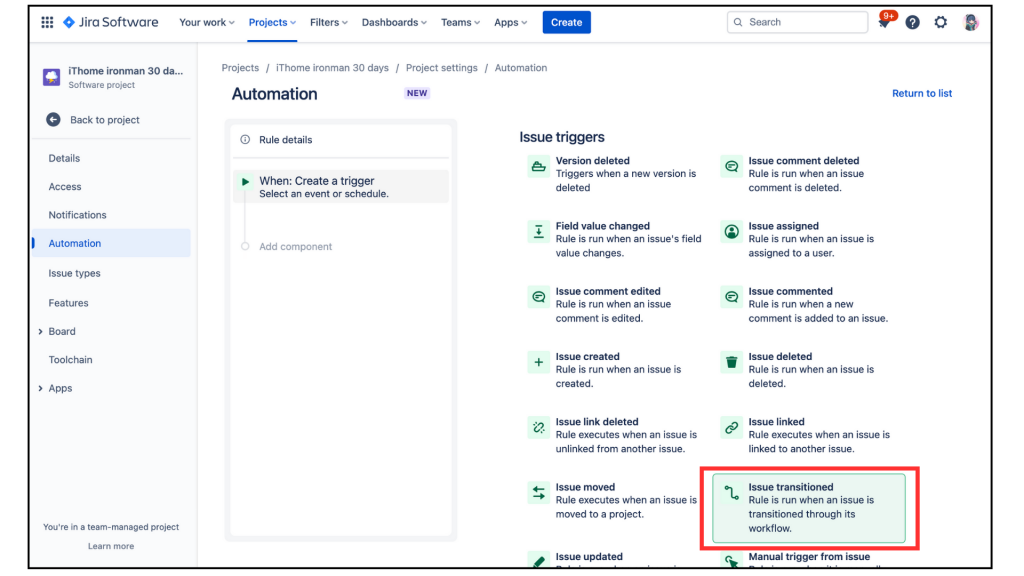
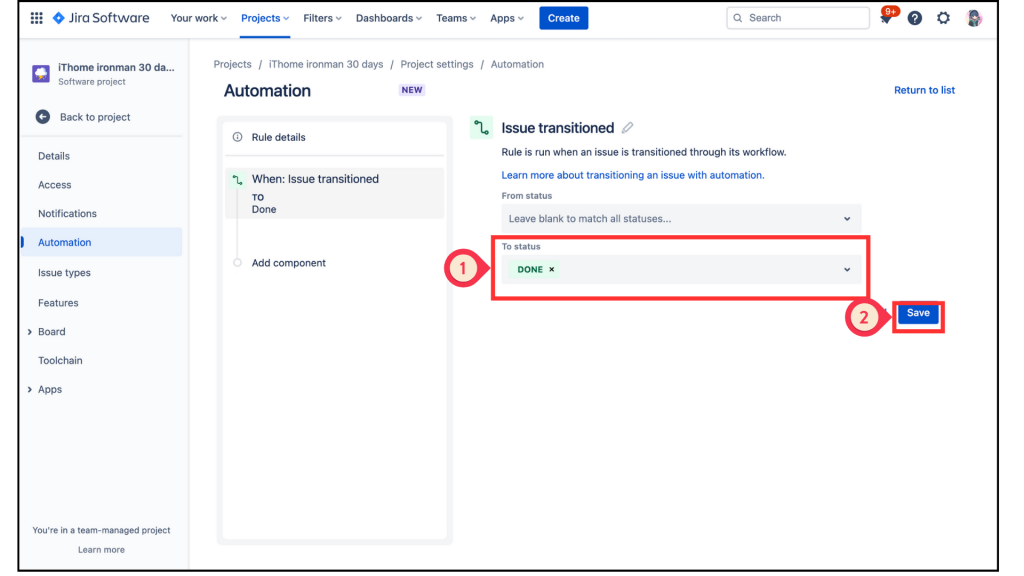
進到 Issue Transitioned 後,有 [From status]和[To status]欄位要選取,我的設定如下:
選取左邊的 Add component 變成 New component 後,選擇右邊的 IF:Add a condition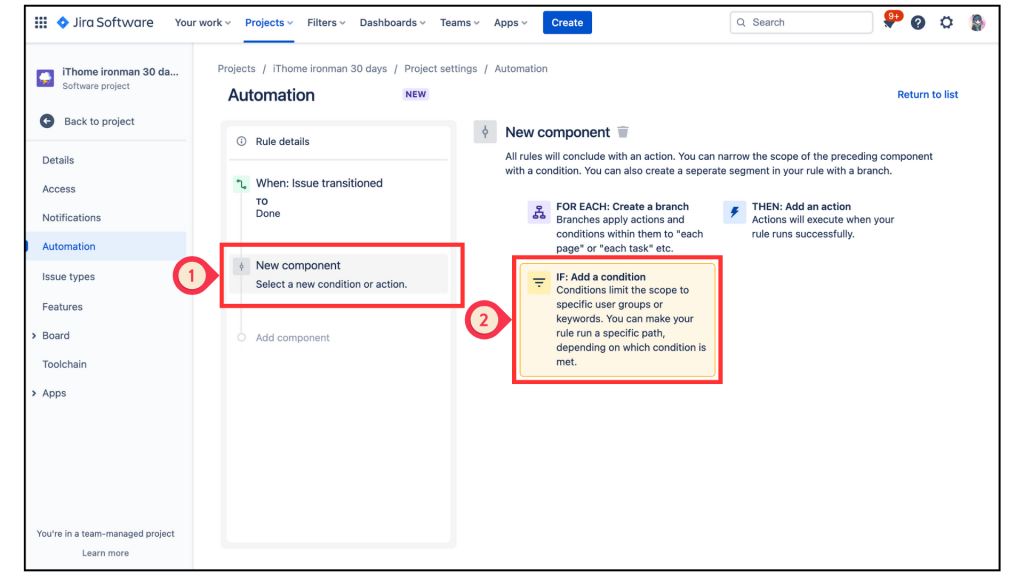
在 Add a condition 的選單中,找到 Recommended,這個選項應該很好找,因為它是也會展示 POPULAR。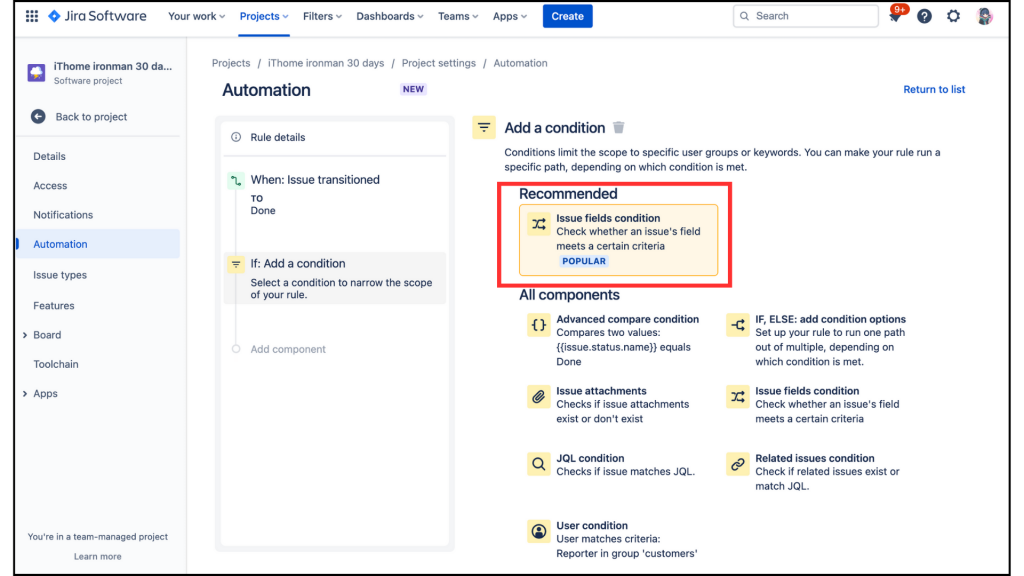
進入 Recommended 後,會看到 Issue fields condition,其下方的設定有 [Field]、[Condition]、[Value],因為我們要設定符合IF觸發的條件,以下是我的設定內容。
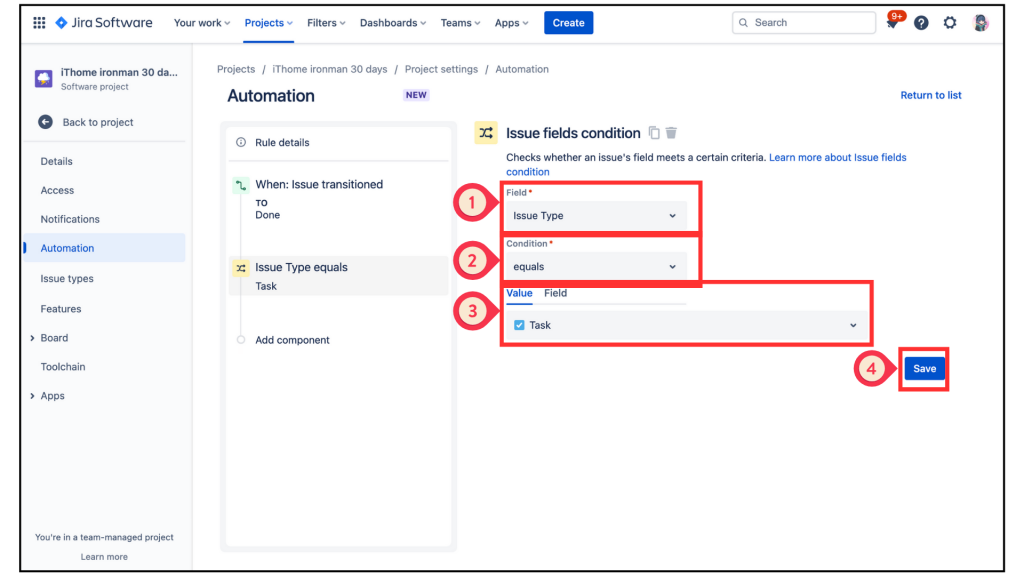
回到左邊的欄位,選取 Add component 變成 New component 後,選擇右邊的 FOR ESCH:Create a branch。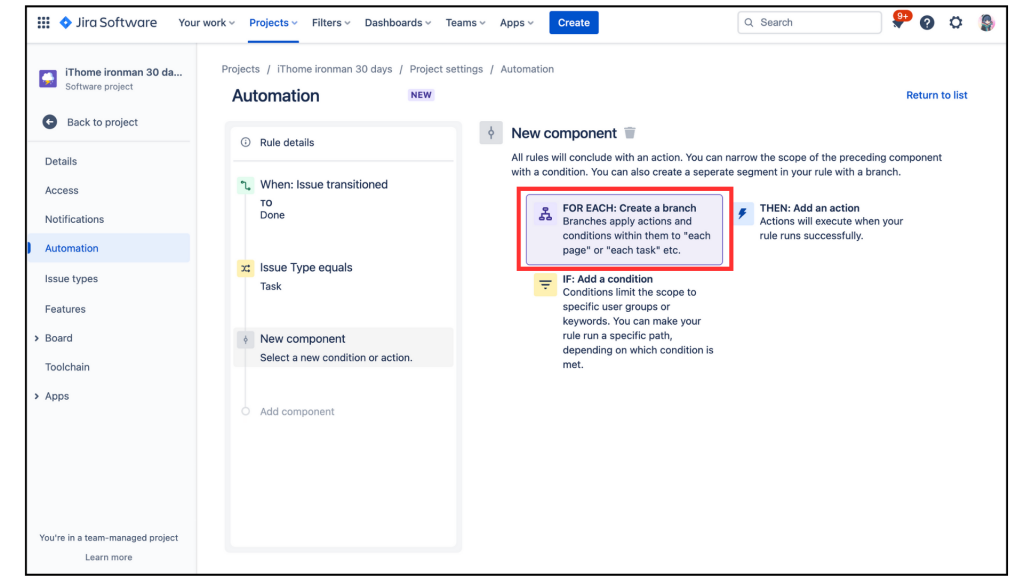
進入 Create a branch 後,可以看到 [Advanced branching] 和 [Branch rule/Related issues]兩個選項,本次要進行 觸發規則的 issue 相關的問題執行操作,所以我們選擇 [Branch rule/Related issues]。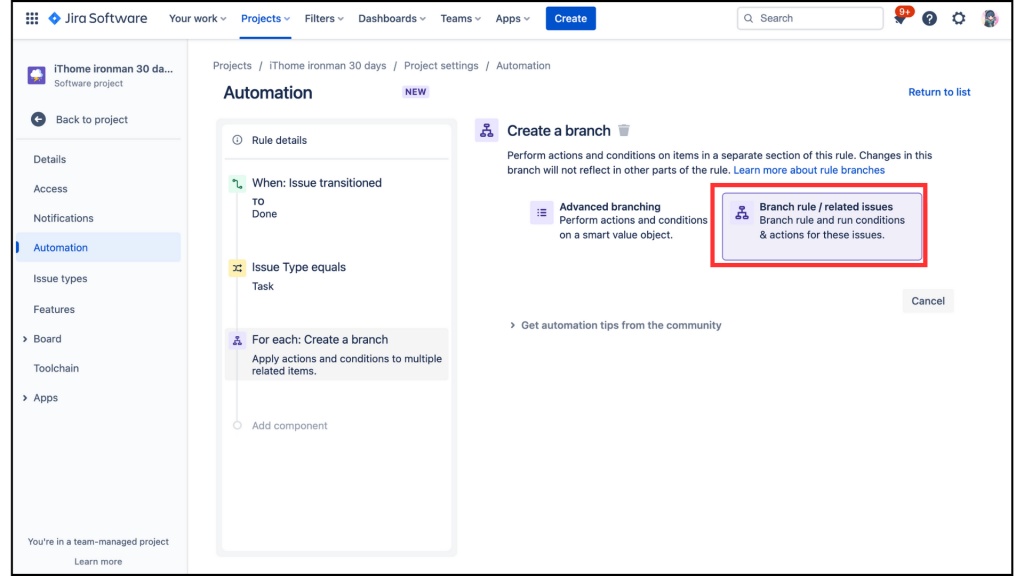
進入 Branch rule/Related issues後,其下方的設定有 [Type of related issues]、[Rule restricted to projects],因為我們要設定當某一個 Epic 中最後一張 Task 拉到 DONE 時,此 Epic 也會完成,而 Epic 是 Parent(我們又稱母票),以下是我的設定內容。
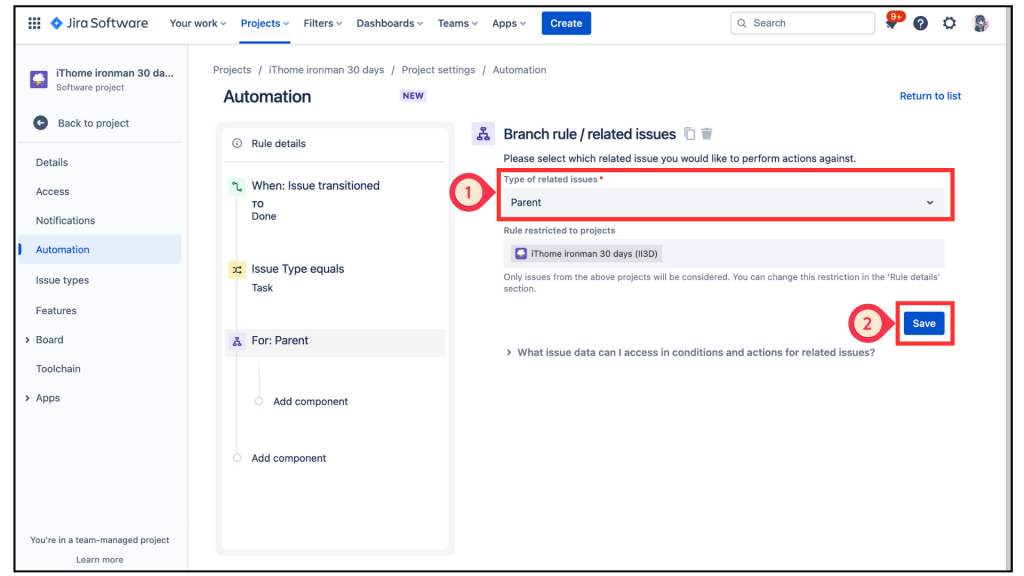
回到左邊的欄位,選取 Add component 變成 New component 後,選擇右邊的 IF:Add a condition。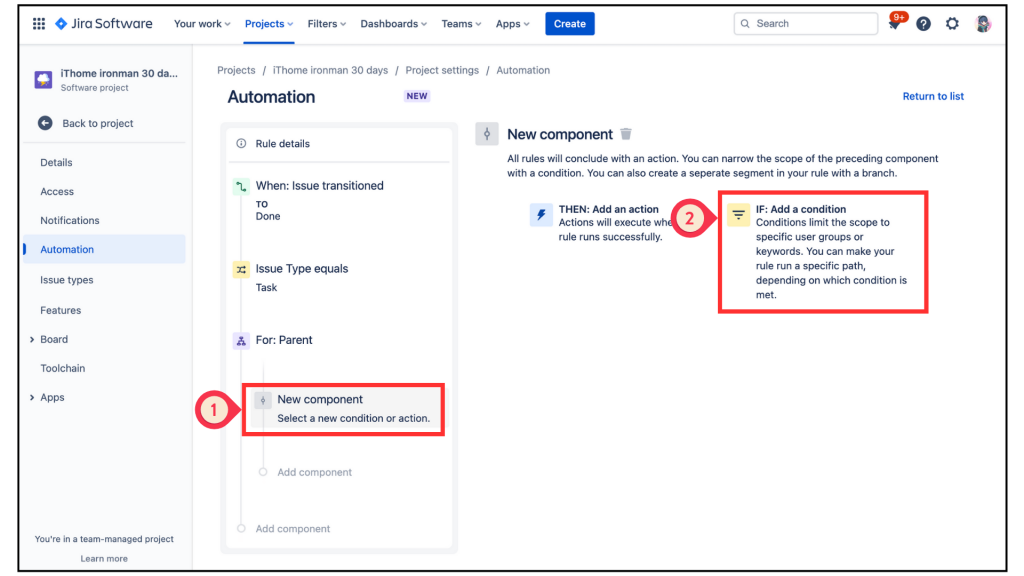
在 Add a condition 的選單中,找到 Related issue condition 並點擊進入。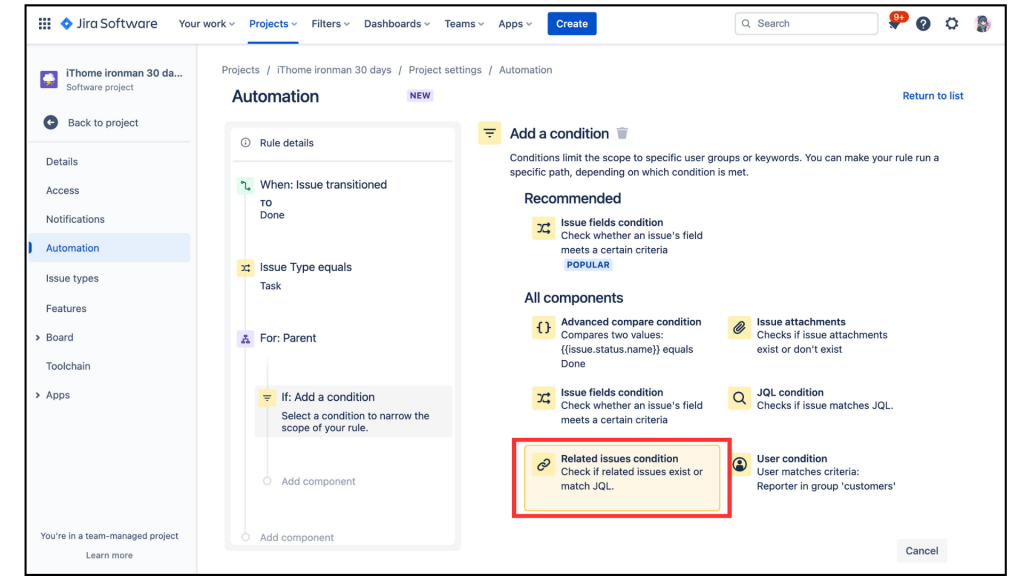
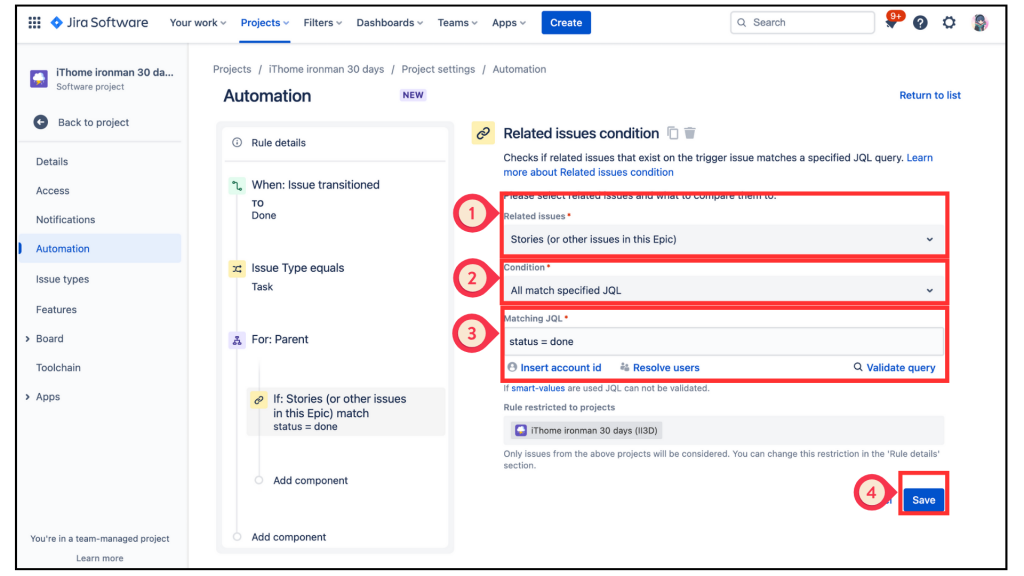
進入 Related issue condition後,其下方的設定有 [Related issues]、[Condition]、[Matching JQL]和[Rule restricted to projects],因為我們要設定 IF 觸發條件,以下是我的設定內容。
我們要來設定 Slack 惹!再回到左邊的欄位,選取 Add component 變成 New component 後,選擇右邊的 THEN:Add an action。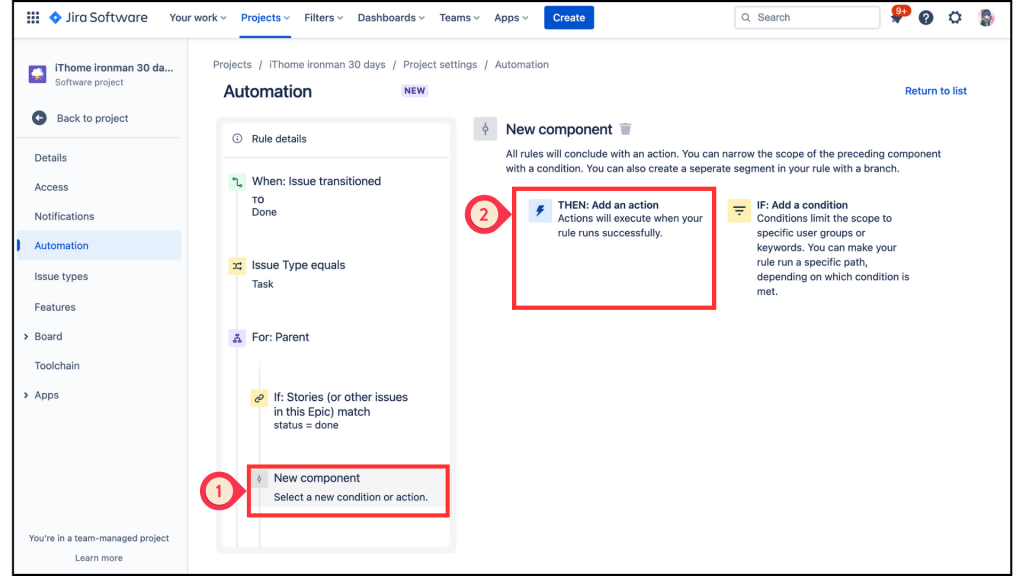
進入 Add an action 選單中把頁面向下拉。THEN:Add an action,進入 Add an action 選單中把頁面向下拉。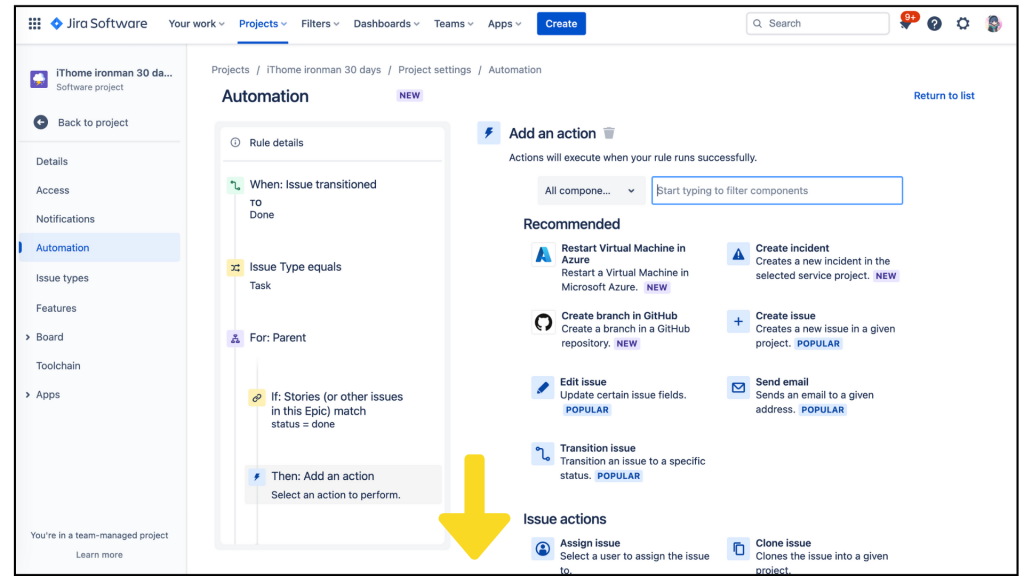
找到 Notification 分類中的 Send slack message,大力的給他點下去!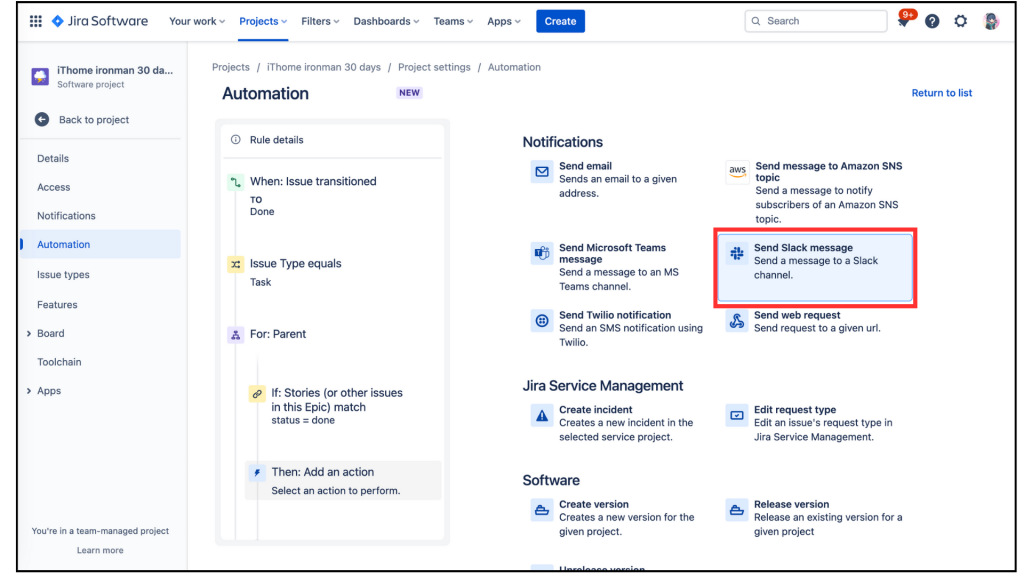
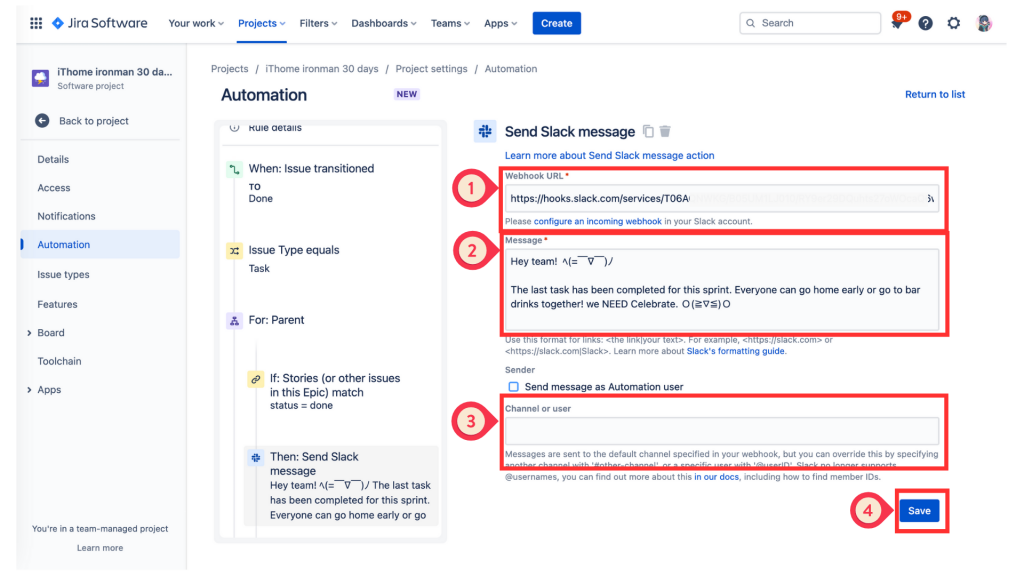
在填入資料前,我們要先取得 [Webhook URL],點擊第一個欄位下方的 [configure an incoming webhook]。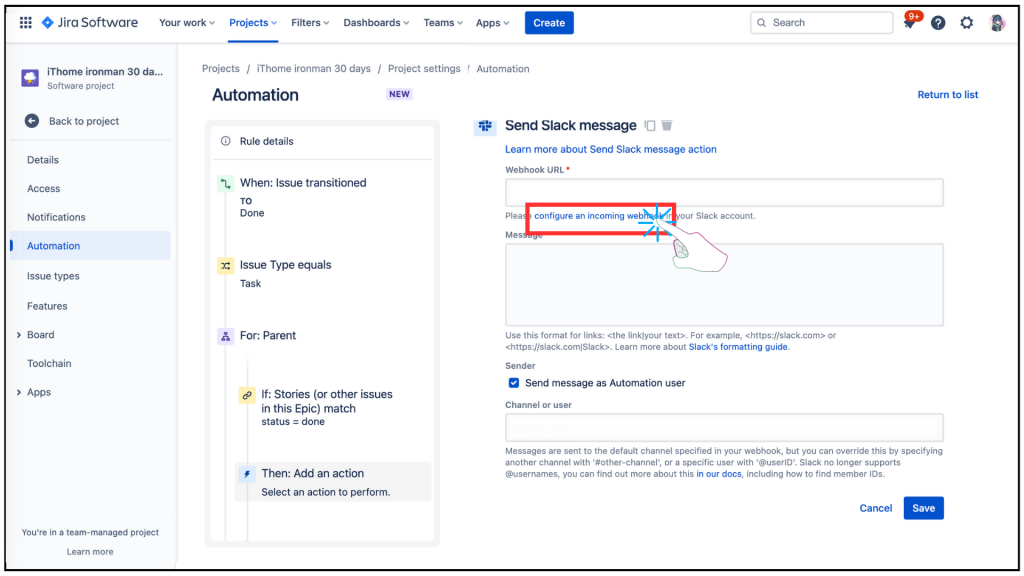
連到另一個網頁 Slack app directory 在紅框欄位中連結到你的 Slack 頻道,並可以選取你要的群組或個人對話,再按下 [Add incoming WebHooks integration],你就可以得到你的 [Webhook URL],請複製它。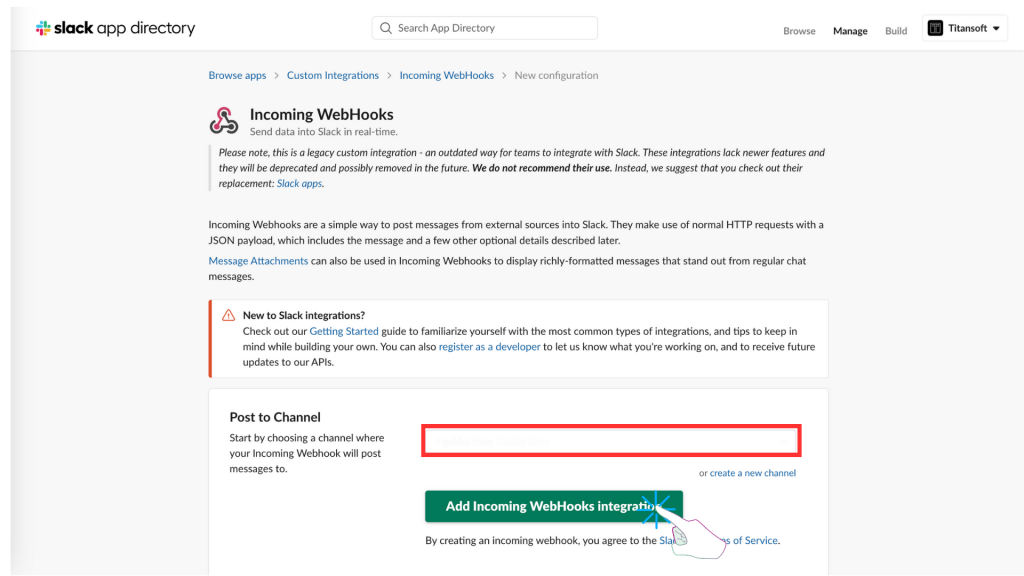
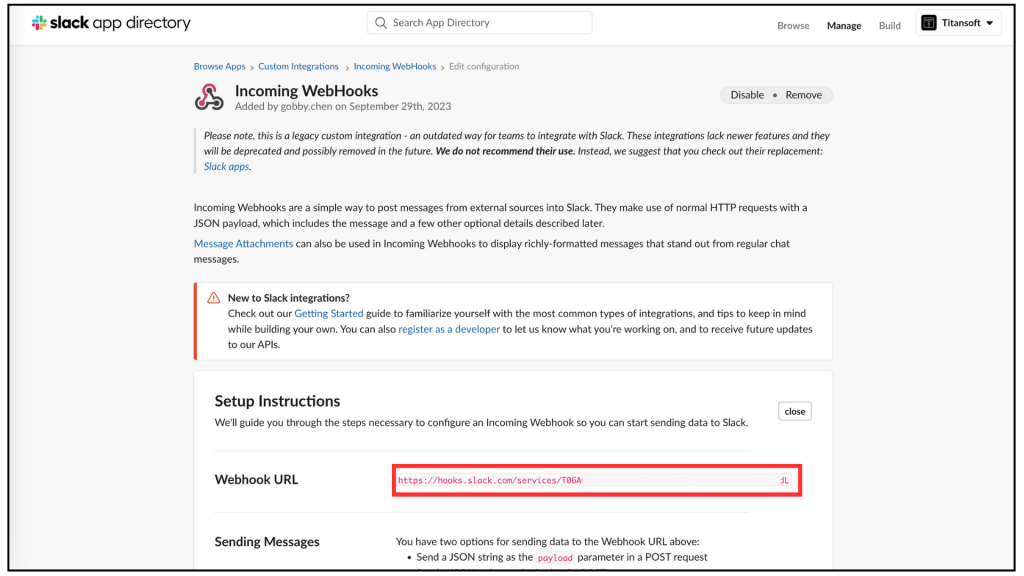
The last task has been completed for this sprint. That's mean iThome ironman has completed 2/3 !
We could go to bar drinks together! we NEED Celebrate. O(≧▽≦)O
來到最後的步驟了,設定好 rule 的名稱,再按下 [Turn it on],就完成✅啦!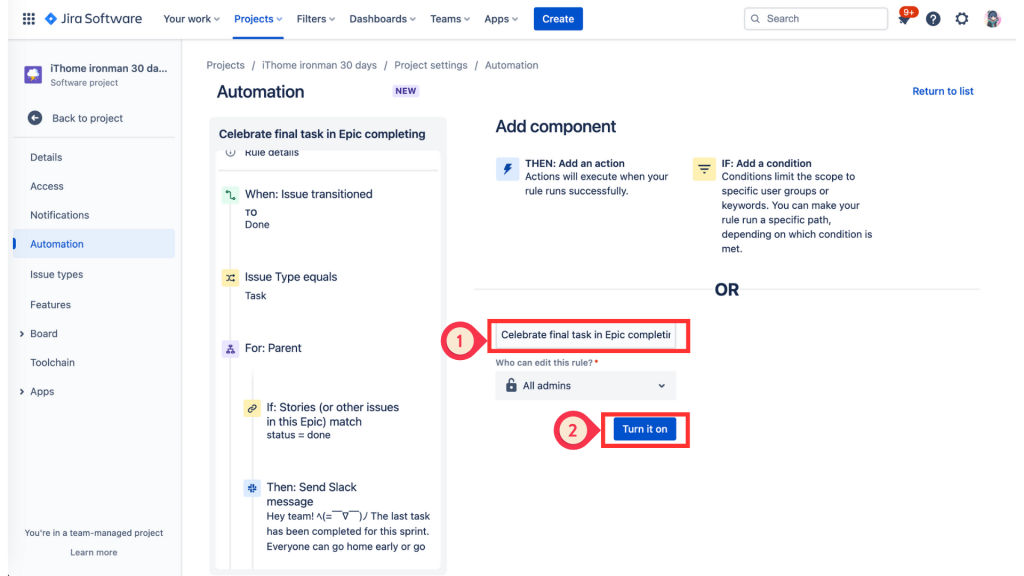
回到 Automation 設定頁,在 [Rule detial] 可以看到內容都自動設定好了 !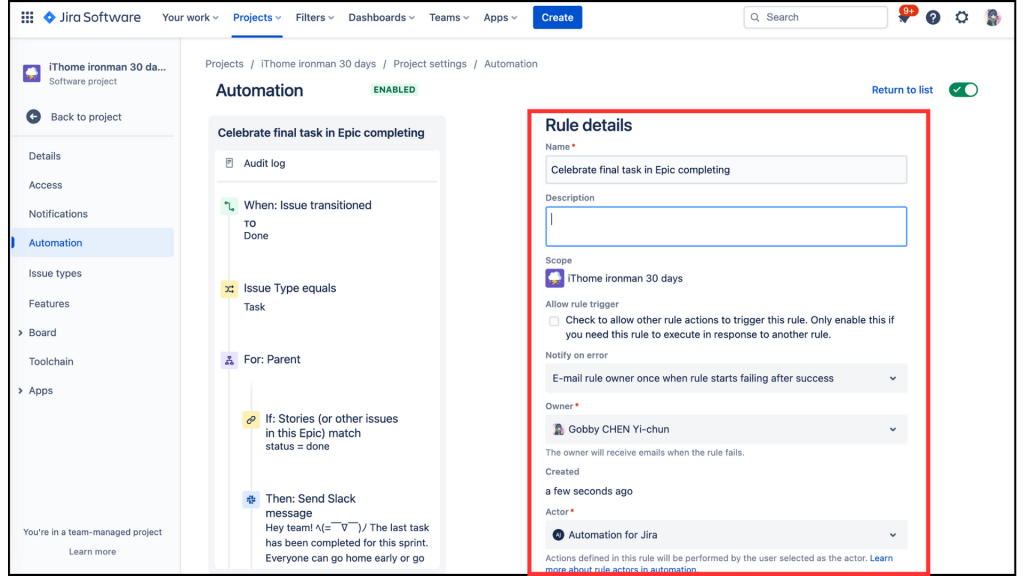
點開 [Audit log],發現此 rule 呈現 ** CONFIG CHANGE**,算是成功啦!(因為還未發生觸發條件,而且界面上沒有 [Run rule] 可以驗證。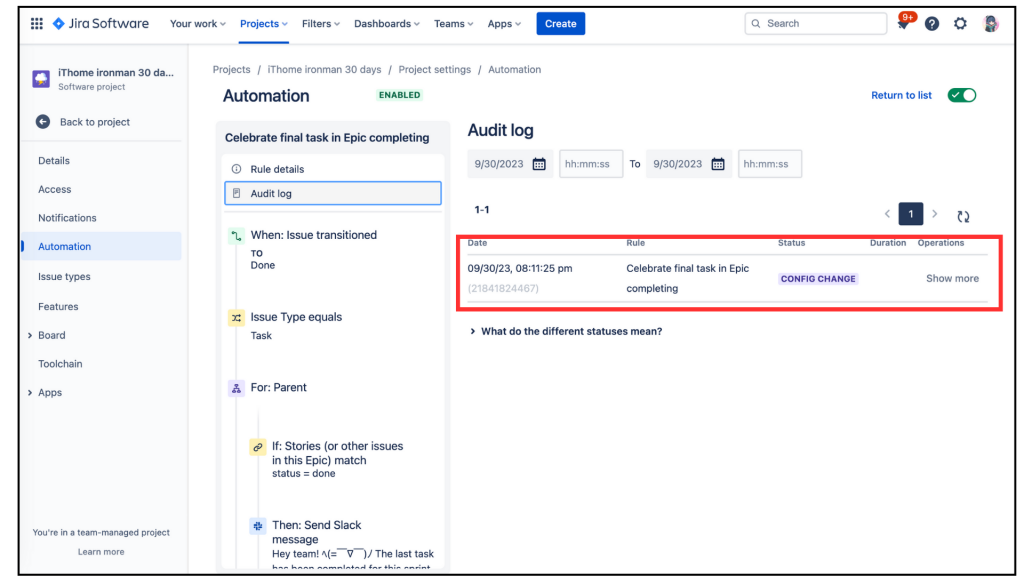
回到 Rules list ,這個 Rule 已經設定完成。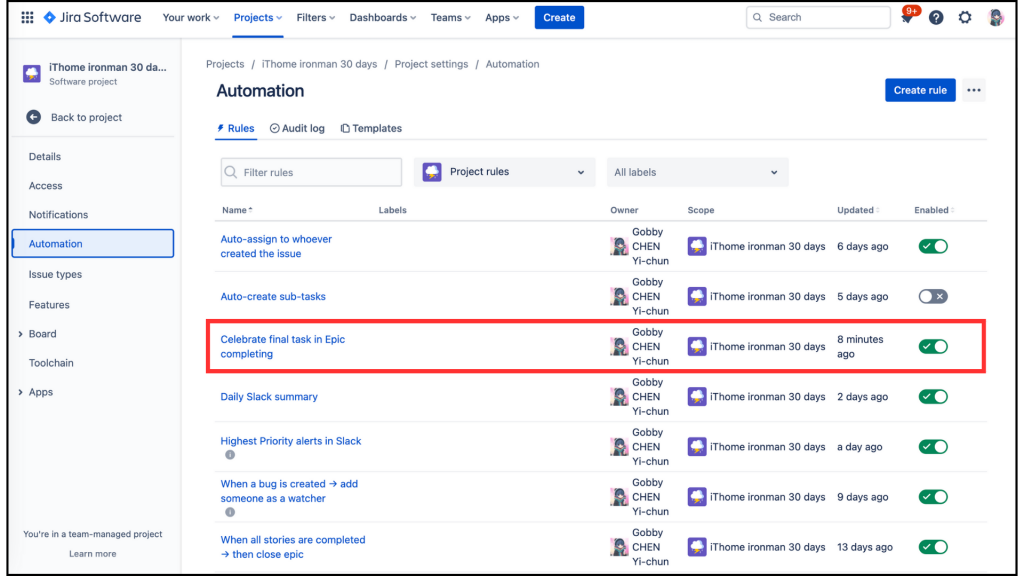
今日 樸實無華的開單日常 小分享,要來做 如何關掉 Automation rule。
相信大家有時會遇到你設定的自動化想要關掉的時候,比如:我在 Day10-又是樸實無華的 Jira 開單日常-Auto-create sub-tasks 省力不少啊!文章中練習的 Automatically add 5 sub-tasks on issue creation,覺得該功能我們目前不需要,那要怎麼做呢?
首先從專案 Board 點擊左邊功能區的 [Project setting]
點擊左邊功能區的 [Automation]
點擊中間上方的 [Rules] 、[Audit log] 、 [Templates] 的 [Rules]
找到 Auto-create sub-tasks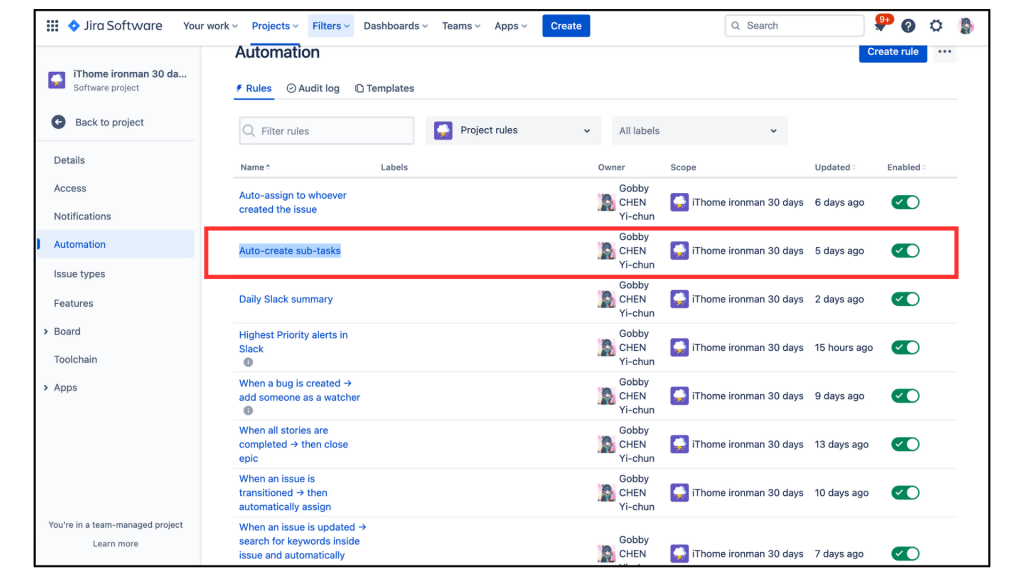
關掉 Auto-create sub-tasks 右邊的 [Enabled],即可完成 ✅。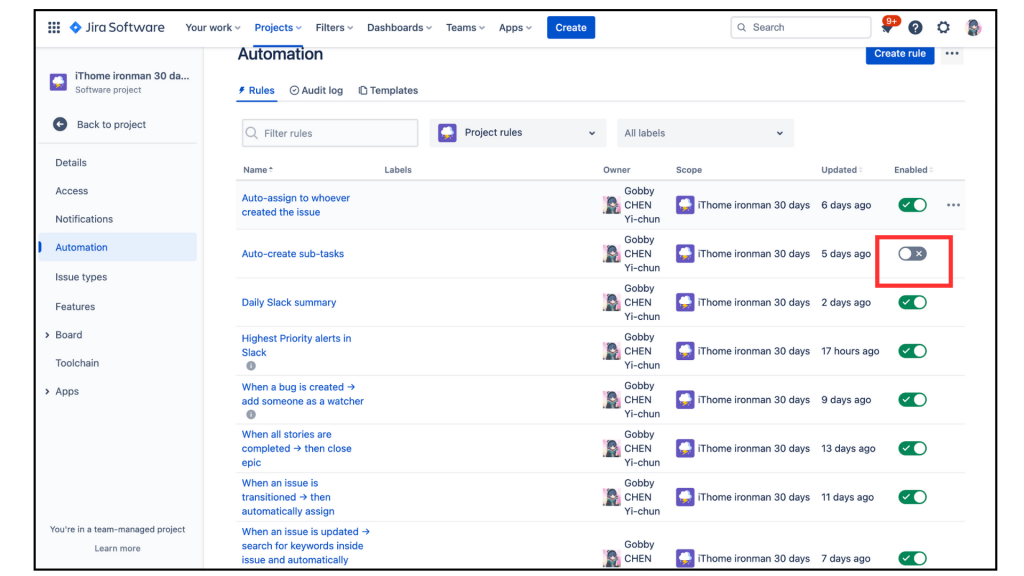
這樣一來,當你不需要這個自動化時可以先關掉,日後如果需要就直接打開即可,是不是很方便呢?
(´・ω・`)
好啊,今天的練習結束啦~大家明天再見。
