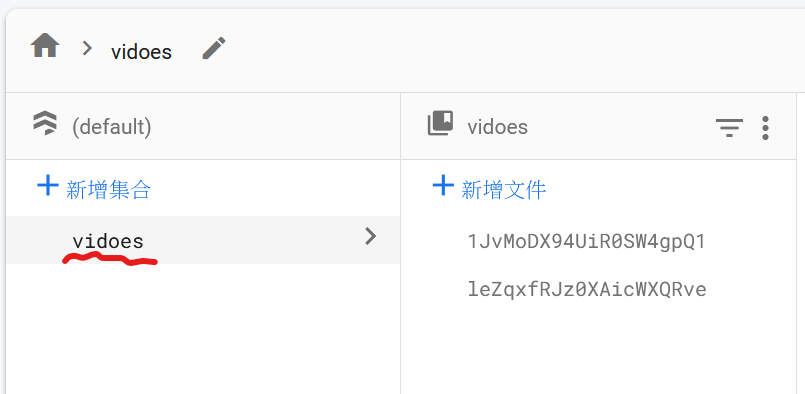
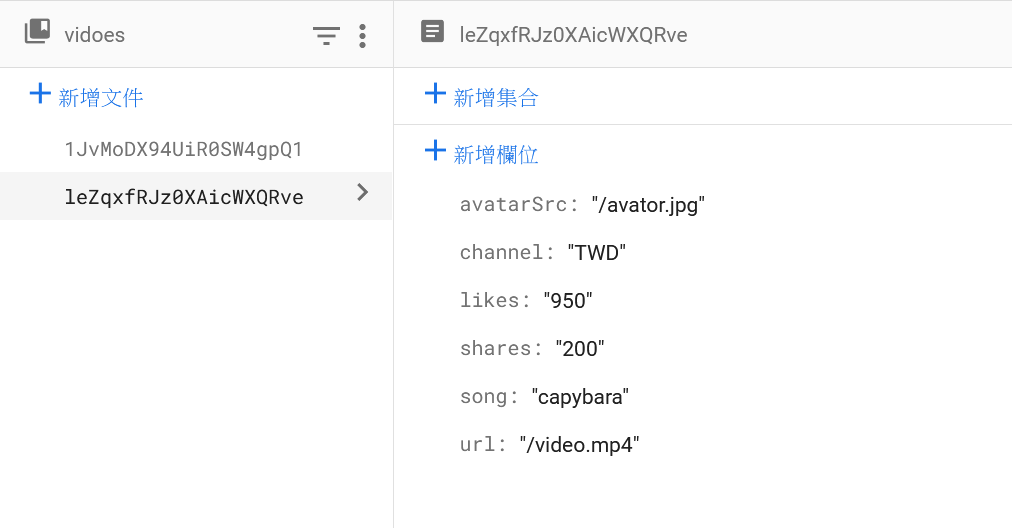
今天的操作與Todo List(三)很相似,如果已經掌握訣竅,可以跳過不看。
回到firebase的主頁,首先開始建立一個實際的雲端資料庫了。
從你的專案頁點入,會看到Cloud Firestore的選項,點選建立。之後在設定頁選擇Start in test mode。

為你的collection取一個ID,這一步很重要,要記得自己取的ID,因為在project中要存取你所往上送的資料,需要透過ID來找到這個collection。

為每一個原始寫好的資料提供相對應的條件,例如在Stories的project中,我們有url、avatar、channel、likes、shares、song......這些data,就要逐一開好項目,以免之後在傳送時沒有資料、顯示異常。
前面提到過,Firebase與其他module一樣,必須先安裝好模組。
跑command line npm install firebase 後,使用initializeApp存取App,並export已經
接著,打開我們在第三天建立過的firebase.js,從firebase裡面存取你的App下來,以便後續使用collection。
這次引入firebase,就是在做資料的存取,我們第一時間可以反應到,它會更改到的是與videos有關的部分----建立一個資料庫,來放前幾天的影片,這樣可以多更多影片、stories app不會侷限在原本的2個影片demo版。
首先,要瞭解到資料庫內部存取資料,以及原先使用的const差異。我們在螢幕上看到任何資料的變化,都是const的變化,因為在React 中,狀態可以分為局部狀態和全域狀態。局部狀態是指只在單一component內部使用的狀態(即使App.js,也視為單一的component),通常使用useState來管理。在執行全域性變化時,可以使用useEffect來監控操作。
videos的內容當然是全域的,除了在App.js中的操作,還需要跨compoent(VideoCard.js),但給予VideoCard變數的是App.js、給予VideoHeader與VideoFooter的是VideoCard,循著正確的資料流,可以判斷出,useEffect這個從firebase拿資料的function應該在App.js實作。
// firebase.js
import { initializeApp } from 'firebase/app';

const firebaseConfig = {
    apiKey: {your key},
    authDomain: {your auth},
    projectId: {your Id},
    storageBucket: {yours},
    messagingSenderId: {your Id},
    appId: {yours}
};

const firebaseApp = initializeApp(firebaseConfig)

export default firebaseApp;
// App.js
import './App.css';
import VideoCard from './component/VideoCard'
import { useState, useEffect } from 'react';
import firebaseApp from "./firebase";
import { getFirestore, collection, addDoc, getDocs, doc, deleteDoc } from "firebase/firestore";

function App() {
  const [videos, setVideos] = useState([])

  const db = getFirestore(firebaseApp);
  const dbCollection = collection(db, 'videos');

  useEffect(() => {
    const fetchVideos = async () => {
      try {
        const querySnapshot = await getDocs(dbCollection);
        const videosData = querySnapshot.docs.map((doc) => doc.data());
        console.log(videosData)
        setVideos(videosData);
      } catch (error) {
        console.error('Error fetching videos:', error);
      }
    };

    fetchVideos()
  }, [videos])

  return (
    <div className="app">
      <div className='app_videos'>
        {videos.map(({ url, channel, avatarSrc, song, likes, shares }) => {
          console.log('URL:', url);
          console.log('Channel:', channel);

          return (
            <VideoCard
              url={url}
              channel={channel}
              avatarSrc={avatarSrc}
              song={song}
              likes={likes}
              shares={shares}
            />
          );
        })}

      </div>
    </div>
  );
}

export default App;
這個project到這裡便告一段落,我會在完成github的布置後將連結放上,參考更完整的code!
