昨天的文章介紹了 RestTemplate 的操作方式,並存取一些測試用的 API。而本文將分享 2 個串接外部服務的實例,出處均來自於筆者工作中遇到的需求。分別是提供 IP 所在地資訊的「ipapi」,以及提供匯率的「Currencylayer」。
此篇亦轉載到個人部落格。
「ipapi」這項服務,能提供 IP 所在地的相關資訊,且無需註冊。使用額度方面,目前每日有 1000 次的免費額度(以前好像比較少,筆者不記得了)。
之前工作時,公司產品提供了 Android 和 iOS 版的手機 App,所以網頁畫面上會出現 Play 商店跟 App Store 的下載頁面連結。然而中國是不能使用 Play 商店的,於是前端起初便呼叫 ipapi 的服務,藉此得知使用者 IP 所在地的資訊。若位於中國,則判定不顯示 Play 商店的連結。
但該服務是有每日的免費使用額度。為避免前端直接呼叫該 API 卻失敗,因此改成讓後端統一幫忙查詢。這項結果也能存入 DB,日後就優先從 DB 查。除非後端也呼叫失敗(可能額度用完了),才由前端直接呼叫 ipapi,甚至能進一步存回後端。
聽完了故事背景,讓我們來看看 ipapi 能提供什麼資訊。
如圖,呼叫 GET https://ipapi.co/IP位置/json,得到的 response 內容有:城市、幣別、經緯度、時區、手機國碼等等。
接下來就開始使用 RestTemplate 串接 ipapi。按照慣例,要先決定我們想要拿取哪些欄位,才能設計出用來接收 response 的類別。
public class IpApiResponse {
    // 查詢失敗會得到的欄位
    private boolean error;
    private String reason;
    private boolean reserved; // true 代表私有 IP

    // IP 所在地資訊
    private String city;
    private String currency;
    private Double latitude;
    private Double longitude;

    @JsonProperty("utc_offset")
    private String utcOffset;

    @JsonProperty("country_calling_code")
    private String countryCallingCode;

    // getter, setter ...
}
然後再設計一個元件,將 RestTemplate 封裝起來。
@Component
public class IpApiClient {
    private RestTemplate restTemplate;

    @PostConstruct
    private void init() {
        restTemplate = new RestTemplateBuilder()
                .rootUri("https://ipapi.co")
                .setConnectTimeout(Duration.ofSeconds(20))
                .build();
    }

    public IpApiResponse getIpInfo(String ipAddress) {
        return restTemplate.getForObject(
                "/{ip}/json",
                IpApiResponse.class,
                Map.of("ip", ipAddress)
        );
    }
}
範例程式中的 init 方法,會用 builder 的方式對 RestTemplate 做客製化設定。例如 API 路徑的前綴和逾時時間。
最後實際測試一下剛剛實作好的 IpApiClient。
@RunWith(SpringRunner.class)
@SpringBootTest
public class ApplicationTests {

    @Autowired
    private IpApiClient ipApiClient;

    @Test
    public void testIpApiClient_Public() {
        IpApiResponse ipInfo = ipApiClient.getIpInfo("208.67.222.222");

        // 確認查詢時是否有問題
        assertFalse(ipInfo.isError());
        assertNull(ipInfo.getReason());
        assertFalse(ipInfo.isReserved());

        // 確認 IP 所在地資訊
        assertEquals("San Francisco", ipInfo.getCity());
        assertEquals("USD", ipInfo.getCurrency());
        assertEquals(-122.397966, ipInfo.getLongitude(), 0);
        assertEquals(37.774778, ipInfo.getLatitude(), 0);
        assertEquals("-0700", ipInfo.getUtcOffset());
        assertEquals("+1", ipInfo.getCountryCallingCode());
    }
}
以上範例是查詢美國舊金山的一個公有 IP。而以下是試圖查詢私有 IP 的資訊。
@Test
public void testIpApiClient_Private() {
    IpApiResponse ipInfo = ipApiClient.getIpInfo("192.168.8.100");

    assertTrue(ipInfo.isError());
    assertEquals("Reserved IP Address", ipInfo.getReason());
    assertTrue(ipInfo.isReserved());
}
可以看到,私有 IP 是不能查詢的。另外,查詢「127.0.0.1」(localhost)也會得到這樣的結果。
「Currencylayer」這項服務,能提供 168 個幣別的匯率,包含歷史匯率。
使用此服務前需註冊。對於免費帳號,目前每月有 1000 次的查詢額度,且每日會更新一次匯率。若系統不要求一定要很新的即時匯率,選擇免費方案也不壞。
但免費方案只能查詢美金對其他幣別的匯率,不能查詢像是臺幣對日圓、歐元對澳幣等組合。
試想使用者在觀看產品列表時,可以用不同的幣別呈現價格,甚至是排序。那麼系統中就要有一個匯率表,用來將當初建立產品資料時所輸入的幣別與價格,換算成使用者想看的幣別。
原本筆者前公司是串接一個叫做「Free Forex API」的服務。但撰寫此文時,發現網站上寫說要與另一個叫做「Currencylayer」的服務合作,故本文將會以後者為串接的對象。
讓我們來看看 Currencylayer 的 API 使用方式。註冊帳號後,會得到一組 access_key。進到 dashboard 後,可實際在畫面上呼叫 API 做嘗試。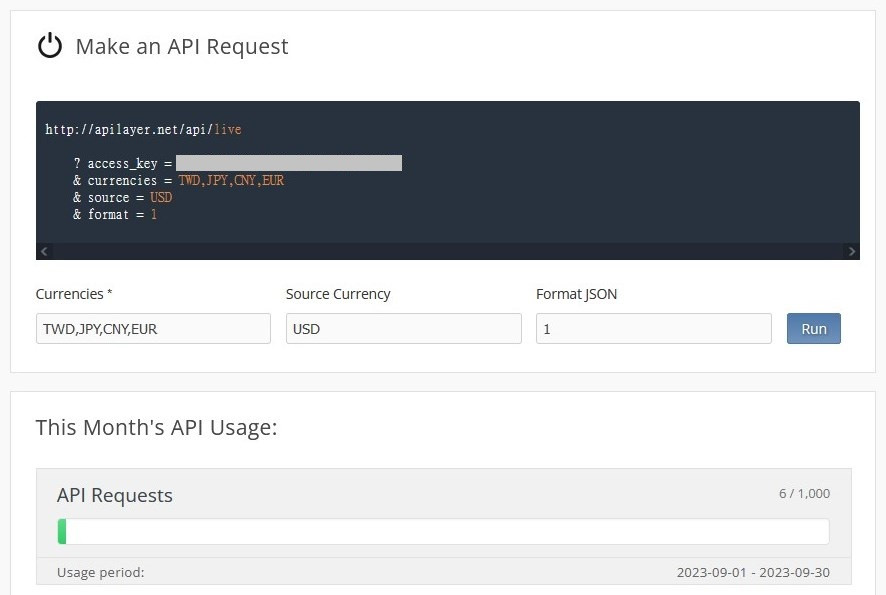
API 的呼叫方式為 GET http://apilayer.net/api/live?format=1&source=基礎幣別¤cies=目標幣別清單,英文逗號分隔&access_key=帳號的存取KEY
發送請求後,得到如下的 JSON 資料。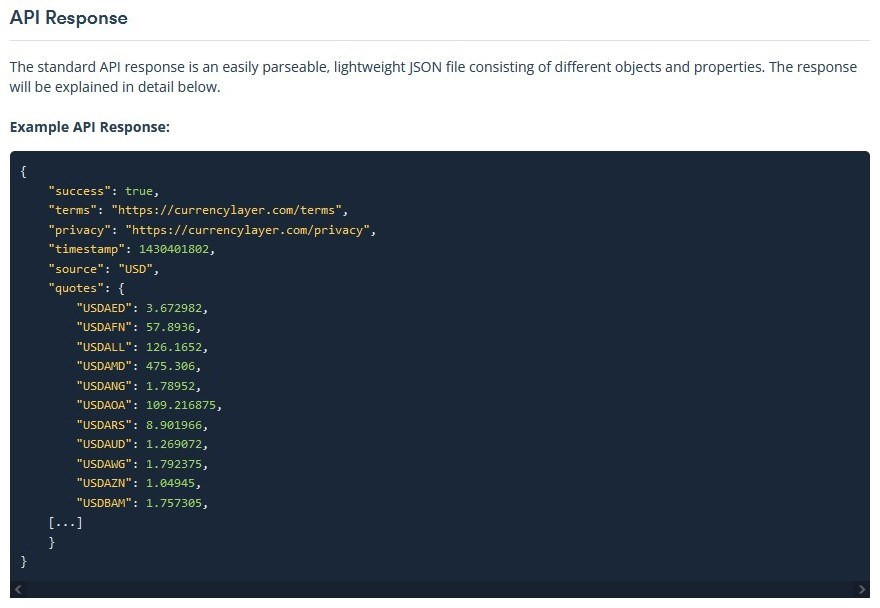
接下來就開始使用 RestTemplate 串接 Currencylayer。一樣要先決定想要拿取的欄位,再設計出用來接收 response 的類別。
public class CurrencyLayerResponse {
    private long timestamp;
    private String source;
    private Map<String, Double> quotes;

    // getter, setter ...
}
然後設計一個元件,將 RestTemplate 封裝起來。
@Component
public class CurrencyLayerClient {
private static final String ACCESS_KEY = "...";
private RestTemplate restTemplate;
@PostConstruct
private void init() {
restTemplate = new RestTemplateBuilder()
.rootUri("http://apilayer.net/api")
.setConnectTimeout(Duration.ofSeconds(20))
.build();
}
public CurrencyLayerResponse getLiveExchangeRate(String sourceCurrency, Collection<String> targetCurrencies) {
var uriVariables = Map.of(
"source", sourceCurrency,
"currencies", String.join(",", targetCurrencies),
"access_key", ACCESS_KEY
);
return restTemplate.getForObject(
"/live?format=1&source={source}¤cies={currencies}&access_key={access_key}",
CurrencyLayerResponse.class,
uriVariables
);
}
}
實作方式與上一節大同小異。要注意的是使用 RestTemplat 時,API 路徑上的 url 至少要保留一個階層(此處保留「/live」),否則會拋出例外說「URI is not absolute」。
ACCESS_KEY 的值,可以選擇放在 application.properties 檔案中,再注入進來。
最後實際測試一下剛剛實作好的 CurrencyLayerClient。
@RunWith(SpringRunner.class)
@SpringBootTest
public class ApplicationTests {
    // ...

    @Autowired
    private CurrencyLayerClient currencyLayerClient;

    @Test
    public void testCurrencyLayerClient() {
        var sourceCurrency = "USD";
        var targetCurrencies = List.of("TWD", "JPY", "CNY", "EUR");
        var exchangeRateRes = currencyLayerClient.getLiveExchangeRate(sourceCurrency, targetCurrencies);

        for (var target : targetCurrencies) {
            var pair = sourceCurrency + target; // USDTWD, USDJPY ...
            var rate = exchangeRateRes.getQuotes().get(pair);
            assertTrue(rate > 0);
        }
    }
}
以上範例是查詢美金對臺幣、日圓、人民幣與歐元的匯率。其他支援的幣別,有興趣的讀者請參考官方文件。
本文介紹了 IP 資訊和匯率的第三方服務。在範例程式中,client 元件與 response 物件也都根據它們的規格來實作。
但若有一天我們需要更換成新服務(例如第二節提到筆者前公司使用的匯率服務即將過時),那麼所有使用舊 client 與 response 類別的地方也都需要改動,畢竟已經無法再適用於新的第三方服務。
考慮到未來更換服務時,會遇到改動太多程式碼的不便,其實我們一開始就可以設計成透過「介面」來使用 client 元件與 response 類別。
還有另一個好處是促進「分工」。可以讓一個人先去物色適合專案的第三方服務,並實作出 client 元件。其他人也能同時依據該介面,著手開發業務邏輯。
以第一節的 IP 服務為例,我們希望能使用固定的介面,獲取需要的資訊。因此以下設計一個介面。
public interface IpInfoClientResponse {
    String getCity();
    String getCurrency();
    Double getLatitude();
    Double getLongitude();
    String getUtcOffset();
    String getCallingCode();
    String getErrorReason();
}
接下來也為 client 元件定義介面。此介面方法很簡單,傳入 IP 地址,回傳帶有 IP 資訊的介面物件。
public interface IpInfoClient {
    IpInfoClientResponse getIpInfo(String ipAddress);
}
定義好介面後,便能套用到需要的地方了。請回到第一節實作的測試程式,將注入的元件、client 元件的呼叫,以及資訊的取得,都調整成以介面來溝通。
@RunWith(SpringRunner.class)
@SpringBootTest
public class ApplicationTests {

    @Autowired
    @Qualifier("ipApiClient")
    private IpInfoClient ipInfoClient;

    @Test
    public void testIpApiClient_Public() {
        IpInfoClientResponse ipInfo = ipInfoClient.getIpInfo("208.67.222.222");

        assertNull(ipInfo.getErrorReason());

        // ...
    }

    @Test
    public void testIpApiClient_Private() {
        IpInfoClientResponse ipInfo = ipInfoClient.getIpInfo("192.168.8.100");
        assertEquals("Reserved IP Address", ipInfo.getErrorReason());
    }

    // ...
}
介面勢必有它的實體類別(concrete class)。定義好介面後,讓我們在 client 元件與 response 類別實作介面。
以下是讓 client 元件類別實作。
@Component
public class IpApiClient implements IpInfoClient {
    // ...

    @Override
    public IpInfoClientResponse getIpInfo(String ipAddress) {
        // ...
    }
}
以下是讓負責攜帶資料的 response 類別實作。
public class IpApiResponse implements IpInfoClientResponse {
    // ...

    @Override
    public String getErrorReason() {
        if (!error) {
            return null;
        } else if (reserved) {
            return "Reserved IP Address";
        } else {
            return reason;
        }
    }

    // getter, setter ...
}
由於已經定義好介面了,因此未來更換服務時,也能比照辦理,只要提供實作類別即可。
本文的完成專案:
https://github.com/ntub46010/SpringBootTutorial/tree/Ch22-2
今日文章到此結束!
最後推廣一下自己的部落格,我是「新手工程師的程式教室」的作者,請多指教


 iThome鐵人賽