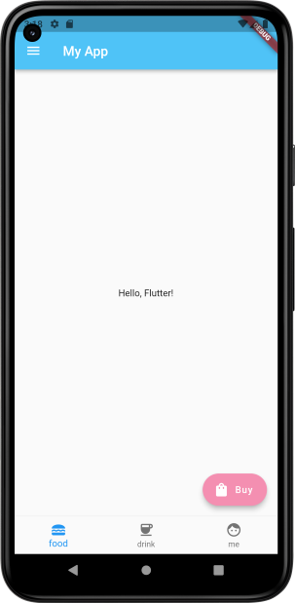
接下來這幾天我會把在通訊錄的實作中有用到的Widget和一些功能再整理、學習一下,也會對通訊錄進行一些改造!今天先來看一下一直有用到的Scaffold類別!
| Scaffold的組成 | 功能 |
|---|---|
| appBar | 介面頂部的應用欄,可以用來設置標題(title)、操作按鈕、搜尋框等等 |
| body | 主要的內容區域 |
| floatingActionButton | 可選的浮動操作按鈕,通常會在右下角用來執行添加新項目或導航至頂部等操作 |
| bottomNavigationBar | 底部導航欄,用來快速切換不同頁面,至少要兩個按鈕。 |
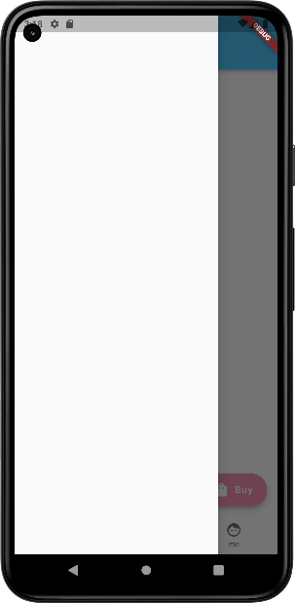
| drawer | 可選的抽屜式選單,在app的左側或右側,用來導航到更多選項或設置。可以將Drawer作為參數傳入,AppBar會自動出現目錄按鈕可以點擊,預設動作從左往右滑也能彈出Drawer。 |
| snackBar | 用來顯示臨時消息或通知的底部彈跳式消息欄 |
| bottomSheet | 可選的底部表單,通常用於顯示更多選項或操作 |
    import 'package:flutter/material.dart';

    void main() => runApp(MyApp());

    class MyApp extends StatefulWidget {
      @override
      _MyApp createState() => _MyApp();
    }

    class _MyApp extends State<MyApp> {
      var _selectedIndex = 0;
      @override
      Widget build(BuildContext context) {
        return MaterialApp(
        home:Scaffold(
          //1 appBar
          appBar: AppBar(
              title: Text('My App'),
              backgroundColor: Colors.lightBlue[300]
          ),
          //2 主要內容
          body: Center(
            child: Text('Hello, Flutter!'),
          ),
          //3 抽屜式選單
          drawer: Drawer(),
          //4 浮動操作按鈕
          floatingActionButton:FloatingActionButton.extended(
            onPressed: () {},
            label: Text('Buy'), //設置有關按鈕的標籤
            icon: Icon(Icons.shopping_bag),
            backgroundColor: Colors.pink[200],

          ),
          floatingActionButtonLocation:FloatingActionButtonLocation.startFloat, //按鈕位置
          //5 底部導航欄
          bottomNavigationBar: BottomNavigationBar(
            items: const <BottomNavigationBarItem>[
              BottomNavigationBarItem(icon: Icon(Icons.lunch_dining),label: "food"),
              BottomNavigationBarItem(icon: Icon(Icons.coffee),label: "drink"),
              BottomNavigationBarItem(icon: Icon(Icons.face),label: "me"),
            ],
            //使用index來回傳使用者按下的BottomNavigationBarItem
            //然後用setState()將index存到_selectedIndex,currentIndex就會顯示當前選中的按鈕
            currentIndex: _selectedIndex,
            onTap: (index) {
            //這裡使用setState()去更新_selectedIndex的值,從而更新介面,故這裡建的MyApp類別是StatefulWidget
              setState(() {
                _selectedIndex = index;
              });
            },
          ),
        ),
    );
  }
}


