昨天的文章,向讀者介紹了 MQ 架構中的「交換機」(exchange)概念,並練習了 Fanout 與 Direct 模式。而本文將會實作「Routing」與「Topic」模式,讓 producer 能夠傳送訊息到 exchange 上的多個 queue。
此篇亦轉載到個人部落格。
本文範例程式的情境是,系統在發送「文章 / 商品有新留言」的通知給使用者時,可分為「站內通知」與「Email 通知」。且這兩項功能被切分為兩個服務,運行在不同 server 上。
當業務邏輯要發送通知時,會將需要的資料包裝成訊息(message),讓 producer 送往 MQ,由 consumer 接收後處理,達到非同步工作的效果。
為避免打錯字,以下先準備一些常數,用來代表 Spring bean、queue 與 exchange 的名稱。
public class Constants {
    public static final String BEAN_INTERNAL_NOTIFICATION_QUEUE = "internalNotification";
    public static final String BEAN_EMAIL_NOTIFICATION_QUEUE = "emailNotification";
    public static final String BEAN_COMMENT_NOTIFICATION_ROUTING_EXCHANGE = "commentNotificationRoutingExchange";
    public static final String BEAN_COMMENT_NOTIFICATION_TOPIC_EXCHANGE = "commentNotificationTopicExchange";

    public static final String NAME_INTERNAL_NOTIFICATION_QUEUE = "Comment Internal Notification Queue";
    public static final String NAME_EMAIL_NOTIFICATION_QUEUE = "Comment Email Notification Queue";
    public static final String NAME_COMMENT_NOTIFICATION_ROUTING_EXCHANGE = "Comment Notification Routing Exchange";
    public static final String NAME_COMMENT_NOTIFICATION_TOPIC_EXCHANGE = "Comment Notification Topic Exchange";
}
以下是在程式中進行 queue 的配置。
@Configuration
public class RabbitConfig {

    @Bean(name = BEAN_INTERNAL_NOTIFICATION_QUEUE)
    public Queue internalNotificationQueue() {
        return new Queue(NAME_INTERNAL_NOTIFICATION_QUEUE);
    }

    @Bean(name = BEAN_EMAIL_NOTIFICATION_QUEUE)
    public Queue emailNotificationQueue() {
        return new Queue(NAME_EMAIL_NOTIFICATION_QUEUE);
    }

    // TODO
}
以下是 producer 所傳送訊息的 model 類別,在此可攜帶一些想傳給 consumer 的資料。
public class CommentMsg implements Serializable {
    private String content;
    private String mode; // routing | topic
    private String routingKey;

    // getter, setter ...
}
其中 mode 欄位代表 producer 要以何種模式執行(Routing 或 Topic),用來判斷要將訊息送給哪一個 exchange。而 rountingKey 欄位則是讓 exchange 判斷要送到哪些 queue。
關於 consumer 的邏輯,筆者只取用 CommentMsg 訊息的其中一個欄位,印出簡單的 log。
@Component
public class InternalNotificationConsumer {
    private static final Logger LOGGER =
            LoggerFactory.getLogger(InternalNotificationConsumer.class);

    @RabbitListener(queues = NAME_INTERNAL_NOTIFICATION_QUEUE)
    public void processMsg(@Payload CommentMsg comment) {
        LOGGER.info("站內通知:{}", comment.getContent());
    }
}

@Component
public class EmailNotificationConsumer {
    private static final Logger LOGGER =
            LoggerFactory.getLogger(EmailNotificationConsumer.class);

    @RabbitListener(queues = NAME_EMAIL_NOTIFICATION_QUEUE)
    public void processMsg(@Payload CommentMsg comment) {
        LOGGER.info("Email 通知:{}", comment.getContent());
    }
}
在呼叫 RabbitTemplate.convertAndSend 方法發送訊息時,請選用正確的 overloading 方法。第一個參數是指定 exchange 名稱;第二個參數叫做 routingKey,在 Routing 與 Topic 模式中,將會對應到一至多個 queue。
@Component
public class MessageProducer {

    @Autowired
    private RabbitTemplate rabbitTemplate;

    public void sendNewCommentNotification(CommentMsg comment) {
        String exchange = "";
        if ("routing".equalsIgnoreCase(comment.getMode())) {
            exchange = NAME_COMMENT_NOTIFICATION_ROUTING_EXCHANGE;
        } else if ("topic".equalsIgnoreCase(comment.getMode())){
            exchange = NAME_COMMENT_NOTIFICATION_TOPIC_EXCHANGE;
        }

        rabbitTemplate.convertAndSend(exchange, comment.getRoutingKey(), comment);
    }
}
為了進行測試,請在 controller 準備 API,藉此呼叫 producer 發送訊息。
@RestController
public class MessageController {

    @Autowired
    private MessageProducer producer;

    @PostMapping("/comment")
    public void notifyNewComment(@RequestBody CommentMsg comment) {
        producer.sendNewCommentNotification(comment);
    }
}
以上就是練習本文兩個模式的前置作業了。
Routing 模式簡單來說,就是 queue 在綁定時,會告訴 exchange 自己想要接收什麼種類的訊息。這個「種類」,我們稱之為「routing key」。而 producer 在傳送訊息時,也會一併附帶 routing key,讓 exchange 知道要轉發給哪些 queue。
以下是官方教學的架構圖。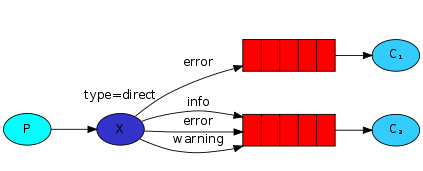
圖中有兩個 queue,其中一個想接收 routing key 為「error」的訊息。另一個除了 error,也接收 info 與 warning 的 routing key。
請建立 exchange,只要在 DirectExchange 的建構子傳入名稱即可。此名稱將會在 producer 傳送訊息時被指定。
綁定時需要建立 Binding 元件。可透過 BindingBuilder.with 方法,告訴 exchange 想要接收何種 routing key 的訊息。
Routing 模式與 Direct 模式的不同之處,在於前者的 queue 可綁定一至多個 routing key,後者固定只綁定一個。
此處筆者設計了「post.comment」與「product.comment」兩個 routing key,分別代表文章留言與商品留言。其中文章留言只會發送站內通知;而商品留言除了站內,亦會發送 Email 通知。
以下是配置程式。
@Configuration
public class RabbitConfig {
    // ...

    @Bean(name = BEAN_COMMENT_NOTIFICATION_ROUTING_EXCHANGE)
    public DirectExchange commentNotificationRoutingExchange() {
        return new DirectExchange(NAME_COMMENT_NOTIFICATION_ROUTING_EXCHANGE);
    }

    @Bean
    public Binding bindInternalNotificationQueueToRoutingExchangeForPostComment(
            @Qualifier(BEAN_INTERNAL_NOTIFICATION_QUEUE) Queue queue,
            @Qualifier(BEAN_COMMENT_NOTIFICATION_ROUTING_EXCHANGE) DirectExchange exchange
    ) {
        return BindingBuilder.bind(queue).to(exchange).with("post.comment");
    }

    @Bean
    public Binding bindInternalNotificationQueueToRoutingExchangeForProductComment(
            @Qualifier(BEAN_INTERNAL_NOTIFICATION_QUEUE) Queue queue,
            @Qualifier(BEAN_COMMENT_NOTIFICATION_ROUTING_EXCHANGE) DirectExchange exchange
    ) {
        return BindingBuilder.bind(queue).to(exchange).with("product.comment");
    }

    @Bean
    public Binding bindEmailNotificationQueueToRoutingExchangeForProductComment(
            @Qualifier(BEAN_EMAIL_NOTIFICATION_QUEUE) Queue queue,
            @Qualifier(BEAN_COMMENT_NOTIFICATION_ROUTING_EXCHANGE) DirectExchange exchange
    ) {
        return BindingBuilder.bind(queue).to(exchange).with("product.comment");
    }
}
也就是說,站內通知 queue 會接收文章留言和商品留言;Email 通知 queue 只接收商品留言。
可發送請求到第一節準備的 API。
POST http://localhost:8080/comment
{
    "content": "這是 Routing 模式,有商品被留言了!",
    "mode": "routing",
    "routingKey": "product.comment"
}
以上面的請求為例,由於是商品留言(product.comment),所以兩個 queue 所對應的 consumer 都能收到訊息。
若將請求中的 routingKey 欄位改為「post.comment」,則只有站內通知 queue(名為「Comment Internal Notification Queue」)會收到訊息。
前面的 Routing 模式,是要求 routing key 完全符合,exchange 才會將訊息轉發到對應的 queue。而本節的 Topic 模式,則是放寬成「模糊比對」。
也就是說,queue 在綁定到 exchange 時所提供的 routing key,將是一個類似正規表示式的字串。只要 producer 送出訊息時,其攜帶的 routine key 有符合該表示式的格式(pattern),exchange 便會轉發給所有符合的 queue。
以下是官方教學的架構圖。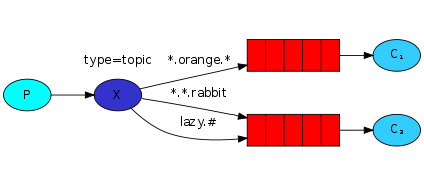
下面配置了 TopicExchange。而綁定 queue 時,可透過 with 方法,決定要接收的 routing key 的 pattern。
@Configuration
public class RabbitConfig {
    // ...

    @Bean(name = BEAN_COMMENT_NOTIFICATION_TOPIC_EXCHANGE)
    public TopicExchange commentNotificationTopicExchange() {
        return new TopicExchange(NAME_COMMENT_NOTIFICATION_TOPIC_EXCHANGE);
    }

    @Bean
    public Binding bindInternalNotificationQueueToTopicExchangeForPostComment(
            @Qualifier(BEAN_INTERNAL_NOTIFICATION_QUEUE) Queue queue,
            @Qualifier(BEAN_COMMENT_NOTIFICATION_TOPIC_EXCHANGE) TopicExchange exchange
    ) {
        return BindingBuilder.bind(queue).to(exchange).with("post.#");
    }

    @Bean
    public Binding bindInternalNotificationQueueToTopicExchangeForProductComment(
            @Qualifier(BEAN_INTERNAL_NOTIFICATION_QUEUE) Queue queue,
            @Qualifier(BEAN_COMMENT_NOTIFICATION_TOPIC_EXCHANGE) TopicExchange exchange
    ) {
        return BindingBuilder.bind(queue).to(exchange).with("product.*");
    }

    @Bean
    public Binding bindEmailNotificationQueueToTopicExchangeForProductComment(
            @Qualifier(BEAN_EMAIL_NOTIFICATION_QUEUE) Queue queue,
            @Qualifier(BEAN_COMMENT_NOTIFICATION_TOPIC_EXCHANGE) TopicExchange exchange
    ) {
        return BindingBuilder.bind(queue).to(exchange).with("product.*.#");
    }
}
上面的配置程式,以及前面附上的架構圖,使用了 * 和 # 號。它們是什麼意思呢?讓我們繼續看下去。
為了便於使用 Topic 模式,在定義 routing key 的值時,會遵循「單詞1.單詞2.單詞3」這樣的命名慣例。可以有多個單詞,它們之間會以「.」符號隔開。
至於 routing key 的 pattern 要如何撰寫呢?只要使用「*」和「#」兩種符號即可。前者(星號)代表一個單詞,後者(井號)代表零到多個單詞。
回顧一下前面綁定 queue 的配置程式,以下舉例幾個符合 pattern 的 routing key。
post.#:post、post.comment、post.like.hundredproduct.*:product.comment、product.shareproduct.*.#:product.comment、product.like.hundred可發送請求到第一節準備的 API。
POST http://localhost:8080/comment
{
    "content": "這是 Topic 模式,有商品被留言了!",
    "mode": "topic",
    "routingKey": "product.comment"
}
以上面的請求為例,routingKey 欄位值符合「product.*」與「product.*.#」這兩個格式,因此站內通知 queue 與 Email 通知 queue 都會收到訊息。若將請求中的 routingKey 欄位改為「post.like」,則只有站內通知 queue 會收到訊息。
本文的完成專案:
https://github.com/ntub46010/SpringBootUsingRabbitMQ/tree/routing-and-topic-pattern
今日文章到此結束!
最後推廣一下自己的部落格,我是「新手工程師的程式教室」的作者,請多指教